•If a key is not depressed within 15 seconds, the display will return
to its initial state – Current time.
•When setting the time with the keys 2 or 3, the setting speed is
accelerated when the key is kept depressed.
•Up to three preset times can be set and activated on this Mini-
Clock. Each preset time is deactivated after the heating period,
and it must be newly activated for each new heating period – see
activate / deactivate the preset time.
Setting functions on the Mini-Clock
Setting-up for the first time:
After connection to the power supply all symbols on the display will
start to flash. The heater cannot be turned on in this state. The
current time has to be set first.
Press key 1: The clock time flashes. Set the time with key 2 or 3.
Press key 1: The time is displayed; the colon flashes.
Setting the time:
Press key 1 for more than 3 seconds: The time flashes. Set the time
with key 2 or 3. Press key 1 within 5 seconds: The time is displayed
and the colon flashes.
Note:
If, after the time has been set, key 1 is not pressed within 5 seconds,
the Mini-Clock will be transferred to the mode “Setting the Heating
Time”.
Setting the heating time:
Press key 1 for more than 3 seconds: The time flashes. The Mini-
Clock is automatically transferred to the mode “Setting the Heating
Time” if no key is pressed for 5 seconds.
The heating symbol is displayed, and the heating time flashes.
Set the heating time (10 to 120 minutes) with key 2 or 3.
Press key 1: The time is displayed once again and the colon flashes.
Setting the preset time:
Press key 1 once, twice or three times to call the preset time 1, 2
or 3. The display will then indicate the preset time, for instance 1
and symbol 1. Set the preset time with key 2 or 3. The preset time
is activated or deactivated with key 4. The “ON” symbol is displayed
when the preset time has been activated.
Symbol 1, 2 or 3 is displayed when the preset time is activated.
Operating functions of the Mini-Clock
Switching on the heater:
Press key 4. The heating duration is … minutes.
The display indicates the remaining heating time and symbol 7.
Switching off the heater:
Press key 4. The heating continues for approx. 3 minutes.
The display indicates the current time.
1Key to activate the setting capabilities
2 / 3Time setting keys forwards / backwards
4ON / OFF key to activate / deactivate the preset time
5Current time, preset time and heating time
6Symbol for activated preset time
7Symbol for heater operation
8Symbol for preset time 1, 2 or 3
Continuous operation:
Press key 3 and keep it depressed while pressing key 4. The
heater will now remain switched on until key 4 (switching off the
heater) is pressed again.
Preset time – Activate / deactivate:
Press key 1 to select the preset time 1, 2 or 3. Activate or deacti-
vate the preset time with key 4.
The “ON” symbol is displayed when the preset time is activated.
Symbol 1, 2 or 3 is displayed when the preset time is activated.
Special functions only in conjunction
with the TP41 / TP41i remote control
Programming the receiver to recognize the transmitter:
Press key 2 and keep it depressed while pressing key 4.
The display indicates 2 horizontal lines.
The display returns to its initial state when the receiver has been
successfully programmed. The display automatically returns to the
initial status after 35 seconds if the transmitter is not recognized. In
this case repeat the above procedure once again.
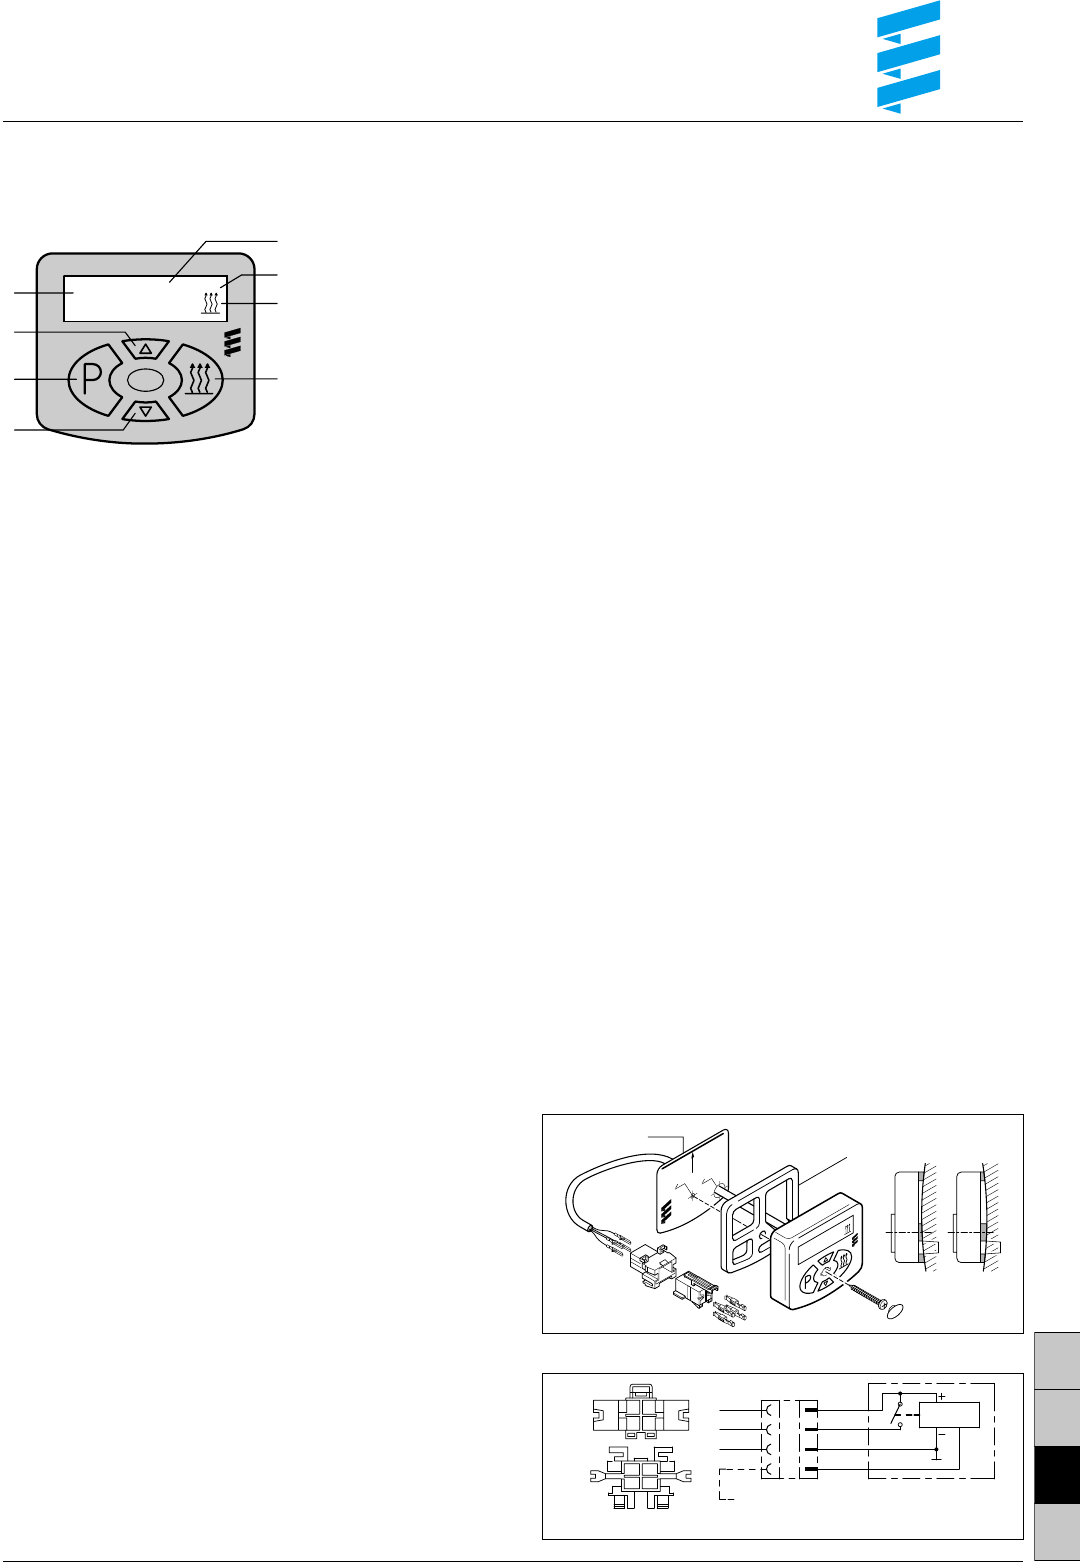
Installing and connecting the Mini-Clock
Follow the drawing to install the Mini-Clock.
The drilling template (can be peeled off and is self-adhesive)
is applied on the front.
Follow the diagram to connect the Mini-Clock.
Note:
Do not press the display and control panel when installing the Mini-
Clock.
Connecting diagram
1
2
3
ON
20
:05
o 7,5
o 2,5
E
b
e
r
s
p
ä
c
h
e
r
Mounting drawing
4
2
3
1
2
4
1
3
13
24
B1 S1
88:88
ge
br
bl
rt
0,5 br
0,5 ge
0,5 rt
4 3 2 1
B1
S1
Drilling template
Resilient base
for uneven mounting surfaces
Connection for TP41 / TP41i remote control
Plug and socket case are shown from the line entry side.
Hulp nodig? Stel uw vraag in het forum
Misbruik melden
Gebruikershandleiding.com neemt misbruik van zijn services uitermate serieus. U kunt hieronder aangeven waarom deze vraag ongepast is. Wij controleren de vraag en zonodig wordt deze verwijderd.
Product:
Spelregels forum
Om tot zinvolle vragen te komen hanteren wij de volgende spelregels:
lees eerst de handleiding door;
controleer of uw vraag al eerder door iemand anders is gesteld;
probeer uw vraag zo duidelijk mogelijk te stellen;
heeft u een probleem en al geprobeerd om dit op te lossen, vermeld dit erbij aub;
heeft u een oplossing gekregen van een bezoeker dan horen wij dat graag in dit forum;
wilt u een reactie geven op een vraag of antwoord, gebruik dan niet dit formulier maar klik op de knop 'reageer op deze vraag';
uw vraag wordt direct op de website gezet; vermijd daarom persoonlijke gegevens in te vullen;
Belangrijk! Als er een antwoord wordt gegeven op uw vraag, dan is het voor de gever van het antwoord nuttig om te weten als u er wel (of niet) mee geholpen bent! Wij vragen u dus ook te reageren op een antwoord.
Belangrijk! Antwoorden worden ook per e-mail naar abonnees gestuurd. Laat uw emailadres achter op deze site, zodat u op de hoogte blijft. U krijgt dan ook andere vragen en antwoorden te zien.
Abonneren
Abonneer u voor het ontvangen van emails voor uw Eberspacher Mini-Clock bij:
nieuwe vragen en antwoorden
nieuwe handleidingen
U ontvangt een email met instructies om u voor één of beide opties in te schrijven.
Ontvang uw handleiding per email
Vul uw emailadres in en ontvang de handleiding van Eberspacher Mini-Clock in de taal/talen: Engels als bijlage per email.
De handleiding is 0,14 mb groot.
U ontvangt de handleiding per email binnen enkele minuten. Als u geen email heeft ontvangen, dan heeft u waarschijnlijk een verkeerd emailadres ingevuld of is uw mailbox te vol. Daarnaast kan het zijn dat uw internetprovider een maximum heeft aan de grootte per email. Omdat hier een handleiding wordt meegestuurd, kan het voorkomen dat de email groter is dan toegestaan bij uw provider.
Stel vragen via chat aan uw handleiding
Stel uw vraag over deze PDF
Uw handleiding is per email verstuurd. Controleer uw email
Als u niet binnen een kwartier uw email met handleiding ontvangen heeft, kan het zijn dat u een verkeerd emailadres heeft ingevuld of dat uw emailprovider een maximum grootte per email heeft ingesteld die kleiner is dan de grootte van de handleiding.
Er is een email naar u verstuurd om uw inschrijving definitief te maken.
Controleer uw email en volg de aanwijzingen op om uw inschrijving definitief te maken
U heeft geen emailadres opgegeven
Als u de handleiding per email wilt ontvangen, vul dan een geldig emailadres in.
Uw vraag is op deze pagina toegevoegd
Wilt u een email ontvangen bij een antwoord en/of nieuwe vragen? Vul dan hier uw emailadres in.