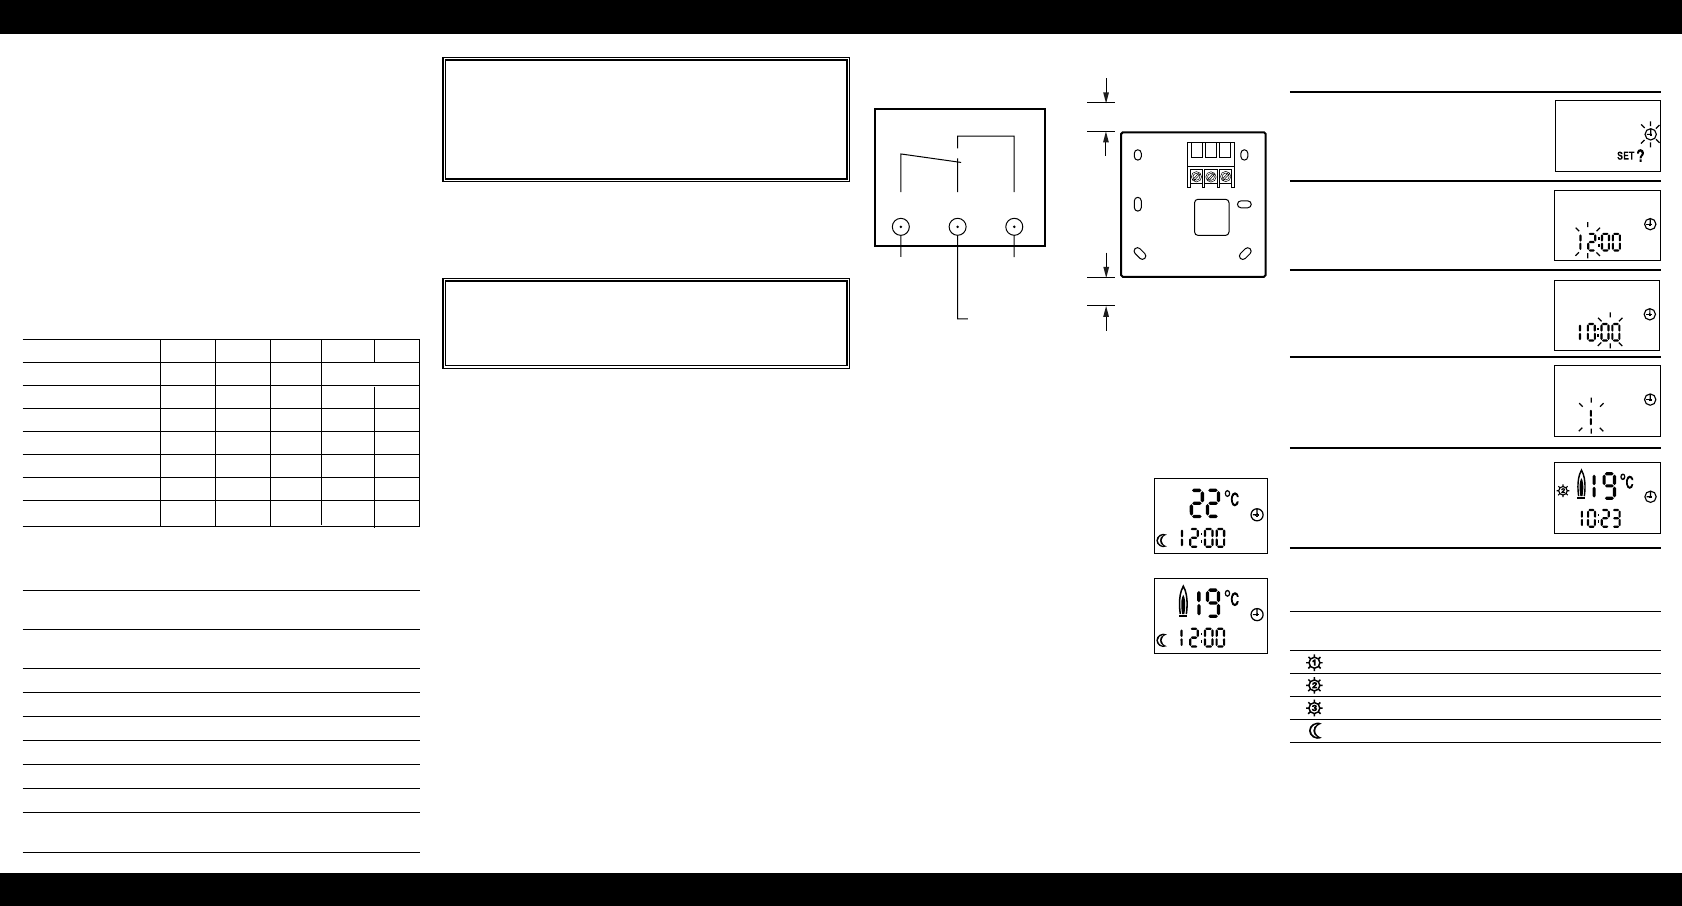
Wiring (schematic) Wall plate clearances
See ‘IMPORTANT’ note
in box opposite.
Maintenance
No regular maintenance is required for this product.
Note: If Digistat 3 has replaced a standard room thermostat and a programmer
is also incorporated in the control system, it is suggested that the central heating
(C.H.) channel is switched to on/continuous/24hrs. Operation of the central
heating times and temperature will be controlled by Digistat 3.
Digistat 3
7 Day programmable room thermostat
Installation and operating instructions
GENERAL DESCRIPTION
Digistat 3 is a sophisticated 7 day programmable room thermostat designed
for use in normal operating environments. Featuring 7 day or 5/2 day
programming, four time/temperature settings and night set-back, it provides
greater levels of comfort and economy for new or existing central heating
systems. The result of our continuous development programme, Digistat 3
combines ease of use with proven reliability.
ELECTRICAL CONNECTIONS
If the Digistat is to be used as a direct replacement for an existing room
thermostat refer to the table below which shows the wiring conversion
necessary for correct operation.
Make/model Common Demand Satisfied Neutral Earth
Drayton Digistat 3* 1 3 2 Not required
Drayton RTS 1&2 L 3 – N –
ACL TS142 1 2 – 4 E
ACL TA350 1 3 2 – 5
Drayton RT/RTE 1 2 3 4 –
Honeywell 6060/6160 1 3 4 2 –
Satchwell TLX 2259 3 1 – 4 E
* Digistat is battery operated and double insulated therefore neutral and earth
connections are not required. Unused existing cables should be safely isolated.
SPECIFICATION
Temperature range : 5°C to 30°C, set in 1ºC steps
16°C to 30°C (selectable)
Power supply : Two type AA1.5v alkaline cells – supplied
(typical battery life two years)
Switch rating : 2 (1) A 230V 50 HZ
Switch type: S.P.D.T. relay (volt free)
Temperature sensor : Electronic
Timing resolution : 1 minute
Programming resolution : 10 minutes
Mounting : Suitable for surface or conduit box mounting
Wiring : Designed for fixed wiring only, to comply with
current IEE regulations
REPLACING EXISTING ROOM THERMOSTAT
Before any existing room thermostat is removed, note the position and colour
of wires already connected. Follow the instructions below for ‘new installations’
referring to the conversion chart overleaf if the function of each wire is not known.
NEW INSTALLATION
Location
Care should be taken to mount the Digistat in a position which is not subject to
direct sunlight or draughts. Preferably it should be mounted on an inside wall
about 1.5M (5ft) above the floor in a position where it can respond to room
temperature but away from the direct influence of radiators or other appliances
giving off heat. Minimum wall plate clearances are shown.
Installation
If you do not have the knowledge to install the Digistat safely arrange for a
competent electrician to do the job for you. Wiring should conform to the
current IEE regulations.
Fixing
1. Loosen the securing screw, remove the wall-plate and, if surface wiring is to be
used, snap out the cable entry panel on the bottom edge of the Digistat using
a pair of pliers.
2. Fix the wall-plate, terminals at the top, either direct onto a flat wall using wall
plugs and No 6 x 1" woodscrews or on a flush mounting single conduit box
using M 3.5 x 14 screws.
3. Complete the wiring to the wall-plate in accordance with the diagram below.
4. Note: the Digistat comes preset with a temperature range of 5ºC to 30ºC. If
you wish to select the optional range of 16ºC to 30ºC, remove the blue
selector pin at the rear of the unit before fitting.
5. Plug the Digistat onto the wall-plate and tighten the securing screw.
6. Before switching on the mains ENSURE THE CIRCUIT FUSE IS 3A.
WARNING
Isolate mains supply before fitting Digistat or removing an existing room
thermostat.
A switch having contact separation of at least 3mm in all poles must be
incorporated in the fixed wiring as a means of providing full
disconnection of the mains supply.
IMPORTANT
If the previous room thermostat used a neutral and/or earth supply,
these should not be connected to the Digistat and should be
safely isolated.
SETTING THE TIME OF DAY (steps 1-4)
The diagram next to each step description shows resulting display.
1. Press “SET?” button
2. Press “Yes” (–) button.The hours
will flash as this diagram. Use the +
and – buttons to set correct hour.
3. Press “SET?” button again and the
minutes will flash, use + and –
buttons to set correct minute time.
4. Press “SET?” button, day of the week
will flash, 1= Monday, 7= Sunday, use
+ and – buttons to set correct day.
5. Press “SET?” button twice to return
to normal operating mode.
PRE-PROGRAMMED TIMES AND TEMPERATURES
The Digistat 3 comes with the following preset programme.
Symbol Mon-Fri Sat-Sun Temperature
Time Time
6.30 am 7.00 am 20°C
8.30 am 9.00 am 16°C
4.30 pm 4.00 pm 21°C
10.30 pm 11.00 pm 7°C*
* 16°C if selector pin removed, see installation instructions
INITIAL START UP
Open the battery compartment situated at the
bottom left hand corner (press to unlatch and slide
down). Remove the insulator strip from between
the batteries and their contacts and close the
compartment.
The unit will now display the actual room
temperature and time at 12.00 am, midnight
(Diagram A).
If the unit has been stored in a cold place, it may
take time to warm up.
Digistat 3 has an indicator to show
when the heating system is ON or OFF, e.g. if the
SET temperature is 20°C and the actual room
temperature is below 20°C a flame symbol will appear on the display
(Diagram B).This indicates a demand for heat (system will switch ON).
During normal operation, the Digistat 3 will display actual room
temperature continuously.