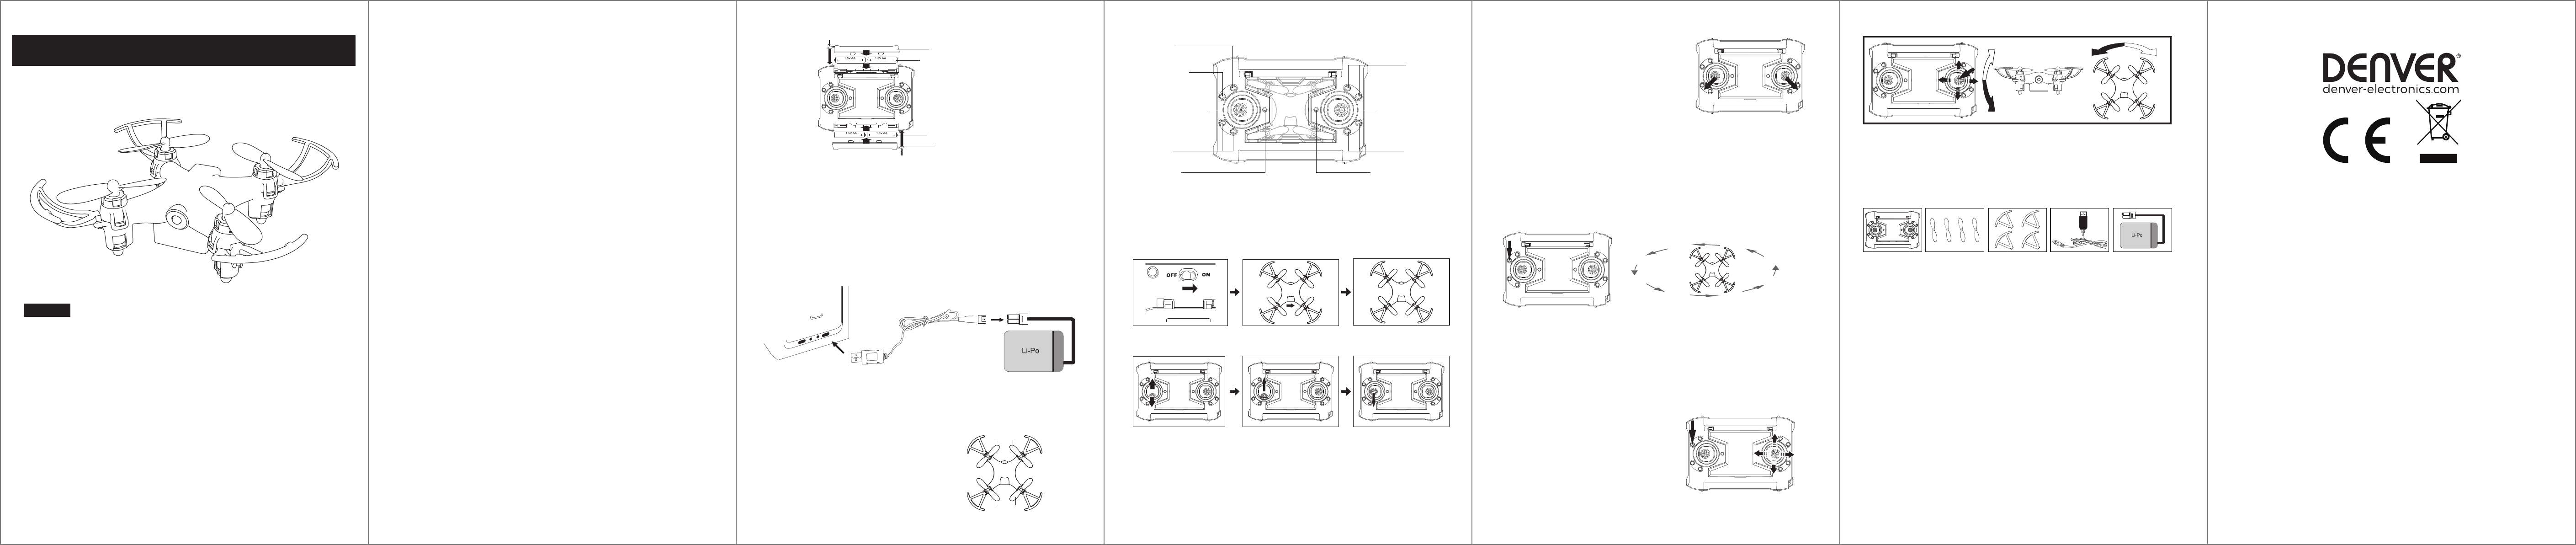
Remove the battery from the drone, then connect one side of the USB cable with the
battery, and the other side into any a USB port of computer or a smart-phone charger
(not included).
-03-
-05--06-
-04-
-01-
-02-
Notice:
1 Instructions
Please read the user handbook carefully and then keep it in a safe place for future
consultation and maintenance.
1.1 Important Notice
(1) This product is not a toy, it's a piece of complicated equipment which integrated with
professional knowledge by mechanic, electric, air mechanics, high-frequency transmitter
and so on, so it should be installed correctly and adjusted to avoid any accidents.
The owner must always operate in a safe manner, if improper operation that caused
human injured or property damage, then we DENVER ELECTRONICS A/S accept no
liability for any safety duties from operation. As we have no control over the way they
maintained, used and operated.
(2) This product is not suitable for users under 14 years of age.
(3) The use of the drone may be prohibited in some areas like train stations, airports,
aircrafts, inhabited areas etc. You should check with the authorities whether the use of
the drone is permitted in some public or private areas. Always use the drone bearing in
mind not to breach people's privacy. We exclude liability for any wrong use of the drone.
(4) We DENVER accept no liability for any safety duties or fines arising from operation,
usage or mis-control after the sale of products. Warranty does not cover if drone crashes
and get damaged.
1.2 Safety Precautions
Keep away from crowd when flying, since drone flight is a high-risk hobby. Misassembled
or broken main frame or defective electronic equipment or unskilled operation may cause
accidents of machine damaged or injured. Please pay special attention to safety operation.
(1) Keep away from people and obstacles
"The flying speed and status of the drone is uncertain, so it may cause potential danger."
When choosing a flying site should stay clear of buildings, trees and power lines. AVOID
flying in or near crowded areas. Meanwhile avoid flying in rain, storms, thunder and
lightening to protect machinery and parts out of damage.
(2) Keep away from humid environments
Inside of drone is made up of precise electronic components. Stay away from humidity or
water vapor to protect machinery and parts.
(3) Safety operation
Please fly your drone according to your physical status and flight skill. Fatigue, listlessness
and mis-operation will increase possibilities of accidental hazard.
(4) Keep away from rotating blades
Keep your face and body as well as all spectators away from the rotating blades. The
spinning blades of a model of this type can cause serious injury.
(5) We recommend flying the drone below 10 meters of height.
(6) Keep away from heat
A drone is made up of metal, fiber, plastic, electronic components, etc. Keep it away from
heat and sunshine to avoid distortion, and damage.
1.3 Check List Before First Flight
(1) Flying field should be in an open space and we suggest at least 5M length *5M wide
*3M height.
(2) Make sure the receiver and transmitter is fully charged.
(3) Please strictly obey the order of turn-on, turn-off before operation. When starting your
flight, first turn on the transmitter, and turn on the drone last; When finishing your flight,
please turn off the drone first, and turn off transmitter last. An upset in the order of
connection may cause your drone loose control to threaten yourself and others safely.
Please follow a correct habit of turn-on and turn-off.
(4) Make sure the connection is solid between battery or motor. The ongoing vibration
may cause bad connection of power terminal and make the drone uncontrollable.
Drone
Replacing the damaged blades:
Your set will come with 4 spare rotors, two type A
and two type B. You will see the "A" and "B" word
on the canopy, then put the rotor on the motor
accordingly
Battery Installation & Charging
Controller
Battery installation should be done under adult supervision only!
Do not mix old and new batteries.
Do not mix different types of batteries.
To install batteries: Open the covers of battery case, then insert 4 x 1.5V AA batteries
according to indicated polarity (batteries not included).
For age 14+
DENVER DRO-120
WWW.DENVER-ELECTRONICS.COM
www.facebook.com/denverelectronics
Please read this instruction manual carefully before using the product
Standard Operation steps
3. Place the drone on a flat
surface
4. Push the throttle up to top
and down to bottom, a beep
will sound: controller has been
connected with the drone
(LED lights on the drone stops flashing)
5. To ascend the drone, push
up the Throttle
(please push up the throttle very slowly,
to avoid the drone rising too fast)
2. Turn on the drone
(Connect the battery plug to drone first)
1. Turn on the controller
(Keep the left joystick at bottom point)
Headless Mode
Start / Quit Headless Mode
Press the button on controller (as picture) you will hear beep sounds and lights on
the drone flashes, then you get into headless mode.
Press it again to quit, beep stops and lights keep on.
At the moment when you start headless mode, the direction that the drone is heading
to will be fixed as the head of drone. No matter how you rotate the drone, the front
direction won’t change accordingly.
One Key Return
Press and hold the button (long press), you will activate One Key Return and the drone
will now attempt to fly back towards its starting point.
If you want to deactivate this mode, then push the right joystick (Rudder) to any direction.
Note: The drone will not land automatically, you still need to control the height of the drone
when using the one key return flying mode.
ENGLISH
Remote Controller
Gyroscope Reset
Before first flying, pull the Throttle to bottom left and
Rudder to bottom right corner at the same time for
2-3 seconds, the lights on the drone flashes quickly,
then let go of the Throttle and Rudder.
When the lights stop flashing and remain on, then
gyroscope reset complete.
Front
LeftRight
Back
-07-
Electric and electronic equipment and included batteries contains materials, components and
substances that can be hazardous to your health and the environment, if the waste materials
(discarded electric and electronic equipment and batteries) are not handled correctly.
Electric and electronic equipment and batteries are marked with the crossed out trash can
symbol, as below. This symbol signifies that electric and electronic equipment and batteries
should not be disposed of with other household waste, but should be disposed of separately.
As the end user it is important that you submit your used batteries to the appropriate and
designated facility. In this manner you make sure that the batteries are recycled in
accordance with legislature and will not harm the environment.
All cities have established collection points, where electric and electronic equipment and
batteries can either be submitted free of charge at recycling stations and other collection
sites, or be collected from the households. Additional information is available at the technical
department of your city.
Hereby, Inter Sales A/S declares that the radio equipment type DENVER DRO-120 is in com-
pliance with Directive 2014/53/EU. The full text of the EU declaration of conformity is available
at the following internet address: http://www.denver-electronics.com/denver-dro-120/
Operating Frequency Range: 2402 MHz - 2480 MHz
Max Output Power: 5.365 W
Imported by:
DENVER ELECTRONICS A/S
Omega 5A, Soeften
DK-8382 Hinnerup
Denmark
www.facebook.com/denverelectronics
ALL RIGHTS RESERVED, COPYRIGHT DENVER ELECTRONICS A/S
Main Accessories
Flips and rolls
After you have the basics of flying, you’re ready to learn flip and roll your drone.
To perform a flip or roll, make sure the drone is at least 3 meters off the ground. Press
the button Flip, then quickly push the Rudder in either direction to make the drone flip
or roll. Once the manoeuvre is completed, steady the drone.
6. To descend the drone, pull
down the Throttle
(please pull down the throttle very slowly,
to avoid the drone falling too fast or crash)
For Emergency, please pull
down the throttle quickly to
the bottom point
PropellersRemote controllerUSB Charge cable
B
A
A
B
Battery
Propeller guards
2 x "AA" Batteries
2 x "AA" Batteries
Battery Cover
Battery Cover
batteriesbatteries
batteriesbatteries
Function indicator
Left Joystick / Throttle
Ascend/Descend/Turn left/Turn right
Speed
Low speed: Di
Mid speed: DiDi
High speed: DiDiDi
Headless / Return
Headless: short press
Return: long press
Right Joystick / Rudder
Forward/Backward/Leftward/Rightward
Flip (short press)
Turn left trim
Turn right trim
Forward trim
Backward trim
Photo / Video
(For camera version only)
Power indicator
Leftward trim
Rightward trim
Hulp nodig? Stel uw vraag in het forum
Misbruik melden
Gebruikershandleiding.com neemt misbruik van zijn services uitermate serieus. U kunt hieronder aangeven waarom deze vraag ongepast is. Wij controleren de vraag en zonodig wordt deze verwijderd.
Product:
Spelregels forum
Om tot zinvolle vragen te komen hanteren wij de volgende spelregels:
lees eerst de handleiding door;
controleer of uw vraag al eerder door iemand anders is gesteld;
probeer uw vraag zo duidelijk mogelijk te stellen;
heeft u een probleem en al geprobeerd om dit op te lossen, vermeld dit erbij aub;
heeft u een oplossing gekregen van een bezoeker dan horen wij dat graag in dit forum;
wilt u een reactie geven op een vraag of antwoord, gebruik dan niet dit formulier maar klik op de knop 'reageer op deze vraag';
uw vraag wordt direct op de website gezet; vermijd daarom persoonlijke gegevens in te vullen;
Belangrijk! Als er een antwoord wordt gegeven op uw vraag, dan is het voor de gever van het antwoord nuttig om te weten als u er wel (of niet) mee geholpen bent! Wij vragen u dus ook te reageren op een antwoord.
Belangrijk! Antwoorden worden ook per e-mail naar abonnees gestuurd. Laat uw emailadres achter op deze site, zodat u op de hoogte blijft. U krijgt dan ook andere vragen en antwoorden te zien.
Abonneren
Abonneer u voor het ontvangen van emails voor uw Denver DRO-120 Drone bij:
nieuwe vragen en antwoorden
nieuwe handleidingen
U ontvangt een email met instructies om u voor één of beide opties in te schrijven.
Ontvang uw handleiding per email
Vul uw emailadres in en ontvang de handleiding van Denver DRO-120 Drone in de taal/talen: Engels als bijlage per email.
De handleiding is 3,76 mb groot.
U ontvangt de handleiding per email binnen enkele minuten. Als u geen email heeft ontvangen, dan heeft u waarschijnlijk een verkeerd emailadres ingevuld of is uw mailbox te vol. Daarnaast kan het zijn dat uw internetprovider een maximum heeft aan de grootte per email. Omdat hier een handleiding wordt meegestuurd, kan het voorkomen dat de email groter is dan toegestaan bij uw provider.
Uw handleiding is per email verstuurd. Controleer uw email
Als u niet binnen een kwartier uw email met handleiding ontvangen heeft, kan het zijn dat u een verkeerd emailadres heeft ingevuld of dat uw emailprovider een maximum grootte per email heeft ingesteld die kleiner is dan de grootte van de handleiding.
Er is een email naar u verstuurd om uw inschrijving definitief te maken.
Controleer uw email en volg de aanwijzingen op om uw inschrijving definitief te maken
U heeft geen emailadres opgegeven
Als u de handleiding per email wilt ontvangen, vul dan een geldig emailadres in.
Uw vraag is op deze pagina toegevoegd
Wilt u een email ontvangen bij een antwoord en/of nieuwe vragen? Vul dan hier uw emailadres in.