Before you can dial out from the car stereo, you must first perform PAIRING. Pairing is a procedure used to connect
2 Bluetooth devices together.
1. Press and hold SEL button for 2 seconds.
2. Press SEL button repeatedly until “PAIRING” displays.
3. Press and hold SEL button to engage paring mode. “PAIRING” blinks on the display.
4. Turn on the Bluetooth feature of your mobile phone. Perform “Add Bluetooth device” from your mobile phone. The
mobile will search for any Bluetooth devices within the range. Select “CAR BLUETOOTH” and enter Passkey: “0000”
to connect to the car audio. (Please refer to the instruction manual of your mobile phone for Bluetooth Pairing).
5. The LCD will display “PAIRED” after successful pairing.
Note:
• IfIf “DISCONN” shows instead of “PAIRING”, it means the head unit currently is paired with another device. Press
and hold SEL button to disconnect the connection and perform steps above again.
• “CAR BLUETOOTH” is the Bluetooth device name of the car stereo.
• Refer to your cellular user manual for the proper procedures of pairing Bluetooth devices.Refer to your cellular user manual for the proper procedures of pairing Bluetooth devices.
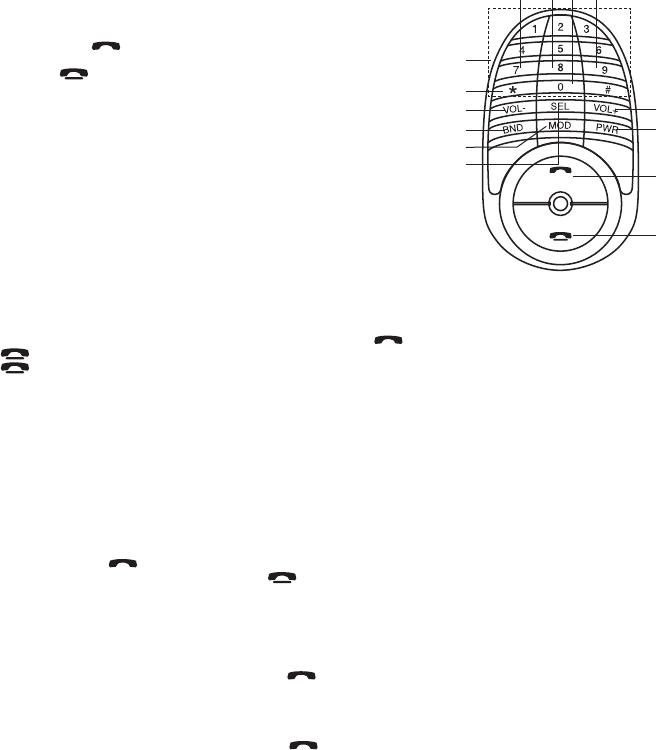
USING REMOTE CONTROL
LOCATION OF REMOTE CONTROL
1. POWER ON / OFF
2. ANSWER A CALL
3. VOLUME +
4. END A CALL
5. BAND
6. SELECT MENU FUNCTION
7. VOLUME -
8. MODE
9. PHONE NUMBER /BUTTON 1-6: STATION PRESETS
10. STEREO / MONO
11. SCAN STATIONS / PHONE MODE
12. ALTERNATE FREQUENCIES (AF)
13. TRAFFIC ANNOUNCEMENT (TA)
14. PROGRAM TYPE (PTY)
Switching to Telephone Mode
1. During any operation mode, press and hold “
*
” to activate TELEPHONE mode.
Press and hold it again to return to previous mode.
Making Calls Using the Remote Control
You can make calls directly from the remote control. Before you make calls, make sure that the devices are properly
paired and connected.
1. Press and hold “
*
” on remote control. Unit switch to phone mode.
2. Enter the phone number via the remote control keypad and pressbutton to dial out.
Pressbutton to make corrections when entering numbers.
3. Pressbutton to end call.
Scan Radio Station
SCAN function scans the entire channel’s frequencies and plays it for 5 seconds if a channel is found.
1. In Tuner mode, press “
*
” to start SCAN function. Press it again to end.
2. When a channel is found, you can press and hold a memory preset key (1-6) to save it.
Audio Streaming
If your phone is “A2DP” format compatible, then you can play music in your mobile and the sound will be transferred
to car head unit.
1. Make sure your mobile and the unit is properly paired and connected.
2. Play the music through your mobile music player software.
3. Press MODE repeatedly until “BT-PLAY” appears in the display. The sound will be transferred to the head unit.
Answering / Hanging Up
To answer a call, press thebutton on the remote control.
Once you have finished your conversation, press thebutton to hang up.
Calls (Outgoing, Incoming)
The unit stores all the incoming and outgoing calls. Use this feature to check the numbers and make calls from it.
“OUT NUM” – outgoing calls made through the remote control.
1. Press and hold (*) then press and hold SEL button for 2 seconds. “OUT NUM” displays.
2. Press and hold SEL button again.
3. Rotate volume knob to search for entries and pressto call.
“IN NUM” – incoming calls received.
1. Press and hold (*) then press and hold SEL button for 2 seconds.
2. Press SEL button repeatedly until “IN NUM” displays.
3. Press and hold SEL button again.
4. Rotate volume knob to search for entries and press to call.
Adding Contacts
The unit can save contact telephone number for quick access.
1. Press and hold (*) then press and hold SEL button for 2 seconds.
2. Press SEL button repeatedly until “ADD NUM” displays.
Gebruikershandleiding.com neemt misbruik van zijn services uitermate serieus. U kunt hieronder aangeven waarom deze vraag ongepast is. Wij controleren de vraag en zonodig wordt deze verwijderd.
Product:
Spelregels forum
Om tot zinvolle vragen te komen hanteren wij de volgende spelregels:
lees eerst de handleiding door;
controleer of uw vraag al eerder door iemand anders is gesteld;
probeer uw vraag zo duidelijk mogelijk te stellen;
heeft u een probleem en al geprobeerd om dit op te lossen, vermeld dit erbij aub;
heeft u een oplossing gekregen van een bezoeker dan horen wij dat graag in dit forum;
wilt u een reactie geven op een vraag of antwoord, gebruik dan niet dit formulier maar klik op de knop 'reageer op deze vraag';
uw vraag wordt direct op de website gezet; vermijd daarom persoonlijke gegevens in te vullen;
Belangrijk! Als er een antwoord wordt gegeven op uw vraag, dan is het voor de gever van het antwoord nuttig om te weten als u er wel (of niet) mee geholpen bent! Wij vragen u dus ook te reageren op een antwoord.
Belangrijk! Antwoorden worden ook per e-mail naar abonnees gestuurd. Laat uw emailadres achter op deze site, zodat u op de hoogte blijft. U krijgt dan ook andere vragen en antwoorden te zien.
Abonneren
Abonneer u voor het ontvangen van emails voor uw Denver CAD-471 bij:
nieuwe vragen en antwoorden
nieuwe handleidingen
U ontvangt een email met instructies om u voor één of beide opties in te schrijven.
Ontvang uw handleiding per email
Vul uw emailadres in en ontvang de handleiding van Denver CAD-471 in de taal/talen: Engels als bijlage per email.
De handleiding is 1,52 mb groot.
U ontvangt de handleiding per email binnen enkele minuten. Als u geen email heeft ontvangen, dan heeft u waarschijnlijk een verkeerd emailadres ingevuld of is uw mailbox te vol. Daarnaast kan het zijn dat uw internetprovider een maximum heeft aan de grootte per email. Omdat hier een handleiding wordt meegestuurd, kan het voorkomen dat de email groter is dan toegestaan bij uw provider.
Uw handleiding is per email verstuurd. Controleer uw email
Als u niet binnen een kwartier uw email met handleiding ontvangen heeft, kan het zijn dat u een verkeerd emailadres heeft ingevuld of dat uw emailprovider een maximum grootte per email heeft ingesteld die kleiner is dan de grootte van de handleiding.
Er is een email naar u verstuurd om uw inschrijving definitief te maken.
Controleer uw email en volg de aanwijzingen op om uw inschrijving definitief te maken
U heeft geen emailadres opgegeven
Als u de handleiding per email wilt ontvangen, vul dan een geldig emailadres in.
Uw vraag is op deze pagina toegevoegd
Wilt u een email ontvangen bij een antwoord en/of nieuwe vragen? Vul dan hier uw emailadres in.