545001
24
Verklein
Vergroot
Pagina terug
1/80
Pagina verder
en - 3 14
ENGLISH
Take the time to thoroughly read and understand this manual prior to
operation.
Remove the saw from the packaging material carefully.
Remove the 4 hex. headed screws securing the machine to the
wooden packaging.
Release the head lock down knob (14) to raise the head of the
machine.
Description (fig. A1 - A4)
A1
1 Bevel locking handle
2 Rotating table locking knobs
3 Mitre fence
4 Plastic feet
5 Plastic handles/work supports
6 Head lock up release lever
7 Switch
8 Additional saw bench table locking knob
9 Moveable lower blade guard
10 Adjustable cut - to length gauge/material support (optional accessory)
11 Rotating work table
12 Steel base
13 Mitre latch lever
14 Head lock down knob
A2
15 Saw bench table
16 Riving knife
17 Upper saw blade guard
18 Rip fence
19 Fixed lower guard (for use in bench saw position)
Optional accessories
A3
20 Material clamp*
A4
9 Adjustable cut - to length gauge/material support*
* refer to sales literature
Electrical safety
The electric motor has been designed for one voltage only. Always check
that the power supply corresponds to the voltage on the rating plate.
Mains plug replacement (U.K. & Ireland only)
Should your mains plug need replacing and you are competent to do
this, proceed as instructed below. If you are in doubt, contact an
authorized DEWALT repair agent or a qualified electrician.
Disconnect the plug from the supply.
Cut off the plug and dispose of it safely; a plug with bared copper
conductors is dangerous if engaged in a live socket outlet.
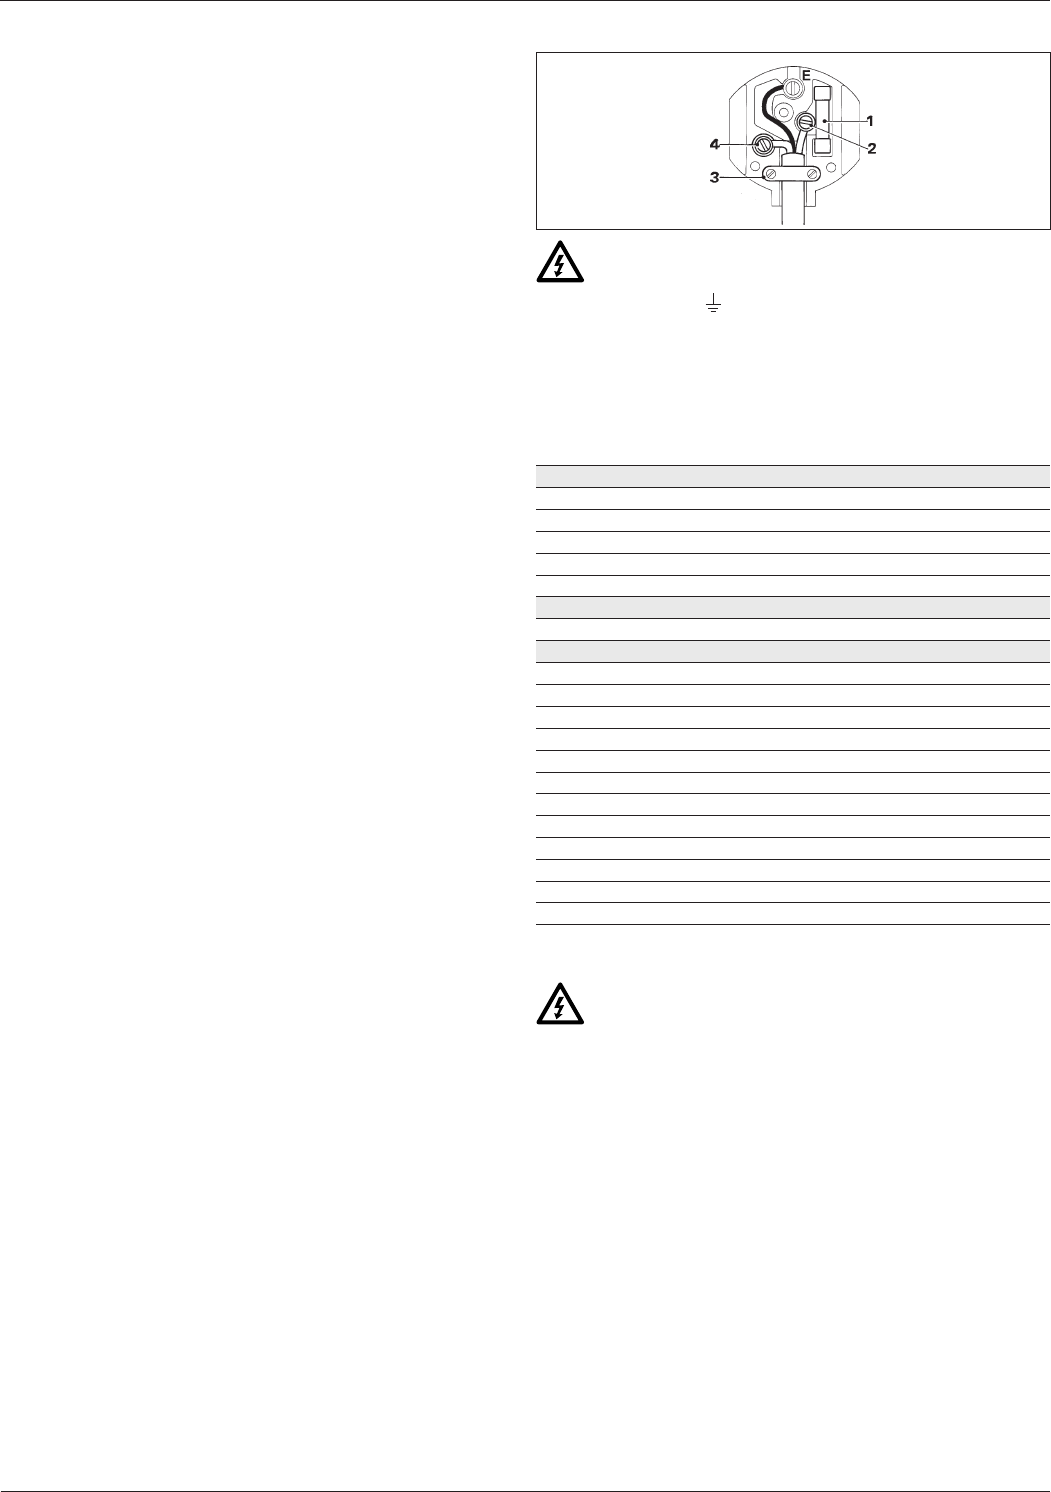
Only fit 13 Amperes BS1363A approved plugs fitted with the correctly
rated fuse (1).
The cable wire colours, or a letter, will be marked at the connection
points of most good quality plugs. Attach the wires to their respective
points in the plug (see below). Brown is for Live (L) (2) and Blue is for
Neutral (N) (4).
Before replacing the top cover of the mains plug ensure that the cable
restraint (3) is holding the outer sheath of the cable firmly and that the
two leads are correctly fixed at the terminal screws.
Never use a light socket.
Never connect the live (L) or neutral (N) wires to the earth pin
marked E or .
Using an extension cable
If an extension cable is required, use an approved triple-core extension
cable suitable for the power input of this tool (see technical data).
The minimum conductor size is 1.5 mm
2
. When using a cable reel, always
unwind the cable completely. Also refer to the table below.
Conductor size (mm
2
) Cable rating (Amperes)
0.75 6
1.00 10
1.50 15
2.50 20
4.00 25
Cable length (m)
7.5 15 25 30 45 60
Voltage Amperes Cable rating (Amperes)
115 0 - 2.0 6 6 6 6 6 10
2.1 - 3.4 6 6 6 6 15 15
3.5 - 5.0 6 6 10 15 20 20
5.1 - 7.0 10 10 15 20 20 25
7.1 - 12.0 15 15 20 25 25 -
12.1 - 20.0 20 20 25 - - -
230 0 - 2.0 6 6 6 6 6 6
2.1 - 3.4 6 6 6 6 6 6
3.5 - 5.0 6 6 6 6 10 15
5.1 - 7.0 10 10 10 10 15 15
7.1 - 12.0 15 15 15 15 20 20
12.1 - 20.0 20 20 20 20 25 -
Assembly and adjustment
Prior to assembly and adjustment always unplug the tool.
Fitting and adjusting the side handles (fig. B1 - B3)
The machine is supplied with two plastic side handles (5) for easy holding
of the base when carrying.
These handles are constructed in two parts in order to be adjustable.
They also act as material supports on each side of the base.
To mount, take one flat part (22) and one part with a curved edge (21)
and place the serrated surfaces together. The serrations allow
adjustment, whilst firmly locking them together (fig. B1).
Place the handles against the side of the base (12), lining up the holes
in the handles with the set of holes nearest to the front provided in the
base. Ensure the curved edge is to the top and pointing to the centre
of the table (fig. B2).
Using the flat HD screws M6 x 16, four washers D6 and four Hex nuts
M6, screw the handles on loosely. Check that the flange on the bottom
of the flat section is under the edge of the base.
Having mounted both handles, take a piece of flat wood and lay it up
against the mitre fence (3) and across the table. Ensure that the tops of
the handles are touching the wood (fig. B3).
Now firmly tighten all bolts.
24

Hulp nodig? Stel uw vraag in het forum

Spelregels
1

Forum

DeWalt-DW710

Zoeken resetten

Misbruik melden

Gebruikershandleiding.com neemt misbruik van zijn services uitermate serieus. U kunt hieronder aangeven waarom deze vraag ongepast is. Wij controleren de vraag en zonodig wordt deze verwijderd.

Product:

Bijvoorbeeld antisemitische inhoud, racistische inhoud, of materiaal dat gewelddadige fysieke handelingen tot gevolg kan hebben.

Bijvoorbeeld een creditcardnummer, een persoonlijk identificatienummer, of een geheim adres. E-mailadressen en volledige namen worden niet als privégegevens beschouwd.

Spelregels forum

Om tot zinvolle vragen te komen hanteren wij de volgende spelregels:

Belangrijk! Als er een antwoord wordt gegeven op uw vraag, dan is het voor de gever van het antwoord nuttig om te weten als u er wel (of niet) mee geholpen bent! Wij vragen u dus ook te reageren op een antwoord.

Belangrijk! Antwoorden worden ook per e-mail naar abonnees gestuurd. Laat uw emailadres achter op deze site, zodat u op de hoogte blijft. U krijgt dan ook andere vragen en antwoorden te zien.

Abonneren

Abonneer u voor het ontvangen van emails voor uw DeWalt DW710 bij:


U ontvangt een email met instructies om u voor één of beide opties in te schrijven.


Ontvang uw handleiding per email

Vul uw emailadres in en ontvang de handleiding van DeWalt DW710 in de taal/talen: Nederlands, Duits, Engels, Frans, Italiaans, Portugees, Spaans, Pools, Turks, Deens, Zweeds, Noors, Fins als bijlage per email.

De handleiding is 1,58 mb groot.


U ontvangt de handleiding per email binnen enkele minuten. Als u geen email heeft ontvangen, dan heeft u waarschijnlijk een verkeerd emailadres ingevuld of is uw mailbox te vol. Daarnaast kan het zijn dat uw internetprovider een maximum heeft aan de grootte per email. Omdat hier een handleiding wordt meegestuurd, kan het voorkomen dat de email groter is dan toegestaan bij uw provider.

Uw handleiding is per email verstuurd. Controleer uw email

Als u niet binnen een kwartier uw email met handleiding ontvangen heeft, kan het zijn dat u een verkeerd emailadres heeft ingevuld of dat uw emailprovider een maximum grootte per email heeft ingesteld die kleiner is dan de grootte van de handleiding.

Er is een email naar u verstuurd om uw inschrijving definitief te maken.

Controleer uw email en volg de aanwijzingen op om uw inschrijving definitief te maken

U heeft geen emailadres opgegeven

Als u de handleiding per email wilt ontvangen, vul dan een geldig emailadres in.

Uw vraag is op deze pagina toegevoegd

Wilt u een email ontvangen bij een antwoord en/of nieuwe vragen? Vul dan hier uw emailadres in.


Info