562697
2
Verklein
Vergroot
Pagina terug
1/14
Pagina verder
5
GB
Setting up your portable
air conditioner
TO AVOID DAMAGE TO THE UNIT:
NEVER TRANSPORT OR TURN THE APPLIANCE UPSIDE DOWN OR ON ITS SIDE. IF THIS OCCURS, WAIT
6 HOURS BEFORE TURNING THE APPLIANCE ON, 24 HOURS IS RECOMMENDED. After the unit has
been on its side, oil needs to return to the compressor to ensure proper function. Without allow-
ing the unit this time (6-24 hours) the unit may function for only a short time, and then the com-
pressor will break down from lack of oil.
ELECTRICAL CONNECTIONS
Before plugging the appliance into the outlet, check that:
The outlet’s power supply corresponds to the value indicated on the rating label on the back
of the appliance;
The outlet and electrical circuit are adequate for the appliance;
The outlet is a 3-hole grounded outlet . If this is not the case, you must choose another outlet.
Failure to follow these important safety instructions absolves the manufacturer of all liability.
The instructions below will enable you to prepare your air conditioner for operation as efficiently
as possible. Before use, make sure the air intake and outlet grilles are unobstructed.
If it becomes necessary, the power cable must be replaced by a qualified professional only.
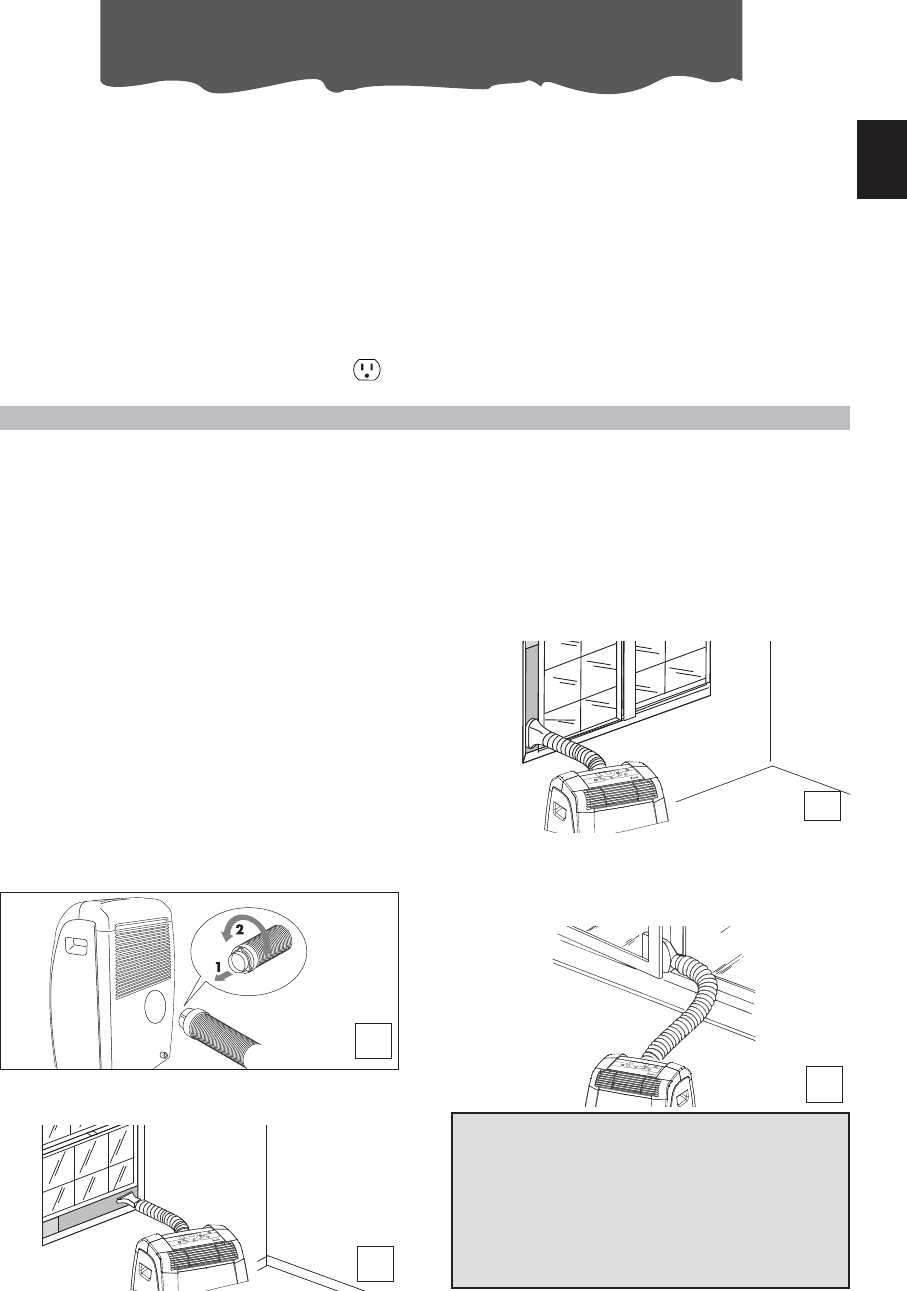
Other set-up methods:
Thanks to the locking pins, it’s possible to
use the window bracket also for sliding
windows. Position the hole of the bracket
so to allow a correct installation of the
exhaust hose (see figure C).
If you have a casement window (figure D)
follow steps 2 & 3 and place the window
outlet (12) outside the window to exhaust
the hot air.
For help with installation, operation, and
for all accessories and spare/replacement
parts, Please contact our toll free cus-
tomer service call center at:
1-800-322-3848 [US only]
Monday – Friday 8:30am – 5:00pm ET Or
log onto our website at
www.delonghiusa.com.
AIR CONDITIONING WITHOUT INSTALLATION
NOTE: Keep the air hoses as short and free of
curves as possible to avoid constrictions.
FOR OPTIMAL RESULTS SET-UP IN A DOU-
BLE-HUNG WINDOW:
1) Place the bracket in the window sill,
extend the bracket fully within the window
frame, fix the bracket by using the pin
then lower the window onto the bracket.
(Should the window bracket be too large
for the window. The plastic can be cut
with a saw by a qualified professional.)
2) Fit the air exhaust hose in the housing at
the back of the appliance. Insert it as
shown in figure A.
3) Connect the window outlet (12) to the
other end of the exhaust hose.
4) Insert the window outlet end of the exhaust
hose into the slot of the window bracket (fig. B).
A
B
C
D
2

Hulp nodig? Stel uw vraag in het forum

Spelregels

Misbruik melden

Gebruikershandleiding.com neemt misbruik van zijn services uitermate serieus. U kunt hieronder aangeven waarom deze vraag ongepast is. Wij controleren de vraag en zonodig wordt deze verwijderd.

Product:

Bijvoorbeeld antisemitische inhoud, racistische inhoud, of materiaal dat gewelddadige fysieke handelingen tot gevolg kan hebben.

Bijvoorbeeld een creditcardnummer, een persoonlijk identificatienummer, of een geheim adres. E-mailadressen en volledige namen worden niet als privégegevens beschouwd.

Spelregels forum

Om tot zinvolle vragen te komen hanteren wij de volgende spelregels:

Belangrijk! Als er een antwoord wordt gegeven op uw vraag, dan is het voor de gever van het antwoord nuttig om te weten als u er wel (of niet) mee geholpen bent! Wij vragen u dus ook te reageren op een antwoord.

Belangrijk! Antwoorden worden ook per e-mail naar abonnees gestuurd. Laat uw emailadres achter op deze site, zodat u op de hoogte blijft. U krijgt dan ook andere vragen en antwoorden te zien.

Abonneren

Abonneer u voor het ontvangen van emails voor uw DeLonghi PAC C120E Pinguino bij:


U ontvangt een email met instructies om u voor één of beide opties in te schrijven.


Ontvang uw handleiding per email

Vul uw emailadres in en ontvang de handleiding van DeLonghi PAC C120E Pinguino in de taal/talen: Engels als bijlage per email.

De handleiding is 1 mb groot.


U ontvangt de handleiding per email binnen enkele minuten. Als u geen email heeft ontvangen, dan heeft u waarschijnlijk een verkeerd emailadres ingevuld of is uw mailbox te vol. Daarnaast kan het zijn dat uw internetprovider een maximum heeft aan de grootte per email. Omdat hier een handleiding wordt meegestuurd, kan het voorkomen dat de email groter is dan toegestaan bij uw provider.

Uw handleiding is per email verstuurd. Controleer uw email

Als u niet binnen een kwartier uw email met handleiding ontvangen heeft, kan het zijn dat u een verkeerd emailadres heeft ingevuld of dat uw emailprovider een maximum grootte per email heeft ingesteld die kleiner is dan de grootte van de handleiding.

Er is een email naar u verstuurd om uw inschrijving definitief te maken.

Controleer uw email en volg de aanwijzingen op om uw inschrijving definitief te maken

U heeft geen emailadres opgegeven

Als u de handleiding per email wilt ontvangen, vul dan een geldig emailadres in.

Uw vraag is op deze pagina toegevoegd

Wilt u een email ontvangen bij een antwoord en/of nieuwe vragen? Vul dan hier uw emailadres in.


Info