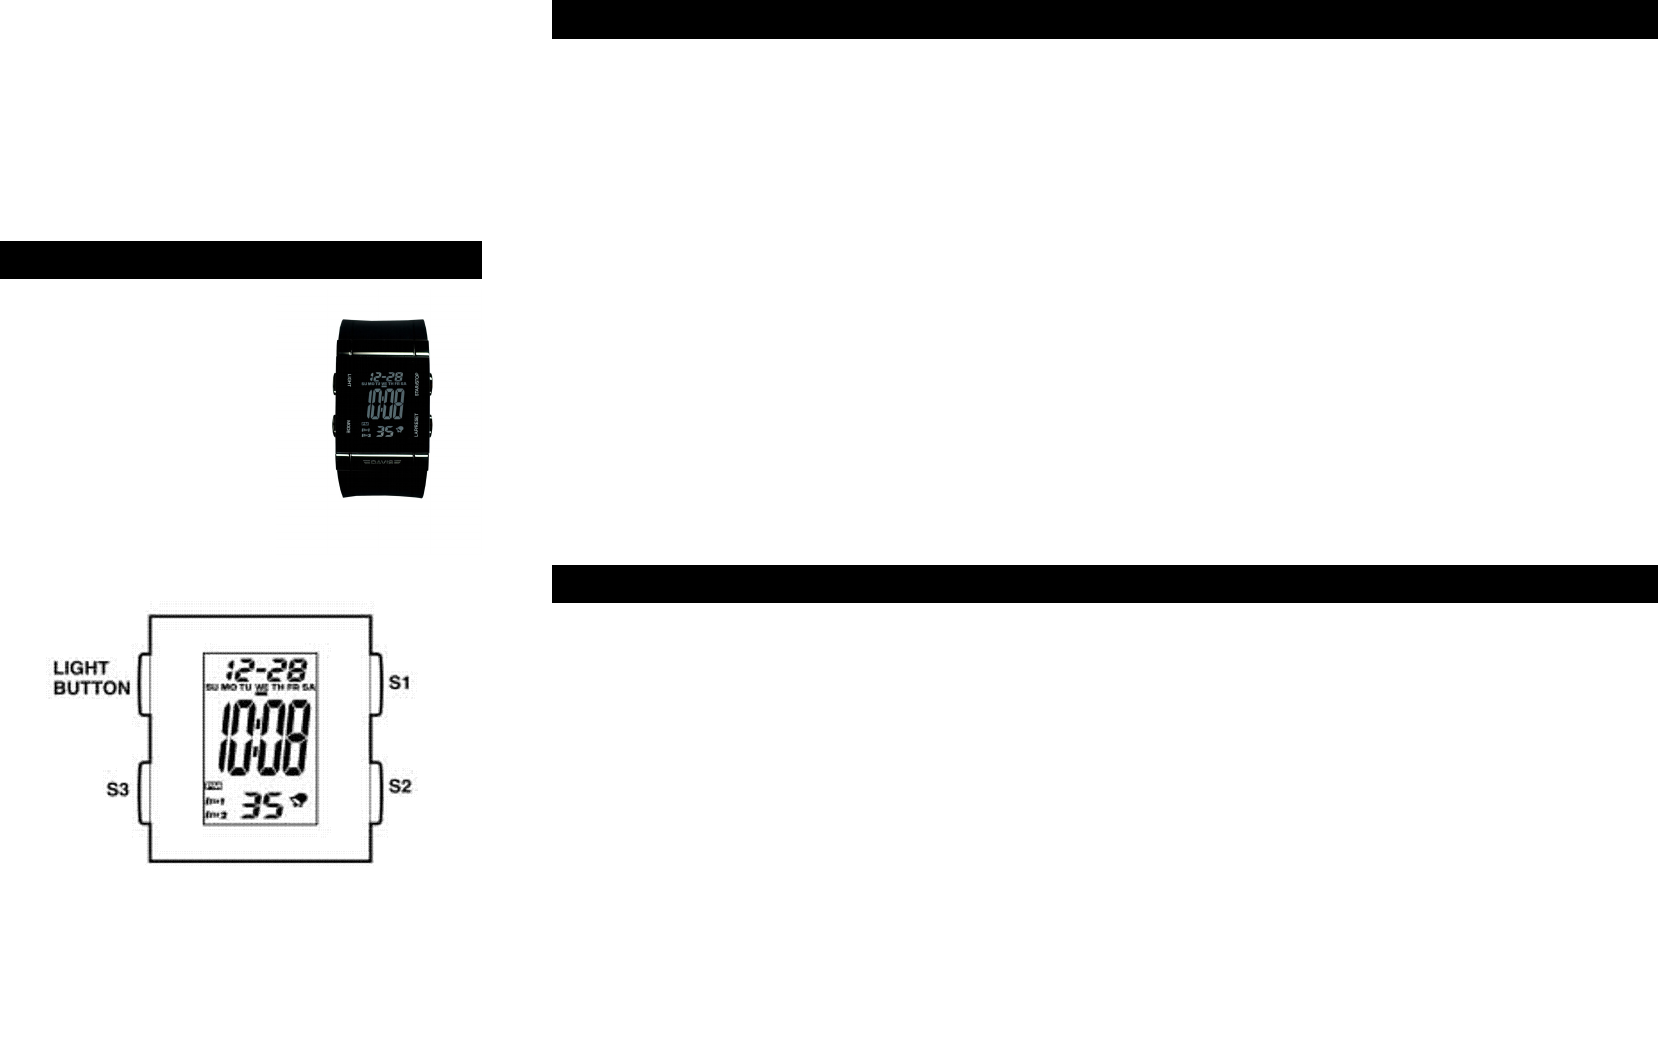
Press the LIGHT button once to turn on the back light for three seconds.
DISPLAY MODES
The watch has four display modes: home time (TIME), home time alarm (ALM1), stopwatch
(STW) and countdown timer (TMR). To change from one display mode to another, press the
S3 button once. The mode description will appear for two seconds before activating the
selected mode.
HOME AND FOREIGN DISPLAY
To display the foreign time, press S2 when the home time is displayed. The mode description
(TM-2) will appear shortly before the foreign time is displayed. To change back to the home
time, press S2. To display the daily alarm for foreign time, press S2 when the daily alarm for
home time is displayed. The mode description (ALM 2) will appear shortly before the foreign
time alarm is displayed.
HOW TO SET THE TIME AND DATE
1 Select time display using the S3 button. 2 Select home time or foreign time using the S2
button. 3 Hold the S2 button for two seconds. The SET message will appear momentarily. The
second digits will blink. 4 Press the S1 button to reset the second digits to 00. 5 Press the S3
button. The minute digits will blink. 6 Use the S1 button to set the minutes. Press the button
once to increase the digits by one unit or speed up the process by holding down the button.
7 Press the S3 button. The hour digits will blink. 8 Use the S1 button to set the hours.
9 Follow the same pattern to set the day-of-the-month, month, day-of-the-week, hour format
and date format. 10 Press the S2 button to confirm the settings and return to current time
display.
HOW TO SET THE DAILY ALARMS
1 Select alarm function using the S3 button. 2 Select home and foreign time alarm using the
S2 button. 3 Hold the S2 button for two seconds. The SET message will appear. The minute
digits will blink. 4 Use the S1 button to set the minutes. 5 Press the S3 button. The hour digits
will blink. 6 Use the S1 button to set the hours. 7 Press the S2 button to confirm and exit.
HOW TO USE THE DAILY ALARMS AND HOURLY CHIMES
To display the alarm time, select ALM 1 or ALM 2 mode using the S2 button in alarm mode.
Use the S1 button to set the status of the alarm and chime functions of the chosen alarm. Press
the button once to activate the daily alarm. Press the button again to activate the hourly chime.
Press the button a third time to activate both functions. To deactivate both, press the S1 button
a fourth time.
HOW TO USE THE STOPWATCH
1 Select stopwatch mode using the S3 button. Press the S2 button to clear the old record.
2 Press the S1 button once to start the stopwatch. 3 To stop counting, press the S1 button
once. Press the button again to resume from where it left off. To clear the stopwatch, press the
S1 button to stop counting and then press the S2 button.
HOW TO USE THE TIMER
1 Select timer mode using the S3 button. 2 Use the S2 button to alter the setting. To start a
countdown, press the S1 button. Press the button again to stop the countdown or a third time
to resume from where it left off.
HET GEBRUIK VAN BACK LIGHT
Druk een maal op de LIGHT knop. Back Light zal 3 seconden branden.
4 DISPLAY MODES
1. Home time (TIME), 2. Home time alarm (ALM1), 3. Stopwatch (STW), 4. Countdown timer
(TMR)
HOME EN FOREIGH DISPLAY
Druk op S2 in de HOME tijd om de FOREIGN TIME te zien. Druk weer op S2 om de HOME tijd te
zien.
Druk op S2 in de dagelijkse alarm voor HOME tijd om het dagelijkse alarm voor FOREIGN TIME
te zien. De melding ALM 2 zal verschijnen kort voordag de FOREIGN TIME te zien is.
DE TIJD EN DATUM INSTELLEN
Selecteer TIME display door op knop S3 te drukken. Selecteer de HOME or FOREIGN TIME door
op knop S2 te drukken. Houd knop S2 ingedrukt voor 2 seconden. In het display zal de melding SET
verschijnen. De secondes zullen nu knipperen. Druk op de knop S1 om de secondes te resetten naar
00. Druk op de knop S3. De minuten zullen nu knipperen. Duk op de knop S1 om de minuten in te
stellen. (Bij ingedrukt houden verspringen de minuten sneller). Druk op de knop S3. De uren zullen
nu knipperen. Druk op de knop S1 om de uren in te stellen. Druk als laatste op de knop S2 om de
instelling af te ronden.
Volg deze manier om ook de datum, de dag, 12-uurs of 24 uurs display in te stellen.
HET DAGELIJKSE ALARM INSTELLEN
Selecteer de alarm functie door op S3 te drukken. Selecteer HOME and FOREIGN TIME door op de
knop S2 te drukken. Houd de knop S2 ingedrukt voor 2 seconden. De melding SET zal verschijnen
en de minuten zullen knipperen. Druk op knop S1 om de minuten in te stellen. Druk daarna op de
knop S3 en de uren zullen knipperen. Druk dan op de knop S1 om de uren in te stellen. Druk als
laatste op knop S2 om de instelling af te ronden.
Het gebruik van het dagelijkse alarm en de CHIME
Druk om de knop S2 in de alarm stand om ALM 1 of ALM 2 te selecteren, de alarm tijd zal nu
verschijnen. Druk op de knop S1 om de status van het alarm en de CHIME?? functies van de
gekozen alarm in te stellen. Druk nog een keer op de knop S1 om het dagelijkse alarm te activeren.
Druk nog een keer op de knop om de uurlijke CHIME te activeren. Druk voor de derde keer op de
knop om beide functies te activeren. Om beide functies te deactiveren druk op S1 voor de vierde
keer.
HET GEBRUIK VAN DE STOPWATCH
Druk op de knop S3. Druk op S2 om de tijd te resetten. Druk op S1 om te starten en nog een keer S1
om te stoppen. Om verder te gaan druk weer op S1. Om te resetten, druk eerst op S1 om te stoppen
en dan op S2 om te resetten.
HET GEBRUIK VAN DE TIMER
Druk op knop S3. Druk op knop S2 om de instellingen te wijzigen. Druk op S1 om te starten. Druk
op S1 om te stopen en weer op S1 om verder te gaan.
1040
Hulp nodig? Stel uw vraag in het forum
Misbruik melden
Gebruikershandleiding.com neemt misbruik van zijn services uitermate serieus. U kunt hieronder aangeven waarom deze vraag ongepast is. Wij controleren de vraag en zonodig wordt deze verwijderd.
Product:
Spelregels forum
Om tot zinvolle vragen te komen hanteren wij de volgende spelregels:
lees eerst de handleiding door;
controleer of uw vraag al eerder door iemand anders is gesteld;
probeer uw vraag zo duidelijk mogelijk te stellen;
heeft u een probleem en al geprobeerd om dit op te lossen, vermeld dit erbij aub;
heeft u een oplossing gekregen van een bezoeker dan horen wij dat graag in dit forum;
wilt u een reactie geven op een vraag of antwoord, gebruik dan niet dit formulier maar klik op de knop 'reageer op deze vraag';
uw vraag wordt direct op de website gezet; vermijd daarom persoonlijke gegevens in te vullen;
Belangrijk! Als er een antwoord wordt gegeven op uw vraag, dan is het voor de gever van het antwoord nuttig om te weten als u er wel (of niet) mee geholpen bent! Wij vragen u dus ook te reageren op een antwoord.
Belangrijk! Antwoorden worden ook per e-mail naar abonnees gestuurd. Laat uw emailadres achter op deze site, zodat u op de hoogte blijft. U krijgt dan ook andere vragen en antwoorden te zien.
Abonneren
Abonneer u voor het ontvangen van emails voor uw Davis 1040 bij:
nieuwe vragen en antwoorden
nieuwe handleidingen
U ontvangt een email met instructies om u voor één of beide opties in te schrijven.
Ontvang uw handleiding per email
Vul uw emailadres in en ontvang de handleiding van Davis 1040 in de taal/talen: Nederlands, Duits, Engels, Frans als bijlage per email.
De handleiding is 0,17 mb groot.
U ontvangt de handleiding per email binnen enkele minuten. Als u geen email heeft ontvangen, dan heeft u waarschijnlijk een verkeerd emailadres ingevuld of is uw mailbox te vol. Daarnaast kan het zijn dat uw internetprovider een maximum heeft aan de grootte per email. Omdat hier een handleiding wordt meegestuurd, kan het voorkomen dat de email groter is dan toegestaan bij uw provider.
Uw handleiding is per email verstuurd. Controleer uw email
Als u niet binnen een kwartier uw email met handleiding ontvangen heeft, kan het zijn dat u een verkeerd emailadres heeft ingevuld of dat uw emailprovider een maximum grootte per email heeft ingesteld die kleiner is dan de grootte van de handleiding.
Er is een email naar u verstuurd om uw inschrijving definitief te maken.
Controleer uw email en volg de aanwijzingen op om uw inschrijving definitief te maken
U heeft geen emailadres opgegeven
Als u de handleiding per email wilt ontvangen, vul dan een geldig emailadres in.
Uw vraag is op deze pagina toegevoegd
Wilt u een email ontvangen bij een antwoord en/of nieuwe vragen? Vul dan hier uw emailadres in.