•A sticker is affixed to the glass of this clock when you purchase it. Be sure to remove the sticker before using the
clock.
•Depending on its model number, the appearance of your clock may differ somewhat from that shown in the
illustration.
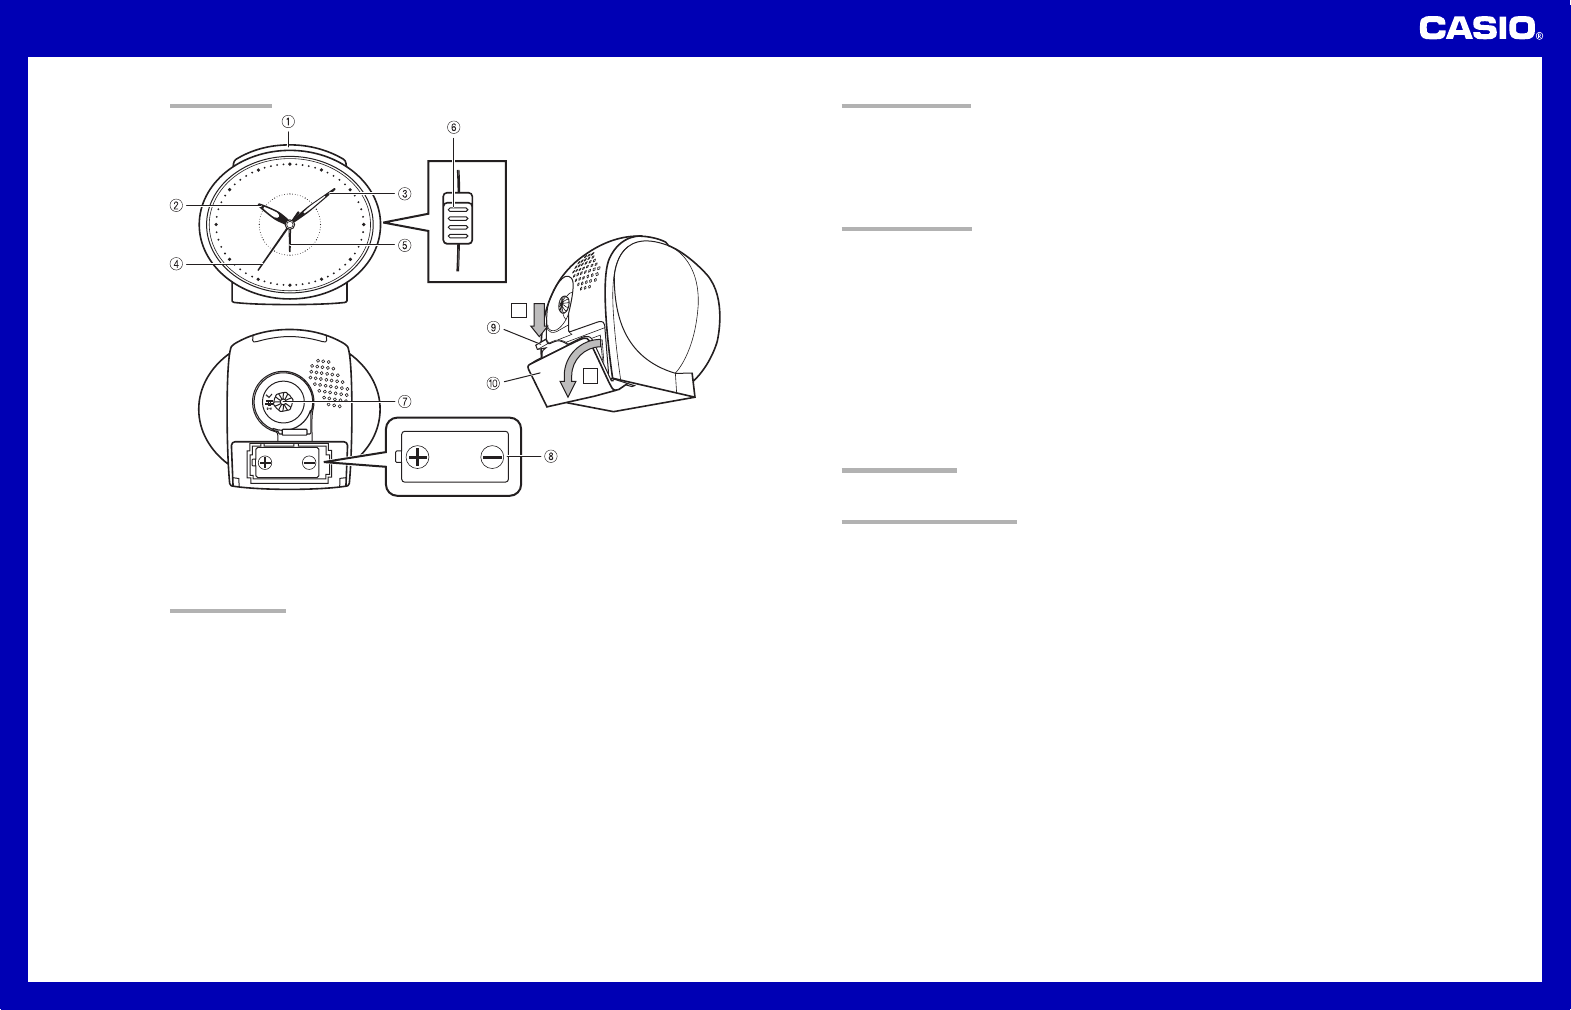
GENERAL GUIDE
11
11
1Light/Snooze button
•Hold down to illuminate the display.
•Pressing this button while the alarm is sounding stops the alarm.
22
22
2Hour hand
33
33
3Minute hand
44
44
4Second hand
55
55
5Alarm hand
66
66
6Alarm ON/OFF switch
77
77
7Time/Alarm setting knob
•Press in and rotate to set the alarm.
•Pull out and rotate to set the time.
88
88
8Battery
99
99
9Catch
00
00
0Battery cover
12
1
2
3
4
5
6
7
8
9
10
11
ON
OFF
1
2
ILLUSTRATION
SETTING THE TIME
1.Load the battery, making sure its ends are facing as shown in the illustration.
2.Remove the battery to stop the Second hand (4) at 12 o’clock position.
3.Pull out the Time/Alarm setting knob (7) and rotate it to set the time.
•Note that this clock does not distinguish between AM and PM times.
4.After setting the time, push the Time/Alarm setting knob (7) back to its original position.
5.Replace the battery at a time signal to restart the Second hand (4) on the correct second.
•The start of Second hand (4) may be delayed depending on when you load the battery.
USING THE ALARM
When the alarm is turned on, the alarm sounds for 60 minutes at the preset time each day. Once the alarm starts to
sound, you can switch it off by pressing the Alarm ON/OFF switch (6).
Setting the Alarm Time
1.Making sure the Time/Alarm setting knob (7) is not pulled out, rotate the knob to move the Alarm hand (5)
counterclockwise to the setting you want.
2.Raise the Alarm ON/OFF switch (6) to turn on the alarm.
•Note that this clock does not distinguish between AM and PM times. If you set an alarm to wake up to in the
morning, the alarm will sound again at the same time in the evening if you leave the Alarm ON/OFF switch (6)
raised.
Stopping the Alarm
While the alarm is sounding, press the Light/Snooze button (1) to stop it.
•The snooze alarm remains activated for about 60 minutes. During that time, the alarm will sound again about four
or five minutes after you press the Light/Snooze button (1) to stop the current alarm.
•Pressing the Light/Snooze button (1) also turns on display illumination.
The alarm will not sound if the Alarm ON/OFF switch (6) is in the OFF position.
LUMINOUS FACE
Special plastic is used for numerals and face markings to make them appear to glow.
BATTERY REPLACEMENT
Low battery power is indicated when timekeeping slows or stops completely. Should either of these symptoms
occur, replace the battery as soon as possible. Do not leave a low or dead battery in the clock.
1.Open the Battery cover (0) as shown in the illustration.
2.Remove the old battery.
3.Load a new battery. Make sure that its positive (+) and negative (–) ends are facing correctly.
4.Replace the Battery cover (0).
Battery precautions
•Keep batteries out of the reach of small children. If a battery is accidentally swallowed, contact your physician
immediately.
•Be sure to load the battery with its positive (+) and negative (–) ends facing correctly.
•Never charge the battery that comes with the clock.
•Should a battery ever leak while in the clock, wipe out the fluid with a cloth, taking care not to let any get onto
your skin.
•Replace the battery at least once a year, even if the current battery is working normally.
•The battery that comes with the clock loses some power during transport and storage.
Hulp nodig? Stel uw vraag in het forum
Misbruik melden
Gebruikershandleiding.com neemt misbruik van zijn services uitermate serieus. U kunt hieronder aangeven waarom deze vraag ongepast is. Wij controleren de vraag en zonodig wordt deze verwijderd.
Product:
Spelregels forum
Om tot zinvolle vragen te komen hanteren wij de volgende spelregels:
lees eerst de handleiding door;
controleer of uw vraag al eerder door iemand anders is gesteld;
probeer uw vraag zo duidelijk mogelijk te stellen;
heeft u een probleem en al geprobeerd om dit op te lossen, vermeld dit erbij aub;
heeft u een oplossing gekregen van een bezoeker dan horen wij dat graag in dit forum;
wilt u een reactie geven op een vraag of antwoord, gebruik dan niet dit formulier maar klik op de knop 'reageer op deze vraag';
uw vraag wordt direct op de website gezet; vermijd daarom persoonlijke gegevens in te vullen;
Belangrijk! Als er een antwoord wordt gegeven op uw vraag, dan is het voor de gever van het antwoord nuttig om te weten als u er wel (of niet) mee geholpen bent! Wij vragen u dus ook te reageren op een antwoord.
Belangrijk! Antwoorden worden ook per e-mail naar abonnees gestuurd. Laat uw emailadres achter op deze site, zodat u op de hoogte blijft. U krijgt dan ook andere vragen en antwoorden te zien.
Abonneren
Abonneer u voor het ontvangen van emails voor uw Casio TQ-309 bij:
nieuwe vragen en antwoorden
nieuwe handleidingen
U ontvangt een email met instructies om u voor één of beide opties in te schrijven.
Ontvang uw handleiding per email
Vul uw emailadres in en ontvang de handleiding van Casio TQ-309 in de taal/talen: Engels als bijlage per email.
De handleiding is 0,38 mb groot.
U ontvangt de handleiding per email binnen enkele minuten. Als u geen email heeft ontvangen, dan heeft u waarschijnlijk een verkeerd emailadres ingevuld of is uw mailbox te vol. Daarnaast kan het zijn dat uw internetprovider een maximum heeft aan de grootte per email. Omdat hier een handleiding wordt meegestuurd, kan het voorkomen dat de email groter is dan toegestaan bij uw provider.
Uw handleiding is per email verstuurd. Controleer uw email
Als u niet binnen een kwartier uw email met handleiding ontvangen heeft, kan het zijn dat u een verkeerd emailadres heeft ingevuld of dat uw emailprovider een maximum grootte per email heeft ingesteld die kleiner is dan de grootte van de handleiding.
Er is een email naar u verstuurd om uw inschrijving definitief te maken.
Controleer uw email en volg de aanwijzingen op om uw inschrijving definitief te maken
U heeft geen emailadres opgegeven
Als u de handleiding per email wilt ontvangen, vul dan een geldig emailadres in.
Uw vraag is op deze pagina toegevoegd
Wilt u een email ontvangen bij een antwoord en/of nieuwe vragen? Vul dan hier uw emailadres in.