614882
6
Verklein
Vergroot
Pagina terug
1/25
Pagina verder
11
A
B
C
EN
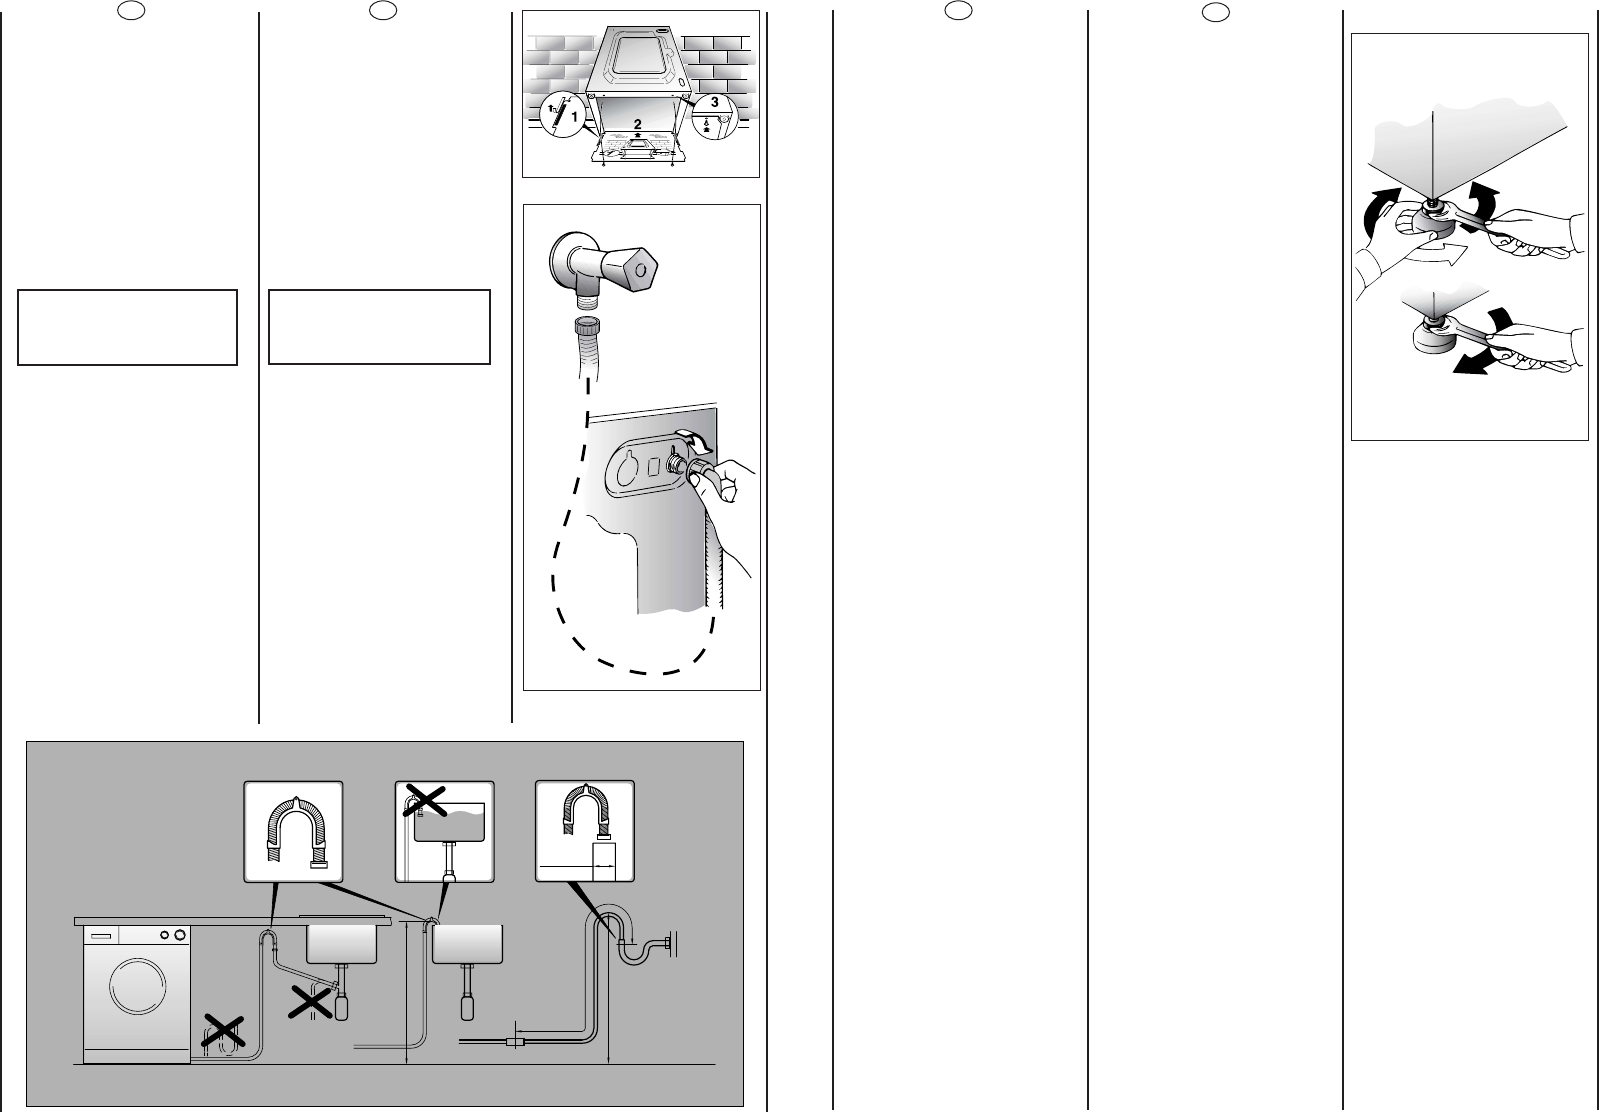
Use front feet to level the
machine with the floor.
a) Turn the nut clockwise to
release the screw adjuster of
the foot.
b) Rotate foot to raise or
lower it until it stands firmly
on the ground.
c) Lock the foot in position
by turning the nut anti-
clockwise until it comes up
against the bottom of the
machine.
Ensure that the knob is on
the “OFF” position and the
load door is closed.
Insert the plug.
After installation, the
appliance must be
positioned so that the plug is
accessible.
SL
Izravnajte vi‰ino stroja s
sprednjima vrtljivima
noÏicama:
a) Matico, s katero je
pritrjena nogica sprostite
tako, da jo odvijete z
ustreznim kljuãem.
b) Nogico z obraãanjem
zvi‰ujte ali zniÏujte toliko ãasa,
dokler se ne bo povsem
prilegala tlom.
c) Po konãanem
izravnavanju nogico
ponovno pritrdite tako, da jo
z ustreznim kljuãem privijate v
smeri nasprotni od gibanja
urinih kazalcev dokler se
povsem ne prileÏe dnu
stroja.
Prepriãajte se, da je gumb
programatorja v izklopljenem
poloÏaju in da so vrata stroja
zaprta.
Vtaknite vtiã v vtiãnico.
Stroj mora biti name‰ãen
tako, da lahko vtiãnico
doseÏete v vsakem trenutku.
10
min 50 cm
max 85 cm
+2,6 mt max
max 100 cm
min 4 cm
EN
Fix the sheet of corrugated
material on the bottom as
shown in picture.
Connect the fill hose
to the tap.
The appliance must be
connected to the water
mains using new hose-sets.
The old hose-sets should not
be reused.
IMPORTANT:
DO NOT TURN THE TAP
ON AT THIS TIME.
Position the washing
machine next to the wall.
Hook the outlet tube to the
edge of the bath tub,
paying attention that there
are no bends or
contractions along the tube.
It is better to connect the
discharge hose to a fixed
outlet of a diameter greater
than that of the outlet tube
and at a height of min. 50
cm. If is necessary to use the
plastic sleeve supplied.
SL
Izolacijsko plo‰ão iz
valovitega kartona
namestite na dno stroja
tako, kot je prikazano na sliki.
Dotoãno cev za vodo
privijte na pipo.
Aparat smete prikljuãiti na
vodovodno omreÏje
izkljuãno z novimi, priloÏenimi
dovodnimi cevmi. Starih
cevi ne smete uporabiti.
OPOZORILO!
PIPE ZA VODO ‚E NE
ODPRITE!
Stroj potisnite k steni in pri
tem pazite, da dotoãna in
odtoãna cev za vodo nista
zviti ali stisnjeni. Odtoãno
cev za vodo obesite nato
preko robu kadi.
Mnogo bolje pa je, ãe v
vodovodni napeljavi
predvidite stalni odtok, ki
mora biti enakega premera
kot je odtoãna cev,
namestiti pa ga morate v
vi‰ini najmanj 50 cm od tal.
âe je potrebno, namestite
na konec odtoãne cevi ‰e
ãvrsto nosilno koleno, ki je
priloÏeno v vreãki s priborom.
6

Hulp nodig? Stel uw vraag in het forum

Spelregels

Misbruik melden

Gebruikershandleiding.com neemt misbruik van zijn services uitermate serieus. U kunt hieronder aangeven waarom deze vraag ongepast is. Wij controleren de vraag en zonodig wordt deze verwijderd.

Product:

Bijvoorbeeld antisemitische inhoud, racistische inhoud, of materiaal dat gewelddadige fysieke handelingen tot gevolg kan hebben.

Bijvoorbeeld een creditcardnummer, een persoonlijk identificatienummer, of een geheim adres. E-mailadressen en volledige namen worden niet als privégegevens beschouwd.

Spelregels forum

Om tot zinvolle vragen te komen hanteren wij de volgende spelregels:

Belangrijk! Als er een antwoord wordt gegeven op uw vraag, dan is het voor de gever van het antwoord nuttig om te weten als u er wel (of niet) mee geholpen bent! Wij vragen u dus ook te reageren op een antwoord.

Belangrijk! Antwoorden worden ook per e-mail naar abonnees gestuurd. Laat uw emailadres achter op deze site, zodat u op de hoogte blijft. U krijgt dan ook andere vragen en antwoorden te zien.

Abonneren

Abonneer u voor het ontvangen van emails voor uw Candy CWD146 bij:


U ontvangt een email met instructies om u voor één of beide opties in te schrijven.


Ontvang uw handleiding per email

Vul uw emailadres in en ontvang de handleiding van Candy CWD146 in de taal/talen: Engels als bijlage per email.

De handleiding is 4,16 mb groot.


U ontvangt de handleiding per email binnen enkele minuten. Als u geen email heeft ontvangen, dan heeft u waarschijnlijk een verkeerd emailadres ingevuld of is uw mailbox te vol. Daarnaast kan het zijn dat uw internetprovider een maximum heeft aan de grootte per email. Omdat hier een handleiding wordt meegestuurd, kan het voorkomen dat de email groter is dan toegestaan bij uw provider.

Uw handleiding is per email verstuurd. Controleer uw email

Als u niet binnen een kwartier uw email met handleiding ontvangen heeft, kan het zijn dat u een verkeerd emailadres heeft ingevuld of dat uw emailprovider een maximum grootte per email heeft ingesteld die kleiner is dan de grootte van de handleiding.

Er is een email naar u verstuurd om uw inschrijving definitief te maken.

Controleer uw email en volg de aanwijzingen op om uw inschrijving definitief te maken

U heeft geen emailadres opgegeven

Als u de handleiding per email wilt ontvangen, vul dan een geldig emailadres in.

Uw vraag is op deze pagina toegevoegd

Wilt u een email ontvangen bij een antwoord en/of nieuwe vragen? Vul dan hier uw emailadres in.


Info