INSTRUCTIONS FOR USE
Rate: 211 g/h (2,9 kw) - injector nº 62708
Category: butane direct pressure
Thank you for choosing the Campingaz® Twister® Plus / Twister® Plus PZ
A - IMPORTANT: ALWAYS BE CAREFUL WHEN USING GAS !
The purpose of these instructions is to enable you to use your Campingaz® Twister® Plus / Twister® Plus PZ
correctly and in complete safety.
Please read them carefully to familiarise yourself with the equipment prior to assembling the gas
container.
Please observe these instructions and the safety measures printed on the Campingaz® CV 270 PLUS /
CV 300 PLUS / CV 470 PLUS cartridges. Failure to observe these instructions may result in the user and
people in the immediate vicinity being put at risk.
Keep these instructions in a safe place so that you can refer to them if needed.
This equipment must be used exclusively with Campingaz® CV 270 PLUS / CV 300 PLUS / CV 470 PLUS
cartridges. Using other gas containers may be dangerous.
The Société Application Des Gaz (Gas Enforcement Company) accepts no responsibility when
cartridges of any other make are used.
This equipment must only be used in adequately ventilated areas (minimum 2 m
3
/h/kw) and at a good
distance from any flammable material.
Do not use equipment which leaks, functions incorrectly or is damaged. Return it to your retailer who
will inform you of your nearest after-sales service.
Never modify this equipment or use it for purposes for which it is not intended.
Do not use this product in caravans, cars, tents, huts, sheds or any small enclosed areas.
The product should not be used while sleeping or left unattended.
This product consumes fuel through combustion or consumption of oxygen and gives off certain
substances and gas, which could be dangerous such as carbon monoxide.
Carbon monoxide is an odorless, clear gas that can cause flu-like symptoms, sickness, illness,
and possibly death if produced inside aforesaid enclosed areas through use of the product
without proper ventilation.
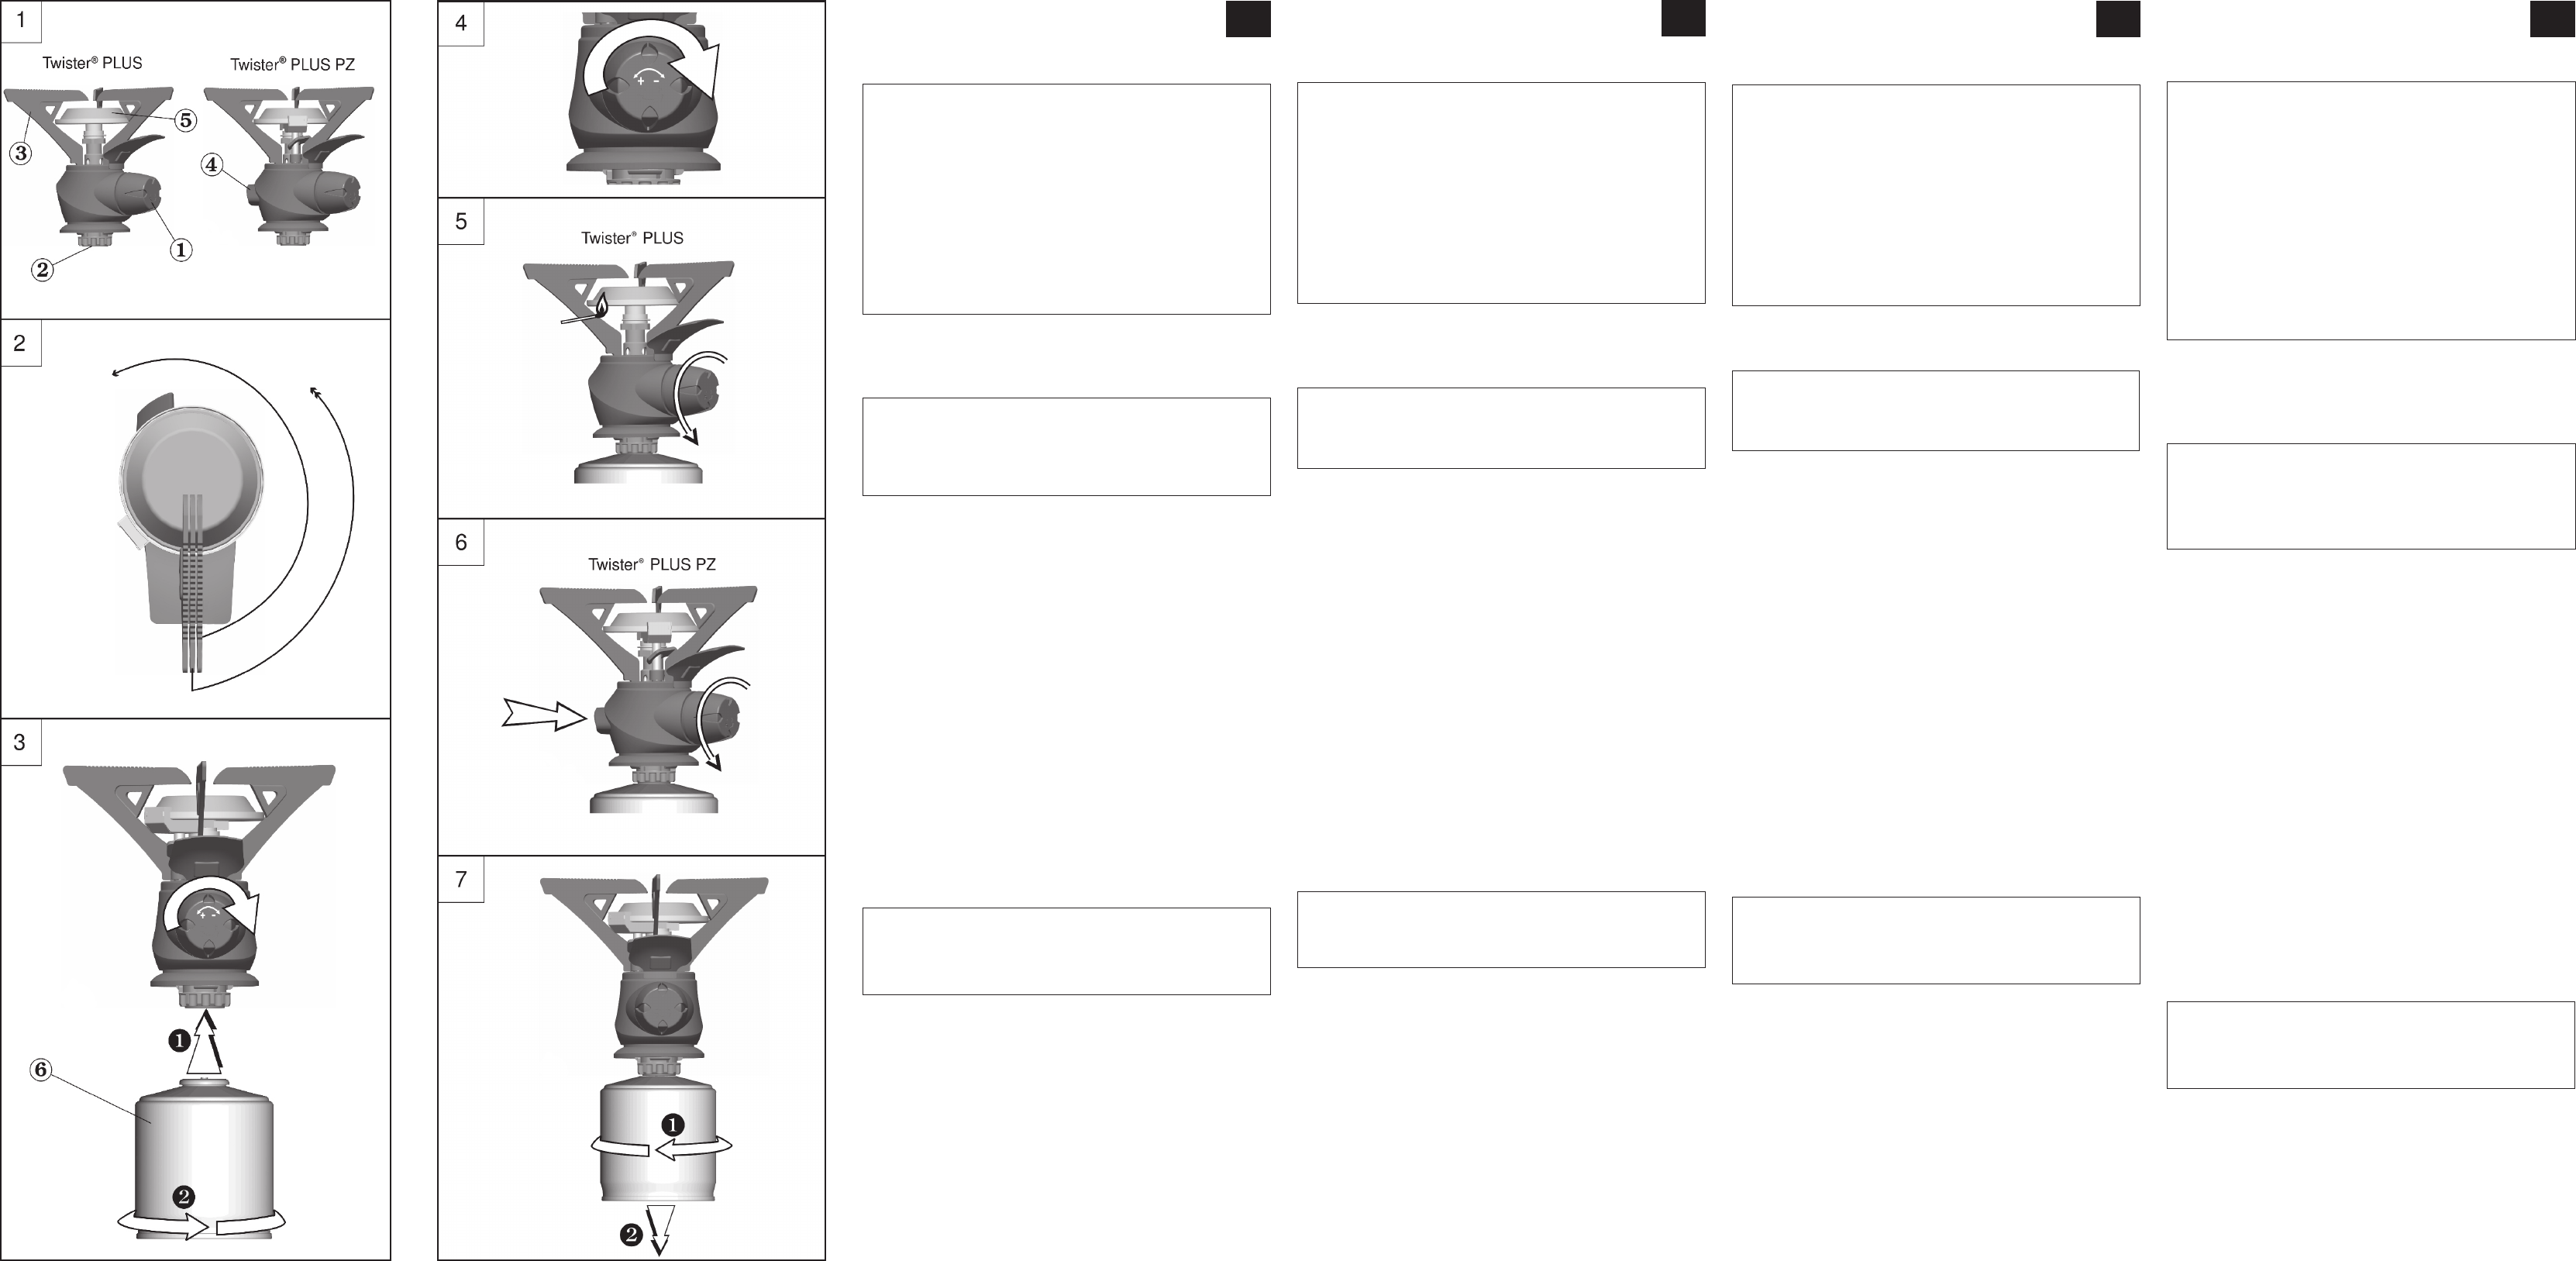
B - ASSEMBLING THE CAMPINGAZ® Twister® Plus / Twister® Plus PZ
a) Remove the equipment from its box
b) Rotate the arms (3) as far as the catch. (fig.2)
C - INSTALLING THE CAMPINGAZ® CV 270 PLUS / CV 300 PLUS / CV 470 PLUS CARTRIDGE
(When the existing cartridge is empty, read paragraph E : “Removing the cartridge”)
To install or remove a cartridge, always work in a well-ventilated area, preferably outside and never in the
presence of a flame, heat source or spark (lit cigarette, electrical equipment, etc.) at a good distance from
other people and flammable material.
AS CAMPINGAZ® CV 270 PLUS / CV 300 PLUS / CV 470 PLUS CARTRIDGES ARE VALVE-OPERATED, THEY CAN
BE DETACHED FROM THE EQUIPMENT, EASILY TRANSPORTED (EVEN WHEN NOT EMPTY) AND FITTED TO
OTHER CAMPINGAZ® EQUIPMENT IN THE 270 PLUS / 300 PLUS / 470 PLUS RANGE DESIGNED TO OPERATE
EXCLUSIVELY WITH THESE CARTRIDGES.
a) Check that the gas supply is fully turned off by turning the control wheel (1) clockwise as far as the handle
(“-” direction of the arrow) (fig. 4).
b) Hold the stove (caution - it may be hot!) and gently screw the cartridge onto the stove clockwise until you
hear a click (about one sixth of a turn) (Fig. 3). Do not tighten the cartridge further, as you may damage its
valve.
c) The equipment is now ready for use.
In the event of leakage (smell of gas prior to turning the tap on), take the equipment outside immediately, in a well-
ventilated area with no combustion source, where the leak can be located and halted. If you wish to check that your
equipment is correctly sealed, do so outside. Never attempt to locate leaks using a flame. Use gas leak solution.
D - USING YOUR STOVE
1) Lighting the burner with pressure system (fig. 6)
a) Turn on the tap by turning the control wheel (1) anticlockwise approximately one turn (“+” direction of
the arrow).
b) Press button (4) with your finger until the pressure system is triggered. This operation is facilitated by
holding the device between thumb and index finger.
c)
d)
and check that there is gas in the cartridge prior to repeating lighting operations a) and b).
2) Lighting a burner without pressure system (fig. 5)
Hold a flame close to the burner (5) and gradually turn on the gas by turning the control wheel (1) anticlockwise.
3) Cooking
Position the pan on the arms, in the centre of the burner and adjust the gas flow-rate so that the flames
do not rise above the pan.
4) Extinguishing (fig. 4)
When you have finished cooking: turn off the gas by turning control wheel (1) clockwise to its full extent.
E - REMOVING THE CARTRIDGE
The cartridge may be removed even if it is not empty. Replace the cartridge outside and away from other people.
- Wait for the stove to cool down.
- Check that the gas supply is fully turned off by turning the control wheel (1) clockwise to its full extent.
- Hold the equipment, then unscrew the cartridge by turning it anti-clockwise and remove it (Fig. 7).
F - SAFETY MEASURES
Never use your equipment at a distance of less than 20 cm from a wall or combustible object.
Position the equipment on a stable, horizontal surface and do not move when in use so as to
avoid the appearance of large flames resulting from the combustion of liquid butane rather than
vaporised butane.
Should this occur, position the equipment and turn the tap off.
Set the cooker at low power when using flat metallic utensils such as a toaster or a rack for
toasting bread.
Do not use recipients with a total weight over 4 kg.
G - Maintenance, Storage and Troubleshooting
In case of burn back (ignition under the burner cap) switch the product off, allow it to cool down
(approximately five minutes), then reignite the appliance. If the problem of burn back persists, then
please contact your local Campingaz® representative.
Once your equipment has fully cooled:
a) Remove the cartridge as shown in paragraph E.
b) Fold the arms and return the equipment to its box.
c)
Never store in a basement or cellar.
d)
not light), do not try to unclog it yourself. Return the equipment to your retailer.
e)
the supply of air required for combustion and avoiding any build-up of a dangerous mixture of non-
burnt gas (2 m
3
/h/kw minimum)
GB
MODE D’EMPLOI
Débit : 211 g/h (2,9 kW) - injecteur n° 62708
Catégorie : pression directe butane
Nous vous remercions d’avoir choisi cet appareil Campingaz® Twister® Plus / Twister® Plus PZ
A - IMPORTANT : VOUS UTILISEZ DU GAZ, SOYEZ PRUDENT !
Ce mode d’emploi a pour objet de vous permettre d’utiliser correctement et en toute sécurité votre appareil Campingaz®
Twister® Plus / Twister® Plus PZ
Lisez-le attentivement pour vous familiariser avec l’appareil avant de l’assembler à son récipient de gaz.
Respectez les instructions de ce mode d’emploi ainsi que les consignes de sécurité figurant sur les cartouches
Campingaz® CV 270 PLUS / CV 300 PLUS / CV 470 PLUS. Le non respect de ces instructions peut être dangereux
pour l’utilisateur et son entourage.
Conservez ce mode d’emploi en permanence en lieu sûr afin de pouvoir vous y reporter en cas de besoin.
Cet appareil doit être utilisé exclusivement avec les cartouches Campingaz® CV 270 PLUS / CV 300 PLUS / CV 470
PLUS. Il peut être dangereux d’utiliser d’autres récipients de gaz.
La Société Application Des Gaz décline toute responsabilité en cas d’utilisation d’une cartouche de toute autre
marque.
Cet appareil ne doit être utilisé que dans des locaux suffisamment aérés (minimum 2 m
3
/h/kw) et éloigné de
matériaux inflammables.
Ne pas utiliser un appareil qui fuit, qui fonctionne mal ou qui est détérioré. Le rapporter à votre vendeur qui vous
indiquera le service après-vente le plus proche.
Ne jamais modifier cet appareil, ni l’utiliser pour des applications auxquelles il n’est pas destiné.
Ne pas utiliser cet appareil dans une caravane, véhicule, tente, abris, cabane et tout petit espace fermé.
L’appareil ne doit pas être utilisé pendant votre sommeil ou laissé sans surveillance.
Cet appareil à gaz fonctionnant sur le principe de la combustion, consomme de l’oxygène et rejette certaines
substances et des gaz qui peuvent être dangereux tels que le monoxyde de carbone (CO).
Le monoxyde de carbone, inodore et incolore, peut provoquer des malaises et des symptômes qui rappellent
la grippe, voire potentiellement la mort si l’appareil est utilisé à l’intérieur desdits espaces fermés sans une
ventilation adéquate.
B - MONTAGE DU RECHAUD CAMPINGAZ® Twister® Plus / Twister® Plus PZ
a) Retirer l’appareil de sa boîte protectrice.
b) Faire pivoter les bras (3) jusqu’à la butée (fig. 2).
C - MISE EN PLACE D’UNE CARTOUCHE CAMPINGAZ® CV 270 PL
470 PLUS
(Si une cartouche vide est en place, lire le paragraphe E : “Démontage de la cartouche”)
Pour la mise en place ou le démontage d’une cartouche, opérer toujours dans un endroit très aéré, de préférence à
l’extérieur et jamais en présence d’une flamme, source de chaleur ou étincelle (cigarette, appareil électrique, etc.), loin
d’autres personnes et de matériaux inflammables.
LES CARTOUCHES CAMPINGAZ® CV 270 PLUS / CV 300 PLUS / CV 470 PLUS ÉTANT À VALVE, ELLES PEUVENT TRE
DÉMONTÉES DE CET APPAREIL AFIN DE FACILITER SON TRANSPORT M ME SI ELLES NE SONT PAS VIDES ET REMONTÉES
SUR D’AUTRES APPAREILS CAMPINGAZ® DE LA GAMME 270 PLUS / 300 PLUS / 470 PLUS CONÇUS POUR FONCTIONNER
EXCLUSIVEMENT SUR CES CARTOUCHES.
a) Vérifier que l’arrivée du gaz est bien fermée en tournant jusqu’à la butée le volant de réglage (
des aiguilles d’une montre (sens “-” de la flèche) (fig. 4).
b) Maintenir l’appareil (attention : il peut être chaud !) et visser doucement la cartouche (6) sur l’appareil en la tournant
dans le sens de rotation des aiguilles d’une montre jusqu’à entendre un “clic” (environ un de tour) (fig. 3). Ne plus
visser la cartouche au-delà : vous risquez de détériorer sa valve.
c) L’appareil est prêt à fonctionner.
En cas de fuite (odeur de gaz avant l’ouverture du robinet), mettez immédiatement l’appareil à l’extérieur, dans un
endroit très ventilé, sans source d’inflammation, où la fuite pourra être recherchée et arrêtée. Si vous voulez vérifier
l’étanchéité de votre appareil, faites-le à l’extérieur. Ne pas rechercher les fuites avec une flamme, utiliser du liquide
détecteur de fuite gazeuse.
D - UTILISATION DU RECHAUD
1) Allumage du brûleur avec piézo (fig. 6)
- Ouvrir le gaz en tournant le volant de réglage (1) dans le sens inverse de rotation des aiguilles d’un montre (sens “ + “
de la flèche) et appuyer une ou plusieurs fois sur le bouton d’allumage Piezo (4 jusqu’à obtenir l’allumage.
- Si le brûleur ne s’allume pas, fermer le robinet en tournant le volant (1) à fond dans le sens de rotatio des aiguilles d’une
montre et vérifier si la cartouche contient du gaz avant de recommencer l’opération.
2) Allumage du brûleur sans piézo (fig. 5)
Présenter une flamme à proximité du brûleur (5) puis ouvrir progressivement le gaz en tournant le volant (1) dans le sens
inverse de rotation des aiguilles d’une montre.
3) Cuisson
Poser la casserole sur les bras, centrée sur le brûleur, et régler le débit du gaz de manière à ce que les flammes ne
dépassent pas la casserole.
4) Extinction (fig. 4)
Quand la cuisson est terminée : fermer le gaz en tournant le volant (1) à fond dans le sens de rotation des aiguilles d’une
montre (sens “ - “ de la flèche).
E - DEMONTAGE DE LA CARTOUCHE
La cartouche peut être démontée même si elle n’est pas vide. Changer la cartouche à l’extérieur et loin d’autres
personnes.
- Attendre que l’appareil ait refroidi.
- Vérifier que l’arrivée du gaz est bien fermée en tournant le volant (1) à fond dans le sens de rotation des aiguilles d’une
montre (sens “ - “ de la flèche) (fig. 4).
- Maintenir l’appareil, puis desserrer la cartouche (6) en la tournant dans le sens inverse de rotation des aiguilles d’une
montre (fig. 7) et la retirer.
Ne jamais jeter une cartouche qui n’est pas vide (vérifier l’absence de bruit de liquide en la secouant).
F - PRECAUTIONS D’EMPLOI
Ne pas utiliser votre appareil à moins de 20 cm d’une paroi ou d’un objet combustible.
Poser l’appareil sur une surface horizontale stable et pendant l’utilisation, ne pas le déplacer, afin d’éviter
l’apparition de grandes flammes dues à la combustion de butane liquide au lieu de butane vaporisé.
Si cela se produit, poser l’appareil et fermer le robinet.
Régler le réchaud à puissance réduite en cas d’utilisation d’accessoires métalliques plats, tels que toaster
ou grille-pain.
Ne pas utiliser de récipients dont la charge totale excède 4 kg.
G - STOCKAGE ET ANOMALIES DE FONCTIONNEMENT
Après refroidissement complet de votre appareil:
a) Démonter la cartouche comme indiqué au paragraphe E.
b)
c)
jamais dans un sous-sol ou une cave.
d) En cas de bouchage de l’injecteur, (la cartouche contient encore du gaz mais l’appareil ne s’allume pas),
ne pas essayer de le déboucher, reporter l’appareil à votre revendeur.
e)
qui permettent de fournir l’air nécessaire à la combustion et d’éviter la création de mélange à teneur
dangereuse en gaz non brûlé (2 m
3
/h/kW minimum).
FR
BEDIENUNGSANLEITUNG
Verbrauch: 211 g/h (2,9 kW) - Düse Nº 62708
Kategorie: Direktdruck Butan
Vielen Dank, dass Sie sich für den Campingaz® Kocher Twister® Plus / Twister® Plus PZ entschieden haben.
A - WICHTIG: SIE VERWENDEN GAS, SEIEN SIE VORSICHTIG!
Diese Bedienungsanleitung soll Sie bei der richtigen und sicheren Benutzung Ihres Campingaz® Kochers Twister® Plus /
Twister® Plus PZ unterstützen.
Lesen Sie sie aufmerksam durch und machen Sie sich mit dem Gerät vertraut, bevor Sie den Gasbehälter anschließen.
Beachten Sie bitte alle Anweisungen in der Bedienungsanleitung sowie die Sicherheitshinweise auf den Campingaz®
Kartuschen CV 270 PLUS / CV 300 PLUS / CV 470 PLUS. Das Nichteinhalten der Anweisungen kann für den Anwender
und seine Umgebung gefährlich sein.
Bewahren Sie diese Bedienungsanleitung an einem sicheren Ort auf, damit Sie im Bedarfsfall immer auf sie zurückgreifen
können.
Dieses Gerät darf nur mit Kartuschen des Typs Campingaz® CV 270 PLUS / CV 300 PLUS / CV 470 PLUS, die mit Butan-
Propan-Gemisch gefüllt sind, betrieben werden. Die Verwendung anderer Gasbehälter kann gefährlich sein.
Die Firma Application Des Gaz/Camping Gaz lehnt jegliche Haftung bei der Verwendung von Kartuschen einer anderen
Marke ab. Das Gerät darf nur im Freien und weit entfernt von brennbaren Materialien betrieben werden.
Betreiben Sie kein Gerät, das undicht ist, schlecht funktioniert oder beschädigt ist. Bringen Sie es zu Ihrem Händler zurück.
Er kann Ihnen die nächste Kundendienstvertretung nennen.
Nehmen Sie an dem Gerät keine Veränderungen vor und setzen Sie es nicht für Anwendungen ein, für die es nicht
vorgesehen ist.
Das Gerät nicht in Wohnwagen, Fahrzeugen, Zelten, Schutzdächern, Hütten und kleinen geschlossenen Bereichen
verwenden.
Nicht beim Schlafen benützen, nicht unbewacht lassen.
Alle Produkte, die mit Gasverbrennung betrieben werden, verbrauchen Sauerstoff und geben Verbrennungsrückstände
ab. Ein Teil dieser Verbrennungsrückstände kann Kohlenmonoxyd (CO) enthalten.
Kohlenmonoxyd ist geruch- und farblos, es kann Übelkeit und grippeähnliche Symptome verursachen, eventuell sogar
zum Tod führen, wenn das Gerät im geschlossenen Raum ohne geeignete Belüftung verwendet wird.
B - MONTAGE DES CAMPINGAZ® KOCHERS Twister® Plus / Twister® Plus PZ
a) Nehmen Sie den Kocher aus seiner Verpackung/Transportbox.
b) Schieben Sie die Topfträger (3) bis zum Anschlag auseinander. (Abb. 2)
C - EINSETZEN EINER CAMPINGAZ®-KARTUSCHE CV 270 PLUS / CV 300 PLUS / CV 470 PLUS
(Befindet sich eine leere Kartusche am Kocher, lesen Sie bitte den Abschnitt E: “Ausbau der Kartusche”.)
Achten Sie darauf, dass die (De-)Montage einer Kartusche immer an einem gut durchlüfteten Ort, am besten im Freien, niemals in der
Nähe von offenen Flammen, Wärmequellen oder Funken (Zigarette, elektrisches Gerät usw.) und immer entfernt von anderen Personen
und brennbaren Materialien erfolgt.
DIE CAMPINGAZ® KARTUSCHEN CV 270 PLUS / CV 300 PLUS / CV 470 PLUS VERFÜGEN ÜBER EIN VENTIL. SIE KÖNNEN DAHER FÜR
EINFACHEN TRANSPORT VOM GERÄT ABGENOMMEN WERDEN, AUCH WENN SIE NOCH NICHT LEER SIND. SIE LASSEN SICH DANN IN
ANDEREN CAMPINGAZ® GERÄTEN DER REIHE 270 PLUS / 300 PLUS / 470 PLUS , DIE AUSSCHLIESSLICH FÜR DEN BETRIEB MIT DIESEN
KARTUSCHEN ENTWICKELT WURDEN, WEITER VERWENDEN.
a) Stellen Sie sicher, dass die Gaszufuhr richtig geschlossen ist, indem Sie den Regelknopf (1) bis zum Anschlag im
Uhrzeigersinn drehen (Pfeilrichtung “-”) (abb. 4).
b) Gerät festhalten (Vorsicht, es kann sehr heiß sein!), dann Kartusche im Uhrzeigersinn vorsichtig ein-schrauben, bis
ein Klick zu hören ist (etwa 1/6 Umdrehung) (Abb. 3). Kartusche nicht weiter einschrau-ben, um das Ventil nicht zu
beschädigen.
c) Das Gerät ist nun betriebsbereit.
Ist das Gerät undicht (Gasgeruch vor dem Öffnen des Regelknopfes), das Gerät sofort ins Freie bringen und an einem
gut durchlüfteten Ort abseits von Zündquellen die undichte Stelle herausfinden und beseitigen. Wenn Sie die Dichtheit
Ihres Geräts überprüfen wollen, so tun Sie dies bitte nur im Freien. Suchen Sie undichte Stellen unter keinen Umständen
mit Hilfe einer Flamme (eine Flüssigkeit für die Gasleckerkennung verwenden).
D - BETRIEB DES KOCHERS
1) Zünden des Brenners mit Piezozündung (Abb. 6)
a)
drehen (Pfeilrichtung “+”).
b)
vereinfachen, wenn das Gerät zwischen Daumen und Zeigefinger gehalten wird.
c) Zündet der Brenner nicht, lassen Sie den Knopf (4) wieder los und wiederholen Sie Schritt b).
d)
Uhrzeigersinn drehen. Überprüfen Sie vor einem neuen Zündversuch (Schritte a) und b)), ob sich noch Gas in der
Kartusche befindet.
2) Zünden des Brenners ohne Piezozündung (Abb. 5)
Halten Sie eine Flamme in die Nähe des Brenners (5) und öffnen Sie langsam die Gaszufuhr, indem Sie den Regelknopf
(1) entgegen den Uhrzeigersinn drehen.
3) Kochen
Stellen Sie den Topf so auf die Topfträger, dass sich der Brenner genau in der Mitte darunter befindet. Regeln Sie den
Gasdurchsatz so, dass die Flammen nicht seitlich am Topf entlang züngeln.
4) Ausschalten (Abb. 4)
Nach dem Kochen die Gaszufuhr schließen, indem Sie den Regelknopf (1) bis zum Anschlag im Uhrzeigersinn drehen.
E - AUSBAU DER KARTUSCHE
Die Kartusche kann ausgebaut werden, auch wenn sie noch nicht leer ist. Kartusche im Freien und nicht in der Nähe
anderer Personen auswechseln.
- Abwarten, bis das Gerät abgekühlt ist.
- Stellen Sie sicher, dass die Gaszufuhr richtig geschlossen ist, indem Sie den Regelknopf (1) bis zum Anschlag im
Uhrzeigersinn drehen.
- Gerät festhalten, dann Kartusche gegen den Uhrzeigersinn lösen und abnehmen (Abb. 7).
Niemals eine nicht vollständig entleerte Kartusche wegwerfen (überprüfen Sie durch Schütteln der Kartusche, ob sie
noch Flüssigkeit enthält).
F - SICHERHEITSHINWEISE
Benutzen Sie den Kocher nur in einer Entfernung von mindestens 20 cm zu einer Wand oder einem
brennbaren Gegenstand.
Stellen Sie den Kocher auf eine stabile und ebene Fläche, verschieben Sie ihn nicht während des Betriebs,
um das Auftreten von Stichflammen zu vermeiden.
Stichflammen können entstehen, wenn flüssiges Butan anstelle von gasförmigem Butan verbrennt.
Sollte dies einmal vorkommen, stellen Sie das Gerät ab und schließen Sie die Gaszufuhr. Bei Gebrauch flacher
metallischer Zubehörteile, wie z. B. Toaster, den Kocher auf verminderte Leistung einstellen.
Keine Behälter verwenden, deren Gesamtlast 4 kg übersteigt.
G - AUFBEWAHRUNG UND FUNKTIONSSTÖRUNGEN
Nachdem der Kocher vollständig abgekühlt ist:
a)
b) Schieben Sie die Topfträger zusammen und stecken Sie den Kocher in seine Verpackung/Transportbox.
c)
belüfteten Ort auf, jedoch niemals in einem Keller oder Untergeschoss.
d)
versuchen Sie nicht, sie zu reinigen. Bringen Sie das Gerät zu Ihrem Händler.
DE
GEBRUIKSAANWIJZING
Vermogen : 211 g/h (2.9 kw) - injector nr. 62708
Categorie : rechtstreekse druk butaan
Wij danken u dat u voor dit Campingaz® apparaat Twister Twister® Plus / Twister® Plus PZ gekozen hebt.
A - BELANGRIJK : U GEBRUIKT GAS, WEES VOORZICHTIG !
Deze gebruiksaanwijzing heeft als doel u in staat te stellen uw apparaat Campingaz® Twister® Plus / Twister® Plus PZ
op een correcte en veilige wijze te gebruiken.
Lees de aanwijzingen van deze gebruiksaanwijzing, evenals de veiligheidsvoorschriften die op de
Campingaz® cartouches CV 270 PLUS / CV 300 PLUS / CV 470 PLUS staan. Het niet naleven van deze
aanwijzingen kan gevaar opleveren voor de gebruiker en zijn omgeving.
Bewaar deze gebruiksaanwijzing altijd op een vaste plaats zodat u deze kan raadplegen indien dit nodig is.
Dit apparaat dient uitsluitend gebruikt te worden met de Campingaz® cartouches CV 270 PLUS / CV 300
PLUS / CV 470 PLUS. Het kan gevaarlijk zijn andere soorten dan de Campingaz® CV 270 PLUS / CV 300 PLUS
/ CV 470 PLUS te gebruiken.
De onderneming Application Des Gaz wijst elke verantwoordelijkheid af in geval van gebruik van een
cartouche van een ander merk.
Dit apparaat mag uitsluitend gebruikt worden in ruimtes die voldoende geventileerd zijn (minimum 2 m
3
/h
/kw) en wanneer het ver van ontvlambare materialen verwijderd is.
Gebruik geen apparaat dat lekt, dat slecht werkt of dat beschadigd is. Breng het naar uw dealer die u de
verdere informatie over reparaties etc. kan verstrekken.
Breng nooit wijzigingen aan op dit apparaat en gebruik het alleen voor de toepassingen waarvoor het
bestemd is.
Dit apparaat mag niet in een caravan, voertuig, tent, afdak, hut of andere kleine gesloten ruimte gebruikt
worden.
Het mag niet gebruikt worden wanneer u slaapt en mag nooit onbewaakt achtergelaten worden.
Leder gasapparaat werkt volgens het volgende principe: de brandstof gebruikt zuurstof en stoot
verbrandingsproducten uit. Een gedeelte van deze verbrandingsproducten kan koolmonoxide (CO) bevatten.
Koolmonoxide dat reuk- en kleurloos is, kan leiden tot flauwvallen of symptomen die aan griep doen
denken. In extreme gevallen kan het zelfs de dood tot gevolg hebben, wanneer het apparaat binnenshuis
zonder goede ventilatie gebruikt wordt.
B - HET IN ELKAAR ZETTEN VAN HET CAMPINGAZ® GASKOOKTOESTEL Twister® Plus /
Twister® Plus PZ
a) Neem het apparaat uit de doos
b) Draai de armen (3) tot aan de aanslag (fig.2).
C - HET MONTEREN VAN EEN CAMPINGAZ® CARTOUCHE CV 270 PLUS / CV 300 PLUS /
CV 470 PLUS
(Indien een lege cartouche geplaatst is, lees dan paragraaf E : “ Het uitnemen van een cartouche. “)
Werk steeds in een geventileerde ruimte bij voorkeur buiten en nooit in aanwezigheid van een vlam,
warmtebron of vonk (sigaret, elektrisch apparaat, enz.) en ver verwijderd van andere personen of
ontvlambare materialen om een cartouche te monteren of uit te nemen.
AANGEZIEN DE CAMPINGAZ® CARTOUCHES CV 270 PLUS / CV 300 PLUS / CV 470 PLUS EEN KLEP
HEBBEN, KUNNEN ZE UIT HET APPARAAT GENOMEN WORDEN OM HET VERVOER TE VERGEMAKKELIJKEN
ZELFS AL ZIJN ZE NIET LEEG EN KUNNEN ZE OP ANDERE CAMPINGAZ® APPARATEN VAN HET GAMMA
270 PLUS / 300 PLUS /470 PLUS, ONTWORPEN OM EXCLUSIEF MET DEZE CARTOUCHES TE WERKEN,
GEMONTEERD WORDEN.
a) Kijk na of de gastoevoer goed gesloten is door het afstellingswiel (1) tot aan de aanslag met de klok mee te draaien,
(richting “-” van de pijl) (fig. 4).
b) Houd het apparaat vast (attentie: deze kan heet zijn!), om voorzichtig het patroon op het apparaat te
schroeven door het in de richting van de wijzers van de klok te draaien totdat u een ‘klik” hoort (ongeveer een
zesde draaiing) (afb. 3). Schroef het patroon niet steviger vast: u loopt het risico het ventiel te beschadigen.
c) Het apparaat is klaar om in werking gesteld te worden.
Bij lekkage (gaslucht voordat de kraan geopend wordt) moet het apparaat onmiddellijk naar buiten worden gebracht,
naar een zeer goed geventileerde plaats waar geen vlam, vonk of verwarmingsbron aanwezig is, zodat daar de oorzaak
van het gaslek kan worden opgespoord en verholpen. Controleer de gasdichtheid van uw apparaat altijd buiten. Spoor
geen lekken op met behulp van een vlam. Gebruik een speciale vloeistof voor het opsporen van gaslekken.
D - GEBRUIK VAN HET GASSTEL
1) Het aanzetten van de brander met piëzo (fig. 6)
a) Open de kraan ongeveer 1 draai door het afstellingswiel (1) tegen de klok in te draaien. (richting “+” van de pijl).
b) Druk op de knop (4) met een vinger totdat het piëzo systeem gestart wordt. Deze handeling is gemak kelijker uit te
voeren door het apparaat tussen duim en wijsvinger te houden.
c) Indien de brander niet start, laat de druk op de knop (4) vrij en herhaal stap b.
d) Na 3 tevergeefse pogingen sluit u de kraan door het afstellingswiel volledig dicht te draaien (met de klok mee)
en kijkt u na of de cartouche gas bevat vooraleer u de stappen a en b om de brander aan te zetten opnieuw
onderneemt.
2) Het aanzetten van de brander zonder plézo (fig. 5)
Houd een vlam dichtbij de brander (5) en open het gas voorzichtig door het afstellingswiel (1) tegen de klok in te
draaien.
3) Het koken
Plaats de kookpan op de pandragers, in het midden van de brander en regel de gastoevoer op zodanige wijze dat de
vlammen niet langs de kookpan schieten.
4) Het doven (fig. 4)
Wanneer u het koken beëindigd hebt, sluit dan het gas af door het afstellingswiel (1) volledig dicht te draaien (met
de klok mee).
E - HET UITNEMEN VAN EEN CARTOUCHE
De cartouche kan eruit genomen worden zelfs indien deze niet leeg is. Vervang het patroon buiten en op afstand
van andere personen.
- Wacht tot het apparaat is afgekoeld.
- Kijk na of de gastoevoer goed afgesloten is door het afstellingswiel (1) volledig dicht te draaien (met de klok mee).
- Houd het apparaat vast, en schroef het patroon los door in de tegengestelde richting van de wijzers van de klok te
draaien en haal het patroon weg (afb. 7).
Werp nooit een cartouche die niet leeg is, weg (kijk dit na door deze te schudden en de afwezigheid van
enig geluid van de vloeistof vast te stellen).
F - VOORZORGSMAATREGELEN
Gebruik uw apparaat niet op minder dan 20 cm van een wand of van een brandbaar voorwerp.
Plaats het apparaat op een stabiel en horizontaal oppervlak en verplaats het niet gedurende het
gebruik om het plots verschijnen van grote vlammen te vermijden te wijten aan de verbranding van
vloeibaar butaan in plaats van verdampt butaan.
Indien dit gebeurt, zet het apparaat dan neer en sluit de kraan.
Zet het kooktoestel op laag-stand bij gebruik van platte metalen accessoires zoals een broodrooster.
Gebruik geen bakken waarvan de totale lading de 4 kg overschrijdt.
G - ONDERHOUD, OPBERGEN EN
In geval van terugbranding (ontsteking onder de branderdop), schakel het product uit, laat
deze (circa vijf minuten) afkoelen en schakel het apparaat opnieuw in. Als de terugbranding zich
opnieuw voordoet, neem contact op met uw lokale Campingaz®-handelaar.
Nadat uw apparaat volledig afgekoeld is :
a) Neem de cartouche eruit zoals aangeduid in paragraaf E.
b) Vouw de pootjes dicht en zet het apparaat in zijn beschermdoos.
c) Berg het apparaat evenals de cartouche op in een koele, droge en geventileerde plaats, buiten het bereik van
kinderen en nooit in een ondergronds terrein of in een kelder
d) In geval van verstopping van de injector (de cartouche bevat nog gas, maar het apparaat wil niet bran den), probeer
deze niet te ontstoppen maar breng het apparaat naar uw dealer.
e) Indien u uw apparaat in een bepaalde ruimte gebruikt, dan dient deze ruimte de grondvoorwaarden van
luchtverversing te eerbiedigen waardoor er voldoende lucht is voor de verbranding en waardoor het ontstaan van
een gevaarlijk mengsel van niet verbrand gas vermeden kan worden. (2 m
3
/h/kw minimum).
NL