FR
MODE D’EMPLOI
Débit : 55 g/h (0,76 kW) - injecteur n° 016455
Catégorie : pression directe butane
Nous vous remercions d’avoir choisi cet appareil Campingaz
®
LABOGAZ 470
A - IMPORANT : VOUS UTILISEZ DU GAZ, SOYEZ PRUDENT !
Ce mode d’emploi a pour objet de vous permettre d’utiliser correctement et en toute sécurité
votre appareil Campingaz
®
LABOGAZ 470. Lisez-le attentivement pour vous familiariser
avec l’appareil avant de l’assembler à son récipient de gaz. Conservez ce mode d’emploi
en permanence en lieu sûr afin de pouvoir vous y reporter en cas de besoin. Respectez les
instructions de ce mode d’emploi ainsi que les consignes de sécurité figurant sur les cartouches
Campingaz
®
CV 470 PLUS. Le non respect de ces instructions peut être dangereux pour
l’utilisateur et son entourage. Cet appareil doit être utilisé exclusivement avec les cartouches
Campingaz
®
CV 470 PLUS. Il peut être dangereux d’utiliser d’autres récipients de gaz. La Société
Application Des Gaz décline toute responsabilité en cas d’utilisation d’une cartouche de toute
autre marque. Cet appareil ne doit être utilisé que dans des locaux suffisamment aérés (minimum 2
m
3
/h/kW) et éloigné de matériaux inflammables. Ne pas utiliser un appareil qui fuit, qui fonctionne
mal ou qui est détérioré. Le rapporter à votre vendeur qui vous indiquera le service après-vente
le plus proche. Ne jamais modifier cet appareil, ni l’utiliser pour des applications auxquelles il
n’est pas destiné.
Ne pas utiliser l’appareil pendant votre sommeil ou sans surveillance. Cet appareil à gaz
fonctionnant sur le principe de la combustion consomme de l’oxygène et rejette des substances et
gaz qui peuvent être dangereux, tel que le monoxyde de carbone (CO).
Le monoxyde de carbone, inodore et incolore, peut provoquer des malaises et des symptômes
qui rappellent la grippe, voire éventuellement la mort si l’appareil est utilisé à l’intérieur d’un petit
espace clos sans ventilation adéquate.
Régler l’appareil de façon à ne pas générer de suie (fumée très noire et odeur acre) en agissant
sur la bague (2) et le volant de réglage (3) – voir paragraphe C – UTILISATION DE L’APPAREIL.
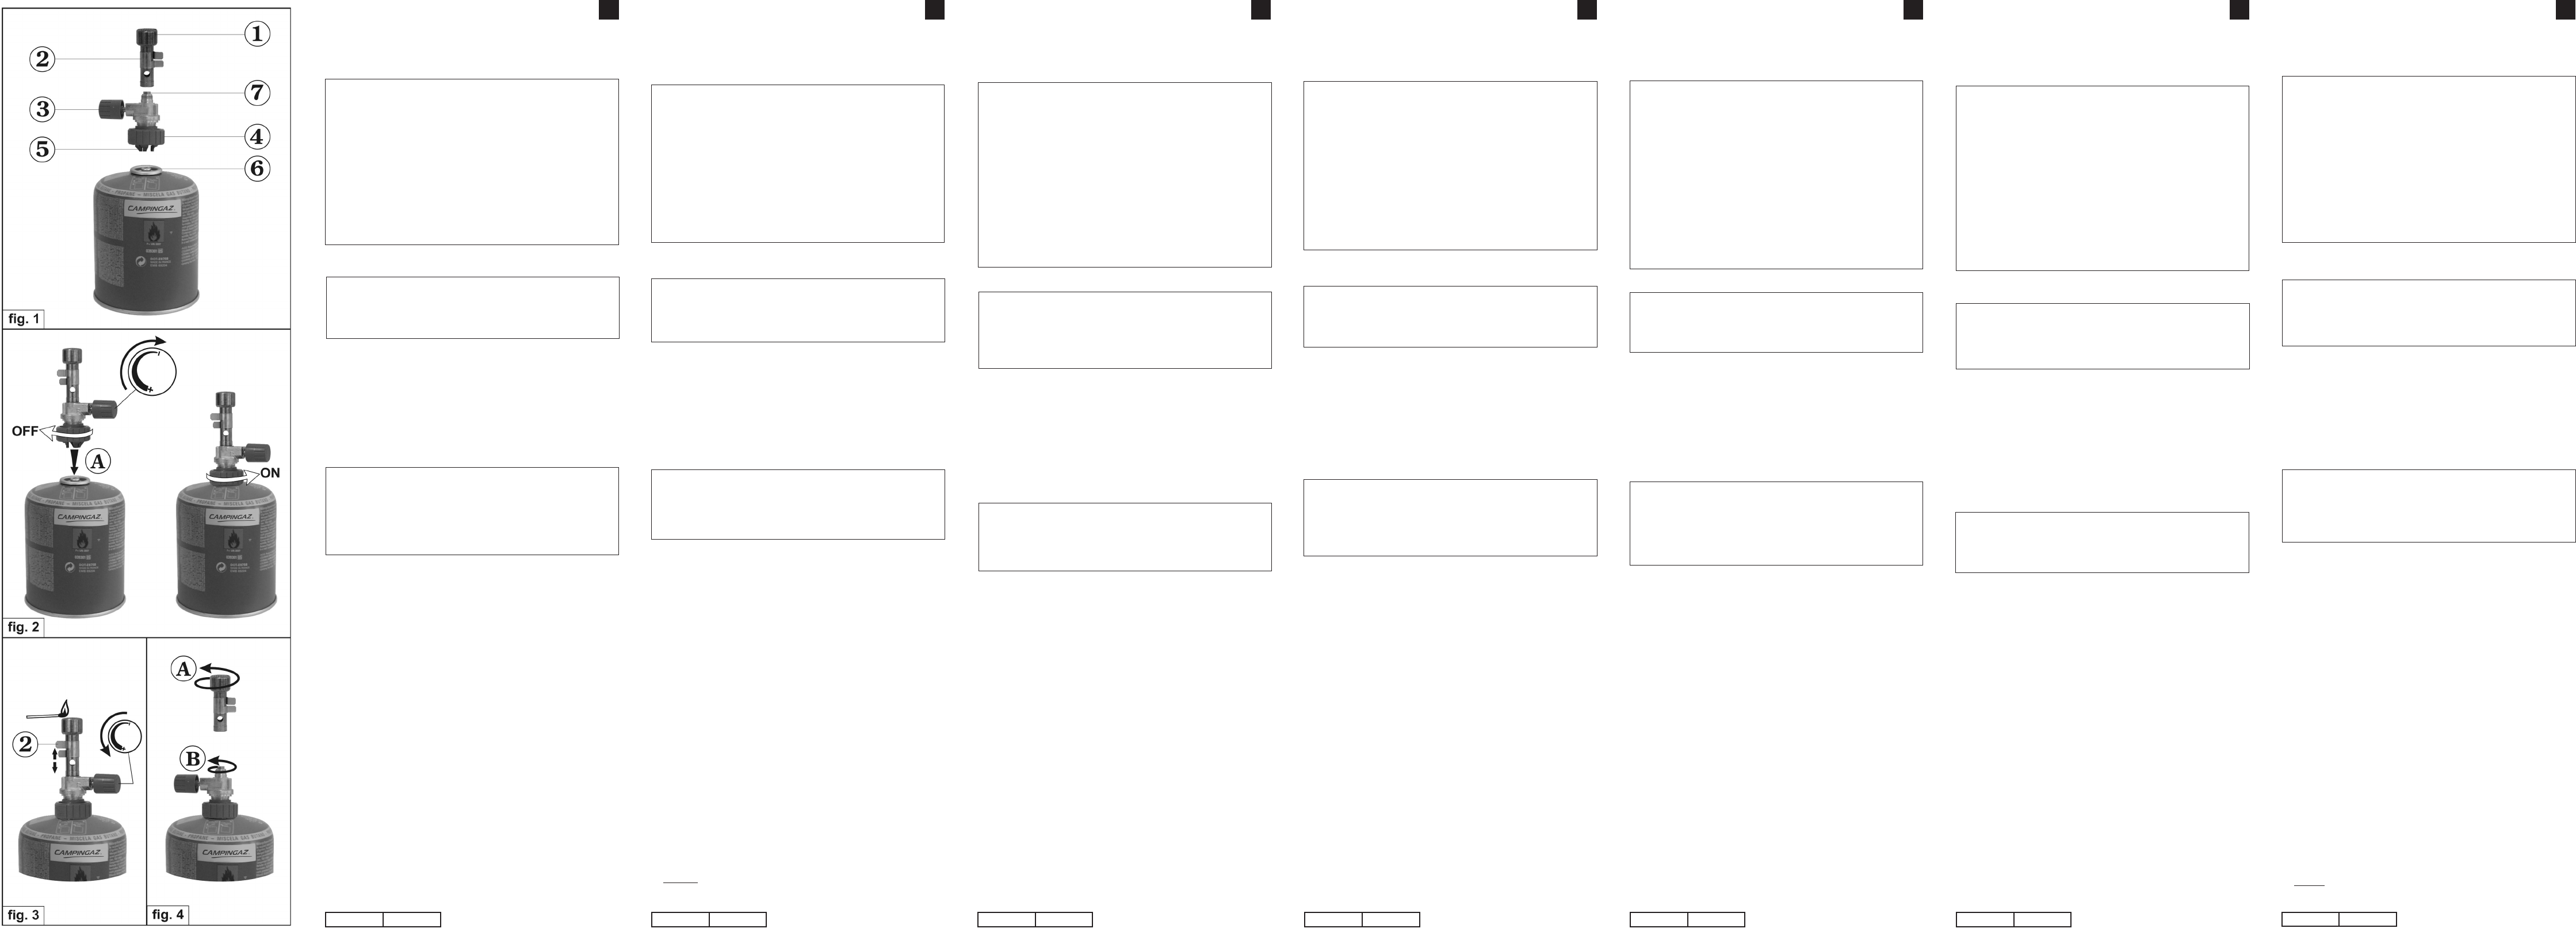
B - MISE EN SERVICE
MISE EN PLACE D’UNE CARTOUCHE CAMPINGAZ
®
CV 470 PLUS :
(Si une cartouche vide est en place, lire le paragraphe D : “Démontage de la cartouche”). Pour la
mise en place ou le démontage d’une cartouche, opérer toujours dans un endroit aéré, de préférence
à l’extérieur et jamais en présence d’une flamme, source de chaleur ou étincelle (cigarette, appareil
électrique, etc.), loin d’autres personnes et de matériaux inflammables.
LES CARTOUCHES CAMPINGAZ
®
CV 470 PLUS ÉTANT À VALVE, ELLES PEUVENT ÊTRE
DÉMONTÉES DE CET APPAREIL AFIN DE FACILITER SON TRANSPORT MÊME SI ELLES NE
SONT PAS VIDES ET REMONTÉES SUR D’AUTRES APPAREILS CAMPINGAZ
®
DE LA GAMME 470
CONÇUS POUR FONCTIONNER EXCLUSIVEMENT SUR CES CARTOUCHES.
a) Retirer l’app
b) Vérifier que l’arrivée du gaz est bien fermée en tournant jusqu’à la butée le volant de réglage (3)
dans le sens de rotation des aiguilles d’une montre (sens “-” de la flèche).
c) Dévisser la pince d’accrochage (4) (sens OFF) jusqu’à la butée, sans forcer (fig.2).
d) Introduire les 3 griffes ( 5) de la pince d’accrochage dans la coupelle (6) de la cartouche suivant
flèche (A) (fig.2).
e) Revisser la pince d’accro
f) L’appareil est prêt à fonctionner.
En cas de fuite (odeur de gaz avant l’ouverture du robV inet), mettez immédiatement l’appareil à l’extérieur,
dans un endroit très ventilé, sans source d’inflammation, où la fuite pourra être recherchée et arrêtée. Si
vous voulez vérifier l’étanchéité de votre appareil, faites-le à l’extérieur. Ne pas rechercher les fuites avec
une flamme, utiliser un liquide de détection de fuite gazeuse.
C - UTILISATION DE L’APPAREIL
1. Quelques conseils supplémentaires :
Ne pas utiliser votre appareil à moins de 20 cm d’une paroi ou d’un objet combustible. Poser
l’appareil sur une surface horizontale stable et pendant l’utilisation, ne pas le déplacer, afin
d’éviter l’apparition de grandes flammes dues à la combustion de butane liquide au lieu de butane
vaporisé. Si cela se produit, poser l’appareil et fermer le robinet. N’utilisez pas votre appareil
de manière abusive et ne l’utilisez pas pour des usages autres que ceux pour lesquels il a été
conçu. Manipulez cet appareil avec soin. Veillez à ne pas le laisser tomber. Ne laissez jamais
cet appareil allumé sans surveillance dans une pièce. Respectez l’environnement: déposer vos
cartouches vides dans un endroit approprié. Si vous utilisez votre appareil dans un local, celui-ci
doit respecter les conditions réglementaires d’aération qui permettent de fournir l’air nécessaire à
la combustion et d’éviter la création de mélange à teneur dangereuse en gaz non brûlé
(2 m
3
/h/kW minimum).
2. Allumage du brûleur (fig.3) :
Présenter une flamme à proximité du brûleur (1) puis ouvrir progressivement le gaz en tournant le volant
(3) dans le sens inverse de rotation des aiguilles d’une montre. (voir détail fig.3).
3. Réglage de la flamme (fig.3):
1/ Puissance : Pour augmenter ou diminuer la puissance de la flamme, tourner le volant (3) suivant les
repères “+” ou “-” de la flèche.
2/ Température (fig. 3) : pour faire varier la température de la flamme, faire glisser la bague (2) le long
du tube de brûleur :
- Prise d’air primaire ouverte = flamme bleue très chaude (de l’ordre de 1000 à 1500°C)
- Prise d’air primaire partiellement obstruée = flamme jaune oxydante (de l’ordre de 800°C).
Attention : ne pas obstruer complètement les trous d’air primaire. En cas d’apparition de suie
(fumée très noire et odeur acre) ou de traces noires sur le bécher ou le tube à essai, remonter la
bague (2) pour augmenter l’entrée d’air et réduire le débit de gaz en tournant le volant de réglage
(3) dans le sens de rotation des aiguilles d’une montre jusqu’à disparition de la suie.
4. Extinction:
Fermer l’arrivée du gaz en tournant le volant (3) dans le sens de rotation des aiguilles d’une montre, à
fond jusqu’à la butée (sens “-” de la flèche).
D - CHANGEMENT DE LA CARTOUCHE
La cartouche peut être démontée même si elle n’est pas vide.
a) Vérifier que l’arrivée du gaz est bien fermée en tournant le volant (3) à fond dans le sens de rotation
des aiguilles d’une montre.
b) Dévisser la pince d’accrochage (4) (sens OFF) jusqu’à la butée, en maintenant l’appareil (attention
aux pièces chaudes).
c) Tirer la cartouche vers le bas pour la dégager des 3 griffes (5) de la pince d’accrochage.
Ne jamais jeter une cartouche qui n’est pas vide, (vérifier l’absence de bruit de liquide en la secouant).
E - STOCKAGE ET ANOMALIES DE FONCTIONNEMENT
Après refroidissement complet de votre appareil:
a) Stocker l’appareil et sa cartouche dans un endroit frais, sec et aéré, hors de portée des enfants,
jamais dans un sous-sol ou une cave.
b) Le brûleur ne s’allume pas lorsqu’on
1/ Si on n’entend pas un bruit de liquide en secouant l’appareil, la cartouche est vide. La remplacer
par une cartouche neuve en procédant comme indiqué au paragraphe D.
2/ Si on entend un bruit de liquide en secouant l’appareil, il reste du gaz, l’injecteur est bouché.
S’assurer que l’ arrivée du gaz est bien fermée (tourner le volant (3) à fond dans le sens de
rotation des aiguilles d’une montre). Tout en maintenant fermement le robinet dévisser le
brûleur (1) (suivant flèche A) (fig.4) puis l’injecteur (7) (suivant flèche B) (fig.4). A sa place,
visser un injecteur neuf ou propre, puis revisser le brûleur (1). En général, il sera facile de
déboucher l’injecteur déficient en chassant l’impureté par un jet d’air comprimé dirigé contre la
face extérieure de l’injecteur préalablement démonté. (Ne jamais utiliser une aiguille ou tout autre
débouchoir métallique).
GB DE
BEDIENUNGSANLEITUNG
Verbrauch : 55 g/h (0,76 kW) - Düse N° 016455
Kategorie: Direktdruck Butan
Vielen Dank, daß Sie sich für den Campingaz
®
-LABOGAZ 470 entschieden haben.
A - WICHTIG: SIE VERWENDEN GAS, SEIEN SIE VORSICHTIG!
Diese Gebrauchsanleitung soll Sie bei der richtigen und sicheren Benutzung Ihres Campingaz
®
-
LABOGAZ 470 unterstützen. Lesen Sie sie aufmerksam durch, und machen Sie sich mit dem
Gerät vertraut, bevor Sie den Gasbehälter anschließen. Beachten Sie bitte alle Anweisungen in
der Gebrauchsanleitung sowie die Sicherheitshinweise auf den Campingaz
®
-Kartuschen CV
470 PLUS. Das Nichteinhalten der Anweisungen kann für den Anwender und seine Umgebung
gefährlich sein. Bewahren Sie diese Gebrauchsanleitung an einem sicheren Ort auf, damit Sie im
Bedarfsfall immer auf sie zurückgreifen können. Dieses Gerät darf nur mit Kartuschen des Typs
Campingaz
®
CV 470 PLUS die mit einem Butan-Propan-Gemisch gefüllt sind betrieben werden.
Die Verwendung anderer Gasbehälter kann gefährlich sein. Die Firma “Application Des Gaz”
lehnt jegliche Haftung bei der Verwendung von Kartuschen einer anderen Marke ab. Das Gerät
Labogaz 470 darf nur in gut belüfteten Bereichen (min. 2 m3/h/kW) und in sicherem Abstand
zu entzündlichem Material genutzt werden. Betreiben Sie kein Gerät, das eine Undichtigkeit
aufweist, das schlecht funktioniert, oder das beschädigt ist. Bringen Sie es zu Ihrem Händler
zurück. Er kann Ihnen die nächste Kundendienstvertretung nennen. Nehmen Sie an dem
Gerät keine Veränderungen vor, und setzen Sie es nicht für Anwendungen ein, für die es nicht
vorgesehen ist. Das Gerät Labogaz 470 nicht in Wohnwagen, Fahrzeugen, Zelten, Schutzdächern,
Hütten und kleinen geschlossenen Bereichen verwenden. Nicht beim Schlafen benützen, nicht
unbewacht lassen. Alle Produkte, die mit Gasverbrennung betrieben werden, verbrauchen
Sauerstoff und geben Verbrennungsrückstände ab. Ein Teil dieser Verbrennungsrückstände
kann Kohlenmonoxyd (CO) enthalten. Kohlenmonoxyd ist geruch- und farblos, es kann Übelkeit
und grippeähnliche Symptome verursachen, eventuell sogar zum Tod führen, wenn das Gerät
Labogaz 470 im geschlossenen Raum ohne geeignete Belüftung verwendet wird.
Passen Sie das Gerät zur Vermeidung von Rußerzeugung (tiefschwarzer Rauch mit beißendem
Geruch) an, indem Sie den Ring (2) und den Bedienknopf (3) drehen – siehe Abschnitt C –
FUNKTIONSWEISE.
B - INBETRIEBSETZUNG
Einsetzen einer Campingaz
®
-Kartuschen CV 470 PLUS :
(Befindet sich eine leere Kartusche im Kocher, lesen Sie bitte den Abschnitt D : “Ausbau der
Kartusche”.). Achten Sie darauf, daß das Einsetzen oder Herausnehmen einer Kartusche immer
an einem gut durchlüfteten Ort, am besten im Freien, niemals in der Nähe von offenen Flammen,
Wärmequellen oder Funken (Zigarette, elektrisches Gerät usw.) und immer entfernt von anderen
Personen und brennbaren Materialien erfolgt.
DA DIE CAMPINGAZ
®
-KARTUSCHEN CV 470 PLUS ÜBER EIN VENTIL VERFÜGEN, KÖNNEN
SIE ZUR VEREINFACHUNG DES TRANSPORTS AUS DEM GERÄT HERAUSGENOMMEN
WERDEN, AUCH WENN SIE NOCH NICHT LEER SIND. SIE LASSEN SICH DANN IN ANDEREN
CAMPINGAZ
®
-GERÄTEN DER REIHE 470, DIE AUSSCHLIESSLICH FÜR DEN BETRIEB MIT
DIESEN KARTUSCHEN ENTWICKELT WURDEN, WEITERVERWENDEN.
a) Das Gerät Labogaz aus dem schützenden Behälter nehmen.
b) Durch Drehen des Stellrades (3) im Uhrzeigersinn (Pfeilrichtung “-”) bis zum Anschlag überprüfen,
dass die Gaszufuhr geschlossen ist.
c) Die Klemmzange (4) (Richtung OFF) ohne zu forcieren bis zum Anschlag aufschrauben (Abb. 2).
d) Die 3 Klauen ( 5) der Klemmzange in Pfeilrichtung (A) in die Schale (6) der Kartusche einführen
(Abb. 2).
e) Das Gerät Labogaz 470 festhalten und dabei die Klemmzange (4) (Richtung ON) wieder aufschrauben
(Abb. 2).
f) Das Gerät Labogaz 470 ist betriebsbereit.
Bei einem Leck (Gasgeruch vor dem Öffnen des Ventils) das Gerät Labogaz 470 sofort an einen gut
belüfteten Ort ohne Entzündungsquelle ins Freie bringen, an dem das Leck gesucht und abgedichtet
werden kann. Die Dichtigkeit des Gerätes immer im Freien überprüfen. Undichte Stellen nicht mit Hilfe
einer Flamme suchen (eine Flüssigkeit für die Gasleckerkennung verwenden).
C - GEBRAUCH DES LABORBRENNERS
1. Einige zusätzliche Empfehlungen:
Benutzen Sie den Gerät nur in einer Entfernung von mindestens 20 cm zu einer Wand oder einem
brennbaren Gegenstand. Stellen Sie den Kocher auf eine stabile und ebene Fläche, verschieben
Sie ihn nicht während des Betriebs, um das Auftreten von Stichflammen zu vermeiden, die
entstehen können, wenn flüssiges Butan anstelle von gasförmigem Butan verbrennt. Das Gerät
Labogaz 470 darf nur in gut belüfteten Bereichen (min. 2 m3/h/kW) und in sicherem Abstand zu
entzündlichem Material genutzt werden. nicht unzulässig intensiv und nur für den beabsichtigten
Zweck benutzen. Sorgfältig mit dem Gerät umgehen. Nicht fallen lassen. Das Gerät Labogaz
470 nie unbeaufsichtigt in einem Raum brennen lassen. Leere Kartuschen umweltbewusst bzw.
vorschriftsmäßig entsorgen.
2. Zünden des Brenners (Fig.3):
Eine Zündflamme an den Brenner (1) halten, dann durch Drehen des Rades (3) gegen den
Uhrzeigersinn das Gas immer weiter öffnen (siehe Detail Abb. 3).
3. Einstellung der Flamme (Fig.3):
1/ Stärke: Um die Stärke der Flamme zu erhöhen oder zu verringern, das Stellrad (3) in Pfeilrichtung
“+” oder “-” drehen.
2/ Temperatur (Abb. 4): Die Temperatur der Flamme wird durch Schieben des Rings (2) entlang des
Brennerrohrs eingestellt:
- Hauptlufteinlass abgedeckt: Extrem heiße blaue Flamme (1000 bis 1500 °C)
- Hauptlufteinlass teilweise abgedeckt: Oxidierende gelbe Flamme (800 °C).
Warnung: Blockieren Sie die Hauptlufteinlässe nicht vollständig. Wenn Ruß (tiefschwarzer Rauch mit
beißendem Geruch) erscheint oder wenn schwarze Streifen im Becher oder Teströhrchen erkennbar
sind, bewegen Sie den Ring (2) zur Erhöhung der Luftzufuhr hinauf und reduzieren Sie die Gasmenge
durch Drehen des Bedienknopfes (3) im Uhrzeigersinn bis sich kein Ruß mehr zeigt.
4. Auslöschen:
Die Gaszufuhr durch Drehen des Knopfs (3) im Uhrzeigersinn bis zum Anschlag schließen.
(Pfeilrichtung nach “-” )
D - AUSBAU DER KARTUSCHE
Die Kartusche kann ausgebaut werden, auch wenn sie nicht leer ist.
a) Durch Drehen des Stellrades (3) im Uhrzeigersinn bis zum Anschlag überprüfen, dass die Gaszufuhr
geschlossen ist.
b) Das Gerät Labogaz 470 festhalten und dabei die Klemmzange (4) (Richtung OFF) bis zum Anschlag
aufschrauben (auf die heißen Teile achten).
c) Die Kartusche nach unten ziehen, um sie aus den 3 Klauen (5) der Klemmzange zu lösen.
Niemals eine Kartusche wegwerfen, die nicht leer ist (überprüfen, dass beim Schütteln kein
Flüssigkeitsgeräusch zu hören ist).
E - AUFBEWAHRUNG UND FUNKTIONSSTÖRUNGEN
Nachdem der Gerät vollständig abgekühlt ist:
a) Bewahren Sie den Laborbrenner und die Kartusche an einem kühlen, trockenen und belüfteten Ort
für Kinder unzugänglich auf, jedoch niemals in einem Keller oder Untergeschoß.
b) Der Brenne
1/ Wenn beim Schütteln des Gerätes kein Flüssigkeitsgeräusch zu hören ist, ist die Kartusche leer
und muss - wie im Abschnitt D angegeben - durch eine neue Kartusche ersetzt werden.
2/ Wenn man beim Schütteln des Gerätes ein Flüssigkeitsgeräusch hört, ist noch Gas vorhanden,
aber die Düse ist verstopft. Sicherstellen, dass die Gaszufuhr geschlossen ist (das Stellrad (3)
im Uhrzeigersinn ganz zudrehen). Das Ventil festhalten, den Brenner (1) in Pfeilrichtung A (Abb.
4) und dann die Düse (7) in Pfeilrichtung B (Abb. 4) aufschrauben. An ihrer Stelle eine neue bzw.
saubere Düse einschrauben, dann den Brenner (1) zudrehen. In der Regel ist es kein Problem,
die verstopfte Düse durch einen Druckluftstrahl gegen die Außenfläche der zuvor ausgebauten
Düse zu säubern (niemals eine Nadel oder ein sonstiges metallisches Räumwerkzeug
verwenden).
ES
ans 2
Période de garantie
www.campingaz.com
Y 2
W
www.campingaz.com
Jahre 2
Garantiezeit
www.campingaz.com
Años 2
Período de garantía
www.campingaz.com
IT
ISTRUZIONI PER L’USO
Portata: 55 g/h (0,76 kW) - iniettore n° 016455
Categoria: pressione diretta butano
Vi ringraziamo di aver scelto questo apparecchio Campingaz
®
LABOGAZ 470
A - IMPORTANTE: STATE UTILIZZANDO DEL GAS, SIATE PRUDENTI!
Lo scopo di queste Istruzioni per l’uso è di permettervi di utilizzare correttamente e in assoluta
sicurezza il vostro apparecchio Campingaz
®
LABOGAZ 470. Leggetele attentamente per
familiarizzarvi con l’apparecchio prima di unirlo al suo contenitore di gas. Conservate in
permanenza queste istruzioni in un luogo sicuro per potervi fare riferimento in caso di necessità.
Rispettate le istruzioni di questo libretto e le prescrizioni di sicurezza indicate sulle cartucce
Campingaz
®
CV 470 PLUS. Il mancato rispetto di queste istruzioni può essere pericoloso per
l’utente o per le persone presenti. Questo apparecchio deve essere utilizzato esclusivamente
con le cartucce Campingaz
®
CV 470 PLUS. L’utilizzazione con altri contenitori di gas può essere
pericolosa. “Application Des Gaz” declina ogni responsabilità in caso di utilizzo di una cartuccia
di un’altra marca. Quest’apparecchio deve essere utilizzato solo in locali ben arieggiati (minimo
2m
3
/h/kW) e lontano dai materiali infiammabili. Non utilizzare un apparecchio che perde, che
funziona male o che è deteriorato. Riportarlo al vostro venditore che vi indicherà il servizio
assistenza più vicino. Non modificare mai quest’apparecchio e non utilizzarlo per usi ai quali non
è destinato. Questo apparecchio non va usato nelle roulottes, all’interno di veicoli, tende, ripari,
baracche e spazi chiusi di piccole dimensioni …. Non va usato mentre dormite e non va lasciato
incustodito. Tutti gli apparecchi a gas che funzionano secondo il principio della combustione
consumano ossigeno ed espellono le sostanze generate dalla combustione. Una parte di tali
sostanze puo’ contenere monossido di carbonio (CO). Il monossido di carbonio, inodore e
incolore, puo’ provocare malessere, con sintomi analoghi a quelli dell’influenza, e persino la
morte se l’apparecchio viene usato in ambienti interni non ventilati.
Regolare il dispositivo in modo da evitare la generazione di fuliggine (fumo molto nero, con
un odore acre) ruotando la ghiera (2) e la manopola di controllo (3) - vedere Sezione C -
FUNZIONAMENTO.
B - MESSA IN SERVIZIO
INSTALLAZIONE DI UNA CARTUCCIA CAMPINGAZ
®
CV 470 PLUS :
(Se una cartuccia vuota è già installata, leggere il paragrafo D “Smontaggio della cartuccia”). Per
l’installazione o lo smontaggio di una cartuccia operare sempre in un luogo arieggiato, preferibilmente
all’esterno e mai alla presenza di una fiamma, di una fonte di calore o di una scintilla (sigaretta,
apparecchio elettrico ecc.) lontano dalle altre persone e dai materiali infiammabili.
LE CARTUCCE CAMPINGAZ
®
CV 470 PLUS SONO A VALVOLA E POSSONO ESSERE SMONTATE
DALL’APPARECCHIO PER FACILITARNE IL TRASPORTO ANCHE SE NON SONO VUOTE.
POSSONO ANCHE ESSERE RIMONTATE SU ALTRI APPARECCHI CAMPINGAZ
®
DELLA GAMMA
470 STUDIATI PER FUNZIONARE ESCLUSIVAMENTE SU QUESTE CARTUCCE.
a) Togliere l’ap
b) Verificare che l’arrivo del gas è ben chiuso girando fino all’arresto il volantino di regolazione (3) in
senso orario (il senso “-” della freccia).
c) Svitare la pinza d’aggancio (4) (senso OFF) fino all’arresto senza forzare (fig.2).
d) Introdurre i tre denti (5) della pinza d’aggancio nella coppetta (6) della cartuccia seguendo la freccia
(A) (fig. 2).
e) Riavvitare
f) l’apparecchio è pronto per funzionare.
In caso di perdita (odore di gas prima dell’apertura del rubinetto) mettete immediatamente l’apparecchio
all’esterno in un luogo ben ventilato senza sorgenti infiammabili, dove sarà possibile cercare la fuga e
fermarla. Se volete verificare la tenuta del vostro apparecchio, fatelo all’esterno. Non ricercare le fughe
con una fiamma, utilizzare un liquido per l’identificazione delle fughe di gas.
C - UTILIZZAZIONE DELL’APPARECCHIO
1. Qualche consiglio supplementare:
Non utilizzare il vostro apparecchio a meno di 20 cm da una parete o da un oggetto combustibile.
Posare l’apparecchio su una superficie orizzontale stabile e durante l’utilizzazione non spostarlo
per evitare l’apparizione di grandi fiammate dovute alla combustione del butano liquido al
posto del butano vaporizzato. Se ciò si verifica, posare l’apparecchio e chiudere il rubinetto. Se
utilizzate il vostro apparecchio in un locale, questo deve rispettare le condizioni regolamentari
d’aerazione che permettono di fornire l’aria necessaria alla combustione e di evitare la creazione
di miscele a tenore pericoloso in gas non bruciato (2 m
3
/h/KW minimo).
2. Accensione del bruciatore (fig. 3):
Presentare una fiamma vicino al bruciatore (1) poi aprire progressivamente il gas girando il volantino
(3) in senso antiorario (vedi particolari fig. 3).
3. Regolazione della fiamma (fig. 3):
1/ Potenza: Per aumentare o diminuire la potenza della fiamma girare il volantino (3) secondo i
riferimenti “+” o “-” della freccia.
2/ Temperatura (fig. 4): la temperatura della fiamma viene regolata facendo scorrere la ghiera (2) lungo
il tubo bruciatore:
- Presa d’aria principale non coperta: fiamma blu estremamente calda (da 1000 a 1500 °C)
- Presa d’aria principale parzialmente coperta: fiamma gialla ossidante (800 °C).
Attenzione: non bloccare completamente le principali prese d’aria. Se la fuliggine (fumo molto nero,
con un odore acre) appare o se ci sono strisce nere nel tubo della provetta o di prova, spostare
la ghiera (2) fino ad aumentare la presa d’aria e a ridurre il tasso di gas ruotando la manopola di
regolazione (3) in senso orario fino alla scomparsa della fuliggine.
4. Spegnimento:
Chiudere l’arrivo del gas girando il volantino (3) in senso orario a fondo fino all’arresto (senso “-”
della freccia)
D - SOSTITUZIONE DELLA CARTUCCIA
La cartuccia può essere smontata anche se non è vuota.
a) Verificare che l’arrivo del gas è ben chiuso girando il volantino (3) a fondo in senso orario.
b) Svitare la pinza d’aggancio (4) senso OFF) fino all’arresto, mantenendo l’apparecchio (attenzione a
non scottarsi toccando le parti calde)
c) Tirare la cartuccia verso il basso per liberarla dai 3 denti (5) della pinza d’aggancio. Non gettare mai
via una cartuccia che non è vuota (verificare che scuotendola non si sente rumore di liquido).
E - STOCCAGGIO E ANOMALIE DI FUNZIONAMENTO
Dopo il completo raffreddamento del vostro apparecchio:
a) Stoccare l’apparecchio e la sua cartuccia in un luogo fresco, asciutto ed aerato, lontano dalla portata
dei bambini, mai in un sottosuolo o in una cantina.
b) Il bruciatore
1/ Se scuotendo l’apparecchio non si sente un rumore di liquido, la cartuccia è vuota. Sostituirla con
una cartuccia nuova procedendo come indicato al paragrafo D.
2/ Se scuotendo l’apparecchio si sente un rumore di liquido, significa che resta del gas e che
l’iniettore è ostruito. Verificare che l’arrivo del gas è ben chiuso (girare il volantino (3) a fondo in
senso orario). Mantenendo saldamente il rubinetto, svitare il bruciatore (1) (secondo la freccia
A) (fig. 4) poi l’iniettore (7) (secondo la freccia B) (fig. 4). Al posto avvitare un iniettore nuovo o
pulito, poi riavvitare il bruciatore (1). In genere, sarà facile disostruire l’iniettore difettoso soffiando
via l’impurità con un getto d’aria compressa diretto contro la faccia esterna dell’iniettore stesso
dopo averlo smontato. (Non utilizzare mai un ago o qualsiasi altro strumento metallico).
NL
GEBRUIKSAANWIJZING
Vermogent : 55 g/h (0,76 kW) - injector nr. 016455
Categorie : rechtstreekse druk butaan
Wij danken u dat u dit apparaat Campingaz
®
LABOGAZ 470 gekozen hebt.
A - BELANGRIJK : U GEBRUIKT GAS, WEES VOORZICHTIG !
Deze gebruiksaanwijzing heeft als doel u in staat te stellen uw apparaat Campingaz
®
LABOGAZ
470 op een correcte en veilige wijze te gebruiken. Lees deze gebruiksaanwijzing aandachtig om
het apparaat beter te leren kennen voordat u de cartouche aansluit. Lees de aanwijzingen van
deze gebruiksaanwijzing, evenals de veiligheidsvoorschriften die op de cartouches Campingaz
®
CV 470 PLUS staan. Het niet naleven van deze aanwijzingen kan gevaaropleveren voor de
gebruiker en zijn omgeving. Bewaar deze gebruiksaanwijzing altijd op een vaste plaats zodat u
deze kan raadplegen indien dit nodig is. Dit apparaat dient uitsluitend gebruikt te worden met
de cartouches Campingaz
®
CV 470 PLUS. Het kan gevaarlijk zijn andere soorten Campingaz
®
CV
470 PLUS te gebruiken. De onderneming Application Des Gaz wijst elke verantwoordelijkheid
af in geval van gebruik van een cartouche van een ander merk. Dit apparaat mag uitsluitend
gebruikt worden in ruimtes die voldoende geventileerd zijn (minimum 2 m
3
/h /kW) en wanneer
het ver van ontvlambare materialen verwijderd is. Gebruik geen apparaat dat lekt, dat slecht
werkt of dat beschadigd is. Breng het naar uw dealer die u de verdere informatie over reparaties
etc. kan verstrekken. Breng nooit wijzigingen aan op dit apparaat en gebruik het aleen voor
de toepassingen waarvoor het bestemd is. Dit apparaat mag niet in een caravan, voertuig,
tent, afdak, hut of andere kleine gesloten ruimte gebruikt worden.Het mag niet gebruikt worden
wanneer u slaapt en mag nooit onbewaakt achtergelaten worden. Ieder gasapparaat werkt volgens
het volgende principe: de brandstof gebruikt zuurstof en stoot verbrandingsproducten uit. Een
gedeelte van deze verbrandingsproducten kan koolmonoxide (CO) bevatten.Koolmonoxide dat
reuk- en kleurloos is, kan leiden tot flauwvallen of symptomen die aan griep doen denken. In
extreme gevallen kan het zelfs de dood tot gevolg hebben, wanneer het apparaat binnenshuis
zonder goede ventilatie gebruikt wordt.
Om roet te vermijden (zeer zwarte rook met een bijtende geur) draait u aan de ring (2) en de
regelknop (3) - zie Rubriek C - WERKING.
B - INGEBRUIKNEMING
Het monteren van een cartouche Campingaz
®
CV 470 PLUS :
(Indien een lege cartouche geplaatst werd, lees dan paragraaf D : “Vervangin van de cartouche.”).
Werk steeds in een geventileerde ruimte bij voorkeur buiten en nooit in aanwezigheid van een vlam,
warmtebron of vonk (sigaret, elektrisch apparaat, enz.) en ver verwijderd van andere personen of
ontvlambare materialen om een cartouche te monteren of uit te nemen.
AANGEZIEN DE CARTOUCHES CAMPINGAZ
®
CV 470 PLUS EEN KLEP HEBBEN, KUNNEN ZE UIT
HET APPARAAT GENOMEN WORDEN OM HET VERVOER TE VERGEMAKKELIJKEN ZELFS AL
ZIJN ZE NIET LEEG EN KUNNEN ZE OP ANDERE APPARATEN CAMPINGAZ
®
VAN HET GAMMA
470, ONTWORPEN OM EXCLUSIEF MET DEZE CARTOUCHES TE WERKEN, GEMONTEERD
WORDEN.
a) Haal het apparaat uit de verpakking.
b) Controleer of de gastoevoer dicht is door de regelknop (3) kloksgewijs dicht te draaien tot hij niet
verder kan (“-” richting van de pijl).
c) Schroef de koppelklem (4) (in OFF) richting los tot hij niet verder kan, maar zonder te forceren (fig.2).
d) Steek de 3 haken (5) van de koppelklem in het schaaltje (6) van de cartouche in de richting van de
pijl (A) (fig.2).
e) Schroef de koppelklem
f) Het apparaat is nu bedrijfsklaar.
Bij lekkage (gaslucht voordat de kraan geopend wordt) moet het apparaat onmiddellijk naar buiten
worden gebracht, naar een zeer goed geventileerde plaats waar geen vlam, vonk of verwarmingsbron
aanwezig is, zodat daar de oorzaak van het gaslek kan worden opgespoord en verholpen. Controleer de
gasdichtheid van uw apparaat altijd buiten. Spoor geen lekken op met een vlam. Gebruik een speciale
vloeistof voor het opsporen van gaslekken.
C - GEBRUIK VAN HET KOOKTOESTEL:
1. Enkele tips:
Gebruik uw apparaat niet op minder dan 20 cm van een wand of van een brandbaar voorwerp.
Plaats het apparaat op een stabiel en horizontaal oppervlak en verplaats het niet gedurende het
gebruik om het plots verschijnen van grote vlammen te vermijden te wijten aan de verbranding van
vloeibaar butaan in plaats van verdampt butaan. Maak geen misbruik van dit apparaat en gebruik
het niet voor andere doeleinden dan welke waarvoor het is ontworpen. Ga voorzichtig met dit
apparaat om. Laat het niet vallen. Laat het apparaat nooit onbewaakt aan in een vertrek. Vervuil het
milieu niet: deponeer uw lege cartouches op een daartoe bestemde plaats. Indien u uw apparaat in
een bepaalde ruimte gebruikt, dan dient deze ruimte de grondvoorwaarden van luchtverversing te
eerbiedigen waardoor er voldoende lucht is voor de verbranding en waardoor het ontstaan van een
gevaarlijk mengsel van niet verbrand gas kan vermeden worden (2 m
3
/h/kW minimum).
2. Het aanzetten van de brander (fig.3):
Breng een vlam dichtbij de brander (1) en open vervolgens geleidelijk de gastoevoer door het wieltje
(3) tegen de richting van de wijzers van de klok te draaien.(zie détail fig.3).
3. Het afstellen van de vlam (fig.3):
1/ Afstellen van de vlam: Om de kracht van de vlam te vergroten of te verminderen moet u aan het
wieltje (3) draaien waarbij u de herkenningstekentjes “+” of “-” van de pijl volgt.
2/ Temperatuur (fig. 4): De temperatuur van de vlam kan worden geregeld door de ring (2) langsheen
de buis van de brander te schuiven:
- Hoofdingang van lucht niet bedekt: zeer hete blauwe vlam (1000 tot 1500 °C)
- Hoofdingang van lucht gedeeltelijk bedekt: oxiderende gele vlam (800 °C).
Waarschuwing: Blokkeer de hoofdingangen van lucht niet volledig. Indien roet verschijnt (zeer zwarte
rook met een bijtende geur) of indien zwarte vegen verschijnen in de beker of testbuis, beweegt u
de ring (2) omhoog om meer lucht te laten binnenkomen en vermindert u de gastoevoer door de
regelknop (3) rechtsom te draaien tot de roet verdwenen is.
4. Doven:
Sluit de gastoevoer door het wieltje (3) dicht te draaien - tegen wijzerszin, tot het wieltje vast zit.
(richting “-” van de pijl).
D - VERVANGING VAN DE CARTOUCHE
De cartouche kan ook als hij niet leeg is worden uitgenomen.
a) Controleer of de gastoevoer afgesloten is door het wieltje (3) stevig in de richting van de wijzers van
de klok te draaien.
b) Schroef de koppelklem (4) (in OFF) richting los tot hij niet verder kan, terwijl u het apparaat vasthoudt
(pas op voor de hete onderdelen).
c) Trek de cartouche naar beneden toe uit de 3 haken (5) van de koppelklem los. Gooi nooit cartouches
weg die niet leeg zijn (controleer door de cartouche te schudden of er geen heen en weer klotsende
vloeistof te horen is).
E - ONDERHOUD, OPBERGEN EN OPLOSSEN VAN PROBLEMEN
Nadat uw apparaat volledig afgekoeld is:
a) Berg het apparaat evenals de cartouche op in een koele, droge en geventileerde plaats, buiten het
bereik van kinderen en nooit in een ondergronds terrein of in een kelder
b) De brander
1/ Wanneer we geen geluid van vloeistof horen wanneer we het apparaat heen en weer schudden,
dan is het cartouche leeg. Deze vervangen door een nieuwe cartouche door te werk te gaan als
in paragraaf D.
2/ Wanneer we een vloeistof horen wanneer we het apparaat heen en weer schudden, dan zit er
nog gas in het apparaat en is de verstuiver verstopt. Verzeker u ervan dat de gastoevoer goed
gesloten is (draai het wieltje (3) helemaal aan in de richting van de wijzers van de klok). Terwijl
u stevig de kraan vasthoudt, draait u de brander (1) eraf volgens pijl A (fig.4), vervolgens de
verstuiver (7) en volgens pijl B (fig.4). Op de plaats van de oude verstuiver draait u een nieuwe
of schone verstuiver vast en vervolgens draait u de brander weer (1) vast. Over het algemeen zal
het gemakkelijk zijn om de niet goed werkende verstuiver te ontstoppen door de vuildeeltjes weg
te halen door een hogedrukspuit met lucht die u naar de buitenkant van de verstuiver wendt die
van tevoren gedemonteerd is. (Gebruik nooit een naald of een andere ontstopper van metaal).
c) Zuid Afrika: In geval van terugbranding (ontsteking onder de branderdop), schakel het product uit,
laat deze (circa vijf minuten) afkoelen en schakel het apparaat opnieuw in. Als de terugbranding zich
opnieuw voordoet, neem contact op met uw lokale Campingaz-handelaar.
jaar 2
Garantieperiode:
www.campingaz.com
MODO DE EMPREGO
Caudal: 55 g/h (0,76 kW) - injector n° 016455
Categoria: pressão directa butano
Agradecemos a sua escolha deste aparelho Campingaz
®
LABOGAZ 470
A - IMPORTANTE: VAI UTILIZAR GÁS, SEJA PRUDENTE!
Estas instruções destinam-se a permitir uma utilização correcta e com toda a segurança do seu
aparelho Campingaz
®
LABOGAZ 470.
Leia-as com atenção para se habituar ao aparelho antes de o montar com o recipiente de
gás.Cumpra estas instruções assim como as recomendações de segurança que figuram nos
cartuchos Campingaz
®
CV 470 PLUS.
O não cumprimento destas instruções pode ser perigoso para o utilizador e as pessoas
próximas. Conserve estas instruções em permanência em local seguro, para consulta em caso
de necessidade.
Este aparelho deve ser utilizado exclusivamente com os cartuchos Campingaz
®
CV 470 PLUS .
Pode ser perigoso utilizar outros recipientes de gás.
A Sociedade Application Des Gaz declina qualquer responsabilidade no caso de utilização de
um cartucho de qualquer outra marca.
Este aparelho só deve ser utilizado em locais suficientemente arejados
(mínimo 2 m
3
/h/kW) e afastado de materiais inflamáveis.Não utilizar um aparelho com fugas, que
funcione mal ou que estiver deteriorado.
Levá-lo ao vendedor que indicará o serviço após-venda mais próximo.Nunca modificar este
aparelho, nem o utilizar para aplicações a que não está destinado.
Este aparelho não deve ser utilizado em caravanas, veículos, tendas de campismo, abrigos,
cabanas ou qualquer outro espaço fechado.
Não deve ser utilizado enquanto dorme ou deixado sem ser vigiado. Qualquer aparelho a
gás que funcione segundo o princípio de combustão, consome oxigénio e emite produtos de
combustão. Uma parte destes produtos de combustão pode conter monóxido de carbono (CO).
O monóxido de carbono, inodoro e incolor, pode provocar enjôo e sintomas gripais, isto é
potencialmente a perda de vida caso o aparelho seja utilizado no interior sem ventilação adequada.
Ajuste o dispositivo de forma a evitar a criação de fuligem (fumaça muito preta com um cheiro a
acre), rodando o anel (2) e o botão de controlo (3) - consulte a secção C - OPERAÇÃO.
B - INSTALACÃO
Colocação de um cartucho Campingaz
®
CV 470 PLUS
(Se estiver instalado um cartucho vazio, ler o parágrafo D: “Desmontagem do cartucho”)
Para colocar ou desmontar um cartucho, trabalhar sempre em local arejado, de preferência no exterior
e nunca em presença de chama, fonte de calor ou faísca (cigarro, aparelho eléctrico, etc.), longe de
outras pessoas e de materiais inflamáveis.
COMO OS CARTUCHOS CAMPINGAZ
®
CV 470 PLUS SÃO DE VÁLVULA, PODEM SER
DESMONTADOS DESTE APARELHO PARA FACILITAR O TRANSPORTE, MESMO SE NÃO
ESTIVEREM VAZIOS E SER MONTADOS EM OUTROS APARELHOS CAMPINGAZ
®
DA GAMA 470
CONCEBIDOS PARA FUNCIONAR EXCLUSIVAMENTE COM ESTES CARTUCHOS.
a) Retirar o aparelho
b) Verificar que a torneira do gás está bem fechada, fazendo-a girar até ao batente de regulação (3)
no sentido de rotação dos ponteiros do relógio (sentido “-” da seta).
c) Desaparafusar o gancho de fixação (4) (sentido OFF) até ao batente, sem forçar (fig.2).
d) Introduzir os 3 dentes (5) do gancho de fixação no encaixe (6) do cartucho (fig.2).
e) Aparafusa
f) O aparelho está pronto a funcionar.
No caso de detectar uma fuga (cheiro a gás antes de abrir a torneira), leve imediatamente o
aparelho para um local ao ar livre, em local bem ventilado, sem qualquer fonte de inflamação, onde
a fuga poderá ser detectada e eliminada. Caso pretenda verificar a estanquicidade do aparelho,
faça-a ao ar livre. Não tente localizar as fugas com uma chama, utilizar um líquido de detecção de
fuga gasosa.
C - UTILIZAÇÃO DO FOGAREIRO
1. Alguns conselhos suplementares:
Não utilizar o seu aparelho a menos de 20 cm de uma parede ou de um objecto combustível.
Colocar o aparelho sobre uma superfície horizontal estável e, durante a utilização, não o
deslocar, para evitar o aparecimento de grandes chamas devidas à combustão de butano líquido
em vez do butano vaporizado.
Não utilize o aparelho de forma abusiva. Este dever ser unicamente utilizado para os fins para
os quais foi concebido. Manipule o aparelho com cuidado e não o deixe cair.
Nunca deixe o aparelho aceso numa sala sem vigilância.Respeite o meio ambiente: deposite os
cartuchos vazios num lugar apropriado.
Se utilizar o aparelho num local fechado, este deve satisfazer as condições elementares de
ventilação que permitem fornecer o ar necessário para a combustão e evitar a criação de mistura
com teor perigoso em gás não queimado (2 m
3
/h/kW mínimo).
2. Acender o queimador (fig.3):
Chegar uma chama perto do queimador (1) e abrir progressivamente o gás, rodando a botoneira (3)
no sentido contrário ao dos ponteiros do relógio (ver pormenor na fig.3).
3. Regulação da chama (fig.3):
1/
de referência “+” ou “-” da seta.
2/ Temperatura (Fig. 4): A temperatura da chama é ajustada rodando o anel (2) ao longo do tubo do
queimador:
- Entrada de ar principal destapada: chama azul extremamente quente (1000 a 1500 ° C)
- Entrada de ar principal parcialmente coberta: chama amarela oxidante (800 ° C).
Aviso: Não bloquear por completo as principais entradas de ar. Se aparecer fuligem (fumaça muito
preta com cheiro a acre) ou se houver listas pretas no copo ou no tubo de teste, mova o anel (2)
para cima para aumentar a entrada de ar e reduzir o consumo de gás, girando o botão de controlo
(3) no sentido horário até que a fuligem desapareça.
4. Extinção:
Fechar a admissão do gás rodando totalmente o regulador (3) no sentido dos ponteiros do relógio, até
parar. (sentido “-” da seta)
D - DESMONTAGEM DO CARTUCHO
O cartucho pode ser desmontado mesmo que não esteja vazio.
a) Verificar que o ponto de chagada do gás está bem fechado, (3) rodando totalmente a torneira no
sentido dos ponteiros do relógio.
b)
(atenção às peças quentes).
c) Puxar o cartucho para baixo para o desencaixar dos 3 dentes (5) do gancho de fixação.Nunca deitar
fora um cartucho que não esteja vazio, (verificar a inexistência de ruído de líquido, sacudindo-o).
E - ARMAZENAMENTO E ANOMALIAS DE FUNCIONAMENTO
Depois do aparelho arrefecer completamente
a) Armazenar o aparelho assim como o cartucho em local fresco, seco e arejado, fora do alcance das
crianças, nunca numa parte inferior da casa.
b) O queimador não acende quando se abre a torneira
1/ Se não ouvir um barulho de líquido ao abanar o aparelho, o cartucho está vazio. Substitua-o por
um cartucho novo, conforme indicado no parágrafo D.
2/ Se ouvir um barulho de líquido ao abanar o aparelho, é porque ainda tem gás, o injector está
entupido.
Certifique-se que a admissão de gás está bem fechada (rodar completamente a botoneira de regulação
(3) no sentido de rotação dos ponteiros do relógio).Segurando bem a torneira, desaparafusar o
queimador (1) no sentido da seta A (fig.4) depois o injector (7) no sentido da seta B (fig.4). No seu lugar,
aparafusar um injector novo ou limpo, e depois aparafusar novamente o queimador (1).
Em geral, não deverá ter dificuldade em desentupir o injector que apresenta problemas, deslocando
a sujidade com um jacto de ar sob pressão dirigido contra a face exterior do injector previamente
desmontado. (Nunca utilizar uma agulha ou qualquer outro desentupidor metálico).
PT
www.campingaz.com
Anos 2
Período de garantia:
Anni 2
Periodo di garanzia:
www.campingaz.com
REMARQUE : Sauf mention contraire, les termes génériques suivants “ appareil /
unité / produit / équipement / installation ” utilisés dans le présent mode d’emploi font
tous référence au produit “ LABOGAZ 470 ”.
NOTE: Unless otherwise specified, following generic terms “appliance / unit / product
/ equipment / device” appeared in this instruction manual all refer to the product
“LABOGAZ 470”.
HINWEIS: Falls nicht anders festgelegt, beziehen sich alle folgenden, in dieser
Bedienungsanleitung angeführten Oberbegriffe „Gerät/Einheit/Produkt/Equipment/
Vorrichtung“ auf das Produkt „LABOGAZ 470“.
NOTA: a menos que se especifique de otro modo, los siguientes términos genéricos
«aparato / unidad / producto / equipo / dispositivo» que aparecen en este manual de
instrucciones se refieren todos al producto “LABOGAZ 470”.
NOTA: Exceto se indicado de outro modo, os termos genéricos seguintes “aparelho /
unidade (produto / equipamento / dispositivo” que aparecem neste manual de instru-
ções referem-se todos ao produto “LABOGAZ 470”.
NOTA: Se non diversamente specificato, i seguenti termini generici «apparecchio /
unità / prodotto / apparecchiatura / dispositivo» che compaiono in questo manuale di
istruzioni si riferiscono tutti al prodotto «LABOGAZ 470».
OPMERKING: Tenzij anders vermeld verwijzen de volgende generieke termen
«toestel / apparaat / eenheid» in deze gebruiksaanwijzing allemaal naar het product
“LABOGAZ 470”.
INSTRUCTIONS FOR USE
Rate : 55 g/h (0,76 kW) - injector n° 016455
Category : butane direct pressure
Thank you for choosing the Campingaz
®
LABOGAZ 470.
A - IMPORTANT: ALWAYS BE CAREFUL WHEN USING GAS !
The purpose of these instructions is to enable you to use your Campingaz
®
LABOGAZ 470
correctly and in complete safety. Please read them carefully to familiarise yourself with the
equipment prior to assembling the gas container. Please observe these instructions and the
safety measures printed on the Campingaz
®
CV 470 PLUS cartridges. Failure to observe these
instructions may result in the user and people in the immediate vicinity being put at risk. Keep
these instructions in a safe place so that you can refer to them if needed. This equipment must
be used exclusively with Campingaz
®
CV 470 PLUS cartridges. Using other gas containers may
be dangerous. The Société Application Des Gaz accepts no responsibility when cartridges of
any other make are used. This equipment must only be used in adequately ventilated areas
(minimum 2 m
3
/h/kW) and at a good distance from any flammable material. Do not use
equipment which leaks, functions incorrectly or is damaged. Return it to your retailer who
will inform you of your nearest after-sales service. Never modify this equipment or use it for
purposes for which it is not intended. Do not use this product in caravans, cars, tents, huts,
sheds or any small enclosed areas.The product should not be used while sleeping or left
unattended. This product consumes fuel through combustion or consumption of oxygen and
gives off certain substances and gas, which could be dangerous such as carbon monoxide
(CO). Carbon monoxide is an odorless, clear gas that can cause flu-like symptoms, sickness,
illness, and possibly death if produced inside aforesaid enclosed areas through use of the
product without proper ventilation.
Adjust the device as to avoid generating soot (very black smoke with an acrid odour) by turning the
ring (2) and control knob (3) - see Section C - OPERATION.
B - PUTTING INTO OPERATION
Installing the Campingaz
®
CV 470 PLUS cartridge:
(When the existing cartridge is empty, read paragraph D : “Removing the cartridge”). To install
or remove a cartridge, always work in a well-ventilated area, preferably outside and never in the
presence of a flame, heat source or spark (lit cigarette, electrical equipment, etc.) at a good distance
from other people and flammable material.
AS CAMPINGAZ
®
CV 470 PLUS CARTRIDGES ARE VALVE-OPERATED, THEY CAN BE
DETACHED FROM THE EQUIPMENT, EASILY TRANSPORTED (EVEN WHEN NOT EMPTY) AND
FITTED TO OTHER CAMPINGAZ
®
EQUIPMENT IN THE 470 RANGE DESIGNED TO OPERATE
EXCLUSIVELY WITH THESE CARTRIDGES.
a) Remove the equipment from its protective box.
b) Check that the gas supply is fully turned off by turning the control wheel (3) clockwise to its full
extent (“-” direction of the arrow).
c) Unscrew the coupling device (4) (towards the OFF) to its full extent, without forcing it (fig.2).
d) Insert the 3 prongs (5) of the coupling
arrow (fig.2).
e) Screw back again the coupling
f) The equipment is ready for use.
In case of leakage (gas smell before opening the valve), put immediately the equipment outside, in a
well-ventilated area, without inflammation source, where it will be possible to locate and stop the lead.
If you wish to check the tightness of the equipment, do it outside. Do not try to locate a leak with a
flame, use gas leak detection liquid.
C - USING THE APPLANCE
1. Additional instructions :
Never use your equipment at a distance of less than 20 cm from a wall or combustible object.
Position the equipment on a stable, horizontal surface and do not move when in use so as to
avoid the appearance of large flames resulting from the combustion of liquid butane rather
than vaporised butane. Do not misuse your torch or use it for applications for which it was
not designed. Handle the equipment very carefully. Take care not to drop it. Never leave the
equipment alight and unattended. Respect the environment: deposit empty cartridges in
an appropriate place. If you use this equipment indoors, the area must observe elementary
ventilation conditions enabling the supply of air required for combustion and avoiding any
build-up of a dangerous mixture of non-burnt gas (2m
3
/h/kW minimum).
2. Lighting the burner (fig.3):
Bring a flame close to the burner (1) then gradually turn on the gas by turning the knob (3) anti-
clockwise (see detail in fig.3)
3. Adjusting the flame (fig.3):
1/ Power: To increase or decrease the power of the flame, turn the knob (3) towards the “+” or “-”
symbols on the arrow as applicable.
2/ Temperature (fig. 4): The temperature of the flame is adjusted by sliding the ring (2) along the
burner tube:
- Main air intake uncovered: extremely hot blue flame (1000 to 1500°C)
- Main air intake partially covered: oxidising yellow flame (800°C).
Attention : ne pas obstruer complètement les trous d’air primaire. En cas d’apparition de Warning:
Do not completely block the main air inlets. If soot (very black smoke with an acrid odour) appears
or if there are black streaks in the beaker or test tube, move the ring (2) up to increase air intake
and reduce gas rate by turning the control knob (3) clockwise until the soot has disappeared.
4. Extinguishing:
Turn off the gas supply by turning the wheel (3) clockwise to its full extent ( “-” direction of the arrow
head).
D - CHANGING THE CARTRIDGE
The cartridge may be removed, even if it is not empty.
a) Check that the gas connection is tight by turning the knob (3) fully in a clockwise direction.
b) Unscrew the coupling
careful as some parts may get hot).
c) Pull the cartridge downwards to release if from the 3 prongs (5) of the coupling device. Never
dispose of a cartridge until you are sure it is empty (shake the cartridge and listen for the sound of
liquid).
E - MAINTENANCE, STORAGE AND TROUBLESHOOTING
Once your equipment has fully cooled
a) Store the equipment and the cartridge in a cool, dry and well-ventilated
children. Never store in a basement or cellar.
b) The burner does not light when the valve is open
1/ If no sound of liquid can be heard when the unit is shaken, the cartridge is empty. Replace it
with a new cartridge, following the instructions in paragraph D.
2/ If the sound of liquid can be heard when the unit is shaken, there is some gas left but the
injector is blocked. Check that the gas inlet is properly closed (turn the knob (3) as far as it will
go in a clockwise direction). While holding the valve firmly, unscrew the burner (1) as indicated
by arrow A (fig.4), then the injector (7), as shown by arrow B (fig.4). Replace it with a new or
clean injector, then screw the burner back in place (1). The defective injector can normally be
easily unblocked simply by ejecting the impurity with a jet of compressed air directed against
the external face of the injector after removing it from the unit. (Never use a needle or any
other metal implement).
c) South Africa: in case of burn back (ignition under the burner cap) switch the product off, allow it
to cool down (approximately five minutes), then reignite the appliance. If the problem of burn back
persists, then please contact your local Campingaz representative.
INSTRUCCIONES DE EMPLEO
Consumo : 55 g/h (0,76 kW) - inyector n° 016455
Categoría: presión directa butano
Le agradecemos haber elegido este aparato Campingaz
®
LABOGAZ 470.
A - IMPORTANTE: ESTA UTILIZANDO GAS ¡SEA PRUDENTE!
Estas instrucciones de empleo tienen por objeto permitirle utilizar su aparato correctamente
y con total seguridad su aparato Campingaz
®
LABOGAZ 470. Léalas atentamente para
familiarizarse con el aparato antes de conectarlo al recipiente de gas. Respete las instrucciones
de esta nota y los consejos de seguridad que aparecen en los cartuchosCampingaz
®
CV 470
PLUS. Si no los respeta, esto puede representar un peligro para el usuario y para su entorno.
Conserve estas instrucciones de empleo siempre en un lugar seguro con el fin de poderlas
consultar cuando sea necesario. Este aparato debe utilizarse exclusivamente con cartuchos
Campingaz
®
CV 470 PLUS. Puede resultar peligroso utilizar otro tipo de recipientes de gas.
“Application Des Gaz” declina toda responsabilidad en caso de utilizarse un cartucho de
otra marca. Este aparato debe utilizarse exclusivamente en locales suficientemente aireados
(mínimo: 2 m
3
/h/kW), alejado de cualquier material inflamable. No utilizar un aparato que
presente pérdidas, que funcione mal o que esté deteriorado. Informar al vendedor, quien le
indicará el servicio postventa más cercano. Jamás modificar este aparato ni utilizarlo para otras
aplicaciones que las específicas para las cuales ha sido diseñado. Este aparato no debe ser
utilizado dentro de una caravana, un vehículo, tienda, caseta, cabaña o cualquier otro espacio
pequeño y cerrado… No debe ser utilizado mientras duerma ni debe ser dejado sin vigilancia.
Todos los aparatos de gas que funcionan sobre el principio de la combustión, consumen
oxígeno y descargan productos de combustión. Una parte de estos productos de combustión
puede contener monóxido de carbono (CO). El monóxido de carbono, inodoro e incoloro, puede
provocar malestar y síntomas similares a la gripe; pueden provocar incluso la muerte si el
aparato se utiliza en interior sin una ventilación adecuada.
Ajuste el aparato para evitar generar hollín (humo muy negro con olor acre), haciendo girar la
anilla (2) y la perilla de mando (3); vea la Sección C (FUNCIONAMIENTO).
B - PUESTA EN SERVICIO
Instalacion de un cartucho Campingaz
®
CV 470 PLUS :
(Si se encuentra instalado un cartucho vacío, leer el párrafo D : “Desmontaje del cartucho”). Para
instalar o para desmontar un cartucho, proceder siempre en un sitio aireado, de preferencia al aire libre,
y nunca en presencia de llama, fuente de calor o chispa (cigarrillo, aparato eléctrico, etc.), lejos de otras
personas y de materiales inflamables.
DADO QUE LOS CARTUCHOS CAMPINGAZ
®
CV 470 PLUS TIENEN VALVULA, PUEDEN
DESMONTARSE DEL APARATO CON EL FIN DE FACILITAR SU TRANSPORTE AUN CUANDO
NO ESTEN VACIOS; PODRAN VOLVER A MONTARSE EN OTROS APARATOS CAMPINGAZ
®
DE
LA GAMA 470 DISE—ADOS PARA FUNCIONAR EXCLUSIVAMENTE CON ESTOS CARTUCHOS.
a) Retire el aparato de su caja protectora.
b) Compruebe que la llegada del gas está bien cerrada, girando hasta el tope el grifo de ajuste (3) en
el sentido de las agujas de un reloj (sentido “-” de la flecha).
c) Afloje la pinza de enganche (4) (sentido OFF) hasta el tope, sin forzar (fig.2).
d) Introduzca las 3 garras (5) de la pinza de enganc
e) Apriete de nuevo la pinza de enganche
f) El aparato está listo para el uso.
En caso de pérdidas (olor a gas antes de abrir el grifo), ponga inmediatamente el aparato en el exterior,
en un lugar muy bien ventilado, sin fuentes de inflamación, donde podrá buscarse y repararse la
pérdida. Si desea comprobar la estanqueidad de su aparato, hágalo en el exterior. No busque pérdidas
con una llama; utilice un líquido de detección de pérdida gaseosa.
C - UTILIZACIÓN DEL HORNILLO
1. Algunos consejos suplementarios:
NeJamás utilizar el aparato a menos de 20 cm de una pared o de un objeto combustible. Colocar
el aparato sobre una superficie horizontal estable y no desplazarlo durante la utilización con el
fin de evitar que aparezcan grandes llamas provocadas por la combustión de butano líquido en
vez de butano vaporizado. No utilice su aparato de forma abusiva ni para otros usos que no sean
aquellos para los que ha sido diseñado. Manipule con cuidado este aparato. Tenga cuidado de
que no se caiga. No deje nunca el aparato encendido sin vigilancia. Respete el medio ambiente :
deposite sus cartuchos vacíos en un lugar adecuado. Si utiliza su aparato en un local, éste debe
respetar las condiciones elementales de aireación que permitan un suministro de aire necesario
para la combustión y para evitar que se genere una mezcla con un contenido peligroso de gas
no quemado (2 m
3
/h/kW como mínimo).
2. Encendido del quemador (fig.3):
Acerque una llama del quemador (1) y abra progresivamente el gas, girando el volante (3) en sentido
contrario a las agujas del reloj (véase destalle fig.3).
3. Ajuste de la llama (fig.3):
1/Potencia: Para aumentar o reducir la potencia de la llama, gire el volante (3) siguiendo las señales
“+” o “-” de la flecha.
2/ Temperatura (fig. 4): La temperatura de la llama se ajusta deslizando la anilla (2) a lo largo del tubo
del quemador:
- Entrada principal de aire no cubierta: llama azul extremadamente caliente (1000 a 1500°C)
- Entrada principal de aire cubierta parcialmente: llama amarilla oxidante (800°C).
Advertencia: No bloquee completamente las entradas principales de aire. Si aparece hollín (humo
muy negro con olor acre) o si hay manchas negras en el vaso o tubo de ensayo, mueva la anilla (2)
hacia arriba para aumentar la entrada de aire y reduzca la velocidad del gas girando la perilla de
control (3) en sentido horario hasta que el hollín desaparezca.
4. Apagado:
Cerrar el gas girando la llave (3) en el sentido de rotación de las agujas del reloj, hasta el final
(sentido “-” de la flecha)
D - DESMONTAJE DEL CARTUCHO
El cartucho puede ser desmontado aunque no esté vacío.
a) Compruebe que la llegada del gas está bien cerrada girando el grifo (3) a fondo en el sentido de
rotación de las agujas de un reloj.
b) Afloje la pinza de enganche (4) (sentido OFF) hasta el tope, sujetando al mismo tiempo el aparato
(cuidado con las piezas calientes).
c) Tirar del cartucho hacia abajo para sacarlo de las 3 garras (5) de la pinza de enganche. No tire
nunca un cartucho que no está vacío (compruebe que hay ruido de gas al sacudirlo).
E - ALMACENAMIENTO Y ANOMALIAS DE FUNCIONAMIENTO
Después que el aparato se haya enfriado por completo:
a) Almacenar el aparato y el cartucho en un lugar fresco, seco y aireado, lejos del alcance de los niños
y nunca en un sótano o en una bodega.
b) Al abrir el grifo, no se enciende el quemador
1/ Si no se oye un ruido de líquido al sacudir el aparato, el cartucho está vacío. Sustitúyalo por un
cartucho nuevo, siguiendo los pasos indicados en el párrafo D.
2/ Si se oye un ruido de líquido al sacudir el aparato, queda gas, pero el inyector está atascado.
Compruebe que esté cerrada la entrada de gas (gire el volante (3) a fondo en el sentido de las
agujas del reloj). Sujete debidamente el grifo y desenrosque el quemador (1) siguiendo la flecha
A (fig. 4), después el inyector (7) siguiendo la flecha B (fig. 4) y sustitúyalo por un inyector nuevo
o limpio. Enrosque de nuevo el quemador (1). De forma general, suele resultar fácil desatascar
el inyector deficiente, expulsando la impureza con un chorro de aire comprimido orientado hacia
la cara exterior del inyector previo desmontaje (no utilice nunca una aguja o un desatascador
metálico).