1 With the stereo / mono selector switch,you can choose whether the output
signal will be in stereo or in mono.We advice you to put this switch in the
mono-position, especially if you have mounted more than one woofer in an
enclosure. Even if the amplifiers are used in a stereo mode, the mono posi-
tion of the CXQ 3 is adviced. In this way you will be sure that both channels
will get the exact same signal and that the woofers perform in an optimal way.
Also by the use of only one woofer the mono-position is adviced, allthough
it wouldn’t make much difference if the stereo-position is used.The only situation
in which the stereo-position is adviced and required, is when you use the CXQ 3
to drive a couple of mid-bass woofers.In that case there is a need for the stereo
sound,because frequencies above the 200Hz are very well hearable in stereo.
2 With the phase reversal switch it is possible to alter the phase of the signal by
0°,90° or even 180°.This can give a great advantage,especially if the woofers are
located on a great distance from the full-range speakers. This can give the
impression that the bass is a bit too late, compared to the full-range sound.
This is logical,because often the distance the bass-sound has to travel from the
back of the car, is twice the distance the full-range has to go in the front. By
shifting the phase with 90° or 180° this problem can be solved, however this
will not always be the case.
3 With the input level control you can amplify the input signal up to 24dB.This can
cause the output signal to become very powerfull,up to 15V.Therefore caution
must be taken by adjusting this inputlevel.It has a direct relation to the Level
Control on your remote control.The best way to get a correct adjustment for
your input level is to take it slowly,step by step.First put all the leveladjustments
in your system (also the amplifiers input) to a minimum.Then turn the volume
of your head-unit to 80% of the maximum. Now slowly start increasing the
input level on your CXQ 3. Keep turning up the input level until the clipping
LED (5) starts to flicker. Now the signal is adjusted correctly, and in most
cases, you won’t even have to adjust the signal on your amplifier anymore.
4 The power LED illuminates when the CXQ 3 is turned on.When this LED is
not burning, there will be no power on the remote-signal, the +12V- or
ground cable.Also check if the fuse is still intact.
5 The clipping LED illuminates constantly when the output signal is clipping.This
can seriously damage your audio system. The clipping is caused by a too
strongly adjusted input level,and this input level should be turned down imme-
diately.When the clipping LED is flickering,it indicates that the output signal is
around 7V, which is a safe value for most amplifiers and woofers.When you
have just insalled your CXQ 3,it is adviced to monitor this clipping LED regu-
lairy, in order to get a good adjustment for all your types of music.
Mounting your Caliber CXQ 3 BassDriver
Before mounting your Caliber CXQ 3 you must carefully choose the place
where it can be installed.Be sure that the power and signal cables can enter and
leave the CXQ 3 in a straight line, to avoid the risk of malfunction.
The CXQ 3 should be protected from exposure to moisture and direct sunlight.
If you’ve decided where to place your Caliber CXQ 3, and you’ve convinced
yourself there is enough protection from unusual hazards, mark the mounting
surface using the CXQ 3 as a template (Placing masking tape on these surfaces
first will make your markings more visible).
Drill 2.5 mm (1/8”) diameter holes at the marked locations and mount the
amplifier using the supplied self-tapping screws.
Note: Do not drill any holes while using the CXQ 3 as a template.You
can easily damage the CXQ 3’s coating in this manner.
Installing and adjusting the CXQ 3
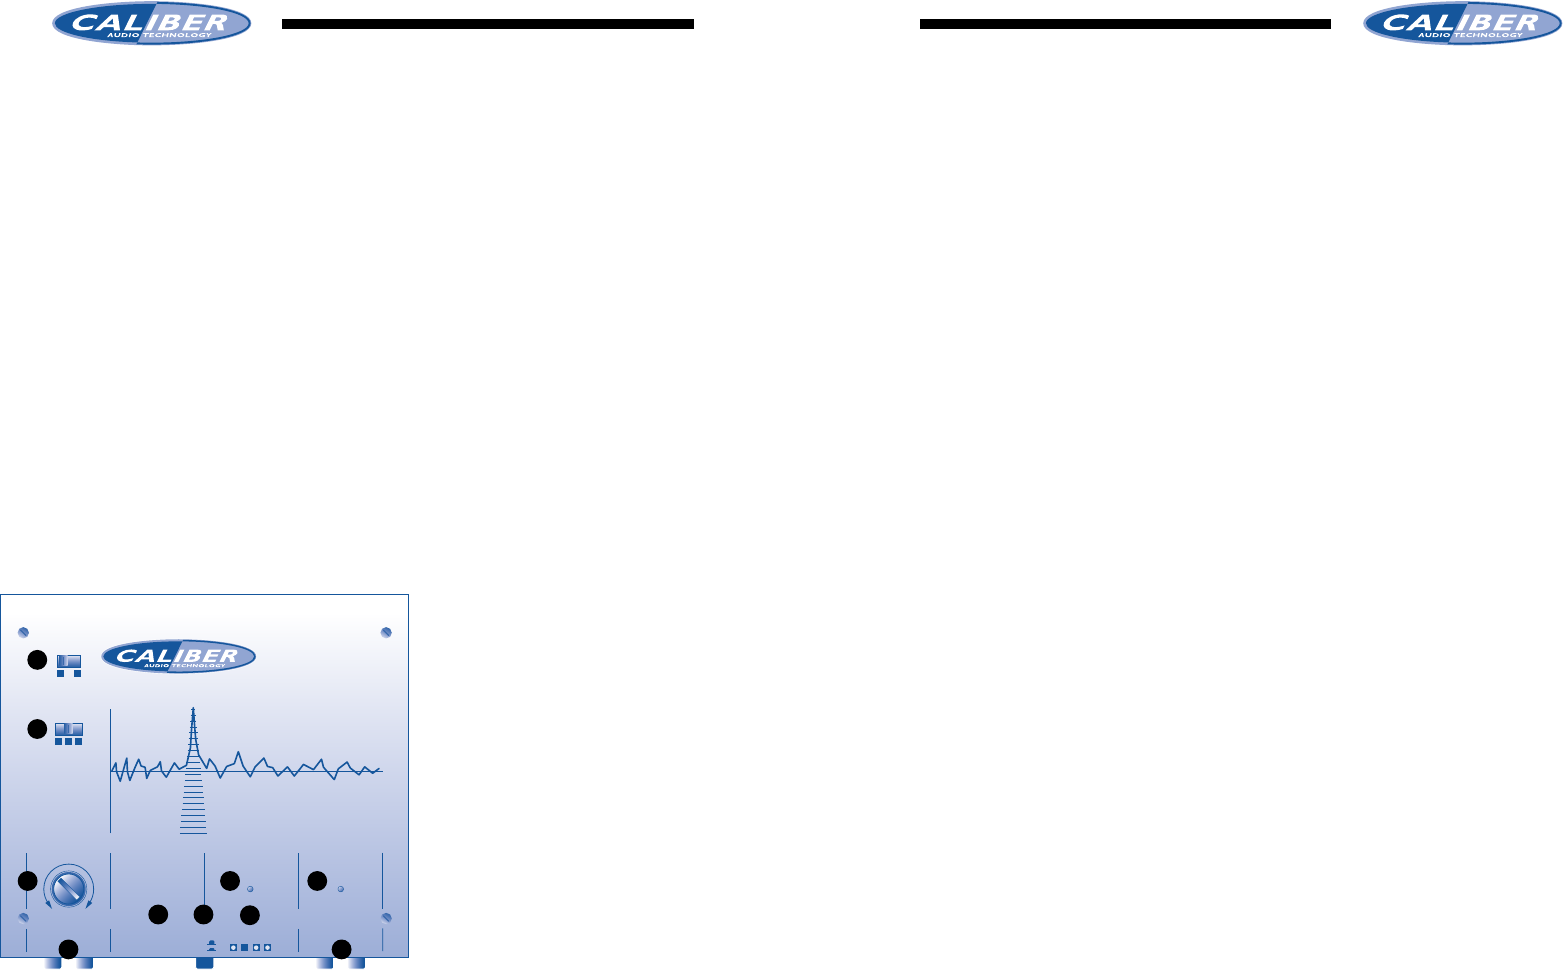
There are 10 points of attention that need explaining on the CXQ 3. Once you
have read this,you will find this BassDriver very easy to operate, and lots of fun
to play with.
1 Stereo / mono selector switch.
2 Phase recersal switch.
3 Input Level Control 0dB-24dB.
4 Power on LED.
5 Clipping LED.
6 Power and remote terminals.
7 Equalizer on/off switch.
8 Telephone jack for remote
control.
9 RCA’s Signal in
10 RCA’s Signal out