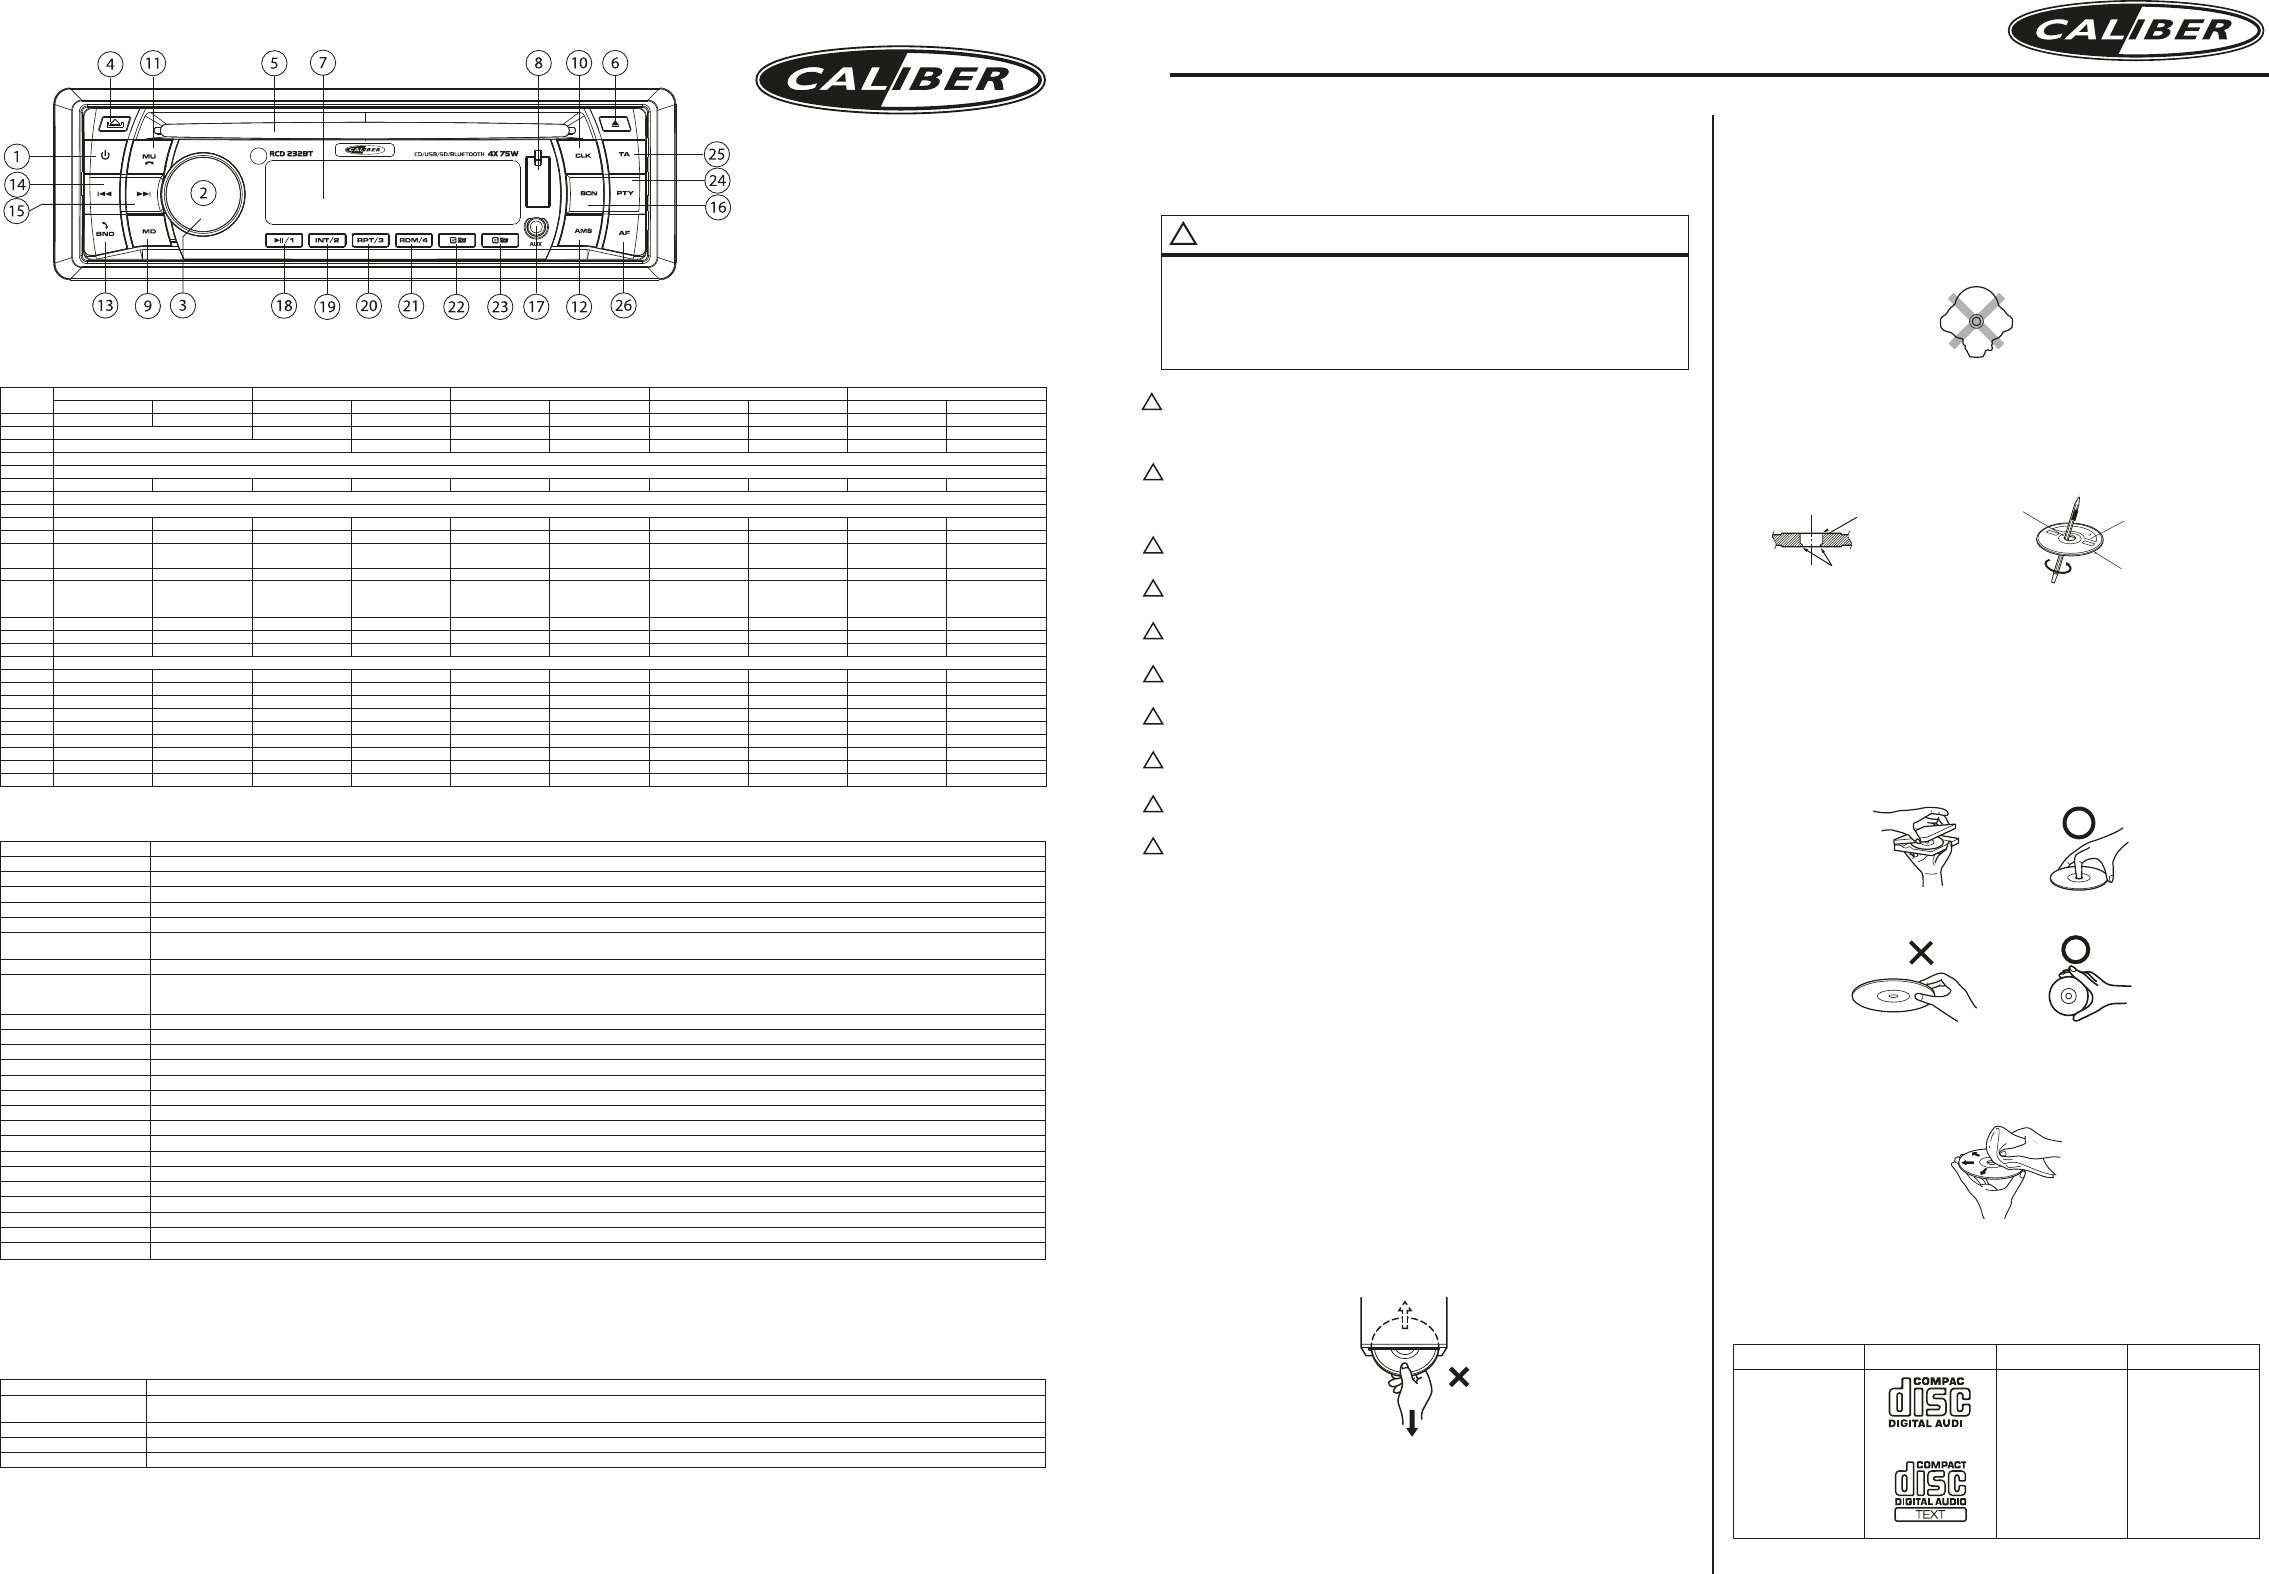
Panel ReleasePush this button to release the frontpanel.
EjectPush this button to eject the CD out of the unit.
PowerPower function to activate or deactivate the unit.
BandBand selection allows you to select different reception bands, f.i. FM1, FM2 and FM3
AFAF stands for Alternative frequencies; the tuner will return to alternative frequencies whenever the reception signal is getting worse.
TATA stands for Trafc announcement which means that it will give you information about the trafc (if broadcasted) no matter what mode you are in (CD,USB, etc.) it will automatically interrupt the cd
and give the information, after that it automatically switches back to the selected mode
Manual up/downLong press to move the radio frequency number up/down step by step.
Menu (system)Press the VOL/SEL button for several seconds to activate the cyclical mode to choose from the following user instructions: DSP ON/OFF > ESP 12/45
(CD mode) > BEEP ON/OFF > AREA > VOL LAST/ADJ > SEEK. (Press to enter fuctions)
In DSP mode you can choose from preset EQ settings: FLAT, CLASSIC, POP, ROCK
Audio MenuThe Audio menu button gives you the possibility to adjust your sound system with the following options Bass, Treble, Balance and Fader. These options can be used to ne tune your sound.
ModeThe mode button allows you to go from one source (f.i. CD) to another source (f.i. Tuner) by pushing the button as many times as needed.
AMS AMS stands for Automatic store; in tuner mode it will automatically store the 6 strongest stations (M1-M6). Note: all previous stored stations are lost.
Rotary volumeThis knob allows you to adjust the volume from minimum to maximum level. NOTE high sound levels may cause damage to your ears.
M1-M6These are the preset stations where you can store your favorite radio stations if in tuner mode.
Pause/PlayThis button allows you in CD, USB or SD mode to play or to pause the music.
ScanScan will play 10 seconds of each song on the CD, USB or SD. If the preferred song is playing, push again and it will play that song.
RepeatRepeat will play a selected song or album continuously. Available in CD, USB and SD mode.
ShufeShufe will play all the songs random. Available in CD, USB and SD mode.
File down/upIn MP3 mode press this button to go up or down one folder.
Track down/upIn MP3 mode press this button to go up or down one track
fast forward/backwardLong press to fast forward to the CD, USB or SD.
3,5mm AV jack inTo connect an external audio system.
USB poortWhen inserting a USB stick the unit will switch to USB mode.
SD card input (behind panel)Remove the frontpanel to insert SD card. When inserting a SD card the unit will switch to SD mode. (Max 16GB card)
Reset (behind panel)Use a non-metallic pointed object to press and hold the reset button for 5 seconds. The unit will be set to factory default.
RCD 232BT
English
RCD PRECAUTIONS
Points to observe for safe usage
• Read this manual carefully before using this disc and the system components. They contain in-
structions on how to use this product in a safe and effective manner. Alpine cannot be responsible
for problems resulting from failure to observe the instructions in this manual.
WARNING
This symbol means important instructions. Fail-
ure to heed them can result in injury or material
property damage.
Do not operate any function that takes your attention away from safely driving your vehicle.
Any function that requires your prolonged attention should only be performed after coming to a
complete stop. Always stop the vehicle in a safe location before performing these functions. Failure
to do so may result in an accident.
Keep the volume at a level where you can still hear outside noises while driving.
Excessive volume levels that obscure sounds such as emergency vehicle sirens or road warning
signals (train crossings, etc.) can be dangerous and may result in an accident. LISTENING AT
LOUD VOLUME LEVELS IN A CAR MAY ALSO CAUSE HEARING DAMAGE.
Do not disassemble or alter.
Doing so may result in an accident, re or electric shock.
Use only in cars with a 12V volt negative ground.
(Check with your dealer if you are not sure.) Failure to do so may result in re, etc.
Keep small objects such as screws out of the reach of children.
Swallowing them may result in serious injury. If swallowed, consult a physician immediately.
Use the correct ampere rating when replacing fuses.
Failure to do so may result in re or electric shock.
Do not block vents or radiator panels.
Doing so may cause heat to build up inside and may result in re.
Use this product for mobile 12V applications.
Use for other than its designed application may result in re, electric shock or other injury.
Do not place hands, ngers or foreign objects in insertion slots or gaps.
Doing so may result in personal injury or damage to the product.
Halt use immediately if a problem appears.
Failure to do so may cause personal injury or damage to the product. Return it to your authorized
Alpine dealer or the nearest Alpine Service Centre for repairing.
Product cleaning.
Use a soft dry cloth for periodic cleaning of the product. For more severe stains, please dampen the
cloth with water only. Anything else has the chance of dissolving the paint or damaging the plastic.
Temperature.
Be sure the temperature inside the vehicle is between +45°C (+113°F) and 0°C (+32°F) before turn-
ing your unit on.
Moisture condensation.
You may notice the disc playback sound wavering due to condensation. If this happens, remove
the disc from the player and wait about an hour for the moisture to evaporate.
Damaged disc.
Do not attempt to play cracked, warped, or damaged discs. Playing a bad disc could severely dam-
age the playback mechanism.
Maintenance.
If you have problems, do not attempt to repair the unit yourself. Return it to your Alpine dealer or
the nearest Alpine Service Station for servicing.
Never attempt the following.
Do not grip or pull out the disc while it is being pulled back into the player by the automatic reload-
ing mechanism. Do not attempt to insert a disc into the unit when the unit power is off.
Inserting discs.
Your player accepts only one disc at a time for playback. Do not attempt to load more than one disc.
Make sure the label side is facing up when you insert the disc. “Disc error” will be displayed on your
player if you insert a disc incorrectly. If “Disc error” continues to be displayed even though the disc
has been inserted correctly, push the RESET switch with a pointed object such as a ballpoint pen.
Playing a disc while driving on a very bumpy road may result in skips, but this will not scratch the disc
or damage the player.
Irregular shaped discs.
Be sure to use round shaped discs only for this unit and never use any special shaped discs. Use of
special shaped discs may cause damage to the mechanism.
new discs.
To prevent the disc from jamming, “Disc error” is displayed if discs with irregular surfaces are inserted
or if discs are inserted incorrectly. When a new disc is ejected immediately after initial loading, use
your nger to feel around the inside of the centre hole and outside edge of the disc. If you feel any
small bumps or irregularities, this could inhibit proper loading of the disc. To remove the bumps, rub
the inside edge of the hole and outside edge of the disc with a ballpoint pen or other such instrument,
then insert the disc again.
Installation location.
Make sure that the system will not be installed in a location subjected to:
• Direct sun and heat
• High humidity and water
• Excessive dust
• Excessive vibrations
Correct handling.
Do not drop the disc while handling. Hold the disc so you will not leave ngerprints on the surface. Do
not afx tape, paper, or gummed labels to the disc. Do not write on the disc.
Disc cleaning.
Fingerprints, dust, or soil on the surface of the disc could cause the DVD player to skip. For routine
cleaning, wipe the playing surface with a clean, soft cloth from the centre of the disc to the outer
edge. If the surface is heavily soiled, dampen a clean, soft cloth in a solution of mild neutral detergent
before cleaning the disc.
Disc-accessoires
There are various accessories available on the market for protecting the disc surface and improving
sound quality. However, most of them will inuence the thickness and/or diametre of the disc. Using
14Seek downManual downTrack downfast backwardTrack down
15Seek upManual upTrack upfast forwardTrack up
16Scan
173,5mm AUX In Jack
18M1Store M1Play/PausePlay/Pause
19M2Store M2Intro
20M3Store M3Repeat
21M4Store M4Shufe
22M5Store M5File down
23M6Store M6File up
24PTY
25TA
26AF
Bluetooth
PairingActivate Bluetooth on your mobile phone, and search for available devices. Select “CAR AUDIO”, password “8888”. If succesfull “Connected” is displayed, if not “Pairing Fail!” will be displayed for 3
seconds. The unit will go back to the previous mode.
Reconnect The unit will normally auto-reconnect.
Reject incomming callPress (MU) button if you not wish to answer the call, and return to normal playing mode.
TransferTo audio transfer from headunit back to the mobile phone. Long press the Transfer (BND) button to transfer the audio back to your mobile.
Gebruikershandleiding.com neemt misbruik van zijn services uitermate serieus. U kunt hieronder aangeven waarom deze vraag ongepast is. Wij controleren de vraag en zonodig wordt deze verwijderd.
Product:
Spelregels forum
Om tot zinvolle vragen te komen hanteren wij de volgende spelregels:
lees eerst de handleiding door;
controleer of uw vraag al eerder door iemand anders is gesteld;
probeer uw vraag zo duidelijk mogelijk te stellen;
heeft u een probleem en al geprobeerd om dit op te lossen, vermeld dit erbij aub;
heeft u een oplossing gekregen van een bezoeker dan horen wij dat graag in dit forum;
wilt u een reactie geven op een vraag of antwoord, gebruik dan niet dit formulier maar klik op de knop 'reageer op deze vraag';
uw vraag wordt direct op de website gezet; vermijd daarom persoonlijke gegevens in te vullen;
Belangrijk! Als er een antwoord wordt gegeven op uw vraag, dan is het voor de gever van het antwoord nuttig om te weten als u er wel (of niet) mee geholpen bent! Wij vragen u dus ook te reageren op een antwoord.
Belangrijk! Antwoorden worden ook per e-mail naar abonnees gestuurd. Laat uw emailadres achter op deze site, zodat u op de hoogte blijft. U krijgt dan ook andere vragen en antwoorden te zien.
Abonneren
Abonneer u voor het ontvangen van emails voor uw Caliber RCD232BT bij:
nieuwe vragen en antwoorden
nieuwe handleidingen
U ontvangt een email met instructies om u voor één of beide opties in te schrijven.
Ontvang uw handleiding per email
Vul uw emailadres in en ontvang de handleiding van Caliber RCD232BT in de taal/talen: Nederlands, Duits, Engels, Frans, Italiaans, Portugees, Spaans, Pools, Zweeds als bijlage per email.
De handleiding is 1,77 mb groot.
U ontvangt de handleiding per email binnen enkele minuten. Als u geen email heeft ontvangen, dan heeft u waarschijnlijk een verkeerd emailadres ingevuld of is uw mailbox te vol. Daarnaast kan het zijn dat uw internetprovider een maximum heeft aan de grootte per email. Omdat hier een handleiding wordt meegestuurd, kan het voorkomen dat de email groter is dan toegestaan bij uw provider.
Uw handleiding is per email verstuurd. Controleer uw email
Als u niet binnen een kwartier uw email met handleiding ontvangen heeft, kan het zijn dat u een verkeerd emailadres heeft ingevuld of dat uw emailprovider een maximum grootte per email heeft ingesteld die kleiner is dan de grootte van de handleiding.
Er is een email naar u verstuurd om uw inschrijving definitief te maken.
Controleer uw email en volg de aanwijzingen op om uw inschrijving definitief te maken
U heeft geen emailadres opgegeven
Als u de handleiding per email wilt ontvangen, vul dan een geldig emailadres in.
Uw vraag is op deze pagina toegevoegd
Wilt u een email ontvangen bij een antwoord en/of nieuwe vragen? Vul dan hier uw emailadres in.