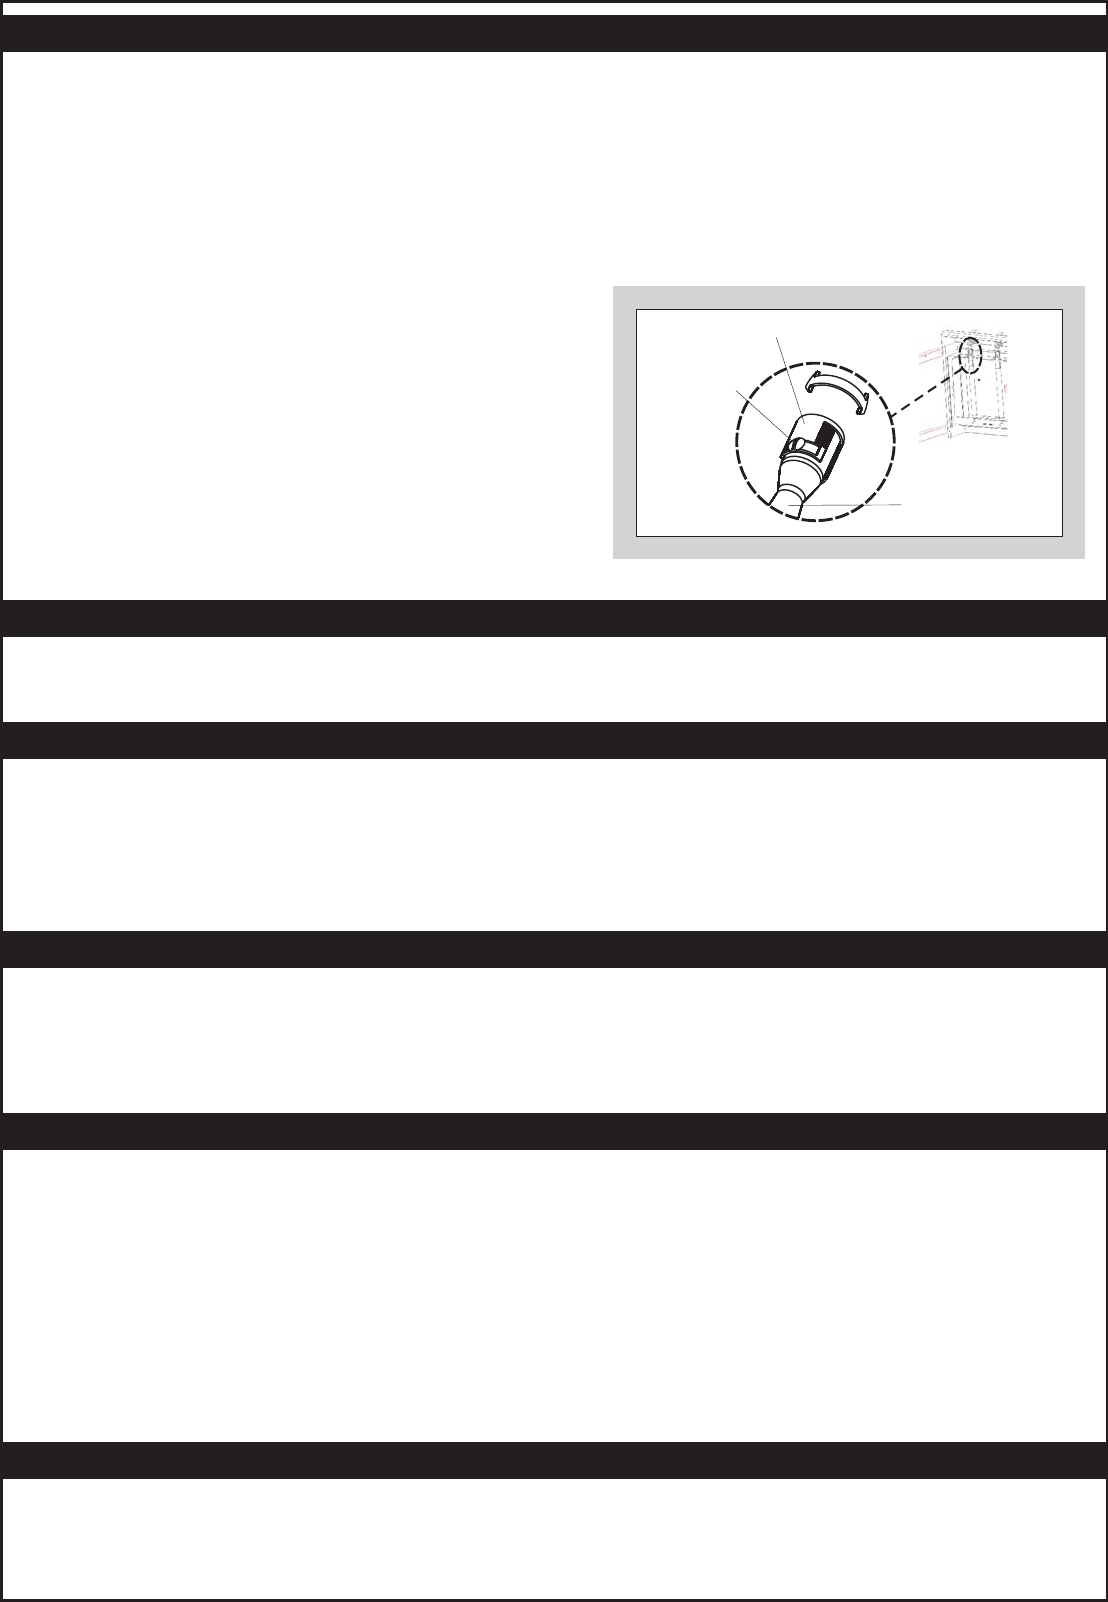
Do not stand the cylinder on the ground when using the appliance or when it is connected to the appliance. It must behanging from the cylinder bracket situated on the side of your
BBQ.
Use this appliance only on a firm level surface.
Before use ensure that the drip tray is in place. It helps to place water or sand in the tray before using the appliance as the fat will drip into the water or sand and this will assist in
preventing flaring. It will also assist in cleaning after use as the fat will be easier to remove from the surface of the drip tray.
Never place sawdust or any other combustible material in or on the drip tray.
Make sure that the cylinder is correctly fitted to the appliance and that the cylinder control valve is in the open position.
To light the appliance using the automatic ignitor, push in and turn the control knob in an anti-clockwise direction until spring resistance is felt. Hold the knob in this position for 3 -5
secs to allow the gas to flow and then turn the knob fully anti-clockwise to the ON position. This will cause the automatic ignitor to light the burner. Should the burner not ignite turn
the control knob to the OFF position and repeat the process until the burner ignites.
Note!All burners are fitted with an automatic Ignitor.
To light the burners using Cross lighting, light the left hand burner as described above.
To light the remainder of the burners, simply turn their control knobs to the HIGH position while ensuring that the lighting sequence is such that any burner to be lit up is directly
adjacent to a burner which is already burning.
To light the burners manually, first remove the cast iron grill plate and the
deflector plate directly underneath it. Strike a match and position it next to the left hand
burner. Turn on the gas supply to that burner only by pushing the control valve in and turning
it in an anti-clockwise direction. This will ignite the burner. Once the burner is ignited,
carefully replace the deflector plate and cast iron grill plate. You will now be able to light the
remainder ofthe burners as described in 'Cross lighting'.
The grids and grills heat up evenly, searing meats and locking in their natural juices and flavours.
When using the grill for the first time, lightly coat the cooking side of the grill / grills with oil before heating. This can berepeated after every wash.
Preheat the grills before cooking.Lightly coat your food with oil, to prevent it sticking to the grill.
For the best results, keep the lid closed while cooking, and only use 2 burners on HIGH. The heat inside the lid should not exceed 250°C (Not applicable to models 98345 & 98346)
is recommended for foods that can be cooked in less than 1/2 hour(e.g. steaks, fish fillets, chops, hamburger patties, etc.).
Food is placed directly over the heat source
Cross lighting:
Manual ignition:
Direct cooking
Use the control knobs to adjust the individual burner flame intensity to the desired level by
turning the knob anti-clockwise to increase the flame and clockwise to decrease it. If flaring
occurs, first check that the primary air supply apertures in the burner mixing tube are not
blocked.
After use, first close valve on gas cylinder. When the flame has extinguished close the burner
control valves on the appliance by turning control knobs fully clockwise.
Anormal flame is blue and may have a yellow tip. If the flame is completely yellow, it may be
that the air-intake adjuster is not correctly set. To set the air-intake adjuster, follow the
steps below:
Depending on where the appliance is operated, it may be necessary to set the air-intake
adjuster.
To obtain a blue flame, loosen the locking screw and adjust the air-adjuster by rotating it
clockwise or anti-clockwise until the desired flame is obtained.
This process needs to be repeated on all the burners.
.As juices from the food drip onto the deflector plate, it creates the "smoke" that gives the food that irresistible barbecue flavour.
(Applicable toALLmodels)
is similar to roasting and is recommended for whole meats (e.g. roasts, whole chickens, vegetables or even baking bread, etc) that need to be cooked slowly.(Not
applicable to models 98345 & 98346)
This is done by either turning down the heat source or by lighting the two side burners only and placing the food over the centre burner. (Not applicable to models 98345 & 98346)
All cooking done in this manner requires the lid to be closed.With the lid closed the circulated heat ensures that the food is cooked evenly, much like a convection oven. (Not
applicable to models 98345 & 98346)
The built-in thermometer in the lid indicates the cooking temperature inside the barbecue and can be used to monitor and control the heat settings for excellent results. (Not
applicable to models 98345 & 98346)
The grill plates are coated with vitreous enamel. Whilst vitreous enamel is very durable, you will add years to its life if you use plastic or wooden utensils when cooking.
Do not overheat the grill plate and always add a little cooking oil to the surface before use.
Always allow the grill plate to cool before immersing it in water.
Vitreous enamel is perfectly safe in the dishwasher, but the surface is so easy to clean that a quick hand wash does the trick. The use of abrasive detergents is not recommended, as
this will permanently scratch or mark the surface.
If through misuse, burned grease or food residue collects on the surface, it can usually be removed with warm water and mild detergent. In an extreme case, it can be removed by a
thorough cleaning with a mixture of 3 tablespoons ofbleach, 1 tablespoon of liquid detergent and 1 cup of water.Apply to the cooking surface with a sponge or plastic scrubbing pad.
After cleaning, recondition the surface with a light wipe of oil before re-use.
There are no predetermined maintenance intervals for this appliance.
It is dangerous to use an appliance with a cracked or perished seal and / or hose. Inspect both seals and hose regularly and replace if they are not in order, before using the
appliance.
If the appliance was in use, it will be hot.Allow to cool sufficiently before attempting any maintenance.
The CADAC Patio BBQ is fitted with a CADAC Jet to regulate the correct amount of gas. Should the hole in the Jet become blocked this may result in a small flame or no flame at all.
Do not attempt to clean the Jet with a pin or other such device as this may damage the orifice, which could make the appliance unsafe.
Ensure that the cylinder valve is closed, then disconnect the appliance from the gas cylinder.
Remove the grill plates. Remove the enamelled deflector plates to expose the burners. Remove the drip tray and the retaining screws of the affected burner.
Remove the affected burner by lifting it out of its location taking care not to damage the control valve whilst doing so. This will expose the jet.
Unscrew the blocked jet with a suitable spanner and replace it with a new jet. Do not use pliers on the jet as this may damage the jet making it unusable or impossible to remove.
Do not over tighten as this may damage the Jet. To re-assemble, reverse the above procedure.
The hose length should not be less than 800 mm and shall not exceed 1.2 m. Check the expiry date on the hose and replace when necessary. Fitting of a hose is described in
Section 3. Only LPG hose that complies with BS 3212 may be used with this appliance.
It is important that the connection between the regulator outlet and the low pressure hose is tight and that it is secured with a metal hose clamp.Always check the joint for gas leaks
as described in section 3 above before use.
Anormal flame is blue and may have an orange or yellow tip. If the flame is completely yellow, it may be that the jet isnot securely fitted. Re-tighten to give a gas tight seal.An
overfilled gas cylinder can also cause large yellow flames. Cylinder should be returned to filling station and checked by weight.
Check that the primary air supply apertures in the Burners are clear and free of obstructions.Also check that there are no obstructions inside the venturi. Remove the affected burner
by lifting it out of its location (see 'Replacing a Blocked Jet' above). Remove whatever material is blocking the venturi, such as insect nests.
If the flame power drops or the gas will not light, check that the gas cylinder still contains gas (shake to hear the noise made by a liquid). If there is still gas, the jet might have
become blocked or partially blocked.
If you suspect a blocked jet, follow the instructions above.
Gebruikershandleiding.com neemt misbruik van zijn services uitermate serieus. U kunt hieronder aangeven waarom deze vraag ongepast is. Wij controleren de vraag en zonodig wordt deze verwijderd.
Product:
Spelregels forum
Om tot zinvolle vragen te komen hanteren wij de volgende spelregels:
lees eerst de handleiding door;
controleer of uw vraag al eerder door iemand anders is gesteld;
probeer uw vraag zo duidelijk mogelijk te stellen;
heeft u een probleem en al geprobeerd om dit op te lossen, vermeld dit erbij aub;
heeft u een oplossing gekregen van een bezoeker dan horen wij dat graag in dit forum;
wilt u een reactie geven op een vraag of antwoord, gebruik dan niet dit formulier maar klik op de knop 'reageer op deze vraag';
uw vraag wordt direct op de website gezet; vermijd daarom persoonlijke gegevens in te vullen;
Belangrijk! Als er een antwoord wordt gegeven op uw vraag, dan is het voor de gever van het antwoord nuttig om te weten als u er wel (of niet) mee geholpen bent! Wij vragen u dus ook te reageren op een antwoord.
Belangrijk! Antwoorden worden ook per e-mail naar abonnees gestuurd. Laat uw emailadres achter op deze site, zodat u op de hoogte blijft. U krijgt dan ook andere vragen en antwoorden te zien.
Abonneren
Abonneer u voor het ontvangen van emails voor uw Cadac 98345 bij:
nieuwe vragen en antwoorden
nieuwe handleidingen
U ontvangt een email met instructies om u voor één of beide opties in te schrijven.
Ontvang uw handleiding per email
Vul uw emailadres in en ontvang de handleiding van Cadac 98345 in de taal/talen: Engels als bijlage per email.
De handleiding is 0,46 mb groot.
U ontvangt de handleiding per email binnen enkele minuten. Als u geen email heeft ontvangen, dan heeft u waarschijnlijk een verkeerd emailadres ingevuld of is uw mailbox te vol. Daarnaast kan het zijn dat uw internetprovider een maximum heeft aan de grootte per email. Omdat hier een handleiding wordt meegestuurd, kan het voorkomen dat de email groter is dan toegestaan bij uw provider.
Uw handleiding is per email verstuurd. Controleer uw email
Als u niet binnen een kwartier uw email met handleiding ontvangen heeft, kan het zijn dat u een verkeerd emailadres heeft ingevuld of dat uw emailprovider een maximum grootte per email heeft ingesteld die kleiner is dan de grootte van de handleiding.
Er is een email naar u verstuurd om uw inschrijving definitief te maken.
Controleer uw email en volg de aanwijzingen op om uw inschrijving definitief te maken
U heeft geen emailadres opgegeven
Als u de handleiding per email wilt ontvangen, vul dan een geldig emailadres in.
Uw vraag is op deze pagina toegevoegd
Wilt u een email ontvangen bij een antwoord en/of nieuwe vragen? Vul dan hier uw emailadres in.