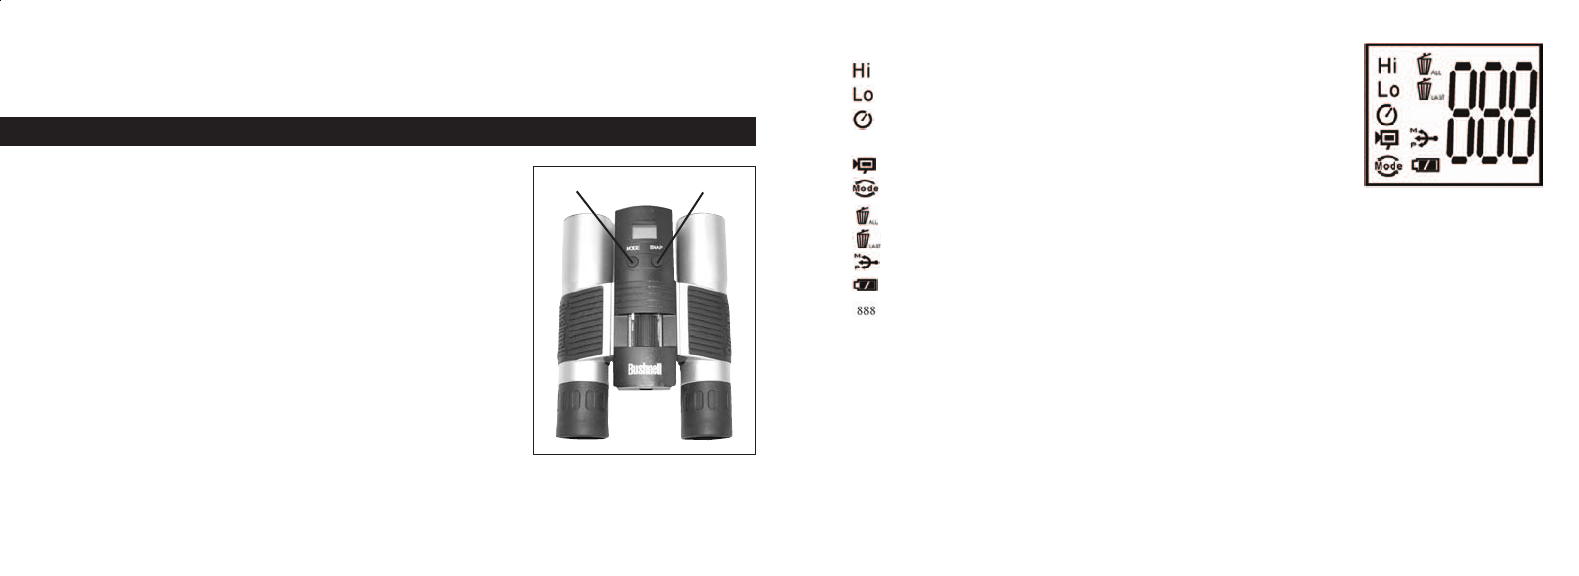
559529
3
Verklein
Vergroot
Pagina terug
1/33
Pagina verder
LCD DISPLAY
1. High Resolution Mode = 1280x1024 Pixels
2. Low Resolution Mode = 1024x768 Pixels
3. Select the timer to take a delayed picture. This gives you
approximately a 10-second delay.
4.
This mode allows you to take short movie clips, saved as “.avi” files.
5. Selects different modes.
6. Deletes all the pictures in the memory.
7. Deletes the last picture taken.
8. USB mark appears when USB cord is connected between the camera and the PC.
9. Battery mark keeps track of the battery life left.
10. a. Picture Number-- This area will show the number of pictures in the memory.
b. SET-- select Hq (high quality)/Lq (low quality) mode, STO (Mass Storage)/ PCC (PC Cam)
mode, 50Hz/60Hz frequency
c. FUL--When the memory is full, the display will show “FUL” and alarm will sound.
OPERATION GUIDE
1. The camera is powered by two AAA batteries (included) or USB power (included).
2. Insert the battery into battery compartment.
3. Press and hold the MODE button until camera turns on.
4. Press SNAP to take a picture, or press the MODE button quickly to change mode settings as described
above. The camera is set at infinity and will not be focused on an object closer than 49 feet.
5. The mode setting operation is a cycle loop, so press the MODE button to switch to another mode.
1
Congratulations on your purchase of a Bushnell ImageView binocular. Before using the product, please
read the instructions contained in this manual and take time to familiarize yourelf with the different
parts and features of the product.
CAMERA OPERATION INSTRUCTIONS
BUTTON DESCRIPTIONS
The MODE button has three functions:
1. Power on: Press and hold button until the camera turns on. When
the camera is connected to your PC via the USB cable provided,
the camera will power on automatically.
2. Power off: While the camera is on, press and hold the button until
camera turns off. If camera has not been used or if a button has
not been pressed for over 2 minutes, the camera will automatically
power off to save battery life. If the camera is connected via the
USB cable, it will not power off except when PC is turned off.
3. Mode change: Press this button rapidly to change modes.
The SNAP button has two functions:
1. Take a picture: Press this button to take a picture when the camera
is on. (But not in the PC mode or mode change.
2. Select: In “Mode Change”, press this button to confirm the function.
2
Mode Snap
11-8313 IMAGEVIEW MANUAL 3/11/04, 2:59 PM4-5
3

Hulp nodig? Stel uw vraag in het forum

Spelregels

Misbruik melden

Gebruikershandleiding.com neemt misbruik van zijn services uitermate serieus. U kunt hieronder aangeven waarom deze vraag ongepast is. Wij controleren de vraag en zonodig wordt deze verwijderd.

Product:

Bijvoorbeeld antisemitische inhoud, racistische inhoud, of materiaal dat gewelddadige fysieke handelingen tot gevolg kan hebben.

Bijvoorbeeld een creditcardnummer, een persoonlijk identificatienummer, of een geheim adres. E-mailadressen en volledige namen worden niet als privégegevens beschouwd.

Spelregels forum

Om tot zinvolle vragen te komen hanteren wij de volgende spelregels:

Belangrijk! Als er een antwoord wordt gegeven op uw vraag, dan is het voor de gever van het antwoord nuttig om te weten als u er wel (of niet) mee geholpen bent! Wij vragen u dus ook te reageren op een antwoord.

Belangrijk! Antwoorden worden ook per e-mail naar abonnees gestuurd. Laat uw emailadres achter op deze site, zodat u op de hoogte blijft. U krijgt dan ook andere vragen en antwoorden te zien.

Abonneren

Abonneer u voor het ontvangen van emails voor uw Bushnell Imageview 118313 bij:


U ontvangt een email met instructies om u voor één of beide opties in te schrijven.


Ontvang uw handleiding per email

Vul uw emailadres in en ontvang de handleiding van Bushnell Imageview 118313 in de taal/talen: Duits, Engels, Frans, Italiaans, Portugees, Spaans als bijlage per email.

De handleiding is 0,39 mb groot.


U ontvangt de handleiding per email binnen enkele minuten. Als u geen email heeft ontvangen, dan heeft u waarschijnlijk een verkeerd emailadres ingevuld of is uw mailbox te vol. Daarnaast kan het zijn dat uw internetprovider een maximum heeft aan de grootte per email. Omdat hier een handleiding wordt meegestuurd, kan het voorkomen dat de email groter is dan toegestaan bij uw provider.

Uw handleiding is per email verstuurd. Controleer uw email

Als u niet binnen een kwartier uw email met handleiding ontvangen heeft, kan het zijn dat u een verkeerd emailadres heeft ingevuld of dat uw emailprovider een maximum grootte per email heeft ingesteld die kleiner is dan de grootte van de handleiding.

Er is een email naar u verstuurd om uw inschrijving definitief te maken.

Controleer uw email en volg de aanwijzingen op om uw inschrijving definitief te maken

U heeft geen emailadres opgegeven

Als u de handleiding per email wilt ontvangen, vul dan een geldig emailadres in.

Uw vraag is op deze pagina toegevoegd

Wilt u een email ontvangen bij een antwoord en/of nieuwe vragen? Vul dan hier uw emailadres in.


Info