RETAIN THE FOLLOWING FOR FUTURE
REFERENCE.
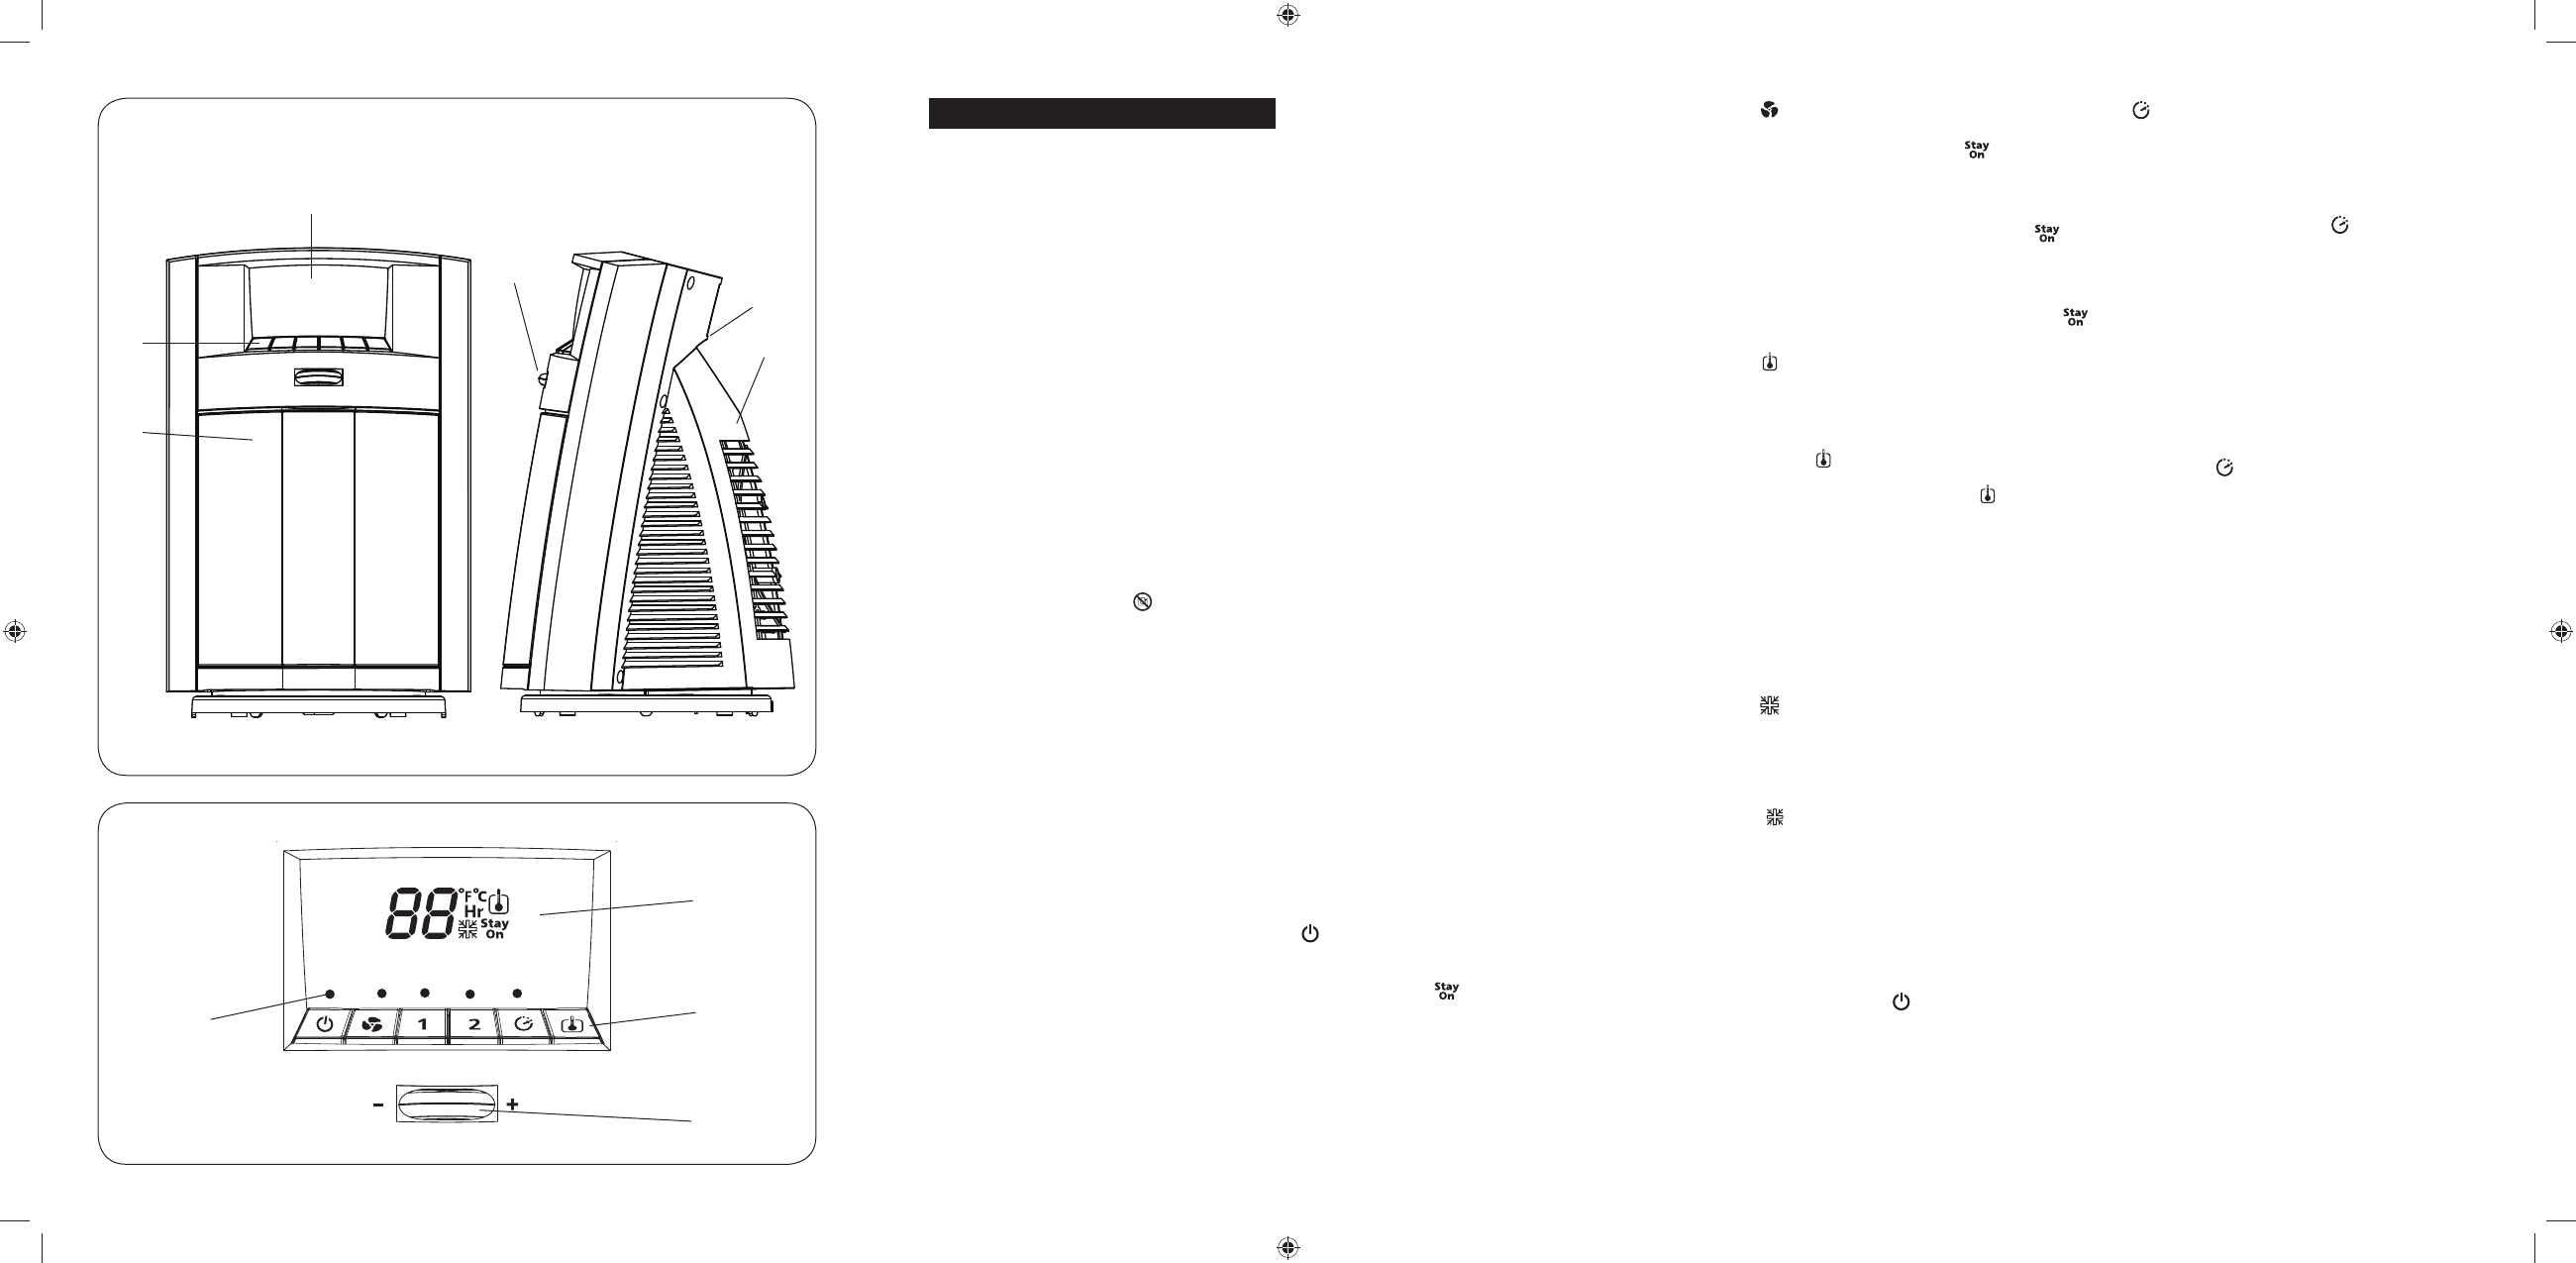
DESCRIPTIONS (See Fig.1 & 2)
A. Main Housing
B. Control Panel
C. Front Grill
D. Carry Handle
E. Power Light
F LCD Display
G Control buttons set
H Dial Wheel
PLEASE READ AND SAVE THESE
IMPORTANT INSTRUCTIONS
When using electrical appliances, basic safety
precautions should always be taken including the
following:
1. Before connecting the heater, check that
the voltage indicated on the rating plate
corresponds to the main voltage in your
home/offi ce.
2. WARNING: In order to avoid overheating,
do not cover the heater (
).
3. DO NOT position the heater directly under a
power socket.
4. Do not use this heater in the immediate
surroundings of a bath, a shower or a
swimming pool.
5. If the supply cord or plug is damaged, it must
be replaced by the manufacturer or its service
agent or similarly qualifi ed person in order to
avoid hazard. The heater contains no user
serviceable parts. Should the product suffer
damage or breakdown, it must be returned to
the manufacturer or their service agent.
6. Under the environment with electrical fast
transient, the product may malfunction and
require user to reset the product.
7. Do not use this heater with a programmer,
timer or any other device that switches the
heater on automatically, since a fi re risk
exists if the heater is covered or positioned
incorrectly.
8. Only touch the heater with dry hands.
9. DO NOT use this heater outdoors.
10. DO NOT position where it can be touched by
children, especially the very young.
11. Allow a safe area around the heater away
from furniture or other objects; at least 50
cm from the top and sides and 200 cm at the
front.
12. Do not use this heater when it is lying on its
side.
13. DO NOT use the heater in rooms with
explosive gas (e.g. petrol) or while using
infl ammable glue or solvent (e.g. when gluing
or varnishing parquet fl oors, PVC etc).
14. DO NOT insert any objects into the heater.
15. Keep the mains cord at a safe distance from
the main body of the heater.
16. If overheating should occur, the built-in
overheating safety device will switch off the
heater.
17. Do not place the cord under a rug.
18. The heater cannot be used adjacent to
curtains or combustible material. Curtains or
combustible material may be burned if the
heater was installed incorrectly.
19. This appliance is not intended for use by
persons (including children) with reduced
physical, sensory or mental capabilities,
or lack of experience and knowledge,
unless they have been given supervision or
instruction concerning use of the appliance
by a person responsible for their safety.
Children should be supervised to ensure that
they do not play with the appliance.
20. WARNING: Risk of Fire. Discontinue
use if the outlet or plug become hot to the
touch. Overheating may indicate a worn
or damaged outlet. Consult a qualifi ed
electrician for outlet replacement.
21. CAUTION: In order to avoid a hazard due
to inadvertent resetting of the thermal cutout,
this appliance must not be supplied through
an external switching device, such as a timer,
or connected to a circuit that is regularly
switched on and off by the utility.
OPERATING INSTRUCTIONS
1. Place heater on a fi rm level surface.
2. Plug heater into wall socket. Once plugged in
the Power Light (E) will illuminate.
3. Operate heater by selecting modes and
settings (G+H) according to your preference.
Power ON/OFF
Press the Power ON/OFF button to turn the heater
on. Once heater on, the heater will run in 2 (HIGH)
heat mode and the icon will appear on the
LCD display. Press the Power ON/OFF button to
manually turn off the heater at any setting.
MODE SELECTION
Select you desired heat settings by pressing the
corresponding buttons (G) as located on your
heater. An indicator light will illuminate next to
each button (G) to indicate that the selected
setting/mode is activated.
Fan Only Setting
Press the Fan Only button to run the heater
without any heat output. The icon will appear
on the LCD Display.
1 - Low Heat
1 = LOW Heat setting. Press the (1) button to run
the heater continuously at 1100W. The
icon
will appear on the LCD display.
2 - High Heat
2 = HIGH Heat setting. Press the (2) button to
run the heater continuously at 2200W. The
icon will appear on the LCD display.
Thermostat Control
Your heater is equipped with a digital thermostat
that allow you to set your heater to a precise
comfort control level by turning the Dial Wheel (H).
NOTE: Your heater comes with a thermostat
button (
) on the control panel, you may either
press the button or turn the the Dial Wheel to
activate. The Thermostat icon ( ) will appear on
the LCD display.
To preset a precise comfort level, turn the Dial
Wheel to adjust the temperature from 30 ˚C to
18 ˚C (Default 30 ˚C) The LCD Display will show
the selected temperature reading. When the
preset temperature is reached the heater will
shut off and cool down for 15 seconds. When
the room temperature drops below the preset
temperature, the heater will automatically turn on
again to maintain the preset temperature level.
Frost Guard Setting
Your heater is equipped with a Frost Guard
feature. The heater will automatically turn on
when the room temperature drops to below 5 ˚C.
To activate the Frost Guard feature, turn the Dial
Wheel to show 5 ˚C and the Frost Guard icon
( ) will appear on the LCD Display.
NOTE: It is normal for the heater to cycle ON
and OFF to maintain the preset temperature.
Raise the thermostat setting to prevent the heater
from cycling. When the preset temperature
is reached or when the heater is shut off, the
fan will run for 15 seconds without heat. This
cool down process ensures an accurate and
consistent temperature reading.
NOTE: To shut the heater off at any time press
the Power Button (
) until the LCD display goes
off. The heater will cool down for 15 seconds,
and the Fan Only indicator light will blink in
Amber until cool down is completed. The digital
thermostat has memory, it will remember the last
temperature setting before the heater is turned
off. However, if the heater is unplugged, the
digital thermostat will not longer remember the
previous temperature setting.
Timer
Your model is equipped with a 24 Hour Auto
shut-off timer feature. This allows you to
programme your heater to shut off automatically
after running a defi ned time interval (from 0-24
hours).
1. Press the Timer Button (
) once. The
indicator light will begin to fl ash for 5
seconds. The LCD display will show “0” and
the “Hr” icon.
2. Turn the Dial Wheel (+/-) to adjust from 0-24
to select your desired time interval for the
heater to shut-off automatically. The selected
hour will appear on the LCD display, and then
the timer indicator light will stop blinking in 3
seconds to indicate that the selected timer
is activated. The LCD display will return to
show the preset temperature.
3. To cancel the timer feature, press the Timer
Button (
) twice within 5 seconds. The
Timer indicator light will go off.
NOTE: The Timer does not work with the Frost
Guard setting.
AUTO SAFETY SHUT OFF
This heater is equipped with a technologically-
advanced safety system that requires the user
to reset the heater if there is a potential overheat
situation. When a potential overheat temperature
is reached, the system will automatically shut the
heater off. It can only resume operation when the
user rests the unit. If the heater shuts off and the
Power Light is fl ashing, please follow the specifi c
reset instructions below:
1. Stand heater upright.
2. Unplug unit from socket and wait 30 minutes.
3. Plug in and turn ON.
NOTE: If the heater is plugged in again and
Power On/Off Button is pressed within the
30-minute cool down period, heater will run at
High Heat (2) setting, but shut down in 2 seconds
with the Power Light fl ashing. Please repeat
the above 3 steps to reset the heater again and
ensure to allow suffi cient time for the thermostat
to cool down.
CLEANING AND MAINTENANCE
• Turn off the unit.
• Remove the plug from the wall socket.
• Wait for the heater to cool down suffi ciently.
• You may clean the outside of the heater with
a damp cloth. DO NOT allow water to come
into the appliance. DO NOT use soap or
chemicals, which may damage the housing.
Allow suffi cient time to dry before plugging
the unit back in the socket.
ENGLISH
Fig.2
A
D
B
C
F
F
G
E
H
H
BFH912
Fig.1
2 3