M
20
1
2
3
4
5
6
7
8
9
10
1
12
13
14
15
16
18
19
LIQUID C
17
*Range may
•
8 PMR Channels
•
121 Privacy Codes
and DCS
•
Up to 10
•
Submersible design
•
Direct Call
•
122 Group Codes
•
Silent Mode
•
10 Selectable Call/Ring
•
Backlit LCD Display
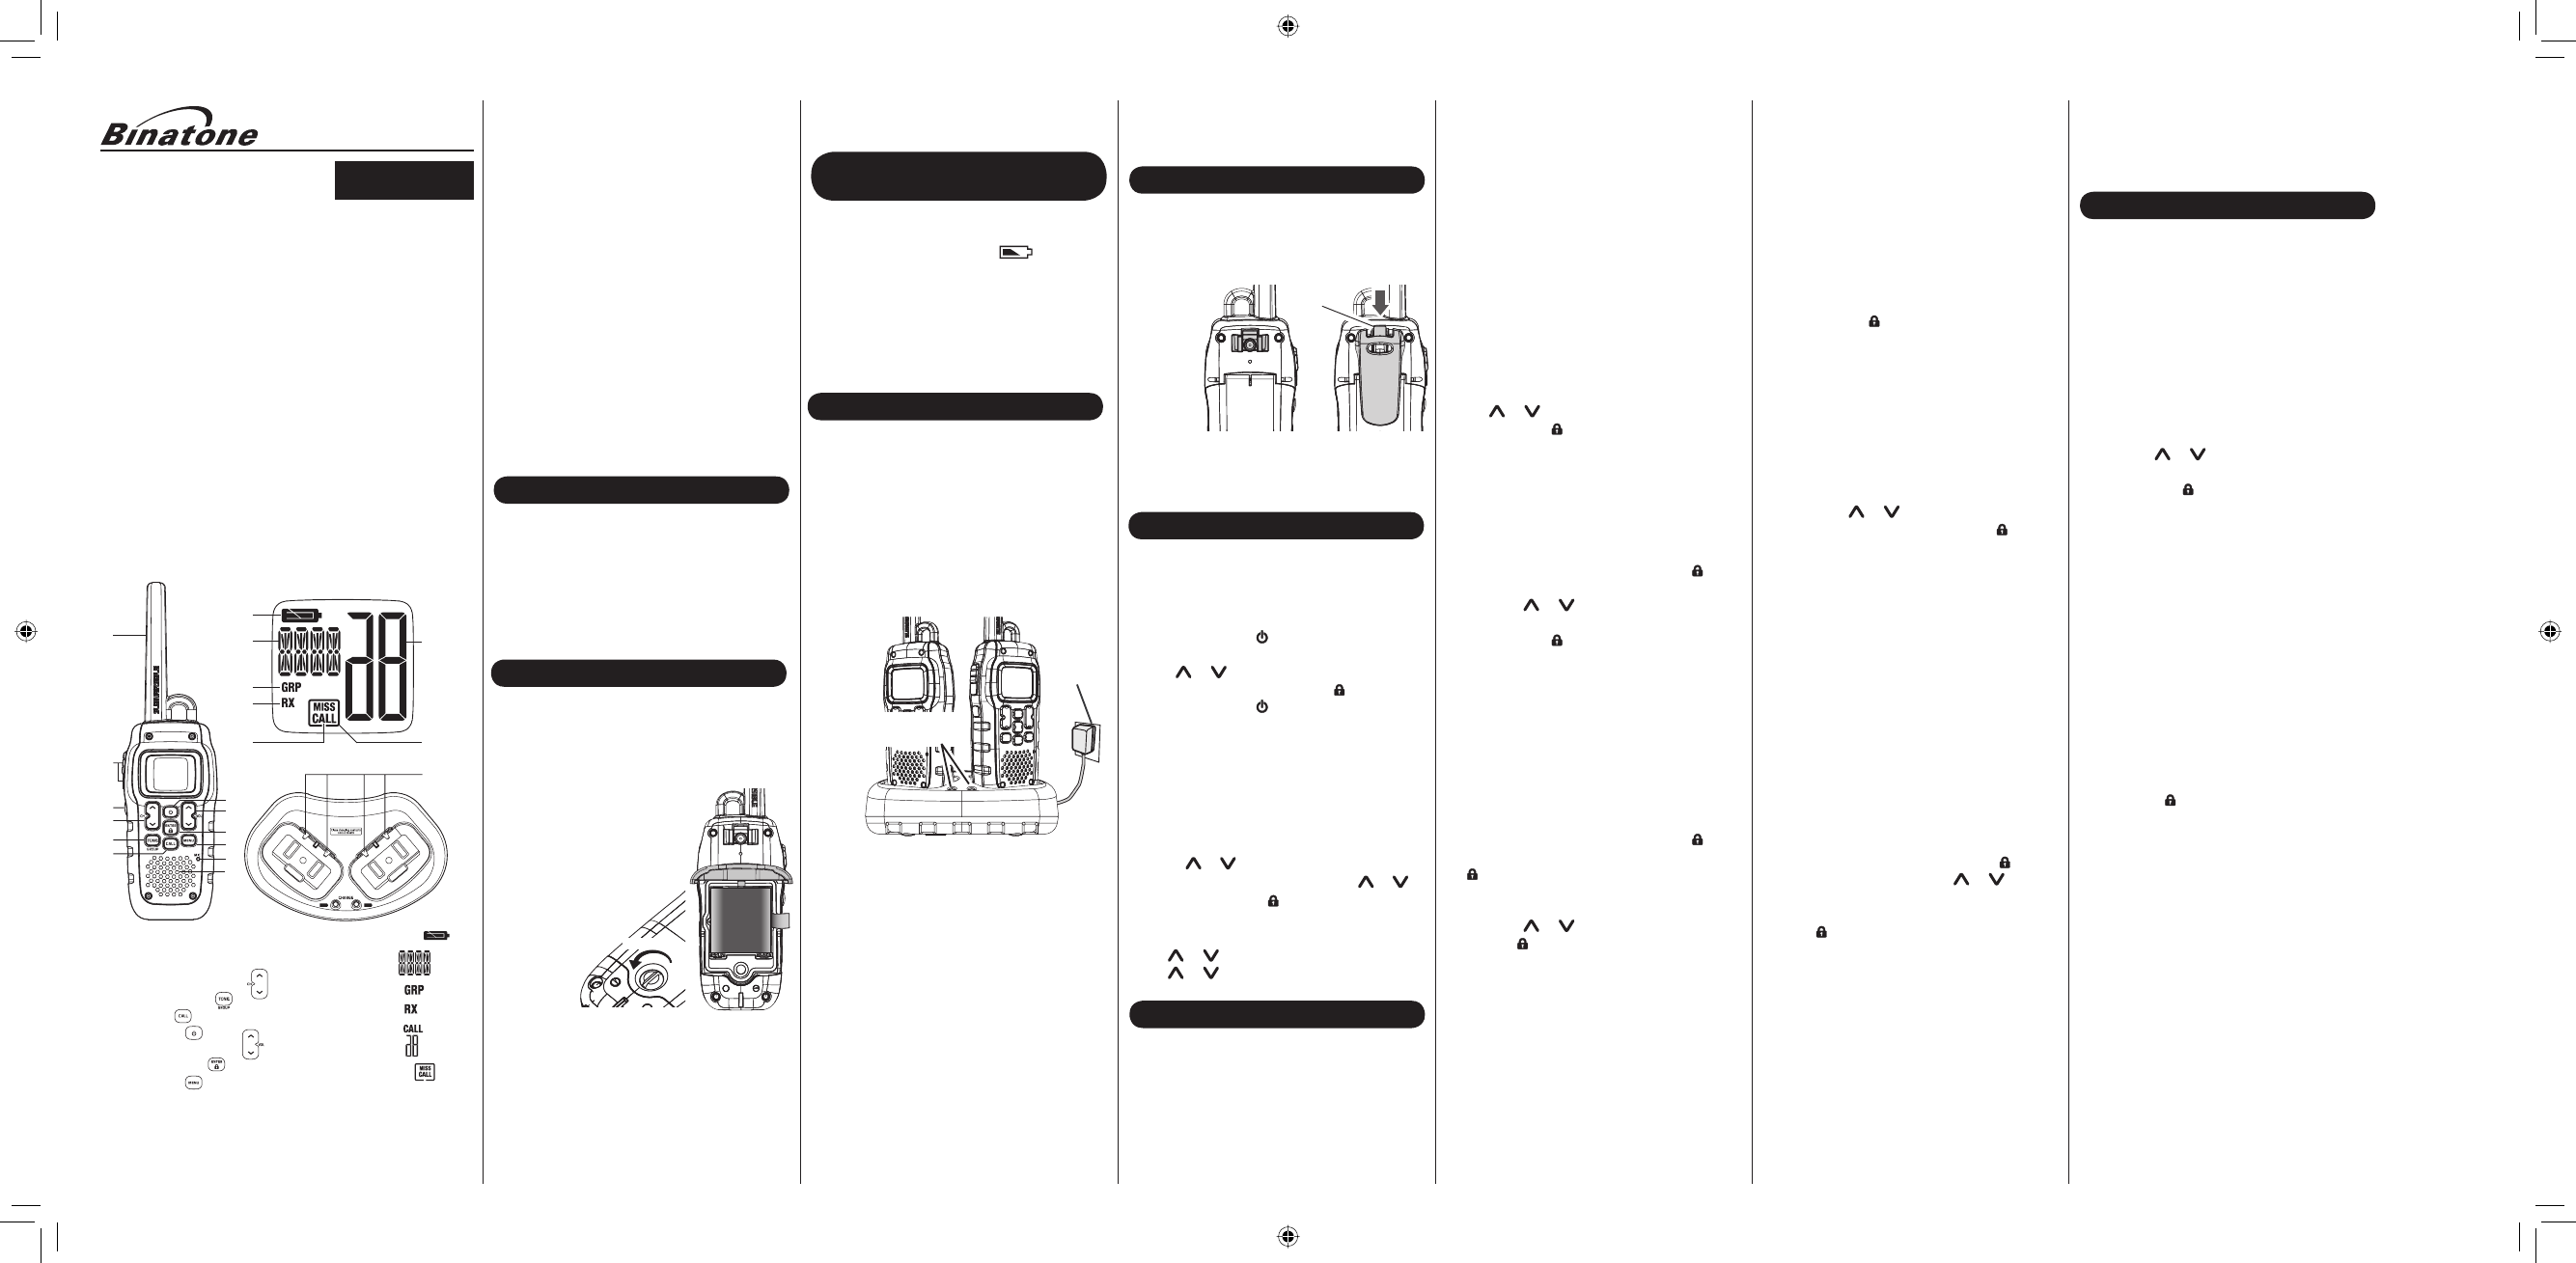
1 Antenna
2 PTT (Push-To-Talk)
3 Monitor Button
4 Channel Up/Down
5 Tone/Group Key
6 Call Key
7 Power key
8 Volume Up/Down
9 Enter/Lock Key
10 Menu Key
11 Microphone
12 Loudspeaker
13 Battery Level
14 Function and Sub
Code
15 Group Indicator
16 Receive Indicator
17 Call Indicator
18 Channel Indicator
19 Missed Call
20 Charging Contacts
Congratulations on
Marina 900
radio. This
of-the-art device,
features. Use
contact with
outdoors, or
communication -
Your radio
standards, which
submerged in
minutes without
After your
notice that
there is
speaker and
excess water,
Note: If
your radio
before turning
PACKAGE CONTENTS
Your package
Two Marina
Two rechargeable
One AC
One dual
Two belt
This user
INSTALL THE
USING THE
SETTING UP
USING THE
BATTERY ALERT
This radio
the status
low, the flashes
then BATT
the NiMH
Warning! To avoid
property damage
use the
product.
M
CHARGING THE
Your radios
rechargeable battery
instructions to
cradle.
Make sure
the radio
Using the
1)
socket in
the adapter
2)
and place
the keypad
3)
battery pack
from the
Note:
• Charge time
life remaining.
• For fastest
charging.
Warrning!:
• The charging
charging cradle
attempting to
cradle to
power.
Setting the
To set
Direct Call,
press and TONE/GROUP
radio displays GRP and
Note: In
transmissions from
also set
Setting the
Set the
0-121. Everyone
same group
each other.
1) Tap TONE/GROUP in
CH
or to
2) Press ENTER/ or TONE/GROUP to
normal operation.
Setting the
Each radio
unique unit
1) Press MENU . Advance
UNIT appears, ENTER/ . The
current unit
2) Press CH or to select
number.
3) Press ENTER/ to
section.
Setting Your
Your nickname
when you
also the
when someone
When no
appears.
1) Press MENU . Advance
UNIT appears, ENTER/ .
current unit ENTER/
. The n
- -
(or
nickname) with
flashing.
2) Press CH or to select
ENTER/ to
you have
3) Press MENU to
menu.
Using Group
Group mode
people in
group and
in your
radio. Before
instructions in
radio in
and everyone’s
call to
a Direct
Sending a
Direct Call
once, or
anyone else
"speed dial"
talk to.
To call CALL
group mode. ALL .
CALL or ENTER/
. Everyone
receives a
the chirp
Note: When
radio also
will show
group.
To call
other people CALL in
Then, use CH or to select
want to CALL ENTER/ .
radio sounds
call. When
begin your
tones at PTT .
Your conversation
and the
your last
automatically exits
Automatically Changing
Auto Channel
channel change
might want
a lot
To start
the group MENU .
until CHCX ENTER/
. The
current channel CH or to select
the target
selected channel CALL or
ENTER/ .
Your radio
sends out
radio receives
once, then
To ensure
we recommend
• Make sure you are
where the
• Optimize
signal by
give the
USING THE
Use the
you need
that do
Choosing a
You can
channel. oFF
selected and
regardless of
radio.
1) TONE/GROUP . The
indicator flashes.
2) CH
or to
code. You oFF .
3) ENTER/ or TONE/GROUP to
normal operation.
Note: Only
brands. Other
brand. See
used for
Channel Scan
Your radio
easily scan
is detected,
the channel
the radio PTT
the scan
on that
To turn
Press MENU . SCAN ,
press ENTER/
.The channel
the radio
To turn
Press MENU , PTT or CALL .
Talking on
To talk
1) PTT and
normal voice
microphone. While TX appears
the display
avoid cutting
transmission, pause PTT
before you
2) PTT . You
can now
RX appears
Note: When PTT , TX
display. If PTT is
•
Roger Beep
•
Vibrate Reminder
•
All Call
•
Auto Channel Change
•
Battery Charger
•
Battery Level Meter
•
Channel Monitor
•
Channel Scan
•
Group Scan
•
Keypad Lock
Private Mobile
Your radio
To install
1)
2)
counterclockwise with
screwdriver, and
battery cover.
3)
the battery
contacts to
charge contacts,
shown, and
instructions
written on
the battery
pack incorrectly
operating.
4)
radio, make
fully inside
the rubber
under the
In order
this user
operate the
Turning the
1)
to
2)
VOL or to increase
volume level ENTER/ .
3) to turn the
Choosing a
Your radio
you can
someone, both
channel and
To choose
Pless CH
or to go to channel mode.
To select the desired channel, press CH
or .
And then press ENTER/
to con rm.
• To change the channel
CH
or , then
CH or for more
In order
couple of
• Set the radio to
• Set a Group Code
• Set a Unit Number
• Set a "Nickname"
USER GUIDE
5)
the screw
OPEN
AC outlet
Charge LED
illuminates
• Wipe off
before placing
is soiled
INSTALL THE
Your radio
To install
1)
2)
indicates
the belt
clip is
locked
into
position.
To Remove
1)
2)
While pulling
Belt clip
latch
• Do a "roll call"
move to
missed someone,
and issue
UT053AK_Marina 900_0810.indd 1 8/11/2010 2:41:06 PM
**Please note that all calls are charged at local rate
www.binatonetelecom.com
Binatone Helpline
Monday to Friday
from 9:00am to 5:00pm
T
o
(for UK only)
Binatone Help Line - 0845 345 9677
Binatone Help Line - 0845 345 9677
Binatone Help Line - 0845 345 9677
a
into a
AC outlet.
with the
follow the
good condition
after you PTT the
and you
CHARGEING CRADLE