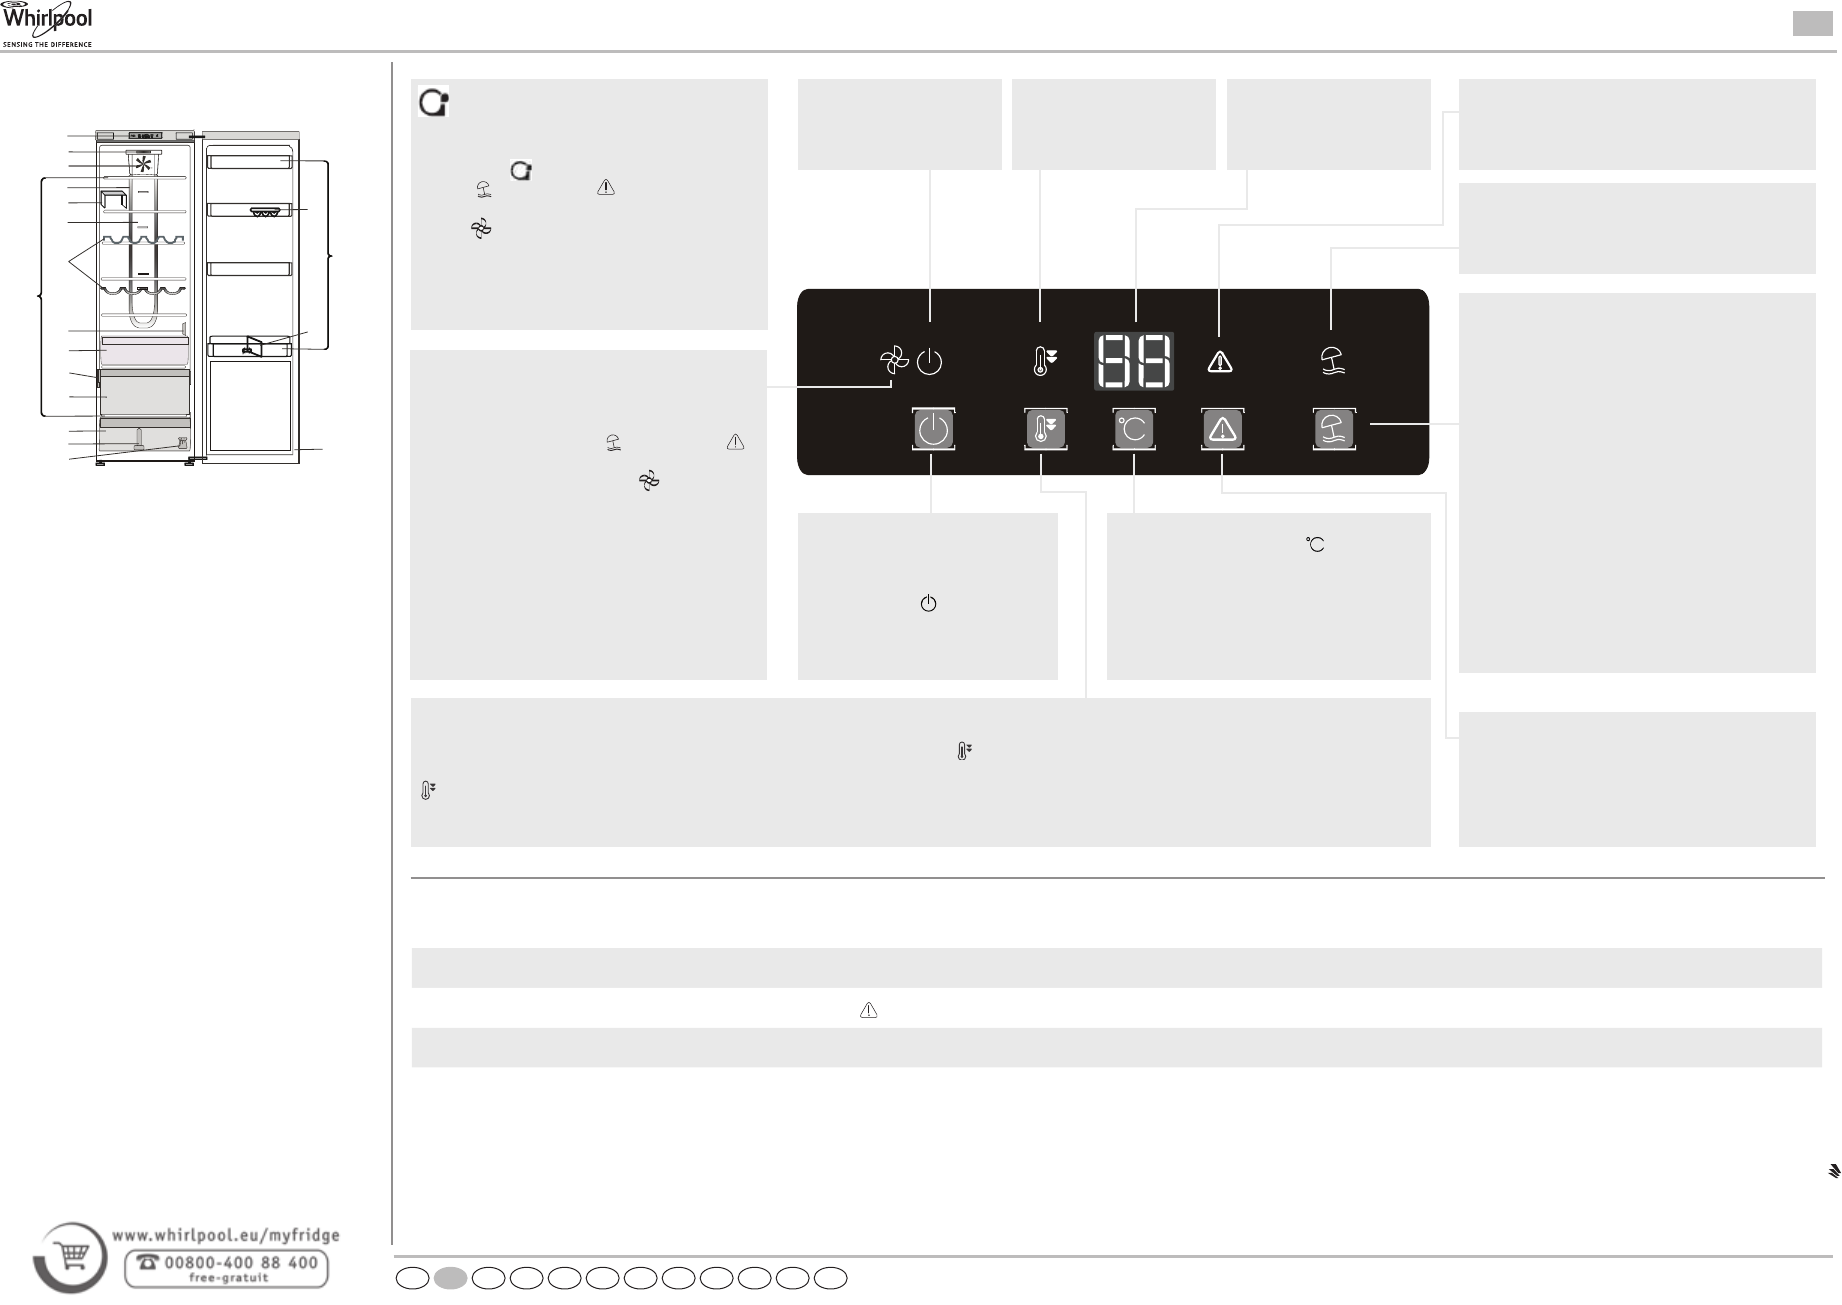
Using Fast Cool function it is possible to increase the cooling capacity in the refrigerator compartment. The use of this function is recommended when placing a
very high quantity of food in the refrigerator compartment. Press the Fast Cool button
to activate Fast Cool function.
When activated, the Fast Cool indicator turns on. The function is automatically disabled after 6 hours, or can be manually disabled by pressing Fast Cool button
again.
STOP ALARM button
Press in case of alarm to mute the acoustic alarm.
4
1.INSTALLING TWO APPLIANCES
During installing the freezer and the fridge
together ensure that the freezer is located on the left and
the fridge on the right (as shown on the drawing). Left side
of refrigerator is equipped with special device in order to
avoid condensation problems between appliances.
We recommended installing two appliances together
using the linking-kit (as shown on the drawing).
You can buy it in Service.
2.FUNCTIONS
2.1. SMART DISPLAY*
This function can be used to save energy.
Please follow the instructions contained in the Quick
Start Guide to activate/deactivate the function.
Two seconds after activation of the Smart Display, the
display goes off. To adjust the temperature or use other
functions, it is necessary to activate the display by
pressing any button. After about 15 seconds without
performing any action, the display goes off again.
When function is deactivated the normal display is
restored. The Smart Display is automatically disabled
after a power failure. Remember that this function does
not disconnect the appliance from the power supply,
but only reduce the energy consumed by external
display.
Note: The declared appliance energy consumption
refers to operation with the Smart Display function
activated.
This function is available only on the model with User
Interface on the door.
2.2. 6th SENSE /
GREEN INTELLIGENCE
The 6th Sense/Green Intelligence function works to
maintain the right temperature in the following cases:
- Door opened for a while
The function activates when door opening causes the
internal temperature to increase to values that do not
ensure safe storage of food and remains active until
optimal storage conditions havebeen restored.
- Fresh food stored in the freezer
The function activates when fresh food is placed in the
freezer and remains active until optimal freezing
conditions are reached so as to ensure the best
freezing quality with the lowest power consumption.
Note: Besides the quantity of food loaded into the
freezer, ambient temperature and the quantity of food
already inside the freezer affect the duration of the 6th
Sense/ Green Intelligence function. Therefore
significant duration variations are quite normal.
*Available on selected models only. Please on the QUICK START GUIDE if this function is actually available on your model.
GREEN INTELLIGENCE
This function automatically works to ensure the
optimal conditions to preserve the stored food. To
deactivate the
4
1.INSTALLING TWO APPLIANCES
During installing the freezer and the fridge
together ensure that the freezer is located on the left and
the fridge on the right (as shown on the drawing). Left side
of refrigerator is equipped with special device in order to
avoid condensation problems between appliances.
We recommended installing two appliances together
using the linking-kit (as shown on the drawing).
You can buy it in Service.
2.FUNCTIONS
2.1. SMART DISPLAY*
This function can be used to save energy.
Please follow the instructions contained in the Quick
Start Guide to activate/deactivate the function.
Two seconds after activation of the Smart Display, the
display goes off. To adjust the temperature or use other
functions, it is necessary to activate the display by
pressing any button. After about 15 seconds without
performing any action, the display goes off again.
When function is deactivated the normal display is
restored. The Smart Display is automatically disabled
after a power failure. Remember that this function does
not disconnect the appliance from the power supply,
but only reduce the energy consumed by external
display.
Note: The declared appliance energy consumption
refers to operation with the Smart Display function
activated.
This function is available only on the model with User
Interface on the door.
2.2. 6th SENSE /
GREEN INTELLIGENCE
The 6th Sense/Green Intelligence function works to
maintain the right temperature in the following cases:
- Door opened for a while
The function activates when door opening causes the
internal temperature to increase to values that do not
ensure safe storage of food and remains active until
optimal storage conditions havebeen restored.
- Fresh food stored in the freezer
The function activates when fresh food is placed in the
freezer and remains active until optimal freezing
conditions are reached so as to ensure the best
freezing quality with the lowest power consumption.
Note: Besides the quantity of food loaded into the
freezer, ambient temperature and the quantity of food
already inside the freezer affect the duration of the 6th
Sense/ Green Intelligence function. Therefore
significant duration variations are quite normal.
*Available on selected models only. Please on the QUICK START GUIDE if this function is actually available on your model.
Green Intelligence, press and hold
Vacation
and Stop Alarm buttons at the same
time for 3 seconds until an audible signal sounds and
fan icon turns off as confirmation that the feature
has been deactivated. To reactivate this function
repeat the same procedure.
Note: Deactivation of the function switch-off the FAN
in the fridge.
FAST COOL indicator
VACATION button
This function can be activated to reduce the energy
consumption of the appliance during a prolonged
period of time. Before activating the feature, all
perishable food should be removed from the
refrigeration compartment and make sure that the
door is closed properly, since the refrigerator will
maintain a suitable temperature to prevent the
formation of unpleasant odors (+12°C).
To activate/deactivate press the Vacation mode
button for 3 seconds. When the function is enabled,
the related symbol will light up and the temperature
of the refrigerator compartment will be set to a higher
setpoint (the temperature display will show the new
temperature setpoint of +12°C).
Changing the temperature setpoint will automatically
deactivate the function.
VACATION indicator
FAN
The Fan improves temperature distribution inside the
product, allowing better preservation of stored food.
By default, the fan is switched on. To switch off the
FAN press and hold Vacation
and Stop Alarm
buttons at the same time for 3 seconds until an
audible signal sounds and fan icon will turn off
as confirmation that the fan has been switched off.
To switched on the FAN repeat the same procedure.
As a confirmation audible signal sounds and the icon
turns on.
Note: Reasons why switch off the fan look for
“ENERGY-SAVING TIPS” in the Instructions for Use.
ON/STANDBY indicator
ALARM indicator (see the below Alarms Table)TEMPERATURE DISPLAY
ON/STANDBY button
To put the product in Stand-by, press
and hold the button for 3 seconds.
All the icons turn off except On/
Standby indicator . To reactivate
the appliance press once (briefly) this
button. (see the Instructions for Use).
TEMPERATURE button
Press the Temperature button
to change
the temperature: the value changes cyclically
between 8°C ad 2°C.
Note: Displayed set points correspond to the
average temperature throughout the whole
refrigerator.
Hulp nodig? Stel uw vraag in het forum
Misbruik melden
Gebruikershandleiding.com neemt misbruik van zijn services uitermate serieus. U kunt hieronder aangeven waarom deze vraag ongepast is. Wij controleren de vraag en zonodig wordt deze verwijderd.
Product:
Spelregels forum
Om tot zinvolle vragen te komen hanteren wij de volgende spelregels:
lees eerst de handleiding door;
controleer of uw vraag al eerder door iemand anders is gesteld;
probeer uw vraag zo duidelijk mogelijk te stellen;
heeft u een probleem en al geprobeerd om dit op te lossen, vermeld dit erbij aub;
heeft u een oplossing gekregen van een bezoeker dan horen wij dat graag in dit forum;
wilt u een reactie geven op een vraag of antwoord, gebruik dan niet dit formulier maar klik op de knop 'reageer op deze vraag';
uw vraag wordt direct op de website gezet; vermijd daarom persoonlijke gegevens in te vullen;
Belangrijk! Als er een antwoord wordt gegeven op uw vraag, dan is het voor de gever van het antwoord nuttig om te weten als u er wel (of niet) mee geholpen bent! Wij vragen u dus ook te reageren op een antwoord.
Belangrijk! Antwoorden worden ook per e-mail naar abonnees gestuurd. Laat uw emailadres achter op deze site, zodat u op de hoogte blijft. U krijgt dan ook andere vragen en antwoorden te zien.
Abonneren
Abonneer u voor het ontvangen van emails voor uw Bauknecht KR PLATINUM SW bij:
nieuwe vragen en antwoorden
nieuwe handleidingen
U ontvangt een email met instructies om u voor één of beide opties in te schrijven.
Ontvang uw handleiding per email
Vul uw emailadres in en ontvang de handleiding van Bauknecht KR PLATINUM SW in de taal/talen: Engels als bijlage per email.
De handleiding is 0,34 mb groot.
U ontvangt de handleiding per email binnen enkele minuten. Als u geen email heeft ontvangen, dan heeft u waarschijnlijk een verkeerd emailadres ingevuld of is uw mailbox te vol. Daarnaast kan het zijn dat uw internetprovider een maximum heeft aan de grootte per email. Omdat hier een handleiding wordt meegestuurd, kan het voorkomen dat de email groter is dan toegestaan bij uw provider.
Andere handleiding(en) van Bauknecht KR PLATINUM SW
Uw handleiding is per email verstuurd. Controleer uw email
Als u niet binnen een kwartier uw email met handleiding ontvangen heeft, kan het zijn dat u een verkeerd emailadres heeft ingevuld of dat uw emailprovider een maximum grootte per email heeft ingesteld die kleiner is dan de grootte van de handleiding.
Er is een email naar u verstuurd om uw inschrijving definitief te maken.
Controleer uw email en volg de aanwijzingen op om uw inschrijving definitief te maken
U heeft geen emailadres opgegeven
Als u de handleiding per email wilt ontvangen, vul dan een geldig emailadres in.
Uw vraag is op deze pagina toegevoegd
Wilt u een email ontvangen bij een antwoord en/of nieuwe vragen? Vul dan hier uw emailadres in.