Notice d’utilisation • Instructions for use • Benutzungsanleitung
Gebruikshandleiding • Instrucciones de uso • Instruções de uso
Istruzioni per l’uso • Náv k použití • Használati utasítás
Babymoov
Parc Industriel des Gravanches - 16, rue Jacqueline Auriol
63051 Clermont-Ferrand cedex 2 - France
www
F
Notice d
M
erci d’avoir choisi le rehausseur bois Babymoov
C
onforme aux exigences de sécurité.
Informations à conserver pour une consultation ultérieure.
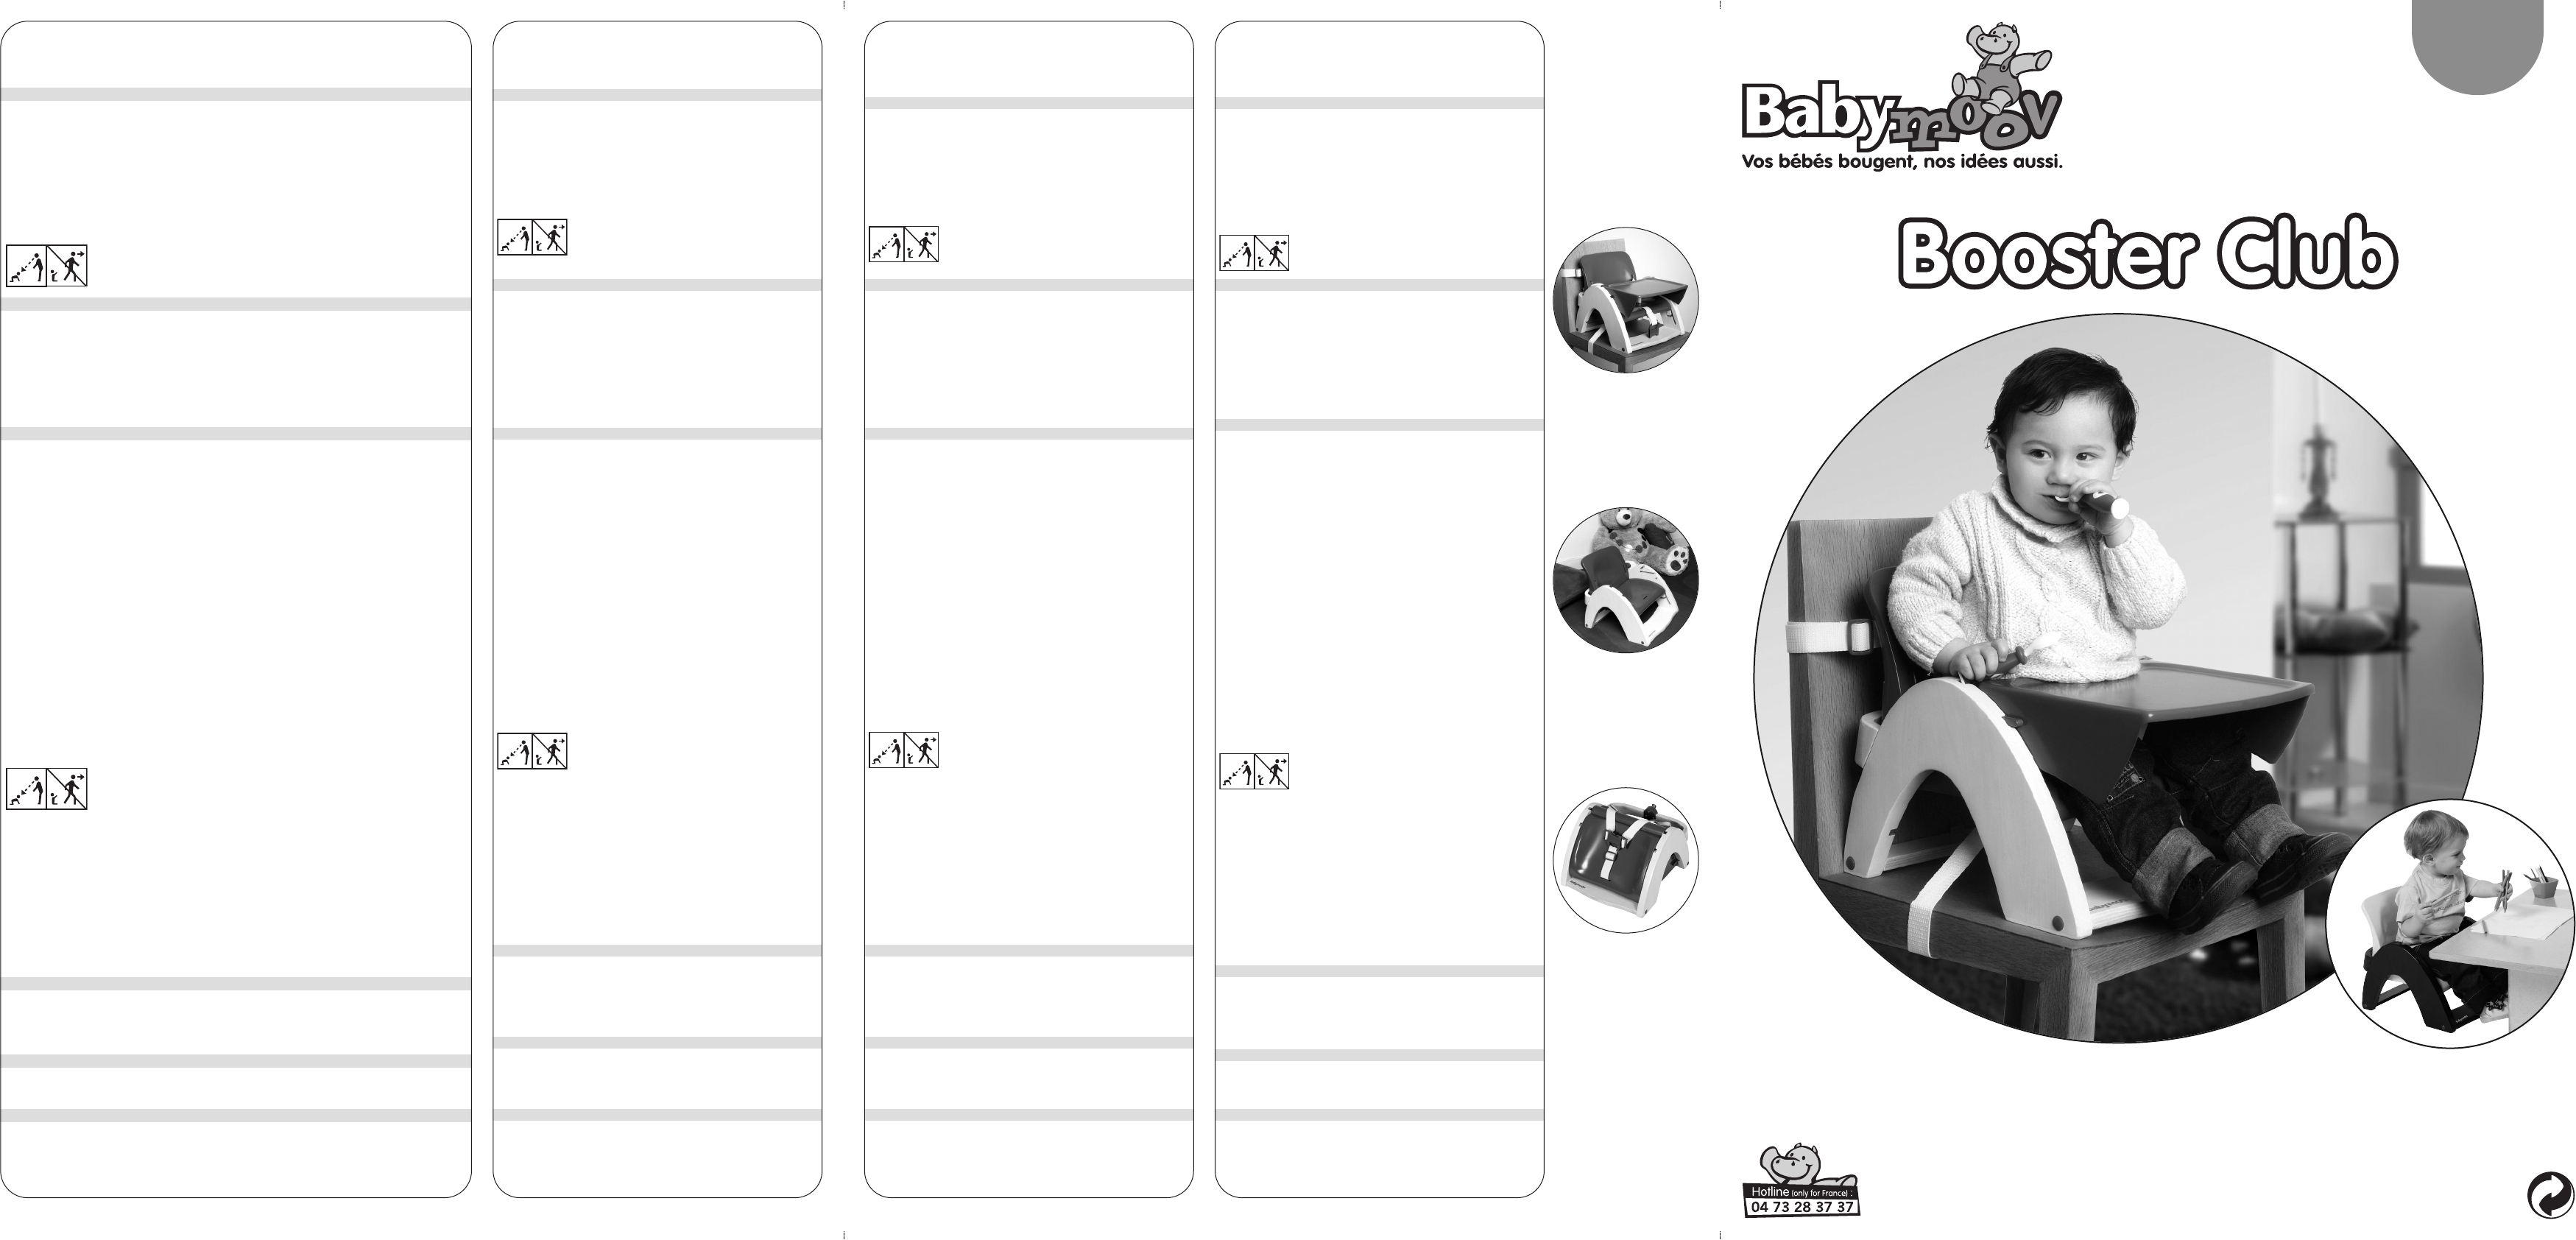
a
. Position 1 de l’assise à l’avant (droite et gauch
b. Position 1 de l’assise à l’arrière (droite et gauche)
c
. Position 2 de l’assise à l’avant (droite et gauche)
d. Position 2 de l’assise à l’arrière (droite et gauche)
e. Dossier du rehausseur
f. Assise du rehausseur
g
. Bouton de sécurité
h. Sangle d’attache à l’assise de la chaise
i
. Sangle d’attache au dossier de la chaise
j. Harnais 3 points
k
. T
l. Encoches de la tablette (droite et gauche)
m. Position de rangement de l’assise (droite et
gauche)
n
. Liaison du dossier et de l’assise
o. Encoche de la liaison du dossier et de l’assise
9. T l s et harnais sont a Une fois enlev l r se t en pe fauteuil
de chambre ou de salon.
A : Une fois l sangles enlevées, si vous souhaitez l remettre pour réutiliser le mini fauteuil
en rehausseur faites bien attention de bien les remettre. Vérifiez bien avant d’installer votre enfant que les
sangles sont bien fixées.
- Vérifiez régulièrement les points de sécurité et de fonctionnement du rehausseur
- Lavez avec un chiffon doux ou légèrement humide.
- Ne pas utiliser d’éponge grattante ou de produits ménagers abrasifs qui pourraient ra le produit.
- Ne pas immerger dans l’eau.
- Ne pas exposer à la lumière.
PRÉCAUTIONS D’EMPLOI
•
A utiliser exclusivement sur une chaise dont les dimensions sont supérieures à celles du rehausseur
• Ne convient pas à un enfant de moins de 18 mois.
•
Vérifier la planéité du sol et de l’assise de la chaise avant d’installer le rehausseur
• Une fois installé, vérifier la tenue du rehausseur su la chaise, v q toute les sangles sont bien fi
e
t attachées.
• Ne pas utiliser sur un tabouret, une chaise instable, une chaise pli
•
Ne jamais utiliser le rehausseur sans le harnais de sécurité.
• Ne jamais utiliser ce produit comme un siège auto, un siège de bain o une chaise de jeu.
•
Utiliser seulement avec un enfant qui se tient bien assis.
• Ne pas utiliser avec un enfant de plus de 18 kgs.
• Ne pas utiliser la tablette pour retenir l’enfant.
•
Ne jamais ajuster la hauteur du rehausseur quand l’enfant est assis dessus.
A
/ Installer le rehausseur
1. Ouvrir le rehausseur
S
aisissez l dossier (e) et relevez-le légèrement en désenclenchant bien la l du dossier et de l’assise (n) .
R
etournez le rehausseur pressez la tablette de chaque côté et ôtez-la bien de ses encoches.
2
. Régler le rehausseur en position haute
Les i 1 e 2 (a,b,c,d) ind q l reh peut se ré à deux hauteur diff ; la
position 1 étant la position la plus haute.
Une fois que vous avez ouver votre reha s l’assi (f) et enclenc d’abo dans les
encoches 1 (a) si à l’avant du rehausseur, p dans les encoches 1 (b) situées à l’arrière du reh
Le bouton de sécurit (g) s’enclenche et v entendez un « cl ». Bien vérifier qu la sécurité arrière est bien
e
nclenchée dans le dossier
3. Régler le rehausseur en position basse
Attention : p régler le rehausseur à l p 2 ( la p basse), 2 étapes sont n Libérez
le bouton de sécurité en le tirant e relevez simultanément le dossier Faites glisser l’assise dans les encoches
2 (c) situé à l’avant du rehausseur puis dan l e 2 (d) situées à l’ Vou r alors que
l’assise n’est pas correctement positionnée dans les encoches 2 (d) situées à l’arrière. T alors la sécurité
arrière, relevez le d et e bie l’as d la position 2 (. B vé que le bouto de
sécurité est bien enclenché dans le dossier
4. Installer le rehausseur sur la chaise
Attacher la sangle (h) à l’assise de la chaise, et la sangle (i) au dossier de la chaise.
Attention : une fois installé, vérifiez la tenue du rehausseur sur la chaise, vérifier que toutes les sangles sont
bien fixées. Ne jamais utiliser le rehausseur sans fixer les sangles de sécurité.
5. Mettre bébé dans le rehausseur
Asseoir bébé dans le rehausseur et bien attacher et régler le harnais 3 points (j) .
6. Installer la tablette
Effectuez de légères p de chaque cô de la tablett (k) et insérez les encoches de la tablette (l) dans
les fentes qui se trouvent d chaque côté du rehausseur S’assurer que chacune des encoches de la tablette
est bien insérée dans les encoches du rehausseur
B/ Fermer le rehausseur
7. Enlevez la tablette. Li la sécurité arrière, tirez le dossier v le haut puis faites glisser l’assise d les
deux encoches d r (m) située à l’avant d re Rabatt l d ve l sans
enclencher la liaison. Retournez le rehausseur rangez les sangles à l’intérieur et venez ranger la tablette en
pressa de cha côté d celle-ci. Une fois q vous a glissé la ta sous le re assurez-v
bien que ses encoches (l) sont bien enclenchées dans celles du rehausseur. Puis retournez le rehausseur et
enclenchez la liaison. Bien vérifier que le tout est bien enclenché.
8. V pouvez transporter le rehausseur par sa poignée.
SCHÉMA DES PIÈCES DU REHAUSSEUR
FONCTION REHAUSSEUR
FONCTION MINI F
LA ET ENTRETIEN
10. Une fois votre rehausseur fermé, retournez-le. Il se transforme en coffret où vous pouvez venir ranger
les ustensiles du repas de bébé. Une fois vos ustensiles placés, rangez les sangles à l’intérieur du coffret
puis la tablette.
FONCTION COFFRE DE RANGEMENT
A
VERTISSEMENT : ne pas laisser l’enfant seul sans surveillance dans le rehausseur
T vous placer face à l’enfant lorsque vous l’installez sur le rehausseur et pour
a
ttacher le harnais de sécurité. Ne jamais mettre votre bébé dans le rehausseur sans
attacher le harnais de sécurité.
Photographies non contractuelles / A009601-Manual-Artwork-0
5 6
A : ne pas laisser l’enfant seul sans surveillance dans le rehausseur
T vous placer face à l’enfant lorsque vous l’installez sur le rehausseur et pour
attacher le harnais de sécurité. Ne jamais mettre votre bébé dans le rehausseur sans
attacher le harnais de sécurité.
EN
Instructions f u
Thank yo for choosing the BABYMOOV wooden booster seat.
Complies w safety requirements.
K
eep t information you may need to refer to it later.
a. P 1 of seat at fro (ri a left
b
. P 1 of s at rear (righ and left)
c. Posit 2 of sea at fron (rig and le
d. P 2 of seat at re (rig an left)
e
. Back of booster seat
f. Seat of booster seat
g. Safety button
h
. Stra for fastening to seat of chair
i. Stra for fastening to back of chair
j
. 3-p harness
k. T
l. Recesses of tray (right and left)
m
. Seat tidy positi (right and left)
n. Co of back and seat
o. R for c of b and s
9. Al the straps and harness can be removed. Once this has been done, the booster
seat b a small armchair for use in the bedroom or living room.
W If y h r the s and w to p them back in o to u the
arm as a b s aga t g car to p th ba p Check t the
str ar corr fixe befo put your ch on th seat
- W the booster seat with so and a soft cloth or sponge.
- T a scratchi it, do not use any scourer, abrasive household cleaners
or d
- Do not immerse in water
- Do not leave in direct sunlight.
- Check the safety and working parts of the booster seat on a regular basis.
P
RECAUTIONS DURING USE
• Only use on a ch which is larger in all directions than the booster seat.
•
Not su for children under 18 months.
• Use only for a ch capabl of sitting up well
• Check that the floor and chair seat are f before installing the booster seat.
•
Once i check that the booster seat is well-fixed to the chair and that all the
straps a properly fixed and attached.
• Do not use on a stool, w chair folding chai etc.
•
Never u the booster seat without the safety harness.
• Never use this seat i the car the bath or as a play seat.
• Do not use for a child weighing over 18 kgs.
•
Never a the height of the booster seat with the child sitting in it.
A
/ Open the booster seat
1. Remove the tray
Gra th ba ( a l i u ge wh u t c o t b a s (n.
T
urn ar the boo seat pres the tra on both si an take it ou of its rec
2. Adjust th booster s to the top position
I
ndicati 1 and 2 (a,b,c, indicate th the booste seat can be adjust to two differ
heights, 1 is the highest positi
Once yo have op y boo s g the s (f) a cli it firs int the
r
ecesses 1 (a) at the front of the booster seat, then the recesses 1 (b) at the rear of the
booster seat. The safety button (g) is secured when you hear a click. Check that the rear
safety d is secured in the back.
3. Adjust th booster s to the bottom position
Attention: Release the safety button by pulling it and simultaneously lifting u the back.
S
lide the se into the recesses 2 (c) at t front of the booster seat then the 2 recesses
(d) at the rea Y wi then notic that the seat is n positio correc in the 2 recess
(d) at the rear. Then pull the rear safety d lift up the back and secure the seat into
p
osition 2 (d) . Check that the safety button is properly secured in the back.
4. Installing the booster seat on a chair
A
ttach st (h) to the chair seat, and strap (i) to the chair back.
T care: Once the booster seat has been installed, check it is firmly attached to the
chair and that all the straps are co fixed and attached. Never use the booster seat
without a t safety straps.
5. Putting your baby in the seat
Place yo baby in the booster seat, fit the 3-point harness (j) correctly and adjust it.
6. Installing the table
Apply g pressure to each side of the tray (k) and insert the recesses of t tray (l) in
the sl either side of the booster seat.
Make sure t each rece of the tray i properly i in th holes of the b sea
B/ Closing the booster seat
7. Remove the tray Release the rear safety device, pull t back upwards then slide the
seat int the two tidy rece (m at the front of the boos seat Fold the back
backwards without locking the connection. T around the booster seat, tidy the straps
inside and t away the tray by pressing on both sides. After sliding the tray under the
booster seat, be sure that t recesses (l) are correctly slott into those of the booster
seat. T around the booster seat and secure the connection. Check that everything is
firmly secu
8. Y can carry the booster seat by its handle.
DIAGRAM OF BOOSTER SEA P
BOOSTER SEA FUNCTION
SMALL ARMCHAIR FUNCTION
W AND CARE
10. When your booster seat is closed, turn it over It doubles up as storage for you to
tidy a baby's eating utensils. When the utensils have been put inside, put the
straps i the storage area then the tray
STORAGE BOX FUNCTION
W ne le a chi alon with sup in the
b
ooster se
W When i y child on the booster seat an
attaching the safety harness, always do so face to face. N p
your baby in the booster seat without attaching the safety harness.
Do n leave a child alone without supervision in the booster seat.
CZ
Návod k použití
Děkujeme, že jste si zakoupili dětskou ž značky B
Odpovídá bezpečnostním normám.
P
ozorně si pročtěte tento návod k použití a uschovejte si jej pro další potř
a. P 1 s v ( a l
b
. Poloha 1 sedáku vzadu (pravá a levá)
c. P 2 s vep ( a le
d. Poloha 2 sedáku vzadu (pravá a levá)
e
. Zádová opěra židličky
f. Sedák židličky
g. P páčka
h
. Pás pro připevnění židličky k
sedáku židle
i. Pás pro připevnění židličky k zádové
o
pěře židle
j. T bezpečnostní postroj
k. Pultík
l
. Drážky pultíku (pravá a l
m. Poloha úložného boxu sedáku (pravá
a levá)
n
. Spojovací lišta zádové opěry a sedáku
o. Drážka spojovací lišty zádové opěry
a sedáku
9. V popruhy jsou odnímatelné. Jakmile je odepnete, změní se se na
křesílko do pokoje nebo salonu
UPOZORNĚNÍ: Jakmile popruhy odepnete, chcete-li je v pro opětovné použití
křesílka jako se nezapomeňte je vrátit zpět. Před vložením dítěte ověřte, zda jsou
popruhy důkladně upevněny.
- Vyčist sedačku mýdlem a jemným hadříkem či ho
- Aby se předešlo poškrábání, nepoužívejte hrubou houbičku, brusn čistidla nebo
čisticí prostředky.
- Neponořujte do vody.
- Nevystavujte světlu.
- Pravidelně kontrolujte bezpečnostní body a funkci sedačky
B
EZPEČNOSTNÍ OPA
• Používejte jen na židli, která má rozměry větší než r sedačky.
•
Není vhodné pro dítě do 18 měsí
• Používejte pouze s dítětem, které se udrží v sedě
• Ověřte rovnost podlahy a sedáku židle než sedačku umístíte.
•
Po nainstalování ověřte upevnění sedačky na židli, zkontr zda jsou všechny
popruhy řádně upevněny
• Nepoužívejte na taburetu, nestabilní židli, skládací židli…
•
Nikdy nepoužívejte sedačku bez bezpečnostního popruhu
• Nikdy n te vý jako a sed d koup ne na h
• Nepoužívejte pro děti o více než 18 k
•
Nikdy neupravujte výšku sedačk když v ní sedí dítě.
A
/ Otevření židličky
1. V pultíku
Uchopte opěru (e) židličky a lehce ji nadzvedněte tak, že uvolňujete spoj opěry a sedáku
(
n) židličky. Obraťte židličku, stiskněte pultík po obou str a vytáhněte ho z drážek.
2. Ustavení židličky do horní poloh
Z
načk 1 a 2 ( zna že lze n 2 v p Pol 1 z
nejvyšší polohu.
Po o ž uch s ( a o ho n do d 1 ( n p s
ž
idličky a potom do 1(b) na z straně židl B páčka (g) zapadne
a zaslechnete cvak Zkontrolujte, zda zadní pojistka zapadla do zádov opěry.
3
. Nastavení židličky do dolní polohy
Důležité up: Pro nastav židličky do polohy 2 (nejnižší pol posedu) jsou
nutné 2 etapy.
U
volněte tahem pojistnou páčku a současně z zádovou opěru. Zasuňte sedák do
drážek 2 (c) n přední straně ži a potom do dr 2 (d) , kt se nacházejí n zadní
stran Z ž s n s o v d 2 (. ta pří
z
atáhněte za zadní pojistku, zvedněte zádovou opěru a sedák dobř u v poloze
2 (d) . Zkontrolujte, zda pojistná páčka dobř zapadla do zádové opěr
4
. Upevnění sedačky na židli
Připoutejte popruh (h) k sedáku židle a popruh (i) k zádové opěře židle.
Po: Po nai o upevnění s k o z js vš popruhy
řádně upevněny Nikdy nepoužívejte sedačku bez upevnění bezpečnostních popruhů.
5. Umístění dítěte do sedačky
Posaďte dítě do sedačky a řádně upevněte a nasta 3-bodový popruh ( .
6. Montáž stolku
Lehký tlake na obou stran pult (k) zat drážk pult (l) do pod
otvorů na obou stranách židličk
Zkontrolujte, zda jsou drážky pultíku dobře zasunuté do drážek židličk
B/ BZavírání sedačky
7. Sejmutí pultíku. Uvolněte zadní pojistku, táhněte zádovou opěrku nahoru a potom
zas s d obou d d(m) , se n n předn s židli
Skl opě dozad nezap spoj pr Obrať židli ul popr
dovni a uložte pultík stiskem po o stranách P za pultíku pod ži
zkon zd js d pultíku ( z d d žid P ž o
a zapněte spojovací prvek Zkontrolujte, zda jsou všechny díly upnuté.
8. Židličku je možno přenášet za držadlo
S
CHÉMA DÍLŮ ŽIDLIČKY
FUNKCE ŽIDLIČKY
FUNKCE KŘESÍLKA
MYTÍ A ÚDRŽBA
10. Jakmile je sedačka zavřená, obraťte ji. Sedačka se změní n odkládací bo kam
můžete uložit jídelní potřeby dítěte. Po uložení jídelních potřeb uložte do boxu upínací
popruhy a pultík.
FUNKCE ÚL BOXU
U
POZORNĚNÍ: Nenechávejte dítě v sedačce bez dozoru.
UPOZORNĚNÍ: Vždy si sedejte čelem k dítěti, když je vkládáte do
sedač a pro u bezpe popruhu. Nikd
nevk dítě do s bez upnutéh b
popruhu. Nenechávejte dítě v sedačce bez dozoru.
HU
Használati utasítás
Köszönjük, hogy a Babymoov szék választotta
Biztonsági előírásoknak megfelel.
K
ésőbbi megtekintés érdekében őrízze meg.
a. Ülés 1. helyzet elölnézetben (
é
s bal)
b. Ülés 1. helyzet hátulnézetben (
és bal)
c
. Ül 2 elö (j és b
d. Ülés 2. helyzet hátulnézetben (
és bal)
e
. A székmagasító háttámlája
f. A sz ülőkéje
g. Biztonsági gomb
h. A szék üléséhez rögzítő heveder
i
. A szék háttámlájához rögzítő heveder
j. Három pontos biztonsági öv
k. Asztalka
l
. Az asztalk hornyai ( és bal)
m. Az ülőke összehajtott állapotban
( és bal)
n
. A háttámla és ülés k
o. A háttámla és ülés kapcsolódását
biztosító horony
9. Az összes szíj és biztonsági öv eltáv Eltávolítás után a székmagasító kisszékké
alakul át.
FIGYELEM: A szíjak eltávolítása után, ha vissza k helyezni ezeket, hogy
magasítóként használhassa a kisszéket, ellenőr hogy jól visszahelyezte őket. Mielőtt
ráültetné gyermekét, ellenőrizze, hogy a szíjak jól vannak r
- T a székmagasítót sz és egy puha r vagy szivaccsal.
- A karcolások elkerülése érdekében, ne h érdes szivacsot, abrazív háztar
szereket vagy tisztítószereket.
- Ne merítse vízbe.
- Ne tegye ki a fénynek.
- Rendszeresen ellenőrizze a székmagasító biztonsági pontjait é ennek működését.
H
ASZNÁLA ÓVINTÉZKEDÉSEK
• Kízárólag olyan széken használja amelynek a mér nagyobbak a székmagasító
m
éreteinél.
• Nem felel meg egy 18 h kisebb g
• Kírárólag olyan gyermekkel használja, a meg tud maradni egy helyben.
•
Ellenőrizze a talaj és a sz ülőkéjének a szintjét m a székmagasítót ö
• Összeszerelés után ellenőrizze a székmagasító tar a széken, ellenőrizze, hogy az
összes szíj jól van csatolva és rögzítve.
•
Ne használja ülőkén, ingatag széken, összecsuk széken…
• Soha ne használja a sz a biztonsági öv nélk
• Soha ne használ ezt a termék mint kocsiü für ül vagy ját
•
Ne használja egy 18 kilónál nehezebb gyermekkel.
• Soha ne szabályozza a szék magasságát amikor a gyermek rajta ül
A/ Nyissa ki a székmagasítót
1. V le az asztalká
F
ogja m a s há (e) és em f kissé hogy kioldódjon a h
és ülőke közötti összekötő (. F meg a székemelőt, n meg az asztalkát két
oldalon és oldja k a hornyokból.
2. A székmagasító beállítása felső helyzetbe
Az 1 és 2 jelzések ( azt mutatják, hogy a székmagasító két m állítható; az
1
helyzet a magasabb.
Miu kinyitot a szék fogja meg az ülőkét (f é akassza be elő a
székma el lévő 1 (a) hor (l a ma a székmagas h
l
évő 1 (b) hornyok A (g) bizt gomb bek és egy k hall
Ellenőrizze, hogy a hátsó biztosítás megfelelően illeszkedik a há
3
. A székmagasító beállítása alsó helyzetbe
F: s hely állí két tört
Húzza k és lazí k a bizton gom köz eme fel a hátt (lásd a
f
énykép Cs az ü a s el lé 2 (c) horony maj a
székmagas h lévő 2 ( h Lá ek h a ülők nem helyezkedik
el megfelelően a hátul lévő 2 (d) hor (lásd a fényképen). Húzza meg ekkor a há
b
iztos g eme f a háttámlá és rögzítse megfelelő az ülőkét a 2. helyz
Ellenőrizze, hogy a hátsó biztosító gomb megfelelően beak a há
4. Szerelje fel a magasítót a székre
Csatolja az (h) hevedert a szék ülőkéjéhez, a (i) hevedert pedig a sz háttámlájához.
Figyelem: Összeszer után ellenőrizze a magasító tartását a széken, ellenőrizze, hogy
a szíjak jól vannak csatolva és rögzítve. S ne használja a székmagasítót a bizotnsági
övek nélkül.
5. Helyezze a babát a székmagasítór
Ültes a babát a szé majd ka össze és rögzítse a 3 p (
biztonsági övet.
6. Szerelje össze az ülőkét
Nyomk m k a asz (k mind o és il bele a asz (l
hornyait az ülésemelő két oldalán található nyílások
Ellenőr hogy az a minden hornya b le i a székmagasító nyílásaiba
B/ Csúkja össze a székmagasítót
7. Vegye le az asz Oldja ki a hátsó biztosító g és húzza f a háttámlát,
majd csúsztassa az ülőkét a sz elején lévő (m) tár horonyba.
Hajtsa hátra a háttámlá de ne oldj ki a öss F meg a s rendezze
el a biztonsági öveket a belsejében, majd tegye el az asztalk k oldalá meg
Miután az asztalkát becsúsztatta a székemelő alá, ellenőrizze, hogy a hornyok (l) benne
vanna a szék nyílá Fordí me a szé é k b az
összekötőt. Ellenőrizze, hogy mindent megfelelően összekapcsolt.
8. A székmagasító a f fogva szállítható.
S
ZÉKMAGASÍT ALKA RA
A SZÉKMAGASÍTÓ HASZNÁLA
KISSZÉK FUNKCIÓ
MOSÁS ÉS KARBANT
10. Miután a sz bezár fordítsa meg. A székmagasító dobozzá alakul és
benne tárolhatja a baba étkezéséhez szükséges e A tárgyak elhelyezése után
rendezze el a biztonsági öveket a doboz belsejében, majd az asztalkát.
T FUNKCIÓ
F
IGYE n hagy gy felügyelet nélkül a s
FIGYEL: Mindig á gyermekéve s amikor a
szék ülteti és bec a biz övet. Soha n
helyez a ba a szé a b ö becs
nélkül. Ne hagyja gyermekét felügyelet nélkül a sz
18
+