SETTING THE CLOCK
The Delta R is equipped with a digital clock that displays time
of day in a 12 hour or 24 hour format.
STEP 1:
After inputting weight (above), the computer will
automatically proceed to the clock mode selection screen.
STEP 2:
“24” will flash at the bottom of the display. Press
the RIGHT button to select the 12 hour or 24 hour mode.
Press the LEFT button to confirm your selection and advance
to the hours setting.
STEP 3:
Press the RIGHT button (or press and hold) to set
the hours. Press the LEFT button to advance to the minutes
setting.
STEP 4:
Press the RIGHT button (or press and hold) to set
the minutes. Once the minutes are set, press the LEFT button
to advance to the maintenance interval selection screen.
SETTING MAINTENANCE REMINDER
The maintenance reminder is intended to remind you to per-
form periodic maintenance at preset mileage intervals. For
example, if you select a maintenance interval of 400 miles (or
kilometers), the maintenance icon will appear when total dis-
tance (ODO) reaches 400, 800, 1200, 1600 miles (or kilome-
ters), and so on. When the wrench icon appears, press the
LEFT button to turn it off until the next maintenance interval is
due.
STEP 1:
After setting the clock (above), the computer will
automatically proceed to the maintenance interval selection
screen.
STEP 2:
“600” miles (or kilometers) will flash in the display
screen. Press the RIGHT button to select a maintenance inter-
val of 200, 400, 600 or 800 miles (or kilometers).
STEP 3:
Press the LEFT button to confirm your selection and
return to the speed and clock display screen.
SETTING THE ODOMETER
The Delta R odometer can be programmed so that cumulative
mileage can be restored after a battery change or transferred
from another computer.
STEP 1:
In the ODO display screen, press and hold the LEFT
button for five seconds until the digit at the bottom right of the
screen begins to flash.
STEP 2:
Use the RIGHT button to adjust the value. Press the
LEFT button to confirm the value and advance to the next
flashing digit.
STEP 3:
Repeat this process until all digits have been set to
the appropriate value.
STEP 4:
Once the last digit has been set, press the LEFT but-
ton to return to the ODO display screen.
RESET DISPLAY SCREENS
The DST, AVS and TM display screens are reset simultaneous-
ly. In the DST display screen, press and hold the LEFT button
for three seconds to reset all three display screens to zero.
The MXS, CAL and FAT display screens are each reset sepa-
rately. In each of these display screens, press and hold the
LEFT button for three seconds to reset the display.
To reset all display screens AND reset all programmed set-
tings (including wheel size, age, weight, clock, maintenance
interval and odometer), press and hold both buttons (LEFT
and RIGHT) for three seconds.
INSTALLATION
Since the Delta R is wireless, installation is simple and
straightforward. Begin by attaching the computer mounting
bracket to the handlebar.
BRACKET AND COMPUTER INSTALLATION
STEP 1:
Select the proper size mounting ring for your han-
dlebar. Two mounting bracket rings and three rubber shims
are included to accommodate a variety of handlebar diame-
ters. The smaller ring (already fitted to the bracket) fits stan-
dard 25.4mm—26.4mm diameter handlebars. The larger ring
fits 31.8mm oversize bars. If necessary, remove the smaller
ring from the bracket and replace it with the larger ring. See
Figure 3.
STEP 2:
Clamp the bracket to the handlebar and tighten in
place. See Figure 3. Do not over-tighten the bracket. The
bracket needs to be tightened only enough to prevent rotation
on the handlebar during normal riding.
STEP 3:
Attach the computer to the bracket. Slide the com-
puter into the bracket from front to back. See Figure 3. You
should hear an audible ‘CLICK’ indicating that the unit is
locked firmly in place. Use the two bracket pivot points to
adjust the viewing angle as desired.
STEP 4:
To remove the computer from the bracket, press
down on the release tab at the rear of the bracket and slide the
computer head forward.
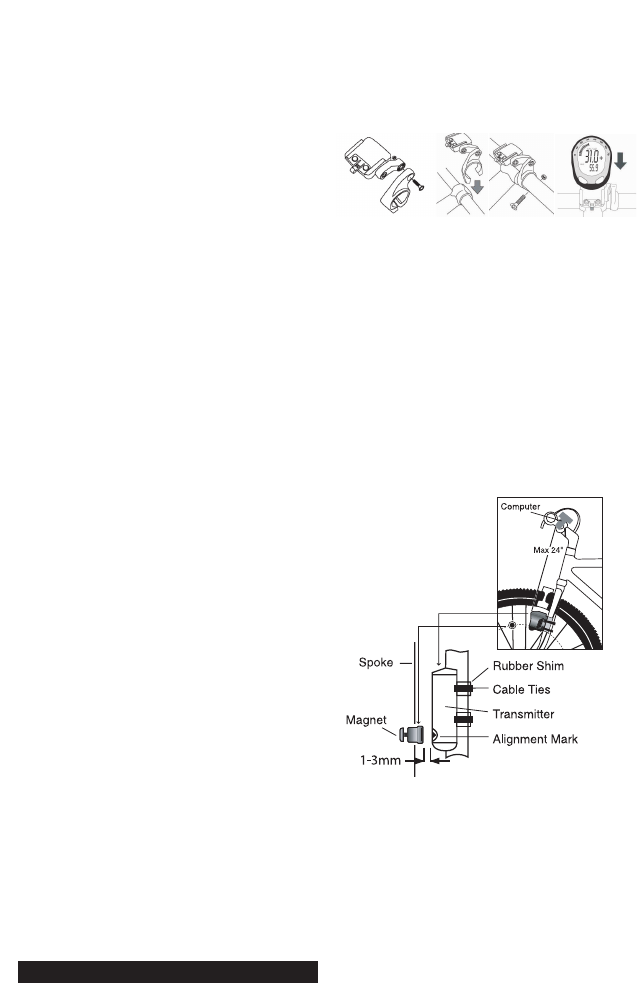
WHEEL MAGNET AND TRANSMITTER
INSTALLATION
STEP 1:
Using the included zip-ties, loosely mount the trans-
mitter (so that you can slide it around) to the leading edge of
the left fork blade with the transmitter battery cap facing up.
See Figure 4. The Delta R wireless transmission range is 24”
(60cm). The transmitter must be mounted no further than 24”
from the receiver (computer head) to properly transmit the
signal.
STEP 2:
Attach the wheel magnet loosely to one of the
spokes on the same side of the wheel as the transmitter.
Adjust the position of the magnet and transmitter by sliding
both pieces up or down until the magnet passes the alignment
mark on the transmitter with a clearance of 1-3mm (1mm is
about the thickness of a penny). See Figure 4. If the magnet
and transmitter are not close enough, computer readings will
be inconsistent, erratic or completely absent. Most problems
that occur when installing a new computer are related to mag-
net and sensor alignment and spacing.
STEP 3:
Once the transmitter and wheel magnet are aligned
properly, tighten both in place securely.
TEST OF INSTALLATION
Once the installation procedure is complete, test the unit to
make sure everything is adjusted and working properly.
STEP 1:
Pick up the front end of the bicycle and spin the
front wheel. The computer should register a speed reading
within 1-2 seconds. If it does not, check the alignment of the
wheel magnet and transmitter, and make sure that the space
between the magnet and transmitter is 3mm or less. Adjust as
necessary and re-test. Note: Wireless cyclocomputers are
occasionally affected by electromagnetic interference.
Common sources of electromagnetic signals include high volt-
age power lines, motor driven equipment and other wireless
devices (such as heart rate monitors). If you experience
unusually high speed readings, check your surroundings for
possible sources of electromagnetic signals and move away
from the source.
Made in China 0405_1
Fig 3
Fig 4