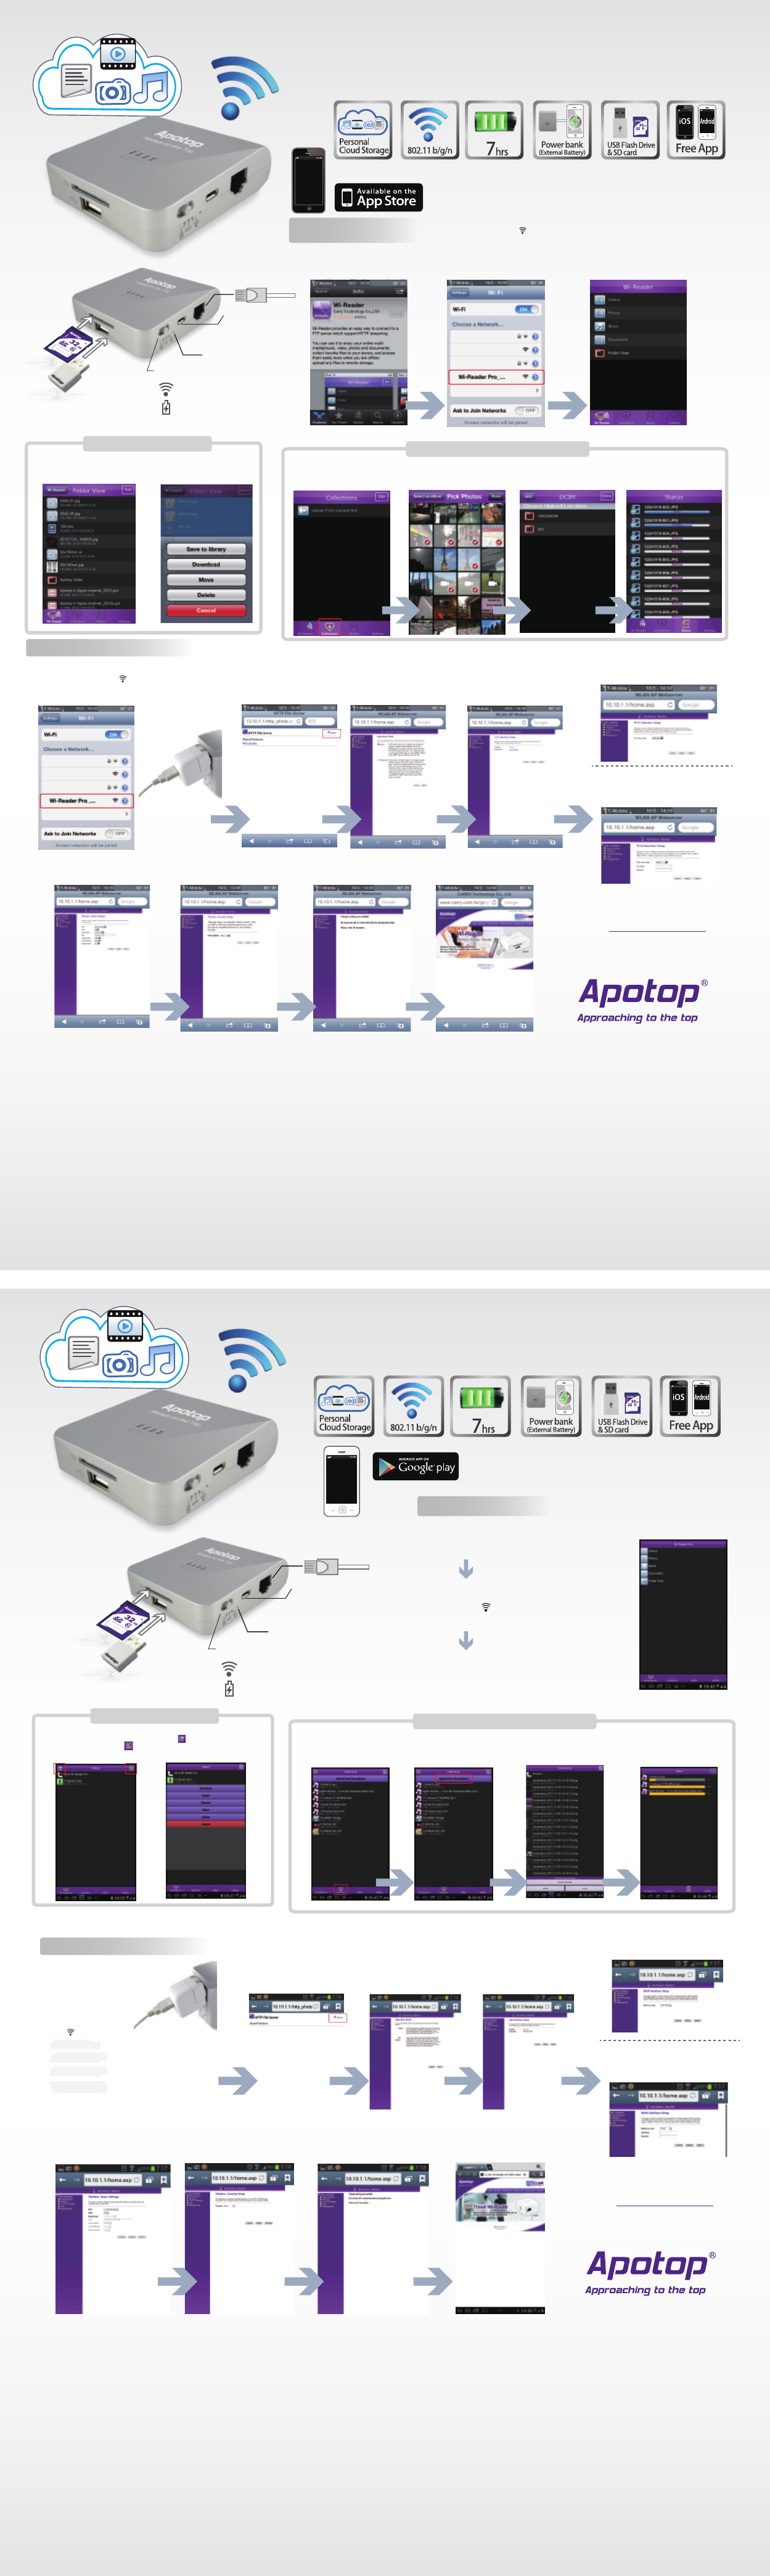
1. Plug internet cable in the network connector(RJ-45)
of Wi-Reader Pro.
2. Switch Wi-Reader Pro to ” ” (WiFi mode.)
3. Go to Setting – WiFi and select Wi-Reader Pro_xxxxxx
(6-digit combination) of iDevice(iPad, iPhone, iPod touch).
4. Open the broser of iDevice and
go to 10.10.1.1
5. Tap on “Settings” on the up-right
of the page.
6. Select “Gateway” and
tap on Next.
7. LAN Interface Setup: please tap
on Next.
8. WAN Interface Setup:
a. If get on Internet through internet cable at
a hotel room, pleased select the default
“DHCP Client” and tap on Next.
b. If get on internet through ADSL modem,
please select PPPoE and fill in username/
password provided by ISP(Internet Service
provider.) Then tap on Next.
9. Wireless Basic Settings: you can
change SSID of Wi-Reader Pro here
or tap on Next directly.
10. Wireless Security Setup: you
can set the password of WiFi
here or tap on Next directly.
11. Complete Setting: please wait for the
Wi-Reader Pro reboot. After reboot
you may to go to Settings- WiFi and
reconnect to Wi-Reader Pro_xxxxxx.
12. Enjoy the wireless network.
Super easy-to-use
wireless card reader
Create a WiFi hotspot in minutes
1. Download Wi-Reader App on
Apple App Store.
2. Plug USB flash drive / SD card, and
switch Wi-Reader Pro to “”(WiFi mode)
till the blue led is flickering.
3.
Go to Setting – WiFi and select Wi-Reader
Pro_xxxxxx(6-digit combination) of iDevice
(iPad, iPhone, iPod touch).
4. Tap on Wi-Reader App; you can browse your
files now. Support file formats:
Video:M4V / MP4 / MOV
Music:MP3 / WAV / AAC
Picture:JPG / BMP / PNG / GIF
Document:PDF / DOC / PPT / TXT / HTM/XLS
If they are picture files, you can
download the files to Photos on
iPad /iPhone or Collections
section of Wi-Reader App
Tap on Collections of Wi-Reader
App; select the files you want to
upload to SD card / USB flash drive.
You can download selected files
from SD card/ USB flash drive to
Collections section of Wi-Reader App.
You can choose to upload from
Camera Roll; upload pictures tool
by iPad, iPhone, and iPod touch.
Choose a location you want
to upload files.
Tap on “Done.” The upload
progress will start immediately.
6. Upload files
For continuous
usage, please power
Wi-Reader Pro with
USB power adapter.
5. Download files
iOS
DW17DW17
Please go to www.apotop.com.tw
Product Center for complete User Manual.
Wi-Reader Pro
4. Tap on Wi-Reader Pro App; you can
browse your files now. Support
file formats:
Video:to watch videos in
Wi-Reader Pro App, please
download MX Player or
MoboPlayer on Play Store.
Music:MP3 / WAV / AAC
Picture:JPG / BMP / PNG
Document:For HTC/ Samsung
Android Phone: please
use built-in Polaris office;
other Android Phones
please download OliveOffice
on Play Store.
Tap on Collections of Wi-Reader App;
select the files you want to upload to
SD card / USB flash drive.
You can download selected files from SD card/
USB flash drive to Collections section of
Wi-Reader Pro App. Tap the icon ” ” on
top-right; you can select the files you want
to download.
Tap on “Upload” from Smartphone.
Tap on the files you want to
upload; choose a location you
want to upload the files.
Tap on “Upload.” The upload
progress will start immediately.
6. Upload files
5. Download files
DW17DW17
Android
For Android OS User
Micro-USB port:
•for PC as a standard
card reader.
•for recharging built-in
battery.
Reset Button
Function switch:
for enabling WiFi mode.
for powerbank function.
RJ-45 cable
Support
SD card
Support
USB Flash drive
Micro-USB port:
•for PC as a standard
card reader.
•for recharging built-in
battery.
Reset Button
Function switch:
for enabling WiFi mode.
for powerbank function.
RJ-45 cable
Support
SD card
Support
USB Flash drive
Super easy-to-use
wireless card reader
1. Download Wi-Reader Pro
App on Google Play Store.
2. Plug USB flash drive /
SD card, and switch
Wi-Reader Pro to ” ”
(WiFi mode) till the blue
led is flickering.
3. Go to Setting-WiFi and
select Wi-Reader Pro_xxxxxx
(6-digit combination) of
Android Device.
8. WAN Interface Setup:
a. If get on Internet through internet cable at
a hotel room, pleased select the default
“DHCP Client” and tap on Next.
b. If get on internet through ADSL modem,
please select PPPoE and fill in username/
password provided by ISP(Internet Service
provider.) Then tap on Next.
9. Wireless Basic Settings: you can
change SSID of Wi-Reader Pro here
or tap on Next directly.
10. Wireless Security Setup: you
can set the password of WiFi
here or tap on Next directly.
11. Complete Setting: please wait for the
Wi-Reader Pro reboot. After reboot
you may to go to Settings- WiFi and
reconnect to Wi-Reader Pro_xxxxxx.
12. Enjoy the wireless network.
4. Open the broser of Android Device
and go to 10.10.1.1
5. Tap on “Settings” on the up-right
of the page.
6. Select “Gateway” and
tap on Next.
7. LAN Interface Setup: please tap
on Next.
Create a WiFi hotspot in minutes
For continuous
usage, please power
Wi-Reader Pro with
USB power adapter.
Please go to www.apotop.com.tw
Product Center for complete User Manual.
1. Plug internet cable in network
connector (RJ-45) of
Wi-Reader Pro.
2. Switch Wi-Reader Pro
to ” ” (WiFi mode.)
3. Go to Wi-Fi Setting and select
Wi-Reader Pro_xxxxxx
(6-digit combination) of Android
Phone/ tablet.
After complete selecting files, please tap the
icon ” ”on the top-left. The function menu
will be shown for Download,Export, Rename,
Move, or Delete the selected files.
FCC Compliance and Advisory Statement
This device complies with Part 15 of the FCC rules. Operation is subject to the following two conditions:(1) this device may not cause harmful interference, and (2)
this device must accept any interference received, including interference that may cause undesired operation.
This equipment has been tested and found to comply with the limits for a Class B digital device, according to Part 15 of the FCC rules. These limits are designed to
provide reasonable protection against harmful interference in a residential installation. This equipment generates, uses and can radiate radio frequency energy and
if not installed and used in accordance with the instructions, may cause harmful interference to radio communications. However, there is no guarantee that
interference will not occur in a particular installation. If this equipment does cause harmful interference to radio or television reception, which can be determined by
turning the equipment off and on, the user is encouraged to try correct the interference by one or more of the following measures:
1.Reorient the receiving antenna.
2.Increase the separation between the equipment and receiver.
3.Connect the equipment into and outlet on a circuit different from that to which the receiver is connected.
4.Consult the dealer or an experienced radio/TV technician for help.
Any special accessories needed for compliance must be specified in the instruction manual.
Warning: A shielded-type power cord is required in order to meet FCC emission limits and also to prevent interference to the nearby radio and television reception.
It is essential that only the supplied power cord be used. Use only shielded cables to connect I/O devices to this equipment.
CAUSION: Any changes or modifications not expressly approved by the party responsible for compliance could void your authority to operate the equipment.
Hulp nodig? Stel uw vraag in het forum
Misbruik melden
Gebruikershandleiding.com neemt misbruik van zijn services uitermate serieus. U kunt hieronder aangeven waarom deze vraag ongepast is. Wij controleren de vraag en zonodig wordt deze verwijderd.
Product:
Spelregels forum
Om tot zinvolle vragen te komen hanteren wij de volgende spelregels:
lees eerst de handleiding door;
controleer of uw vraag al eerder door iemand anders is gesteld;
probeer uw vraag zo duidelijk mogelijk te stellen;
heeft u een probleem en al geprobeerd om dit op te lossen, vermeld dit erbij aub;
heeft u een oplossing gekregen van een bezoeker dan horen wij dat graag in dit forum;
wilt u een reactie geven op een vraag of antwoord, gebruik dan niet dit formulier maar klik op de knop 'reageer op deze vraag';
uw vraag wordt direct op de website gezet; vermijd daarom persoonlijke gegevens in te vullen;
Belangrijk! Als er een antwoord wordt gegeven op uw vraag, dan is het voor de gever van het antwoord nuttig om te weten als u er wel (of niet) mee geholpen bent! Wij vragen u dus ook te reageren op een antwoord.
Belangrijk! Antwoorden worden ook per e-mail naar abonnees gestuurd. Laat uw emailadres achter op deze site, zodat u op de hoogte blijft. U krijgt dan ook andere vragen en antwoorden te zien.
Abonneren
Abonneer u voor het ontvangen van emails voor uw Apotop DW17 - Wi-Reader Pro bij:
nieuwe vragen en antwoorden
nieuwe handleidingen
U ontvangt een email met instructies om u voor één of beide opties in te schrijven.
Ontvang uw handleiding per email
Vul uw emailadres in en ontvang de handleiding van Apotop DW17 - Wi-Reader Pro in de taal/talen: Engels als bijlage per email.
De handleiding is 1,79 mb groot.
U ontvangt de handleiding per email binnen enkele minuten. Als u geen email heeft ontvangen, dan heeft u waarschijnlijk een verkeerd emailadres ingevuld of is uw mailbox te vol. Daarnaast kan het zijn dat uw internetprovider een maximum heeft aan de grootte per email. Omdat hier een handleiding wordt meegestuurd, kan het voorkomen dat de email groter is dan toegestaan bij uw provider.
Andere handleiding(en) van Apotop DW17 - Wi-Reader Pro
Uw handleiding is per email verstuurd. Controleer uw email
Als u niet binnen een kwartier uw email met handleiding ontvangen heeft, kan het zijn dat u een verkeerd emailadres heeft ingevuld of dat uw emailprovider een maximum grootte per email heeft ingesteld die kleiner is dan de grootte van de handleiding.
Er is een email naar u verstuurd om uw inschrijving definitief te maken.
Controleer uw email en volg de aanwijzingen op om uw inschrijving definitief te maken
U heeft geen emailadres opgegeven
Als u de handleiding per email wilt ontvangen, vul dan een geldig emailadres in.
Uw vraag is op deze pagina toegevoegd
Wilt u een email ontvangen bij een antwoord en/of nieuwe vragen? Vul dan hier uw emailadres in.