USER'S GUIDE
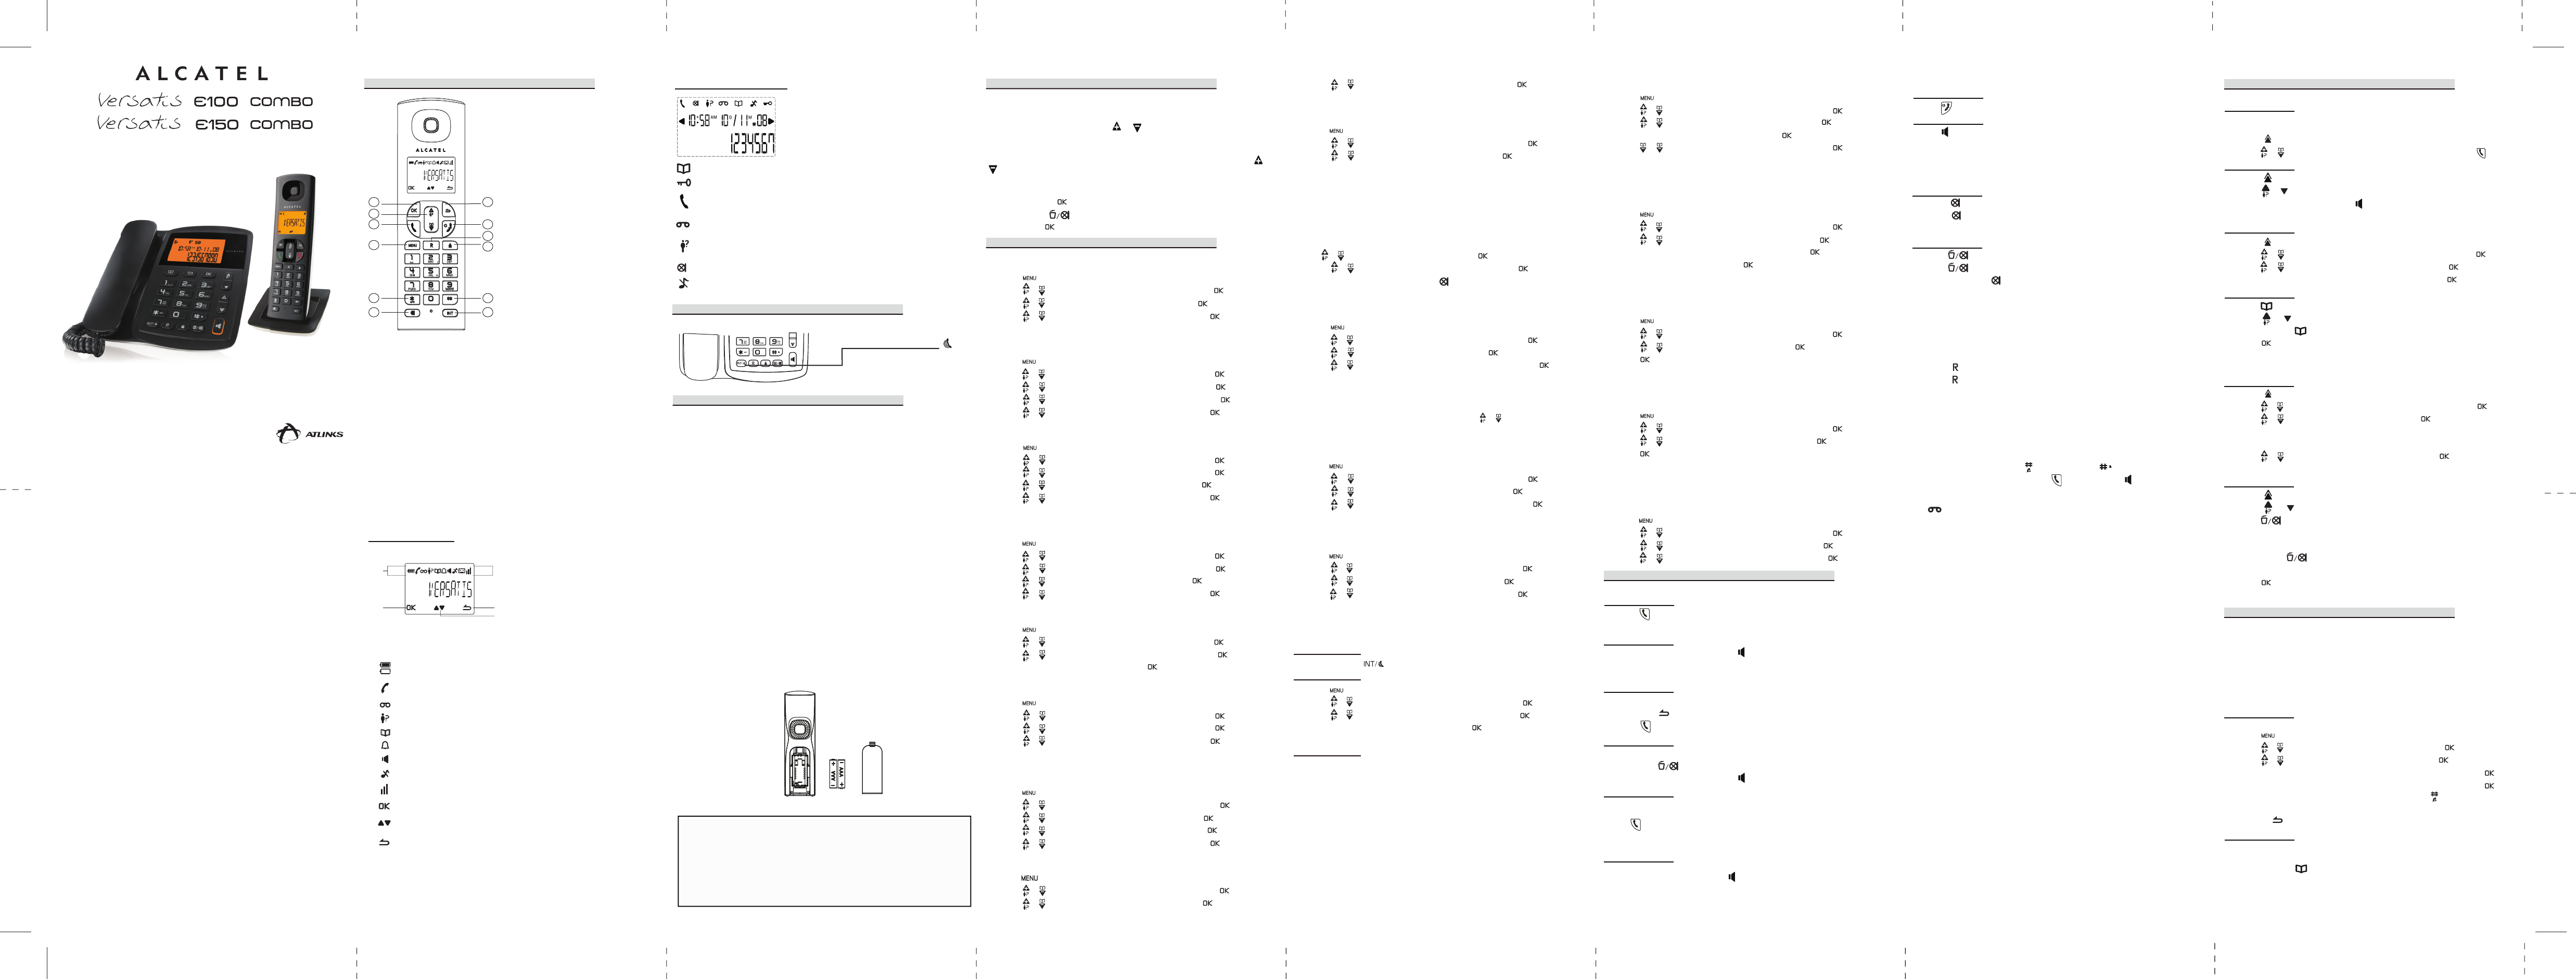
1 OK key
Press to select the function displayed on the
handset screen directly above it.
2 Back/clear key
Press to delete a digit/a character in editing mode
Press to return to idle mode.
Press and hold to change the handset idle display
between handset name and date/time.
3 Navigation key
Press UP to access the call log* and press DOWN
to access the phonebook when in idle mode.
Press UP/DOWN to increase or decrease
earpiece volume during a call.
Press to increase or decrease the ringer volume.
Press UP/DOWN to increase or decrease
handsfree volume (Versatis E150 only)
Scroll up/down a list.
4 Talk key
Press to accept or make a call
Press to activate handsfree mode (Versatis E150
only)
5 Hang-up/Exit key
Press and hold to switch the handset power
on/off.
Press to end a call.
Press to return to idle mode in other menus.
6 Recall (Flash) key
Access to operator services*
7 Menu key
Press to access the main menu.
8 Redial key
Press to access the Redial list.
9 Star key
Press and hold to lock/unlock keypad.
Press and hold to toggle between the external and internal calls when both are set up.
10 Hash key
Press and hold to insert a pause during a call.
Press and hold to turn the ringer on/off.
11 Mute key
Press to mute / unmute the handset microphone.
12 Call transfer/Intercom key
Press to initiate an internal call.
Press to hold the line and page another handset during a call.
Press and hold to initiate a conference call.
*Subject to subscritption and availability of the service from the fixed line operator.
ATLINKS Europe, 22 quai Gallieni 92150 Suresnes – France
Alcatel Logo and Alcatel name are trademarks of Alcatel and used under license by Atlinks.
www.atlinks.com
3 Installation and Set-up
Precautions
The signal quality will depend on the location and environment of the base and
handset. Position your Versatis E100 Combo / Versatis E150 Combo away from
sources of excessive heat (radiators, direct sunlight, etc.) and protect it from
vibrations and dust. Never allow your telephone to come into contact with water
or other liquids, or with aerosols. To reduce the risk of interference and optimize
reception, take particular care not to install the base in the immediate vicinity of
windows, large metal objects, reinforced concrete, televisions, music centres,
VCR or DVD players, halogen lamps or heating devices, fluorescent lighting,
burglar alarms, microwave ovens, computers, etc.
This telephone requires an electrical power supply in order to function.
To clean your Versatis E100 Combo / Versatis E150 Combo, use an antistatic
cloth lightly moistened with water.
NB: Your Versatis E100 Combo / Versatis E150 Combo is a DECT™* standard
appliance designed to receive and transmit telephone calls. It is designed for
connection to the public telecommunications network.
Fit the rechargeable batteries in each handset
1) Install the AAA batteries (Brand name: High power, Capacity: Ni-MH 1.2V/
400mAh, or Brand name: SANIK, Capacity: Ni-MH 1.2V/400mAh) into handset
in accordance with the polarity marked in the battery compartment.
2) Close the battery compartment cover, sliding it into place and pressing firmly
to make sure it is secure.
Only use rechargeable batteries with exactly the same specifications as
those supplied with the product.
Using non-rechargeable or non-conforming batteries can damage the
product and could pose a health hazard (see “Technical Specifications”).
Failure to comply with this recommendation will invalidate the manufacturer's
warranty.
Batteries can split or leak if incorrectly inserted , opened or exposed to heat.
Never dispose of batteries in a fire: they could explode.
4 Telephone Base Settings
Base ringer volume
You can set the ringer volume on the telephone base from level 0 to level 5.
Level 0 means the ringer is off.
To adjust the ringer volume, press or when in idle mode.
Corded handset receiver volume
You can set the corded handset receiver volume from level 1 to level 5.
To adjust the corded handset receiver volume, lift the handset and press or
when in dial mode.
Setting date and time
You can set the date and time on the telephone base.
1. Press and hold [ ]: Enter time (HH:MM) and date (DD-MM) -> To correct
your input, press .
2. Short press [ ].
5 Handset Settings
Display language
To change the display language:
1. Press [ ] to enter in the menu.
2. Press [ ]/[ ]: to select PERSONAL SET and then press [ ].
3. Press [ ]/[ ]: to select LANGUAGE and then press [ ].
4. Press [ ]/[ ]: Select the desired setting and then press [ ].
Ringer volume
You can set the handset ringer volume from level 1 to level 4 or turn the ringer
off.
1. Press [ ] to enter in the menu.
2. Press [ ]/[ ]: to select PERSONAL SET and then press [ ].
3. Press [ ]/[ ]: to select HANDSET TONE and then press [ ].
4. Press [ ]/[ ]: to select RINGER VOLUME and then press [ ].
5. Press [ ]/[ ]: Select the desired setting and then press [ ].
Ringer tone
You can select from 10 ringer tones (Melody 1 to 10).
1. Press [ ] to enter in the menu.
2. Press [ ]/[ ]: to select PERSONAL SET and then press [ ].
3. Press [ ]/[ ]: to select HANDSET TONE and then press [ ].
4. Press [ ]/[ ]: to select RING TONES and then press [ ].
5. Press [ ]/[ ]: Select the desired setting and then press [ ].
Key tone
The handset can be programmed to emit a tone with each key press.
To change the key tone setting:
1. Press [ ] to enter in the menu.
2. Press [ ]/[ ]: to select PERSONAL SET and then press [ ].
3. Press [ ]/[ ]: to select HANDSET TONE and then press [ ].
4. Press [ ]/[ ]: to select KEY BEEP and then press [ ].
5. Press [ ]/[ ]: Select the desired setting and then press [ ].
Handset name
To change the name of the handset:
1. Press [ ] to enter in the menu.
2. Press [ ]/[ ]: to select PERSONAL SET and then press [ ].
3. Press [ ]/[ ]: to select HANDSET NAME and then press [ ].
4. Enter the handset name and then press [ ].
Auto hang-up
To set Auto Hang-Up “ON” or “OFF”:
1. Press [ ] to enter in the menu.
2. Press [ ]/[ ]: to select PERSONAL SET and then press [ ].
3. Press [ ]/[ ]: to select AUTO HANG-UP and then press [ ].
4. Press [ ]/[ ]: Select the desired setting and then press [ ].
Clock & Alarm (Cordless Handset Only)
Time format
You can set the display format of time to be either 12-hour or 24-hour.
1. Press [ ] to enter in the menu.
2. Press [ ]/[ ]: to select CLOCK & ALARM and then press [ ].
3. Press [ ]/[ ]: to select SET FORMAT and then press [ ].
4. Press [ ]/[ ]: to select TIME FORMAT and then press [ ].
5. Press [ ]/[ ]: Select the desired setting and then press [ ].
Date format
To change the date format:
1. Press [ ] to enter in the menu.
2. Press [ ]/[ ]: to select CLOCK & ALARM and then press [ ].
3. Press [ ]/[ ]: to select SET FORMAT and then press [ ]
4. Press [ ]/[ ]: to select DATE FORMAT and then press [ ].
Date and time
If you cannot make calls, change this setting according to your telephone line
service. The default setting is “TONE”.
1. Press [ ] to enter in the menu.
2. Press [ ]/[ ]: to select CLOCK & ALARM and then press [ ].
3. Press [ ]/[ ]: to select DATE/TIME and then press [ ].
4. Enter the current year, month, and date by modifying 2 digits for each. For
example, if the date you want is May 25, 2011, press [1][1][0][5][2][5].
5. Enter the current hour and minute by modifying 2 digits for each.
If the time is 3:34 p.m. and you have chosen the 24-hour time format, press
[1][5][3][4].
If the tims is 3:34 p.m., and you have chosen the 12-hour time format, press
[0][3][3][4].
Press [ ]/[ ]: Select AM or PM and then press [ ].
6. Press [ ]/[ ]: Select the desired setting and then press [ ].
NOTE: To display date and time, long press on handset when in idle mode.
Alarm
The alarm can be programmed to sound once or daily for one minute. The alarm
setting is independent to each handset.
1. Press [ ] to enter in the menu.
2. Press [ ]/[ ]: to select CLOCK & ALARM and then press [ ].
3. Press [ ]/[ ]: to select ALARM and then press [ ].
4. Press [ ]/[ ]: Select the desired alarm option and then press [ ].
OFF: Turn alarm off (settings completed).
ON ONCE: The alarm sounds once at the set time.
ON DAILY: The alarm sounds daily at the set time.
5. Enter the desired hour and minute ,then press [ ]/[ ]: select AM or PM for
12-hour time format.
Alarm tone
You can select from 3 alarm melodies.
1. Press [ ] to enter in the menu.
2. Press [ ]/[ ]: to select CLOCK & ALARM and then press [ ].
3. Press [ ]/[ ]: to select ALARM TONE and then press [ ].
4. Press [ ]/[ ]: Select the desired alarm tone and then press [ ].
9 Redial List
To make a call using the redial list
Cordless handset
The last 5 telephone numbers previously dialed are stored in the redial list.
To make a call using a phone number in the redial list:
1. Press [ ].
2. Press [ ]/[ ]: select the desired phone number and then press [ ] to dial.
Telephone base
1. Press [ ].
2. Press [ ]/[ ]: select the desired phone number.
3. Lift the corded handset, or press to make the call.
Saving a phone number from the redial list to the phonebook
Cordless handset
1. Press [ ].
2. Press [ ]/[ ]: select the desired phone number and then press [ ].
3. Press [ ]/[ ]: to select SAVE NUMBER and then press [ ].
4. Enter the name by using the dial key pad and then press [ ].
Telephone base
1. Press [ ].
2. Press [ ]/[ ]: select the desired phone number.
3. Press and hold [ ].
4. Press [ ]: you hear a beep sound confirming that the number has been
saved to the first available memory location in the phonebook.
Deleting phone number(s) from the redial list
Cordless handset
1. Press [ ].
2. Press [ ]/[ ]: select the desired phone number and then press [ ].
3. Press [ ]/[ ]: to select DELETE and then press [ ] twice to delete the
selected number.
-OR-
Press [ ]/[ ]: to select DELETE ALL and then press [ ] twice to delete
all the numbers.
Telephone base
1. Press [ ].
2. Press [ ]/[ ]: select the desired phone number.
3. Press [ ]: to delete the selected phone number -> [- - - -] appears on
LCD screen.
-OR-
Press and hold [ ]: to delete all the phone numbers -> [- - - - - - - -]
appears on LCD screen.
4. Press [ ]: you hear a beep sound confirming that the number(s) has/have
been deleted.
10 Phonebook
On the handset, the phonebook can store up to 50 entries. Each number can
be up to 24 digits long and each name can be up to 12 characters long. The
phonebook on each handset is independent of each other. Changes made to
the phonebook on one handset does not apply to another handset.
On the telephpne base, the phonebook can store up to 30 entries. Each
number can be up to 24 digits long. You cannot store a name on the telephone
base phonebook.
Adding a phonebook record
Cordless handset
You can add a phonebook record.
1. Press [ ] to enter in the menu.
2. Press [ ]/[ ]: to select PHONEBOOK and then press [ ].
3. Press [ ]/[ ]: to select NEW ENTRY and then press [ ].
ENTER NAME: Enter the name (max. 12 characters) and then press [ ].
ENTER NUMBER: Enter the number (max. 24 digits) and then press [ ].
If you need a pause between digits, press and hold the until a P appears in
the display. This will insert a 3-second pause in the dialing sequence.
Note: Press to correct an error.
Telephone base
A phonebook record on the telephone base consists only of the phone number,
not the name.
1. Press and hold [ ].
2. Enter the phone number.
To make a call
Cordless handset
1. Press [ ].
2. Dial the phone number after you hear the dial tone.
Telephone base
1. Lift the corded handset, or press [ ].
2. Dial the phone number.
To predial a call
Cordless handset
1. Dial the phone number using the dial key pads. If you make an error when
dialing, press [ ] to erase the digit entered.
2. Press [ ].
Telephone base
1. Dial the phone number using the dial key pads. If you make an error when
dialing, press [ ] to erase the digit entered.
2. Lift the corded handset, or press [ ].
To answer a call
Cordless handset
When there is an incoming call, the LCD will light up.
Press [ ] to answer an incoming call.
NOTE: The screen shows the elapsed time as hours, minutes, seconds (hh--mm--ss) after
you end the call.
Telephone base
When there is an incoming call, the LCD will light up.
Lift the corded handset, or press [ ] to answer an incoming call.
Cordless Handset
1. Press [ ]: to mute a call.
2. Press [ ]: to resume conversation.
NOTE: The screen shows MUTE ON when mute feature is activated.
Telephone Base
1. Press [ ]: to mute a call.
2. Press [ ]: to resume conversation.
NOTE: The mute icon [ ] is displayed on the LCD when mute feature is activated.
Call waiting or call waiting with caller ID service
To use call waiting, you must subscribe to call waiting service from your
telephone service provider. This feature allows you to receive calls while you are
already talking on the phone. You will hear a call waiting alert tone when there is
a second incoming call. If you subscribe to both caller ID and call waiting with
caller ID services, the second caller’s information is displayed after you hear the
call waiting alert tone.
1. Press [ ]: answer the second incoming call.
2. Press [ ]: to switch between calls.
Pause (for PBX / long distance service users)
A pause is sometimes required when making calls using a PBX or long distance
service.
When storing a calling card access number and/or PIN in the phonebook, a
pause is also needed.
EXAMPLE: If you need to dial the line access number “9” when making outside calls with
PBX.
1. Press [9], then long press [ ] on handset or [ ] on telephone base.
2. Dial the phone number and press [ ] on handset or [ ] on telephone base.
NOTE: A 3-second pause is inserted each time and a character P is displayed.
Voice mail service.
The icon flashes on the screen when you have received a new voice mail
message from your service provider.
IMPORTANT: In order to use the voice mail service, you must subscribe to it from your
telephone service provider.
Muting a call
The mute function allows you to turn off the microphone while on a call. You
can hear the other party but the other party cannot hear you.
To end a call
Cordless handset
Press [ ] or place the handset in the charger to end a call.
Telephone base
Press [ ] or return the corded handset to the telephone base.
Handset Display Icons:
Indicates battery is fully charged.
Indicates battery is fully discharged.
Indicates that an external call is connected or held.
Icon blinks when receiving an incoming call.
Indicates you have a new Voice Mail message*.
Indicates you have new missed calls*, or the call log is being viewed.
Displays when the phonebook is accessed.
Displays when the alarm clock is activated.
Displays when handsfree is activated (Versatis E150 only).
Displays when ringer volume is turned off.
D
C
A
B
A Display Icons
B Displays when in menu mode to confirm
your selection.
C Indicates that more options are available.
Use the UP / DOWN keys to scroll up/down.
D Displays when in menu mode.
Select BACK to return to the previous menu
level. Select BACK to delete the last digit/
character entered.
1
7
4
3
9
11
5
2
6
10
8
12
Deregistering a handset
1. Press [ ] to enter in the menu.
2. Press [ ]/[ ]: to select ADVANCED SET and then press [ ].
3. Press [ ]/[ ]: to select UNREGISTER and then press [ ].
4. Enter the PIN (default: 0000) and then press [ ].
5. Press [ ]/[ ]: Select the desired handset and then press [ ].
Changing the PIN
The phone has a PIN (Personal Identification Number) associated with it. The
default PIN is 0000. If you change your PIN, please make note of the new PIN.
If you forget your PIN, you must reset your phone.
To change the PIN:
1. Press [ ] to enter in the menu.
2. Press [ ]/[ ]: to select ADVANCED SET and then press [ ].
3. Press [ ]/[ ]: to select CHANGE PIN and then press [ ].
4. Enter the current PIN (default: 0000) and then press [ ].
5. Enter the new PIN and then press [ ].
Reset
This feature allows you to restore all system settings, except the phonebook, to
default settings. This feature can be useful, for example, if you have forgotten
the PIN.
1. Press [ ] to enter in the menu.
2. Press [ ]/[ ]: to select ADVANCED SET and then press [ ].
3. Press [ ]/[ ]: to select RESET and then press [ ].
4. Press [ ].
Area code
If you program your area code, the caller ID history displays the telephone
numbers with the area code filtered.
To set the area code:
1. Press [ ] to enter in the menu.
2. Press [ ]/[ ]: to select ADVANCED SET and then press [ ].
3. Press [ ]/[ ]: to select AREA CODE and then press [ ].
4. Press [ ].
Recall time
This setting allows you to choose between SHORT, MEDIUM or LONG to
accommodate the setting of your telephone service provider for using customer
calling service, such as call waiting.
To change the recall time:
1. Press [ ] to enter in the menu.
2. Press [ ]/[ ]: to select ADVANCED SET and then press [ ].
3. Press [ ]/[ ]: to select RECALL TIME and then press [ ].
4. Press [ ]/[ ]: Select the desired setting and then press [ ].
Dialing mode
If you cannot make calls, change this setting according to your telephone line
service. The default setting is “TONE”.
1. Press [ ] to enter in the menu.
2. Press [ ]/[ ]: to select ADVANCED SET and then press [ ].
3. Press [ ]/[ ]: to select DIAL MODE and then press [ ].
4. Press [ ]/[ ]: Select the desired setting and then press [ ].
Registering a handset
The telephone system can support up to a total of 4 cordless handsets.
Handsets that were included with your main base are pre-registered.
To add or re-register a handset:
Telephone Base:
1. Press and hold for 5 seconds.
Cordless Handset:
2. Press [ ] to enter in the menu.
3. Press [ ]/[ ]: to select ADVANCED SET and then press [ ].
4. Press [ ]/[ ]: to select REGISTRATION and then press [ ].
5. Enter the PIN (default: 0000) and then press [ ].
6. Handset displays “WAITING”.
Cordless Handset:
7. You will hear a beep sound if the handset registration is successful. The
handset screen displays “Handset X”, where X is a number from 1 to 4.
NOTE: An error tone will sound if the registration is not successful.
6 Telephone Operations
8 Phonebook
7 Redial List
4 Telephone Base Settings
5 Handset Settings
3 Installation and Set-up
HANDSET LOCATOR button
Press to page handsets.
Press and hold to start registration
procedure.
2 Base station
1 Phone Function Keys
Indicates that the handset is registered and within range of the base station.
Icon blinks when the handset is out of range or is searching for a base.
Displays when in menu mode to confirm your selection.
Indicates that more options are available.
Use the UP / DOWN keys to scroll up/down.
Displays when in menu mode.
Select BACK to return to the previous menu level.
Displays when reviewing the phonebook.
Displays when keypad lock is turned on.
Displays when there is a new voice mail message. (This feature is available only if
you have subscribed to voice mail service from your telephone service provider).
Displays when there are old calls in the call list.
Flashes when there are new calls in the call list.
Displays when the mute function is turned on (i.e., the microphone is turned off).
Displays when the ringer is turned off.
Flashes when there is an incoming call.
Displays during a call.
Telephone Base Display Icons:
/
/
/
/
/
/