6
3
GB
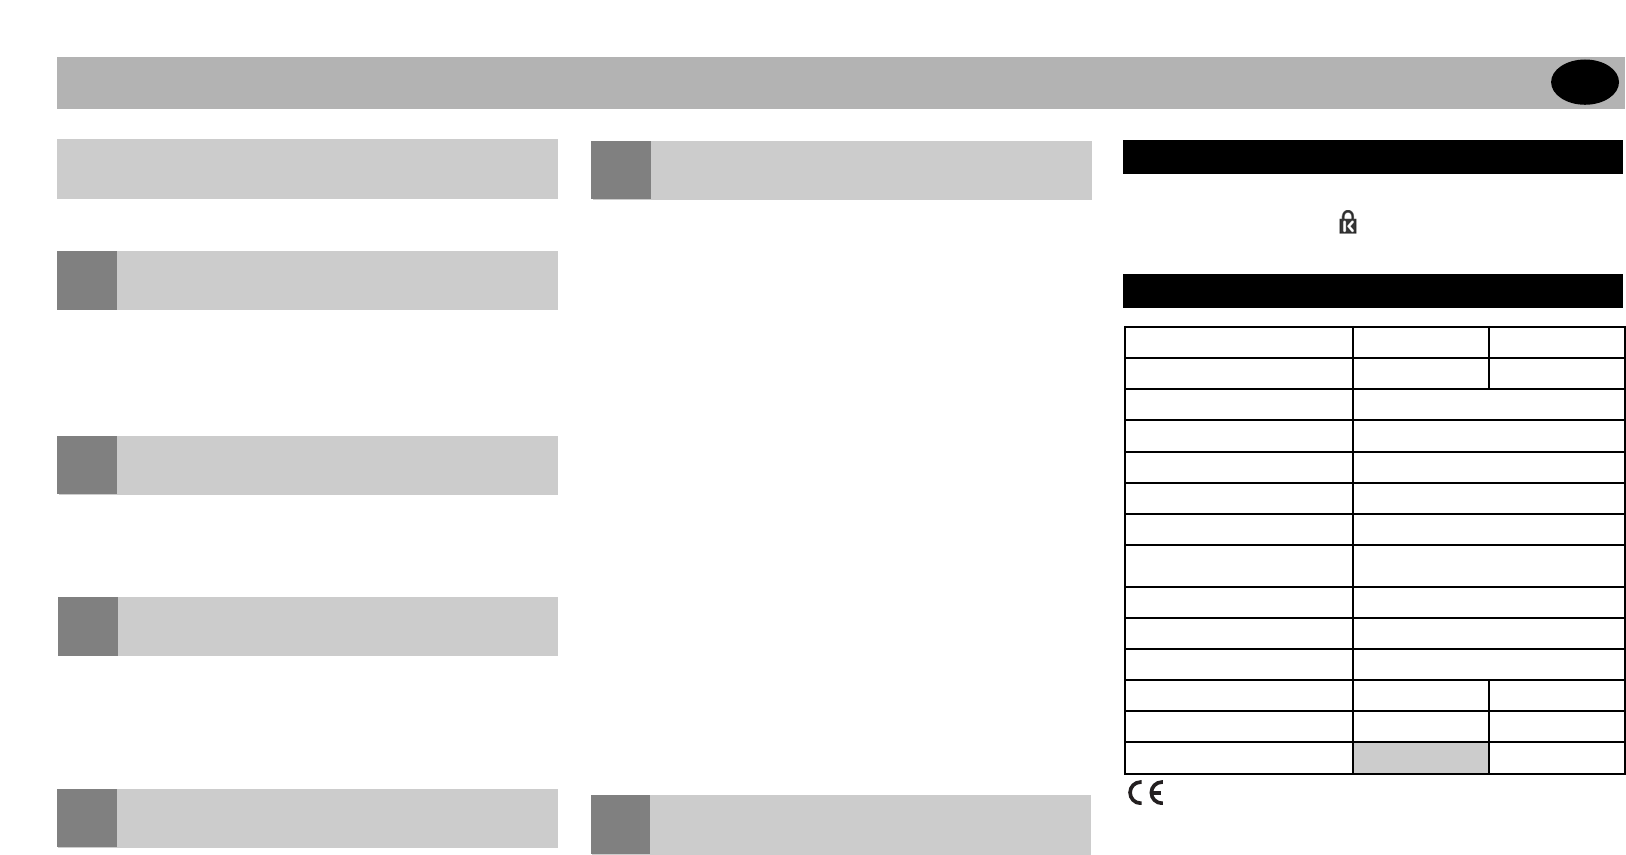
CWB406E is approved to EN60950 and CE Standards
Technical data subject to change without notification
Technical data CWB406 CWB406E
Operation mode
manual electric
Max. binding size A4
Hole pitch US Pitch 9/6” / 14.28mm
Number of punch slots
21
Margin depth
variable
Punching paper (80gsm)
max. 30
Punching PVC plastic foils
(0.2mm)
max. 4
Max. comb diameter (mm)
50
Max. wire diameter (mm)
14
Binding capacity (sheets)
450/140
Net weight (kg)
12.2 17.1
Dimensions WxDxH (mm)
525x450x200 525x450x170
Voltage
230V 50Hz AC
1
2
3
4
5
For use with Rexel 21 loop wire elements.
● Lift the lid and punch handle to the upright position.
● Place entire document so it rests on the lid.
● Check the wire size (mm) needed using the paper thickness
guide.
● Measure your wire using the wire size guide.
● For managing large documents use the document separator.
● Push the separator into the document.
● Lift the separator upwards to reveal the first stack of paper ready
for easy punching.
● Load the first paper stack into the punch slot.
● Centre the paper using the dial located at the front of the
machine.
Adjusting your machine for A5:
● Slide the switch located at the front of the machine from A4 to A5.
● For manual punching: Lower the raised handle until the paper is
punched and support the machine when lifting the handle to the
upright position.
● For electric punching (CWB406E only):
Press the 'punch button' located on the right panel of the
machine.
Note:
If the machine is overloaded and fails to complete the punch
cycle, the red LED will be lit. Press the 'punch button’ to cancel
the red LED. If this does not work contact the service helpline.
● Open the hinged cover at the front of the machine to reveal the
wire binding channel.
● Place the wire (open side up) on the wire support.
● Feed each paper stack onto the wire and repeat until your
document is complete.
● Support the document and wire on removal from the wire support.
● Insert the document into the wire closing jaws (wire opening face
down).
● Support the document and pull down the handle at the side of the
machine to close the jaws.
● Use the wire closing guide (located in the wire closing jaws) to
ensure correct closure of the wire.
Binding tips:
To hide the spine of the wire:
● Load the internal sheets onto the wire first, repeating until all are
loaded.
● Load the front PVC cover onto the wire element.
● Load the rear cover onto the wire element last.
● It is best to close the wire a little, check, and then close the wire a
little more until you are happy with the wire closure.
● Always use the wire size closing guide (located in the wire closing
jaws) to prevent over closing the wire.
● For further hints and tips please visit our website:
www.boundtopresent.com
Please ensure the clippings tray is emptied on a regular basis. This
may prevent your machine from overloading.
CWB406:
When the clippings tray is full, you will see the clear window full of
clippings. Empty the contents of the tray to continue binding.
CWB406E:
When the clippings tray is full, a yellow LED will be lit. Empty the
contents of the tray to continue binding.
A security slot is fitted for use with leading makes of security leash.
E.g. Kensington Microsaver. ( )
Wire binding instructions
Set the wire
Sort paper
Set paper size
Punch paper
Wire binding
Maintenance
Security
Technical data
Getting Started