MoAnLtg_Detecto8000 14.12.2006 13:03 Uhr Seite 1
Probedruck
C M Y CM MY CY CMY K
Detecto Granit 8000
D Bedienungsanleitung für ABUS Detecto Granit 8000
1. Funktionalität
Beim ABUS Detecto Granit handelt es sich um ein elektronisches Bremsscheiben-
schloss, welches gleichermaßen die Funktion eines V
schlosses abdeckt. Die umfangreiche Funktionalität wird dur
sensors erreicht, der bereits kleinste Bewegungen auswertet und erkennt. Die Elektr
des Schlosses wird durch Aufschieben auf die Br
Abschließen aktiviert. Die Scharfschaltung des Schlosses wird mittels eines
Quittierungstones ca. 4 Sekunden nach dem Abschließen angezeigt.
Hierbei ermittelt die Elektronik die Nullstellung (Ausgangslage) des Schlosses.
V
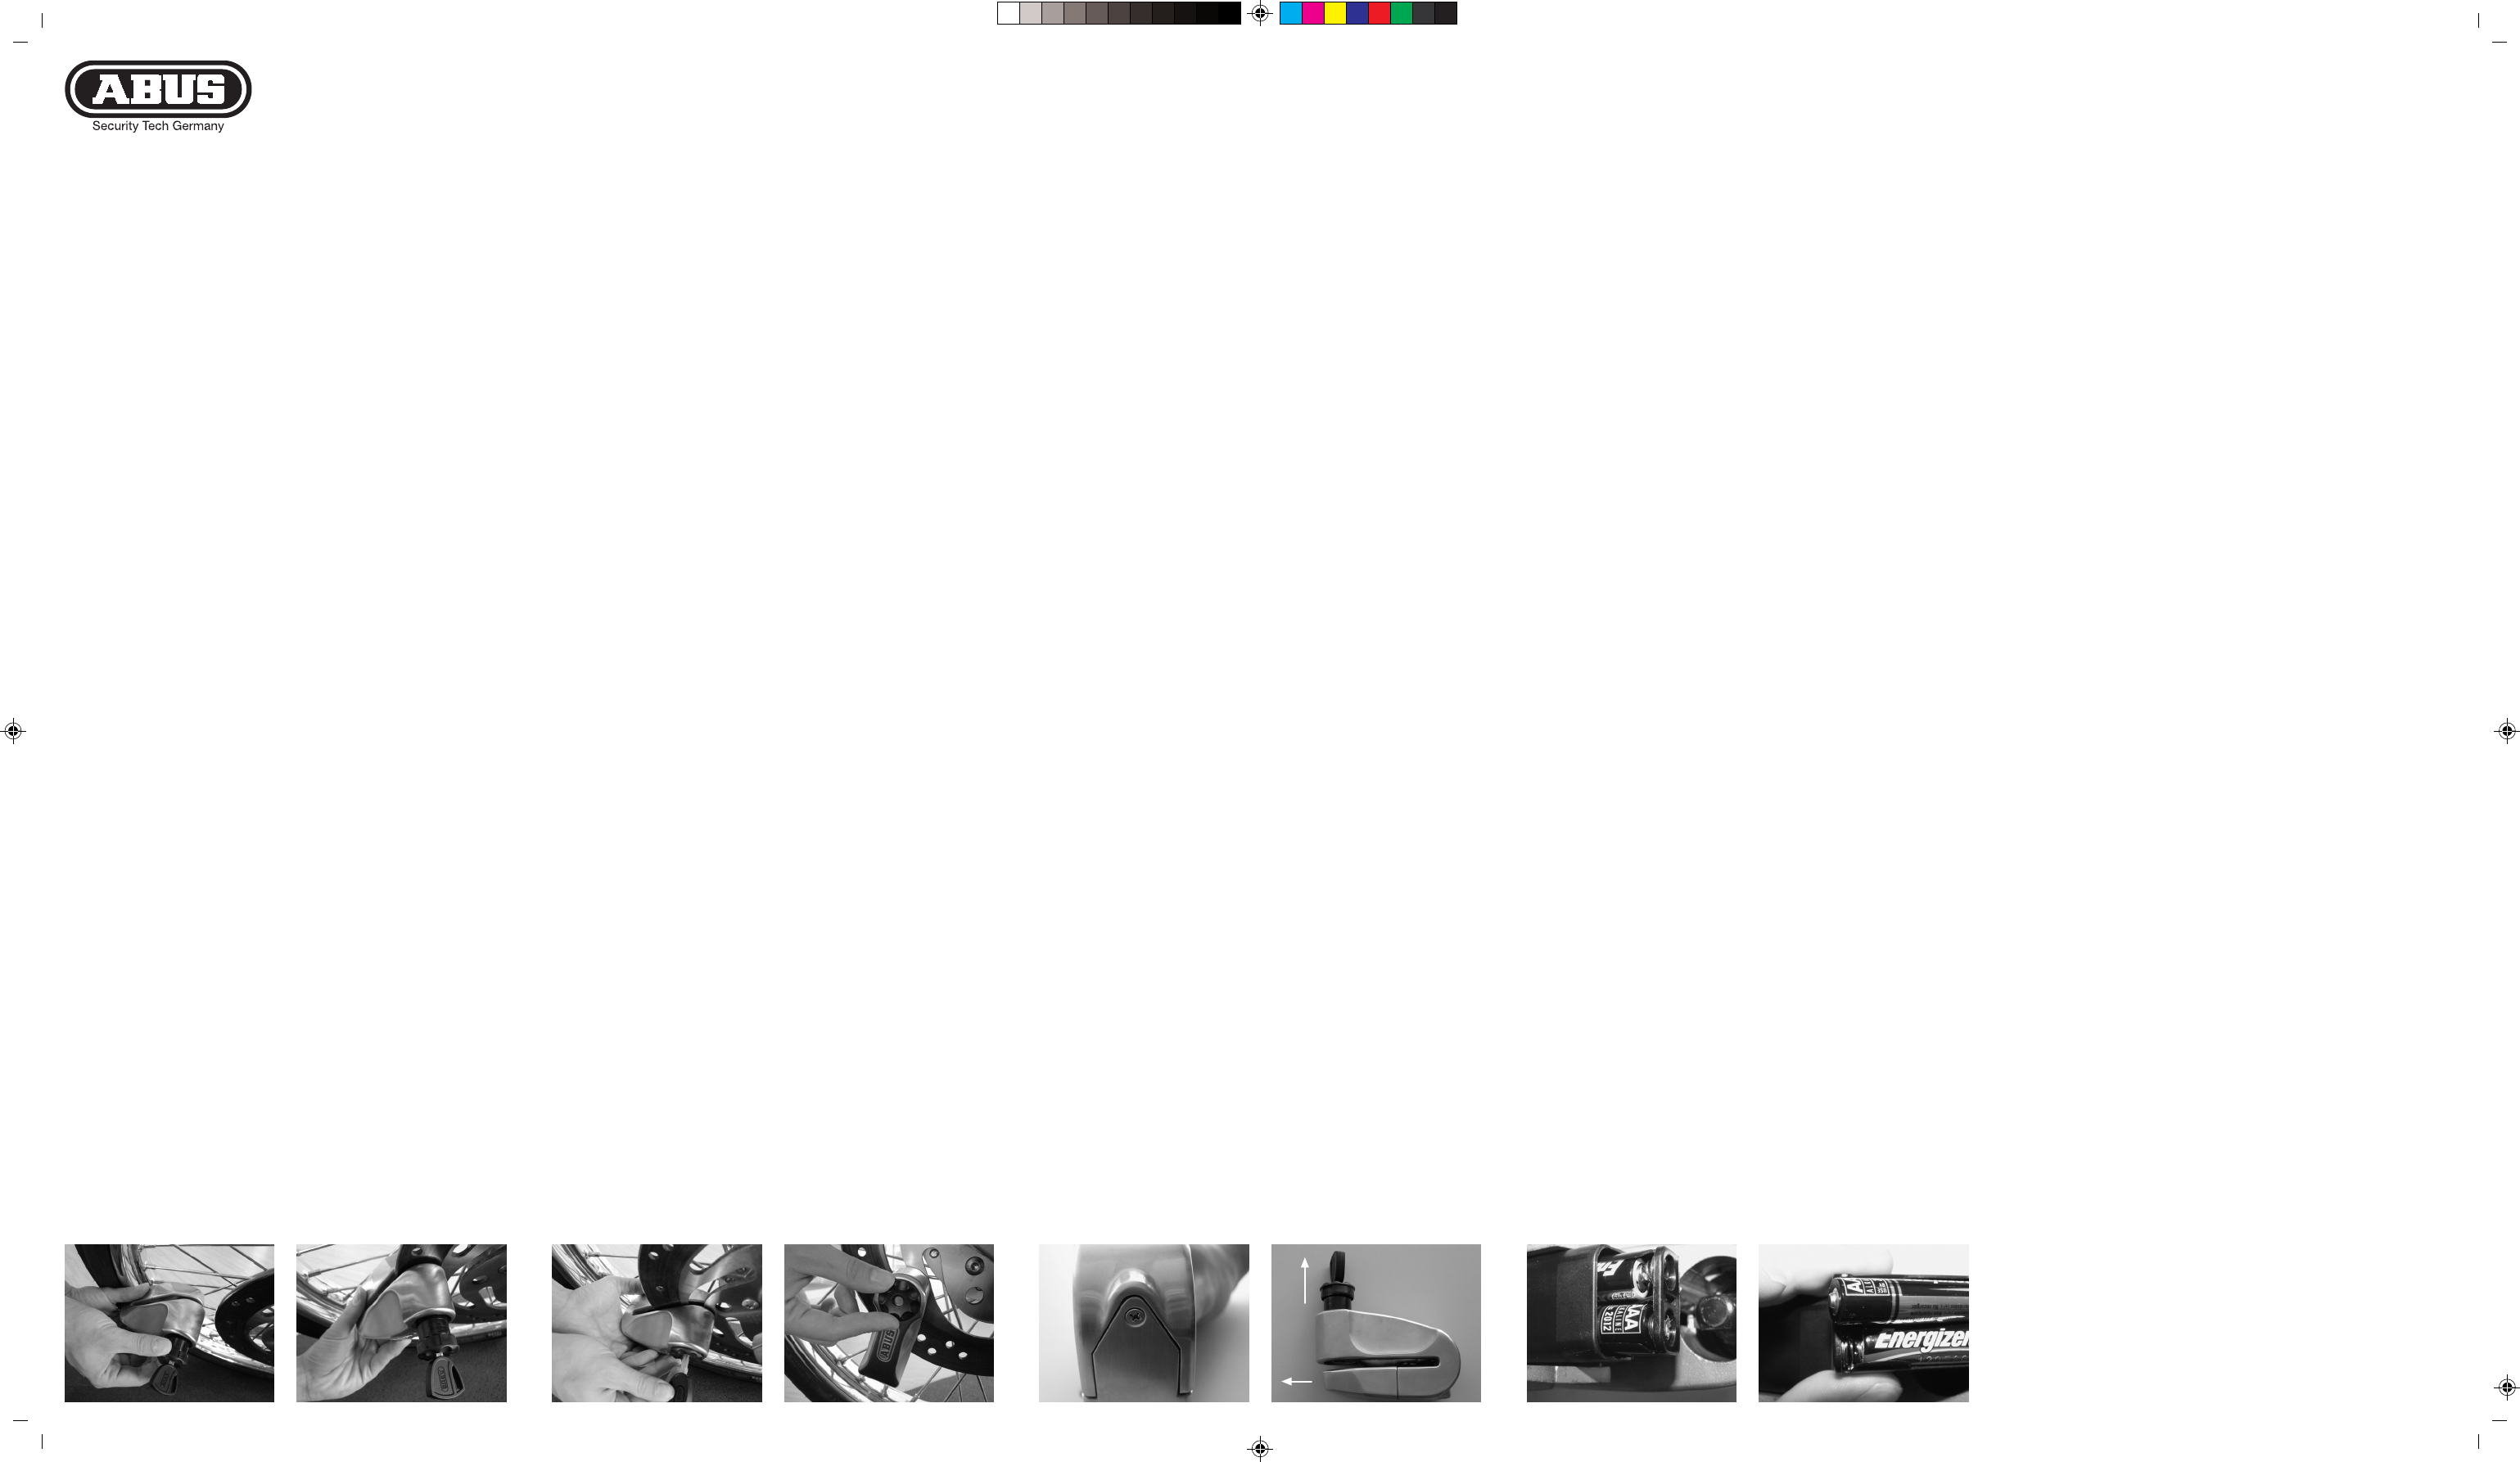
1. Entriegeln / Schließbolzen zurückziehen (Abb.1).
2. Aufschieben auf die Bremsscheibe (Abb. 2 ).
3. Zylinder einschieben und abschließen (Abb. 3 ).
Wichtig: Eine Scharfschaltung der Elektr
die Bremsscheibe aufgeschoben und abgeschlossen wird. Somit kann das Schloss im
abgeschlossenen Zustand ohne Alarmauslösung transportiert werden.
Mittels des Lagesensors wird die aktuelle Lage des Schlosses erkannt.
Kommt es dann im scharf geschalteten Zustand zu einer Lageänderung (Aufrichten des
Motorrades, Drehen des V
matisch zu einem Alarm (Dauer ca.
des Schlosses sofort deaktiviert werden.
VEs ist darauf zu achten, dass sich die Ruheposition des Schlosses
nach Ertönen des Quittierungstones nicht mehr ändert (Abrutschen an Bremsscheibe).
Es kommt sonst zur Alarmauslösung.
2. Funktion Schlüssellochverdeck
Nach Abziehen des Schlüssels besteht die Möglichkeit, das Schlüsselloch mittels eines
V
Eine Linksdrehung gibt das Schlüsselloch wieder frei (Abb. 4 ).
3. „Low Battery“ Warnung
Die Elektronik des Schlosses kündigt einen nötigen Batteriewechsel mittels einer
„Low Battery“ Warnung an. Nach V
erfolgen drei kurze „Pieptöne“. Ersetzen Sie die Batterien, sobald die akustische
„Low Battery“ Warnung auftritt.
VW
längeren Zeitraum weiter betrieben, kann es zur Fehlfunktion der Elektronik führ
4. Batteriewechsel
Die Elektronik des Schlosses wird mittels zweier handelsüblicher Alkaline Zellen versor
Die durchschnittliche Batterielebensdauer liegt bei ca. einem Jahr
Ersetzen Sie die Batterien, sobald die akustische „Low Battery“ Warnung auftritt.
Wir empfehlen den Einsatz folgender hochwertiger Alkaline Batterien:
Energizer Ultra+, Duracell Plus oder V
Zum Austausch der Zellen ist es nötig, die Schraube am Unterteil des Schlosses
herauszudrehen. Hiernach lässt sich das Unterteil des Schlosses durch Ziehen bei
zurückgezogenen Schließbolzen abnehmen. Um die Batterien auszutauschen,
müssen Sie nur noch das Batteriefach aus der V7 ).
Achten Sie bitte beim Einsetzen der Batterien auf die richtige Polarität.
Durch V
V
1. Schraube Unterteil lösen (Abb. 5 ).
2. Schließbolzen herausziehen und Unterteil abziehen (Abb. 6 ).
3. Batteriefach herausziehen (Abb. 7 ).
4. Batterien entnehmen und neue einsetzen (Abb. 8 ).
Batteriefach in V
gehäuse aufschieben. Schraube nur leicht bis zum spüren eines Widerstandes eindrehen.
Hinweis:
• Ausgelaufene oder beschädigte Batterien können bei Berührung mit der Haut
V
Schutzhandschuhe.
• Achten Sie darauf, dass Batterien nicht kurzgeschlossen oder ins Feuer geworfen
werden.
• Batterien dürfen nicht aufgeladen werden.
• Entsorgen Sie das unbrauchbar gewor
gesetzlichen Bestimmungen.
• Sie als Endverbraucher sind gesetzlich zur Rückgabe aller gebrauchten
Batterien verpflichtet; eine Entsorgung über den Hausmüll ist untersagt!
• Ihre verbrauchten Batterien können Sie unentgeltlich bei den Sammelstellen Ihrer
Gemeinde oder überall dort abgeben, wo Batterien verkauft werden. Sie erfüllen
hiermit die gesetzlichen V
Achtung: Beim Anbringen- bzw. Lösen des Schlosses besteht bei erhitzter
Bremsscheibe Verbrennungsgefahr!
Gewährleistung:
• ABUS leistet für dieses Schloss eine Gewährleistung von 2 Jahren für
Material- und Herstellungsfehler
• Ohne Kaufbeleg besteht kein Gewähleistungsanspruch.
Durch die Gewährung von einwandfreiem Ersatz oder Reparatur wir
ursprüngliche Gewährleistungszeit nicht verlängert.
Gewährleistungsansprüche bestehen insbesondere nicht bei:
a) Unsachgemäßem Gebrauch und Überbeanspruchung des Produkts
b) Nichtbeachtung unserer Pr
c) Normaler Abnutzung
Achtung: Bei entladenen Batterien besteht kein Anspruch auf Umtausch des Produktes.
Abb. / fig. / photo / ilustración / ill.1 Abb. / fig. / photo / ilustración / ill. 2 Abb. / fig. / photo / ilustración / ill. 3 Abb. / fig. / photo / ilustración / ill. 4 Abb. / fig. / photo / ilustración / ill. 5 Abb. / fig. / photo / ilustración / ill. 6 Abb. / fig. / photo / ilustración / ill. 7 Abb. / fig. / photo / ilustración / ill. 8
G Instructions on using your ABUS Detecto Granit 8000
1. Operation
The ABUS Detecto Granit 8000 is an electronic disc brake lock, which both protects
against physical attack, but also has an added feature of a tamper proof alarm built
into the lock. This multi-function has an inset sensor which registers and analyses even
the lightest of movements. The electronic alarm is activated once the disc lock is fitted
and locked to the motorcycle. The alarm activates automatically approx 4 seconds after
the cylinder is pressed to secure the lock, this is indicated by a “beep” as the sensor
registers the position of the lock.
How to fit the lock:
1. Open the lock and withdraw the locking bolt (fig.1 ).
2. Fit it to the motorcycle disc (fig. 2 ).
3. Push the cylinder and secure the disc brake loc (fig. 3 ).
Important:
Y
activate the alarm. The electronic sensor will only be activated by both fitting and locking
the disc lock to the motorcycle.
The actual position of the lock is registered by the electr
alters by someone tampering with the motorcycle, the alarm is activated for approx.
15 seconds. When the alarm stops the tamper proof alarm is still active if there is a further
movement of the locking mechanism, the alarm will sound again. The alarm is deactivated
when the key is used to open the lock.
Caution:
The lock should not be moved after the lock is secured and the “beep” has been heard,
otherwise the alarm will be activated.
2. Operation of the Keyhole Cover
When the key is removed the keyway can be covered to pr
T4 ).
3. “Low Battery” Alarm
The battery will need to be changed from time to time and you will hear a low battery
alarm consisting of three short beeps. When this occurs the batteries need to be changed
as soon as possible.
Caution:
If batteries are not changed when a warning is given, it may result in a malfunction
of the disc brake tamper proof alarm.
4. Changing Batteries
The useful life of the
Alkaline batteries required to operate the ABUS Detecto Granit 8000
electronic disc brake lock is about 1 year
Energizer Ultra+, Duracell Plus or V
battery life.
T
Withdraw the bolt and remove base plate.
T
batteries into the correct position (see fig.
7).
Incorrect battery polarity could cause damage the lock’
When you have changed the batteries insert the battery compartment and replace
the base plate. Do not over tighten the securing screw
How to change the batteries:
1. Remove the screw on the underside of the lock (fig. 5 ).
2. Withdraw the bolt and remove the base plate (fig. 6 ).
3. Withdraw the battery compartment (fig. 7 ).
4. Remove the old batteries and put new ones in (fig. 8 ).
Caution: Brake disks may be heated after riding!
Hints:
• W
as these could harm skin.
• Do not short-circuit the batteries.
• Do not throw them into fire.
• Do not rechar
• Please dispose of you batteries carefully
Liability:
• ABUS is liable for faults in material or production for a period of 2 years
as of date of purchase.
• No right to claim liability without the purchasing receipt.
The original time of liability is not extended by supplying faultless replacements
or repair
The right of claim liability does not exist especially when:
a) using the right product impr
b) disregar
c) normal wear and tear
Attention:
“In case of low batteries the consumer has no right to claim exchange of the product.”
F
Notice de montage pour ABUS Granit Detecto 8000
1. Fonctionnement
Avec le bloque disque éléctronique ABUS Granit Detecto, vous obtenez la pr
mécanique ainsi qu’une alarme. Cette fonctionnalité se fait par l’emploi d’un détecteur
de position, qui distingue et analyse le moindre mouvement. L
est activée lors de la mise en position sur le disque de frein et son verrouillage.
La mise en service est signalée 4 secondes après fermeture par un bip sonore.
Pour se faire l’électronique détermine la position initiale (position à zér
Procédure:
1. Déverrouiller / tirer le pène à l’aide de la clé
(photo1).
2. Positionner au disque de frein (photo 2 ).
3. Introduire le cylindr
(photo 3).
Important:
L
et qu’il est verrouillé. Ainsi l’antivol peut être transporté en étant fermé sans que l’alarme
soit activée.
La position actuelle de l’antivol est déterminée par un capteur
de position, en état actif (redresser la moto, tourner la roue avant, si l’antivol est fixé)
l’alarme est automatiquement déclanchée (durée: 15 secondes environ).
L
Attention:
Il faut prendre gar
(glissé sur le disque). L
2. Fonction du câche-serrure
Si la clé est retirée, il est possible de protéger la serrur
Ceci se fait par rotation dans le sens des aiguilles d’une montre.
Dans le sens inverse la serrure est libérée
(photo 4).
3. Signal Décharge de batterie («
L
que rappel pour le remplacement de la batterie. L
trois bips sonores sont émis. Après ce signal, r
Attention:
L
un mauvais fonctionnement de l’électronique.
4. Remplacement des piles
L
La durée de vie est en moyenne d’un an.
Remplacer les piles aussitôt que le signal accoustique «
Nous recommandons l’emploi de piles Alkaline de haute qualité aux marques suivantes:
Energizer Ultra+, Duracell Plus ou V
Pour le remplacement, retir
le pêne en position ouverte. Retirer les battéries de leur compartiment (photo 7 )
pour le remplacement. Pour ne pas endommager l’électronique,
faire attention à la bonne polarité.
Procécure:
1. Déserrer la vis du bas de boîtier (photo 5 ).
2. Retirer le pêne et libérer le bas du boîter (photo 6 ).
3. Libérer le compartiment (photo 7 ).
4. Enlever les piles et les remplacer (photo 8 ).
Remettre les piles dans leur compartiment et repositioner le bas du boîtier
Serrer la vis correctement sans for
Attention: Les disques de frein sont généralement très brûlants!
Conseil:
• Des piles endommagées peuvent causer des brûlures à l’acide sur la peau.
Dans ce cas, des gants de protection sont conseillés.
• Attention de ne pas causer un court-circuit ni de les jeter au feux.
Ne pas charger les piles.
• Elimination de produits inutilisables uniquement selon directives légales en vigueur
En tant que consommateur
dans un emplacement réservé et de ne pas les éliminer par les ordures ménagèr
• Les piles usagées peuvent être placées gratuitement aux emplacements collectifs
de votre commune ainsi qu’à tout point de vente collectant les piles usagées.
De cette manière vous répondrez à votr
les efforts pour la protection de l’envir
Garantie:
• 2 ans de garantie pour tout défaut de matériel ou de production comptant depuis
la date de pièce justificative.
• Sans pièces justificative pas de droit de garantie, le rechange ou la réparation
ne prolongeant pas le délai de garantie.
Pas de garantie en cas:
a) d’utilisation inadaptée et excessive
b) de non-respect des r
c) d’usure normale
Attention:
En cas de piles déchargées, l’échange du pr
E Manual de instrucciones para el Abus Detecto Granit 8000
1. Funcionalidad
El candado ABUS Detecto Granit es un bloqueo de disco de freno electrónico que cubre
a la vez las funciones de aviso de olvido y alarma. Esta amplia funcionalidad se obtiene
mediante la utilización de un sensor que reconoce y evalúa el mínimo movimiento.
El sistema electrónico del candado se activa con su colocación en el disco de freno
y su cierre posterior
que el candado está conectado. De este modo el sistema electrónico proporciona
la posición cero (punto de partida) del candado.
Modo de proceder:
1. Desbloquear / extraer bulón de cierre (ilustración
1).
2. Colocar sobre el disco de freno 2 ).
3. Introducir cilindro y cerrar y esperar a oír el tono 3 ).
Importante:
La conexión del sistema electrónico solo ocurre cuando el candado está
colocado sobre el disco de freno y ha sido cerrado. De esta forma el candado puede ser
transportado en estado cerrado sin que salte la alarma.
El sensor reconoce la situación actual del candado. Si se produce un cambio de situación
estando conectado el sensor porque alguien toque la moto (elevación de la moto,
giro de la rueda delantera estando el candado en esa rueda) salta automáticamente
la alarma (duración aproximada
mente abriendo el candado.
Precaución:
Hay que tener en cuenta que no hay que mover el bloqueo después de oír el tono
indicador de entrada en funcionamiento. De lo contrario la alarma se dispararía.
2. Función tapa de protección entrada llave
Después de sacar la llave existe la posibilidad de proteger a abertura de entrada de
la llave con la tapa protectora giratoria incorporada. Mediante un giro a la der
abertura queda cerrada. Un giro a la izquierda deja la abertura libr4 ).
3. Aviso “batería baja”
El sistema electrónico del candado se alimenta mediante dos pilas
Alkaline.
La duración media es de aproximadamente
Reponga las baterías en cuanto se produzca el aviso acústico “batería baja”
(“Low Battery”), que consiste en tres tonos cortos seguidos.
Por nuestra parte, recomendamos las siguientes pilas alcalinas:
Energizer Ultra+, Duracell Plus, V
Para cambiar las pilas es necesario aflojar el tornillo de la parte inferior del candado
y soltar la pletina de la base. Sólo entonces y con el bulón sacado, puede desmontarse
la parte inferior del candado. Para cambiar las pilas solo tendrá que extraerlas de su
compartimiento (ilustración
7). Cuando coloque las pilas nuevas tenga en cuenta la
polaridad correcta. Una colocación errónea puede dañar el sistema electrónico del
candado.
Modo de proceder:
1. Desenroscar tornillo parte inferior (ilustración 4 ).
2. Extraer bulón de cierre y desmontar parte inferior (ilustración 6 ).
3. Extraer compartimiento de pilas (ilustración 7 ).
4. Sustituir las pilas usadas por nuevas (ilustración 8 ).
Introducir el car
la base sobre el cuerpo del bloqueo. Apretar el tornillo de sujeción sin pasarse de fuerza.
Atención: Al colocar y quitar el antirrobo, tenga cuidado de no quemarse con el disco
de freno si éste está caliente.
Consejos:
• Las pilas deterioradas pueden causar daños en contacto con la piel.
Utilice por tanto en ese caso unos guantes protectores adecuados.
• T
ni deben arrojarse al fuego.
• T
• Deshágase de ellas en los puntos de recogida establecidos para tal efecto
en su comunidad o en todos aquellos lugares donde se compran pilas nuevas.
Por favor
De esta forma contribuirán a la protección del medio ambiente.
Garantía:
• 2 años de garantía por cualquier defecto de material o de fabricación
a contar a partir de la fecha de compra.
• Si no hay factura justificativa de la compra indicando la fecha,
no se puede cambiar o reparar sin car
La garantía no cubre:
a) En caso de utilización inadecuada o excesiva
b) En caso de no respetarse las r
c) El desgaste normal de uso
“En el caso de estar las pilas contenidas de regalo bajas de car
el consumidor no tiene derecho a reclamar el cambio del pr
I
Istruzioni per l’utilizzo dell’ ABUS Detecto 8000 Granit
1) Funzionamento
ABUS Detecto 8000 Granit è un blocca disco meccanico elettronico sonoro che
protegge contro gli attacchi fisici. In aggiunta alla sicur
è presente un allarme elettronico con speciale dispositivo di sicur
complementare ha un sensore che r
L
disco della motocicletta. Il ritardo di attivazione dell’allarme è di circa 4 secondi dopo
la chiusura, e l’attivazione viene confermata con un «
l’antifurto memorizza attraverso un sensore la posizione della moto.
Come installare l’antifurto:
1. Aprire il blocca disco ed alzare il perno
(ill. 1 ).
2. Installare l’antifurto nel disco della moto
(usare i fori di alleggerimento, non di raffr
(ill. 2 ).
3. Chiudere il perno ruotando la chiave (bloccaggio non automatico)
(ill. 3 ).
Importante: il blocca disco chiuso può esser
non si attiverà. Il sensore elettronico si attiva solamente se l’antifurto è installato e chiuso
al disco della motocicletta.
La posizione iniziale dell’antifurto viene memorizzata da un sensore elettronico e qualora
questa posizione subisca un’alterazione anche minima, l’allarme suonerà per circa per
1
mente e se ci sono ulteriori movimenti, l’allarme continuerà a suonare.
L
Attenzione: l’antifurto non deve esser
dell’allarme.
2. Funzionamento della copertura del foro chiave
Quando la chiave non è inserita il foro chiave del cilindro può esser
Per chiudere il foro chiave si deve girar
per riaprirlo si deve girare verso sinistra (senso antiorario)
(ill. 4 ).
3. Allarme «
Le batterie devono essere sostituite periodicamente,
l’antifurto avvisa che le batterie sono scariche emettendo tre brevi «
In questo caso bisogna sostituire le batterie nel più breve tempo possibile.
Attenzione: se non vengono sostituite le batterie dopo il segnale di batteria scarica,
il dispositivo di sicurezza potrebbe smetter
(con le batterie scariche non funziona la parte elettronica).
4. Sostituzione delle batterie
L
normali condizioni d’uso è di circa un anno (sbalzi di temperatura riducono notevolmente
la durata). Si consiglia l’uso delle seguenti marche: Ener
V
Per sostituire le batterie bisogna rimuovere la vite posta nel lato inferior
Alzare il perno e sfilare la base del blocca disco. Estrarre le batterie dal lor
scompartimento ed inserire le nuove batterie verificando la corretta posizione.
Uno scorretto posizionamento della batteria potrebbe danneggiar
elettronico dell’antifurto (ill. 7 ).
Dopo avere inserito le batterie nello scomparto si deve riposizionare la base dell’antifurto.
Non stringere troppo la vite di fissaggio.
Attenzione: Durante l’installazione dell’antifurto fare attenzione a non bruciarsi con il
disco del freno caldo
Suggerimenti:
1. Indossare guanti adatti quando si tolgono le batterie danneggiate perché
potrebbero cr5 ).
2. Non fare cortocircuito con le batterie (ill. 6 ).
3. Non gettare le batterie nel fuoco (ill. 7 ).
4. Non ricaricare le batterie non ricaricabili (ill. 8 ).
Smaltire sempre le batterie in osservanza delle norme.
Garanzia
• 2 anni di garanzia per tutti i difetti di materiale o di produzione
a partire dalla data del documento fiscale d’acquisto.
• Senza il documento fiscale d’acquisto, la garanzia non è valida.
La sostituzione e la riparazione non prolungano il periodo di garanzia.
La garanzia non è valida nei seguenti casi:
a) Utilizzo improprio ed eccessivo
b) Mancata osservazione delle indicationi d’ABUS sull’uso dei prodotti
c) Normale usura
Attenzione:
In caso di batteria scarica non vengono accettati reclami o richieste di sostituzione
prodotto in garanzia.
1
2
390255