Connect to Electrical Power
Am Strom anschließen
Raccordement au réseau électrique
Conectar a la alimentación eléctrica
Collegamento alla rete elettrica
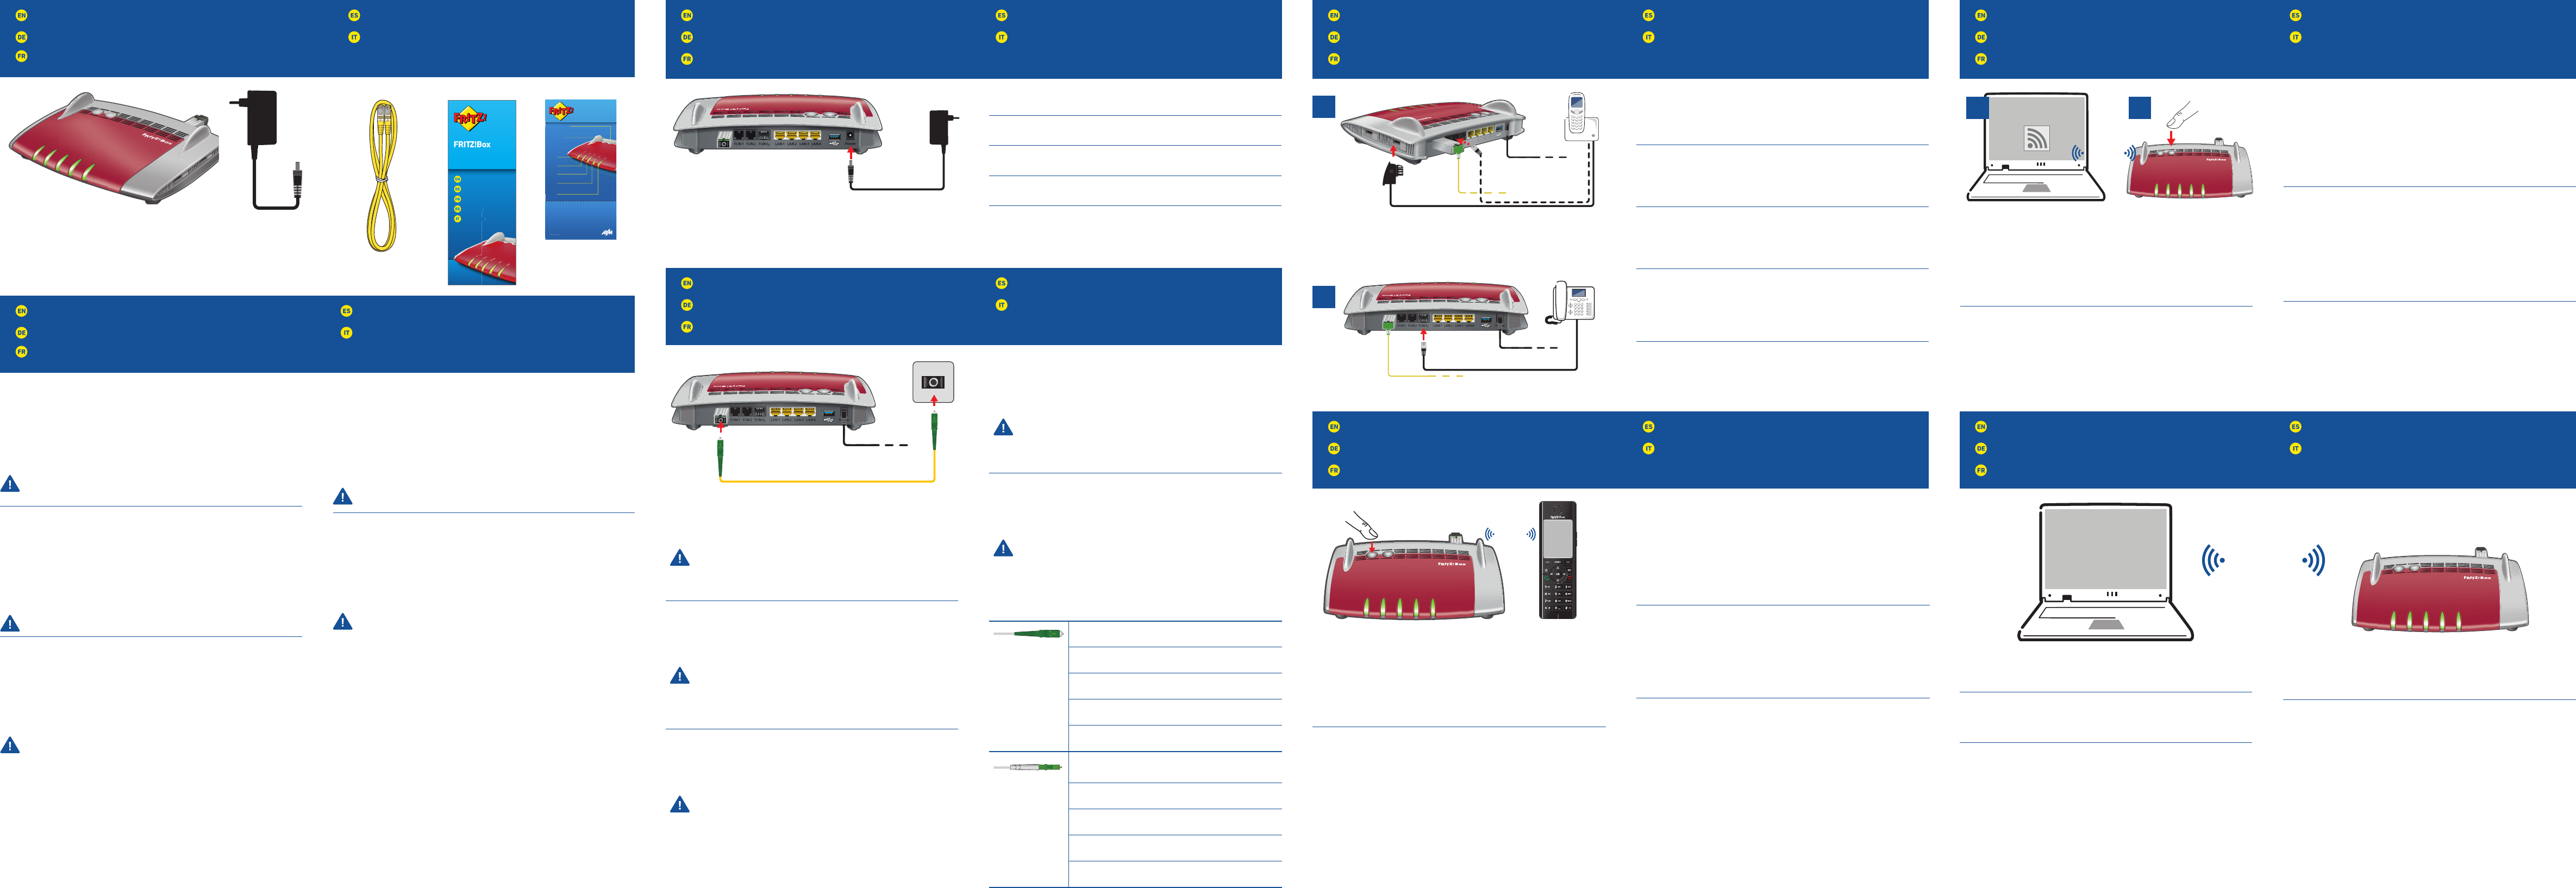
Connect Telephones by Cable
Telefone per Kabel anschließen
Raccordement de téléphones par câble
Conectar los teléfonos con cable
Collegamento di telefoni via cavo
Register Cordless Telephones
Schnurlostelefone anmelden
Enregistrement des téléphones sans fi l
Conectar teléfonos inalámbricos
Registrazione di cordless
Wireless LAN Quick Connection (WPS)
WLAN-Schnellverbindung (WPS)
Connexion sans fi l rapide (WPS)
Conexión inalámbrica rápida (WPS)
Connessione rapida wireless (WPS)
Connect to the Fiber Optic Port
Mit dem Fiber-Anschluss verbinden
Raccordement à l’accès en fi bre optique
Conectar a la conexión de fi bra óptica
Collegamento alla connecssione in fi bra ottica
Package Contents
Lieferumfang
Contenu de la livraison
Contenido del paquete
Contenuto
Safety Instructions
Sicherheitshinweise
Consignes de sécurité
Consejos de seguridad
Indicazioni di sicurezza
Connecting a Computer via Wireless LAN
Computer per WLAN anschließen
Connexion sans fi l d’un ordinateur
Conexión a través de la red inalámbrica
Collegamento di un computer via wireless
WiFi
Connect the FRITZ!Box to electrical power. The “Power” LED begins fl ashing
quickly.
Schließen Sie die FRITZ!Box an den Strom an. Die Leuchtdiode „Power“
beginnt zu blinken.
Raccordez FRITZ!Box au réseau électrique. Le voyant lumineux «Power»
commence à clignoter.
Conecte su FRITZ!Box a la alimentación eléctrica. El díodo “Power” comenzará
a parpadear.
Collegate il FRITZ!Box alla rete elettrica. Il LED “Power” inizia a lampeggiare.
SC connector, for connecting to the FRITZ!Box and the
fi ber socket.
SC-Stecker, zum Anschluss an die FRITZ!Box und die
Fiber-Buchse.
Connecteur SC, pour le raccordement à FRITZ!Box et
la prise optiqu.
Conector SC, para la conexión al FRITZ!Box y la toma
Fiber.
Spina SC per il collegamento al FRITZ!Box e alla presa
per fi bra ottica.
LC connector, supplied by various providers for
connecting to the fi ber socket.
LC-Stecker, bei verschiedenen Anbietern zum
Anschluss an die Fiber-Buchse.
Connecteur LC, pour le raccordement à la prise
optique chez de nombreux fournisseurs.
Conector LC, que diferentes proveedores utilizan para
la conexión a la toma Fiber.
Spina LC, vari provider la off rono per il collegamento
alla presa per fi bra ottica.
• Connect analog telephones to the “FON1” and “FON2” sockets. The
FRITZ!Box is equipped with two diff erent types of sockets: one on the back
for RJ11 connectors, and one on the side for TAE connectors.
• Connect ISDN telephones to the “FONS
0
” socket.
• Schließen Sie analoge Telefone an die Buchsen „FON1“ und „FON2“ an.
Die FRITZ!Box hat diese Buchsen in zwei Ausführungen: hinten für RJ11-
und seitlich für TAE-Stecker.
• Schließen Sie ISDN-Telefone an die Buchse „FONS
0
“ an.
• Raccordez vos téléphones analogiques aux prises «FON1» et «FON2».
FRITZ!Box est dotée de deux types de prises diff érents (RJ11 au dos, TAE
sur le côté).
• Raccordez vos téléphones RNIS à la prise «FONS
0
».
• Conecte teléfonos analógicos a los puertos “FON1” y “FON2” que se
encuentran al respaldo de su FRITZ!Box. Su FRITZ!Box tiene dos tipos de
puertos de conexión: RJ11, en el panel de conexión y puertos TAE en la
parte lateral.
• Podrá conectar teléfonos RDSI al puerto “FONS
0
”.
• Collegate i telefoni analogici alle prese “FON1” e “FON2”. Il FRITZ!Box
dispone di due versioni di queste prese: sul retro per RJ11 e lateralmente
per connettori TAE.
• Collegate i telefoni ISDN alla presa “FONS
0
”.
2
Computers with wireless LAN can be connected with the FRITZ!Box using
WPS:
• Click the WLAN icon in the notifi cation area of the Windows task bar.
• A list appears on the screen showing all wireless networks.
• Select the wireless network of your FRITZ!Box and click “Connect”.
• Press the “WPS” button on the FRITZ!Box5491 until the “WLAN” LED
begins fl ashing.
Sie können WLAN-Geräte per WPS mit der FRITZ!Box verbinden:
• Klicken Sie in der Windows-Taskleiste auf das WLAN-Symbol.
• Auf dem Bildschirm erscheint eine Liste mit Drahtlosnetzwerken.
• Wählen Sie das Drahlosnetzwerk Ihrer FRITZ!Box5491 aus und klicken
Sie auf „Verbinden“.
• Drücken Sie den WPS-Taster der FRITZ!Box5491 so lange, bis die
Leuchtdiode „WLAN“ blinkt.
Vous pouvez connecter vos périphériques sans fi l à FRITZ!Box par WPS:
• Cliquez sur l’icône de réseau sans fi l dans la barre des tâchesWindows.
• Une liste de réseaux sans fi l s’affi che sur votre écran.
• Sélectionnez le réseau sans fi l de votre FRITZ!Box5491, puis cliquez sur
«Connecter».
• Enfoncez la toucheWPS de votre FRITZ!Box5491 jusqu’à ce que la diode
électroluminescente «WLAN» clignote.
Podrá conectar dispositivos inalámbricos a FRITZ!Box a través de WPS:
• Haga clic en la barra de tareas de Windows sobre el símbolo de la red
inalámbrica.
• En la pantalla aparecerá una lista de las redes inalámbricas en su
entorno.
• Seleccione la red de su FRITZ!Box5491 y haga clic sobre “Conectar”.
• Presione el botón “WPS” en su FRITZ!Box5491 hasta que el indicador
“WLAN” parpadee.
Tramite WPS potete collegare al FRITZ!Box i dispositivi wireless:
• Nella barra delle applicazioni di Windows cliccate l’icona della rete
wireless.
• Sullo schermo compare una lista delle reti wireless.
• Selezionate la rete wireless del FRITZ!Box5491 e cliccate “Collega”.
• Premete il tasto WPS del FRITZ!Box5491 fi nché il LED “WLAN” non
lampeggia.
Computers with wireless LAN and the operating system MACOS or others can
be connected with the FRITZ!Box using the network key. The network key is
printed on your FRITZ!Notice service card and on the bottom of the FRITZ!Box.
Computer mit WLAN und dem Betriebssystem MACOS oder anderen können
Sie mit dem WLAN-Netzwerkschlüssel an der FRITZ!Box anschließen. Sie
fi nden den WLAN-Netzwerkschlüssel auf Ihrer Servicekarte FRITZ!Notiz und
auf der Unterseite der FRITZ!Box.
Vous pouvez connecter vos ordinateurs dotés d’une fonction sans fi l et du
système d’exploitation MACOS ou autres à FRITZ!Box à l’aide de la clé réseau
sans fi l. Vous trouverez la clé réseau sans fi l sur votre fi che d’information
«FRITZ!Notice» ainsi que sur la partie inférieure de votre FRITZ!Box.
Ordenadores con conexión WiFi y el sistema operativo MACOS u otro
pueden conectarse a su FRITZ!Box indicando la clave de la red inalámbrica.
Encontrará la clave de red en la tarjeta FRITZ!Notice y en la parte inferior del
FRITZ!Box.
Potete collegare al FRITZ!Box i computer dotati di funzione wireless e del
sistema operativo MACOS o di altri sistemi, usando la chiave di rete wireless.
La chiave di rete wireless si trova sulla scheda di servizio FRITZ!Notice e alla
base del FRITZ!Box.
Connect the fi ber optic cable to the socket on the FRITZ!Box labeled „Fiber“,
and to the socket on the fi ber outlet designated for internet access. The fi ber
optic cable is not included with delivery of the FRITZ!Box 5491. It is supplied
by your internet provider.
• Do not hold the ends of the fi ber optic cable in front of your
eyes (laser).
• Do not touch or contaminate the ends of the fi ber optic cable.
• Do not bend the fi ber optic cable.
Schließen Sie das Glasfaserkabel an die Buchse „Fiber“ der FRITZ!Box und
an die für den Internetzugang vorgesehene Buchse der Fiber-Dose an. Das
Glasfaserkabel gehört nicht zum Lieferumfang der FRITZ!Box 5491. Es wird
von Ihrem Internetanbieter bereitgestellt.
• Halten Sie die Enden das Glasfaserkabels nicht vor die Augen
(Laser).
• Berühren oder verschmutzen Sie nicht die Enden des
Glasfaserkabels.
• Knicken Sie das Glasfaserkabel nicht!
Insérez le câble à fi bre optique dans la prise «Fiber» de FRITZ!Box et la prise
prévue pour l’accès Internet sur le boîtier optique. Le câble à fi bre optique
n’est pas livré avec FRITZ!Box 5491. Il vous est fourni par votre fournisseur
d’accès.
• Ne tenez pas les extrémités du câble à fi bre optique devant
vos yeux (laser).
• Ne touchez pas, ne salissez pas les extrémités du câble à
fi bre optique.
• Ne pliez pas le câble à fi bre optique.
Conecte el cable de fi bra óptica al puerto “Fiber” de su FRITZ!Box y a la toma
de fi bra (Fiber) destinada para la conexión a Internet. El cable de fi bra óptica
no se suministra con su FRITZ!Box 5491. Es proporcionado por su proveedor
de Internet.
• No sostenga los extremos del cable de fi bra óptica en frente
de sus ojos (Laser).
• No toque ni contamine los extremos del cable de fi bra óptica.
• No doble el cable de fi bra óptica.
Collegate il cavo in fi bra ottica alla porta “Fiber” del FRITZ!Box e all’apposita
presa per l’accesso a Internet della presa per la fi bra ottica. Il cavo in fi bra
ottica non viene fornito insieme al FRITZ!Box 5491. Lo mette a disposizione il
vostro provider di Internet.
• Non tenete le estremità del cavo in fi bra ottica davanti agli
occhi (laser).
• Evitate di toccare o sporcare le estremità del cavo in fi bra
ottica.
• Non piegate il cavo in fi bra ottica.
• Do not install the FRITZ!Box during an electrical storm.
• During a storm, disconnect the FRITZ!Box from the power supply and from
the fi ber optic connection.
• The ventilation slits of the FRITZ!Box must never be obstructed.
• Do not place the FRITZ!Box on excessively heat-sensitive surfaces.
• Insert the FRITZ!Box into an outlet that is easy to reach.
• The FRITZ!Box is intended only for indoor operation.
See also the security instructions in your FRITZ!Box manual.
• Installieren Sie die FRITZ!Box nicht bei Gewitter.
• Trennen Sie die FRITZ!Box bei Gewitter vom Strom und vom Fiber-
Anschluss.
• Die Lüftungsschlitze der FRITZ!Box müssen immer frei sein.
• Stellen Sie die FRITZ!Box nicht auf wärmeempfi ndliche Flächen.
• Schließen Sie die FRITZ!Box an eine leicht erreichbare Steckdose an.
• Die FRITZ!Box darf nur innerhalb von Gebäuden verwendet werden.
Beachten Sie auch die Sicherheitshinweise in Ihrem FRITZ!Box-Handbuch.
• N’installez pas votre FRITZ!Box pendant un orage.
• En cas d’orage, débranchez votre FRITZ!Box du réseau d’alimentation
électrique et de l’accès en fi bre optique.
• Les fentes d’aération de votre FRITZ!Box ne doivent pas être obstruées.
• Ne posez pas votre FRITZ!Box sur des surfaces sensibles à la chaleur.
• Branchez FRITZ!Box sur une prise facile d’accès.
• FRITZ!Box doit être utilisée uniquement à l’intérieur d’un bâtiment.
Tenez également compte des consignes de sécurité fournies dans le
manuel de votre FRITZ!Box
.
• No instale su FRITZ!Box durante una tormenta eléctrica.
• Desconecte su FRITZ!Box durante una tormenta eléctrica tanto de la
corriente, como de la conexión Fiber.
• No se debe bloquear la rejilla de ventilación de su FRITZ!Box.
• No coloque su FRITZ!Box sobre una superfi cie que no resista el calor,
ya que el router se calienta durante el uso normal.
• Conecte su FRITZ!Box a una toma eléctrica de fácil acceso.
• Su FRITZ!Box sólo debe ser utilizado en interiores.
¡Tenga en cuenta las indicaciones de seguridad que encontrará en el
manual de usuario de FRITZ!Box!
• Non installate il FRITZ!Box durante un temporale.
• Durante i temporali scollegate il FRITZ!Box dall’alimentazione elettrica e
dalla connessione in fi bra ottica.
• Le fessure di ventilazione del router devono restare sempre libere.
• Non collocate il FRITZ!Box su superfi ci sensibili al calore.
• Collegate il FRITZ!Box ad una presa di corrente facilmente accessibile.
• Il FRITZ!Box va utilizzato esclusivamente all’interno degli edifi ci.
Osservate anche le indicazioni di sicurezza riportate nel manuale del
FRITZ!Box.
Start your telephone.
• If you have a FRITZ!Fon, press the “DECT” button on the FRITZ!Box. The
“Fon” LED fl ashes and the FRITZ!Fon is registered immediately.
• Telephones from other manufacturers must fi rst be made ready for
registration; then enter the PIN of the FRITZ!Box on the telephone (a value
of “0000” is preconfi gured) before concluding registration with the “DECT”
button.
Starten Sie Ihr Telefon.
• Wenn Sie ein FRITZ!Fon haben, drücken Sie die „DECT“-Taste der
FRITZ!Box. Die Leuchtdiode „Fon“ blinkt und das FRITZ!Fon wird sofort
angemeldet.
• Telefone anderer Hersteller bringen Sie zunächst in Anmelde bereitschaft
und geben die PIN der FRITZ!Box am Telefon ein (voreingestellter Wert
„0000“), bevor Sie die Anmeldung mit
der „DECT“-Taste abschließen.
Allumez votre téléphone.
• Si vous avez un FRITZ!Fon, appuyez sur la touche «DECT» de votre
FRITZ!Box. Le voyant «Fon» clignote et le FRITZ!Fon est enregistré
immédiatement.
• Si vous avez un téléphone d’un autre fabricant, mettez-le en mode
d’attente d’enregistrement, puis saisissez le code PIN de la FRITZ!Box
sur le téléphone (code par défaut: «0000») et terminez l’enregistrement
avec la touche «DECT».
Inicie su teléfono.
• Si tiene un FRITZ!Fon, pulse el botón “DECT” en su FRITZ!Box. El led “Fon”
parpadea y el FRITZ!Fon se conecta de inmediato.
• Con teléfonos de otros fabricantes: ponga primero el teléfono en modo
de espera e ingrese el PIN del FRITZ!Box (valor predeterminado “0000”)
antes de completar la conexión pulsando el botón “DECT”.
Avviate il vostro telefono.
• Se avete un FRITZ!Fon, premete il tasto “DECT” del FRITZ!Box. Il LED “Fon”
lampeggia e il FRITZ!Fon viene subito registrato.
• Per i telefoni di altri produttori dovete innanzitutto avviare la modalità
di registrazione e digitare sul telefono il PIN del FRITZ!Box (valore
preimpostato “0000”) prima di poter completare la registrazione
premendo il tasto “DECT”.