332467
31
Verklein
Vergroot
Pagina terug
1/34
Pagina verder
59
ENVIRONMENTAL ASPECTS disposal of packaging and appliance
In the manufacturing of this appliance use has been made of durable
materials. At the end of its lifecycle this appliance must be disposed of in a
responsible manner. The authorities can advise you on this.
The appliance packaging is recyclable. The following may have been used:
• cardboard;
• paper;
• polythene film (PE);
• CFC-free polystyrene (PS hard foam);
• polypropylene tape (PP).
Dispose of these materials in a responsible manner and in accordance with
government regulations.
58
FAULTS
If the appliance does not work properly, it does not always mean that it is
defective. Try to deal with the problem yourself first. Phone the service
department if the advice given below does not help. Only authorised
personnel may carry out work on the gas and electrical part.
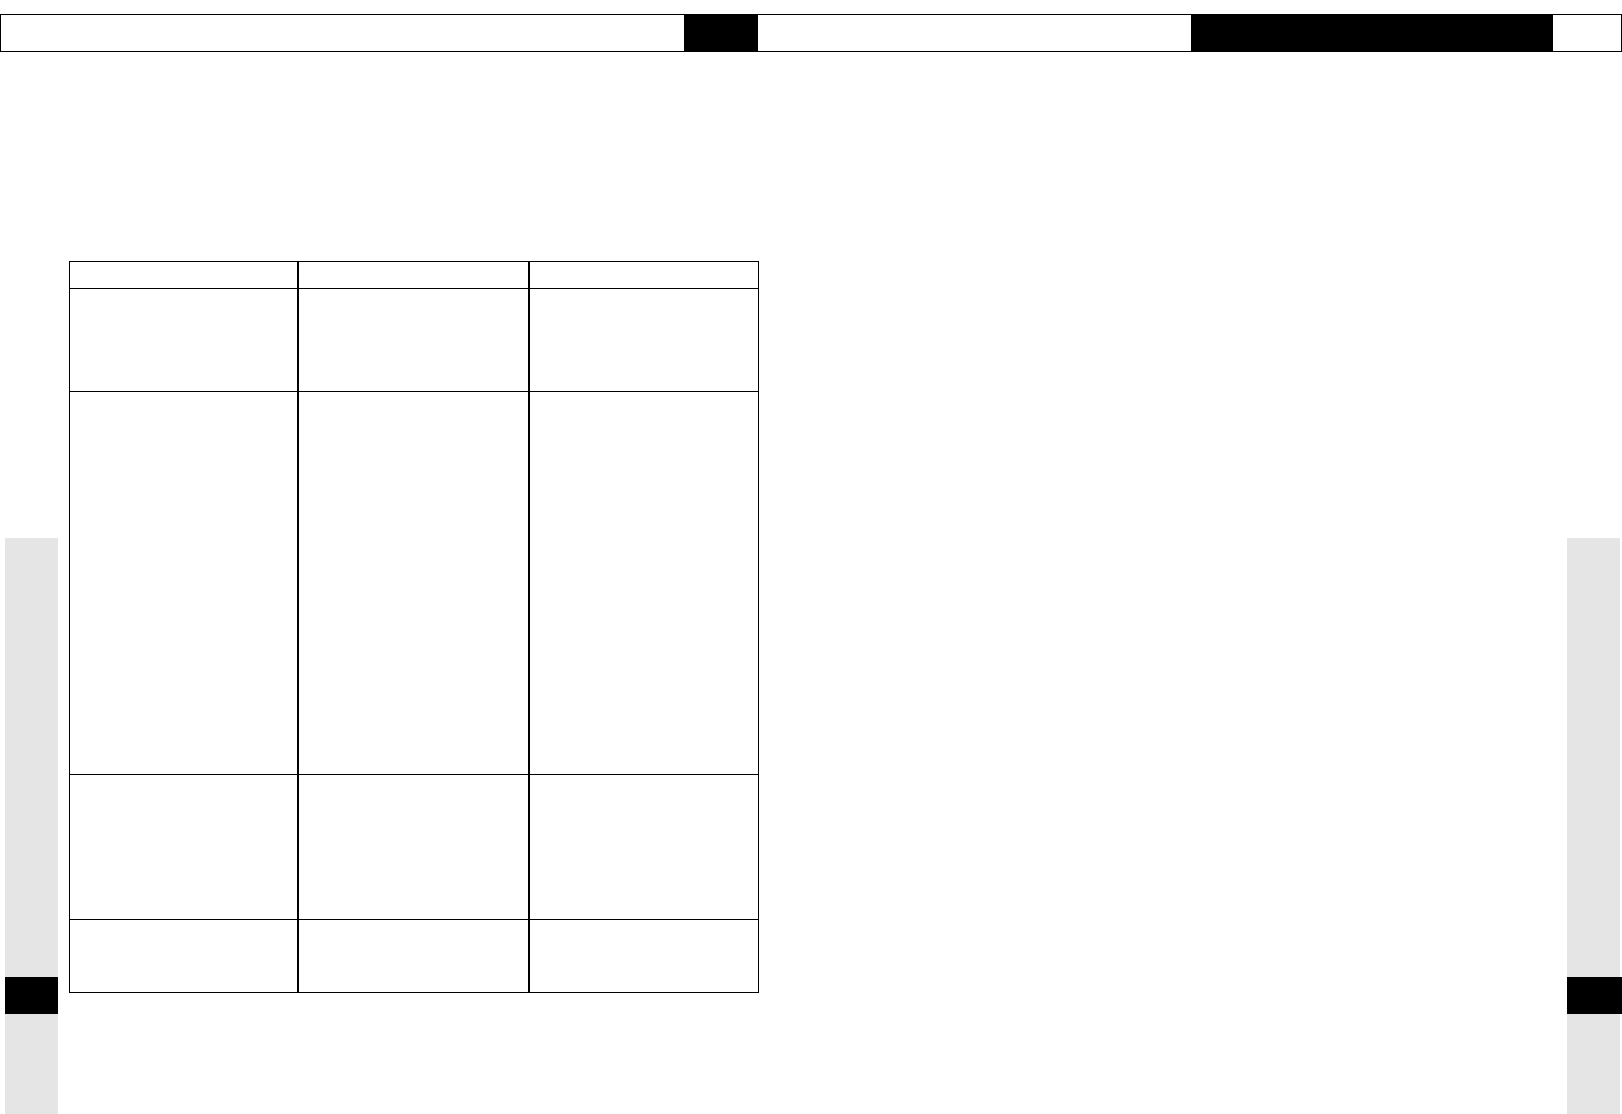
table
fault
There is a smell of gas in the
vicinity of the appliance.
A burner does not ignite.
The burner does not burn evenly.
The burner goes out after igniting
cause
– A burner is turned on but not lit.
The coupling on a bottled gas
unit has come undone.
– Fuse defective/fuse in meter
cabinet switched off.
– Plug not in socket.
– Sparkplug dirty/damp.
– Burner parts not correctly
installed.
– Burner parts dirty/damp.
– Ventilation opening at the rear
closed.
– Main gas tap closed.
– Fault in the gas network.
– Gas bottle or tank is empty.
– Control knob not kept pressed in
long enough or far enough
(HG61/76/91/96).
– Control knob turned too quickly
through ignition position (HG41).
– Burner parts incorrectly installed.
– Burner parts dirty or damp.
– Wrong type of gas used (where
bottled gas is used).
– Control knob not kept pressed in
long enough (H61..B/HG76..B/
HG91..B/HG96..B).
solution
– Close the tap and wait for a few
minutes before relighting.
Tighten the coupling.
– Fit a new fuse or switch the
automatic fuse back on.
– Push the plug into the socket.
– Clean and dry the sparkplug.
– Assemble the burner parts using
the centring ridges..
– Clean and dry the burner parts,
making sure that the outflow
holes are open.
– Ensure adequate air supply.
– Open the main gas tap.
– Check with your gas supplier.
– Connect a new gas bottle or have
the tank filled.
– Keep the control knob pressed in
far enough between full and low
for at least 5 seconds.
– Light the burner in the ignition
zone.
– Assemble the burner parts using
the centring ridges.
– Clean and dry the burner parts,
checking that the outflow holes
are open.
– Check that the gas used is suitable
for the appliance.
– Keep the control knob pressed in
for at least 5 seconds.
31

Hulp nodig? Stel uw vraag in het forum

Spelregels

Misbruik melden

Gebruikershandleiding.com neemt misbruik van zijn services uitermate serieus. U kunt hieronder aangeven waarom deze vraag ongepast is. Wij controleren de vraag en zonodig wordt deze verwijderd.

Product:

Bijvoorbeeld antisemitische inhoud, racistische inhoud, of materiaal dat gewelddadige fysieke handelingen tot gevolg kan hebben.

Bijvoorbeeld een creditcardnummer, een persoonlijk identificatienummer, of een geheim adres. E-mailadressen en volledige namen worden niet als privégegevens beschouwd.

Spelregels forum

Om tot zinvolle vragen te komen hanteren wij de volgende spelregels:

Belangrijk! Als er een antwoord wordt gegeven op uw vraag, dan is het voor de gever van het antwoord nuttig om te weten als u er wel (of niet) mee geholpen bent! Wij vragen u dus ook te reageren op een antwoord.

Belangrijk! Antwoorden worden ook per e-mail naar abonnees gestuurd. Laat uw emailadres achter op deze site, zodat u op de hoogte blijft. U krijgt dan ook andere vragen en antwoorden te zien.

Abonneren

Abonneer u voor het ontvangen van emails voor uw ATAG hg4192 bij:


U ontvangt een email met instructies om u voor één of beide opties in te schrijven.


Ontvang uw handleiding per email

Vul uw emailadres in en ontvang de handleiding van ATAG hg4192 in de taal/talen: Nederlands, Duits, Engels, Frans als bijlage per email.

De handleiding is 1,04 mb groot.


U ontvangt de handleiding per email binnen enkele minuten. Als u geen email heeft ontvangen, dan heeft u waarschijnlijk een verkeerd emailadres ingevuld of is uw mailbox te vol. Daarnaast kan het zijn dat uw internetprovider een maximum heeft aan de grootte per email. Omdat hier een handleiding wordt meegestuurd, kan het voorkomen dat de email groter is dan toegestaan bij uw provider.

Uw handleiding is per email verstuurd. Controleer uw email

Als u niet binnen een kwartier uw email met handleiding ontvangen heeft, kan het zijn dat u een verkeerd emailadres heeft ingevuld of dat uw emailprovider een maximum grootte per email heeft ingesteld die kleiner is dan de grootte van de handleiding.

Er is een email naar u verstuurd om uw inschrijving definitief te maken.

Controleer uw email en volg de aanwijzingen op om uw inschrijving definitief te maken

U heeft geen emailadres opgegeven

Als u de handleiding per email wilt ontvangen, vul dan een geldig emailadres in.

Uw vraag is op deze pagina toegevoegd

Wilt u een email ontvangen bij een antwoord en/of nieuwe vragen? Vul dan hier uw emailadres in.


Info