The Yamaha YHT-196 Home Theater Package includes everything you need to add great sound
to your home theater. By following the steps in this Connection Guide, you’ll have your home
theater set up in no time and be enjoying music and movies like never before. Part A explains how
to connect the speakers and antenna. Part B explains how to connect various AV components. See
the relevant owner’s manuals for full instructions and precautions.
Caution: Disconnect all components from AC outlets before proceeding.
Part A: Speakers and Antenna
1
P
H
O
N
E
S
S
I
L
E
N
T
C
IN
E
MA
T
ONE
C
O
N
T
R
O
L
STR
AIGH
T
V
O
L
U
M
E
T
V
B
D
D
V
D
C
D
R
A
D
IO
IN
P
U
T
P
R
O
G
R
A
M
S
C
E
N
E
I
N
F
O
M
E
M
O
R
Y
P
R
E
S
E
T
T
U
N
I
N
G
F
M
M
O
D
E
M
U
T
E
a
c
b
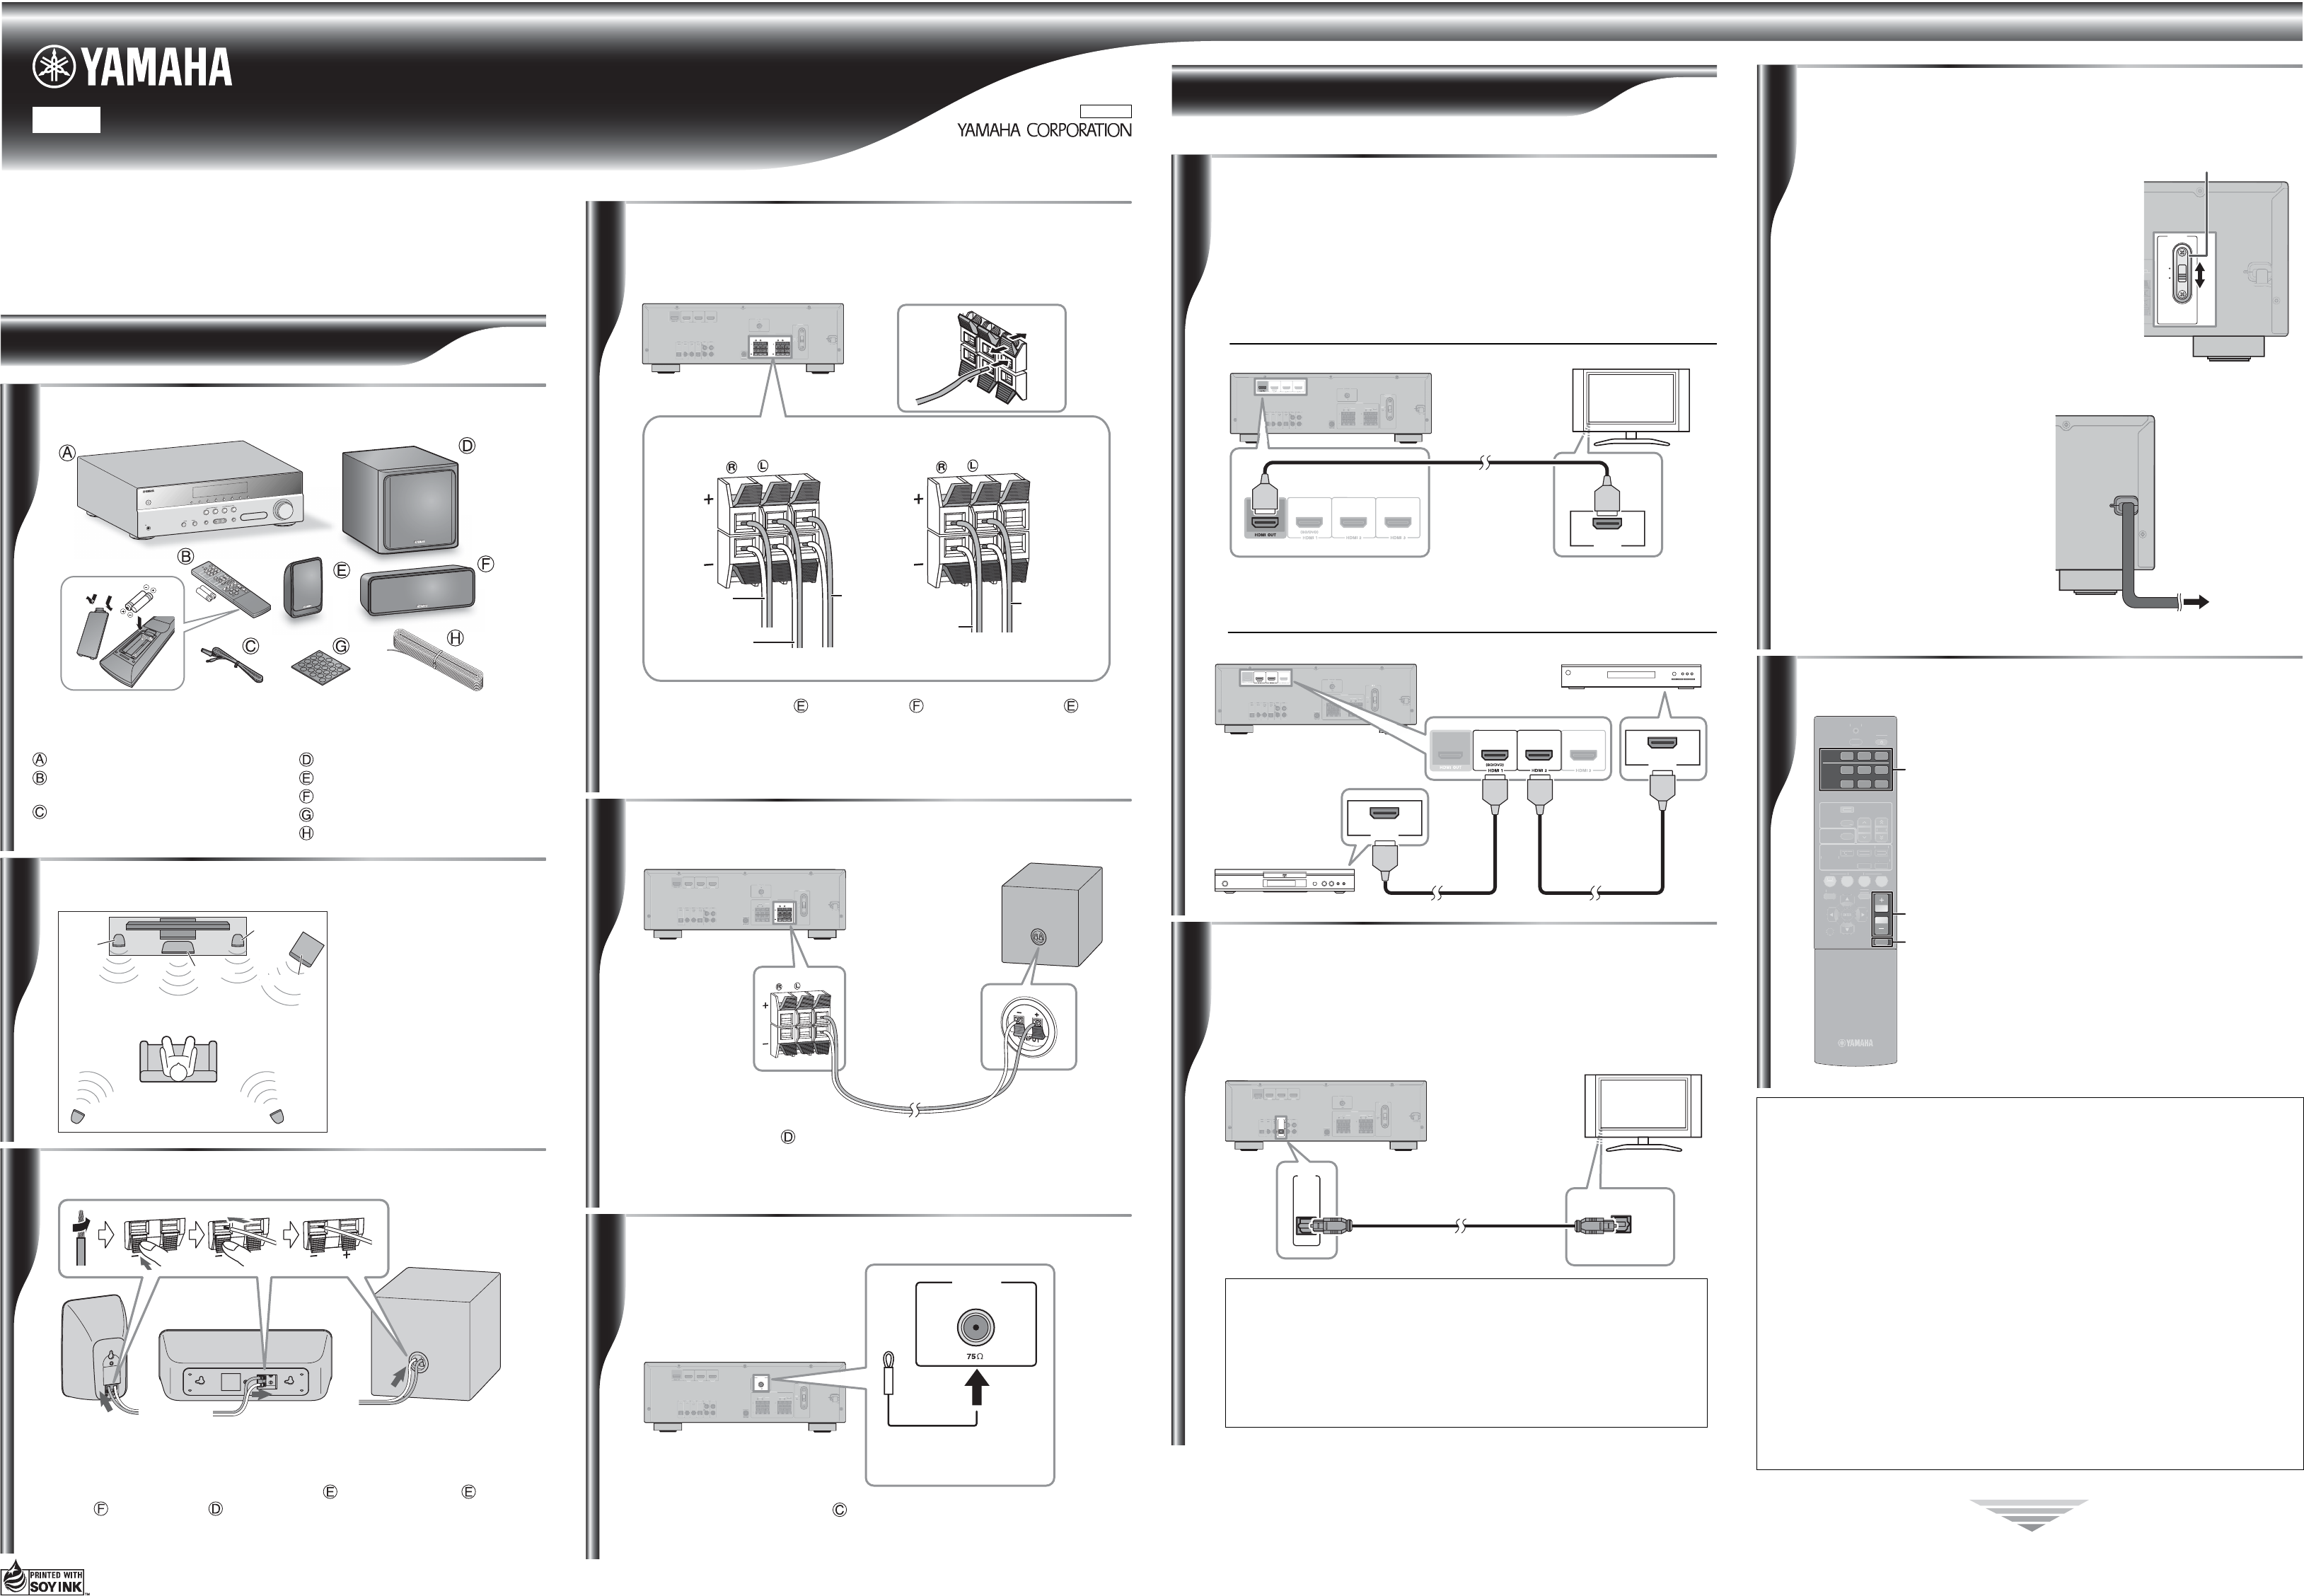
Unpack and check the package contents. The following items are necessary to complete this
Connection Guide. See the owner’s manuals for a complete list of supplied items.
AV Receiver (HTR-2064)
Remote control and two batteries
(AAA, R03, UM-4)
Indoor FM antenna (FM antenna type
depends on destination country.)
Subwoofer (NS-SWP20)
Front/surround speaker (NS-B20)
Center speaker (NS-C20)
Non-skid pad
Speaker cable
Checking the package contents
x 4
2
The four front and surround
speakers are identical, so it
doesn’t matter which one you use
in each position.
Position the speakers as shown.
See the owner’s manuals for more
information on installing the
speakers.
Positioning the speakers
Front
left
Front
right
Subwoofer
Surround
left
Surround
right
Center
3
•Cut the included speaker cable to suitable lengths for the front, center, surround speakers
and subwoofer. You need to make six cables altogether. Remove about 10mm (3/8in.) of
insulation from the end of each cable, and then twist the bare strands tightly.
•Connect the speaker cables to the front speakers (), surround speakers (), center
speaker () and subwoofer (). Make sure you connect the speakers and subwoofer
with the correct polarity—positive (+) terminals to positive (+) terminals, and negative
(–) terminals to negative (–) terminals.
Front, Surround speakers
Preparing the cables, speakers and subwoofer
Center speaker
Subwoofer
CENTER
FRONT
HDMI 1
(
BD/DVD
)
HDMI 2HDMI 3
SUB
WOOFER
SURROUND
SUBWOOFER
SPEAKERS
VOLTAGE
SELECTOR
110V-
120V
220V-
240V
HDMI
1
(
B
D
/
DVD
)
HDMI2
HDMI
3
S
UBW
OO
FE
R
S
PEAKER
S
V
O
LTA
G
E
SELECTOR
1
1
0V-
120
V
2
20V-
24
0V
CENTER
FRONT
SUB
WOO
FER
SURROUND
2
2
3
3
1
1
To front right
speaker
To front left
speaker
To surround
right speaker
To surround
left speaker
To center
speaker
4
AV Receiver
Connect the front speaker (), center speaker () and surround speaker () cables
to the AV Receiver. Make sure you connect the speakers with the correct polarity—
positive (+) terminals to positive (+) terminals, and negative (–) terminals to negative
(–) terminals.
Connecting the front, center and surround
speakers
CENTER
HDMI 1
(
BD/DVD
)
HDMI 2HDMI 3
SUB
WOOFER
SURROUND
SPEAKERS
VOLTAGE
SELECTOR
110V-
120V
220V-
240V
C
ENTER
HDMI
1
(
B
D
/
DVD
)
HDMI2
HDMI
3
S
PEAKER
S
V
O
LTA
G
E
SELECTOR
10
V
-
2
0
V
2
0V-
40V
SUB
WOOFER
SURROUND
AV Receiver
5
Subwoofer
Connect the subwoofer () cables to the AV Receiver.
Make sure you connect the subwoofer with the correct polarity—positive (+) terminals
to positive (+) terminals, and negative (–) terminals to negative (–) terminals.
Connecting the subwoofer
Connecting the antenna
ANTENNA
FM
75
CENTER
FRONT
HDMI 1
(
BD/DVD
)
HDMI 2HDMI 3
SUB
SURROUND
SPEAKERS
VOLTAGE
SELECTOR
110V-
120V
C
ENTER
F
RONT
HDMI
1
(
B
D
/
DVD
)
HDMI2
H
DMI
3
SUB
S
URROUND
S
PEAKER
S
V
O
LTA
G
E
SELECTOR
1
10V
-
12
0V
ANTENNA
FM
6
AV Receiver
Connect the indoor FM antenna () to the AV Receiver, as shown. See the owner’s
manuals for more information about connecting antenna.
Indoor FM
antenna
Caution: Disconnect all components from AC outlets before proceeding.
Part B: AV Components
Connecting HDMI-capable components
CENTERSUB
SURROUND
SPEAKERS
VOLTAGE
SELECTOR
110V-
120V
C
ENTERSUB
S
URROUND
S
PEAKER
S
V
O
LTA
G
E
S
ELE
C
T
O
R
1
10V
-
12
0V
HDMI
IN
1
AV ReceiverTV
If your TV and BD/DVD players or recorders or satellite/cable set-top box have HDMI
jacks, you can connect them via the AV Receiver. Using HDMI cables (not included),
connect the AV Receiver’s HDMI OUT jack to an HDMI input on your TV, and
connect your BD/DVD players or recorders and satellite/cable set-top box to the AV
Receiver’s HDMI 1(BD/DVD) and HDMI 2 jacks, respectively, as shown.
See the owner’s manuals for more information about HDMI.
● Connecting your TV
● Connecting your BD/DVD players or recorders,
satellite/cable set-top box
CENTERSUB
SURROUND
SPEAKERS
VOLTAGE
SELECT
OR
110V-
120V
C
ENTE
R
S
U
B
S
U
R
R
O
UN
D
S
PEAKER
S
V
O
L
T
L
L
A
T
T
GE
S
ELEC
T
OR
110
V
-
V
V
1
20V
HDMI
OUT
HDMI
OUT
AV Receiver
BD/DVD players or
recorders
Satellite/cable set-top box
(
TV
)
OPTICAL
CENTER
HDMI 1
(
BD/DVD
)
HDMI 2HDMI 3
SUB
SURROUND
SPEAKERS
VOLTAGE
SELECTOR
110V-
120V
AUDIO 4
C
ENTER
HDMI
1
(
B
D
/
DVD
)
HDMI2
H
DMI
3
S
UB
S
URR
O
UND
S
PEAKER
S
V
O
LTA
G
E
SELECTOR
1
1
0
V
-
12
0V
(
TV
)
OPTICAL
AUDIO 4
AUDIO OUTPUT
OPTICAL
2
AV Receiver
TV
You can listen to TV audio through the AV Receiver and speakers by connecting an
audio output on your TV to an audio input on the AV Receiver with, for example, an
optical digital audio cable (not included), as shown.
To listen to TV audio, select the appropriate input source on the AV Receiver.
Connecting your TV for audio output
Your TV supports the Audio Return Channel function and HDMI Control
function
•If your TV supports ARC (Audio Return Channel), this connection is
unnecessary.
•The Audio Return Channel is required the setting of HDMI function of the AV
Receiver before use.
•For the connections and settings, refer to “Single HDMI cable input to TV audio
with Audio Return Channel function” (See HTR-2064 Owner’s Manual).
Time to enjoy your Yamaha Home Theater Package!
Now, relax and enjoy the great sound of your Yamaha Home Theater Package.
More various functions are available with the
unit.
Refer to the “HTR-2064 Owner’s Manual” for details on effective use of the unit.
Connecting external devices other than BD/DVD players
Various devices, audio players, such as CD players, video games, camcorders, etc. can be
connected to the unit.
Changing input settings with a single key (SCENE function)
This unit has a SCENE function that allows you to turn the power on and change input sources
and sound field programs with one key.
Enjoying sound field programs
You can enjoy multi-channel playback for almost any sound source using various sound field
programs stored on the chip, and a range of sound decoders.
For more detail, see the relevant owner’s manuals for full operating instructions.
3
Select the switch position according to your local
voltage using a straight slot screwdriver.
(General model)
Voltages are AC 110-120/220-240 V, 50/60 Hz.
Caution
The VOLTAGE SELECTOR on the rear panel of this unit
must be set for your local voltage BEFORE plugging the
power cable into the AC wall outlet. Improper setting of
the VOLTAGE SELECTOR may cause damage to this
unit and create a potential fire hazard.
Set the VOLTAGE SELECTOR (General model)
Connect the AC power cable (Other models)
UB
OFER
VOLTAGE
SELECTOR
110V-
120V
220V-
240V
VOLTAGE SELECTOR
To an AC wall
outlet
(Other models)
Connect the AV Receiver and your
other AV components to suitable AC
outlets.
AV Receiver
Rear Panel
AV Receiver
Rear Panel
4
Playback
VOLUME
MUTE
123
123
456
HDMI
AUDIO
RE
C
EIVER
SC
EN
E
O
PTI
ON
S
ET
U
P
RETURN
TRAN
S
MI
T
S
LEEP
BD
D
VD
T
V
CD
R
ADI
O
TU
NER
SOU
ND
I
NF
O
TUNER
M
EM
O
R
Y
PRE
S
ET
TU
NIN
G
SU
R
.
DE
CO
DE
S
TRAI
G
HT
E
NHAN
C
ER
S
TERE
O
MU
S
I
C
M
O
VIE
Input selector
VOLUME +/–
MUTE
Basic playback procedure
1.Turn on external components (TV, BD player,
etc.) connected to this unit.
2.Turn on this unit and select the input source
using Input selector.
The name of the selected input source is displayed
for a few seconds.
3.Play the external component that you have
selected as the source input, or select a radio
station on the tuner.
Refer to the instruction manuals provided with the
external component for details
4.Press VOLUME +/– to adjust the volume.
To mute the output.
Press MUTE to mute the audio output.
Press MUTE again to unmute.
Hulp nodig? Stel uw vraag in het forum
Misbruik melden
Gebruikershandleiding.com neemt misbruik van zijn services uitermate serieus. U kunt hieronder aangeven waarom deze vraag ongepast is. Wij controleren de vraag en zonodig wordt deze verwijderd.
Product:
Spelregels forum
Om tot zinvolle vragen te komen hanteren wij de volgende spelregels:
lees eerst de handleiding door;
controleer of uw vraag al eerder door iemand anders is gesteld;
probeer uw vraag zo duidelijk mogelijk te stellen;
heeft u een probleem en al geprobeerd om dit op te lossen, vermeld dit erbij aub;
heeft u een oplossing gekregen van een bezoeker dan horen wij dat graag in dit forum;
wilt u een reactie geven op een vraag of antwoord, gebruik dan niet dit formulier maar klik op de knop 'reageer op deze vraag';
uw vraag wordt direct op de website gezet; vermijd daarom persoonlijke gegevens in te vullen;
Belangrijk! Als er een antwoord wordt gegeven op uw vraag, dan is het voor de gever van het antwoord nuttig om te weten als u er wel (of niet) mee geholpen bent! Wij vragen u dus ook te reageren op een antwoord.
Belangrijk! Antwoorden worden ook per e-mail naar abonnees gestuurd. Laat uw emailadres achter op deze site, zodat u op de hoogte blijft. U krijgt dan ook andere vragen en antwoorden te zien.
Abonneren
Abonneer u voor het ontvangen van emails voor uw Yamaha YHT-196 bij:
nieuwe vragen en antwoorden
nieuwe handleidingen
U ontvangt een email met instructies om u voor één of beide opties in te schrijven.
Ontvang uw handleiding per email
Vul uw emailadres in en ontvang de handleiding van Yamaha YHT-196 in de taal/talen: Engels als bijlage per email.
De handleiding is 1,34 mb groot.
U ontvangt de handleiding per email binnen enkele minuten. Als u geen email heeft ontvangen, dan heeft u waarschijnlijk een verkeerd emailadres ingevuld of is uw mailbox te vol. Daarnaast kan het zijn dat uw internetprovider een maximum heeft aan de grootte per email. Omdat hier een handleiding wordt meegestuurd, kan het voorkomen dat de email groter is dan toegestaan bij uw provider.
Uw handleiding is per email verstuurd. Controleer uw email
Als u niet binnen een kwartier uw email met handleiding ontvangen heeft, kan het zijn dat u een verkeerd emailadres heeft ingevuld of dat uw emailprovider een maximum grootte per email heeft ingesteld die kleiner is dan de grootte van de handleiding.
Er is een email naar u verstuurd om uw inschrijving definitief te maken.
Controleer uw email en volg de aanwijzingen op om uw inschrijving definitief te maken
U heeft geen emailadres opgegeven
Als u de handleiding per email wilt ontvangen, vul dan een geldig emailadres in.
Uw vraag is op deze pagina toegevoegd
Wilt u een email ontvangen bij een antwoord en/of nieuwe vragen? Vul dan hier uw emailadres in.