and a network list will appear at the right side of
your screen. Select your target network, and
then click Connect.
34
The screen will appear as shown below. Enter
the network security key, and then click Next.
Instant Wireless Connection
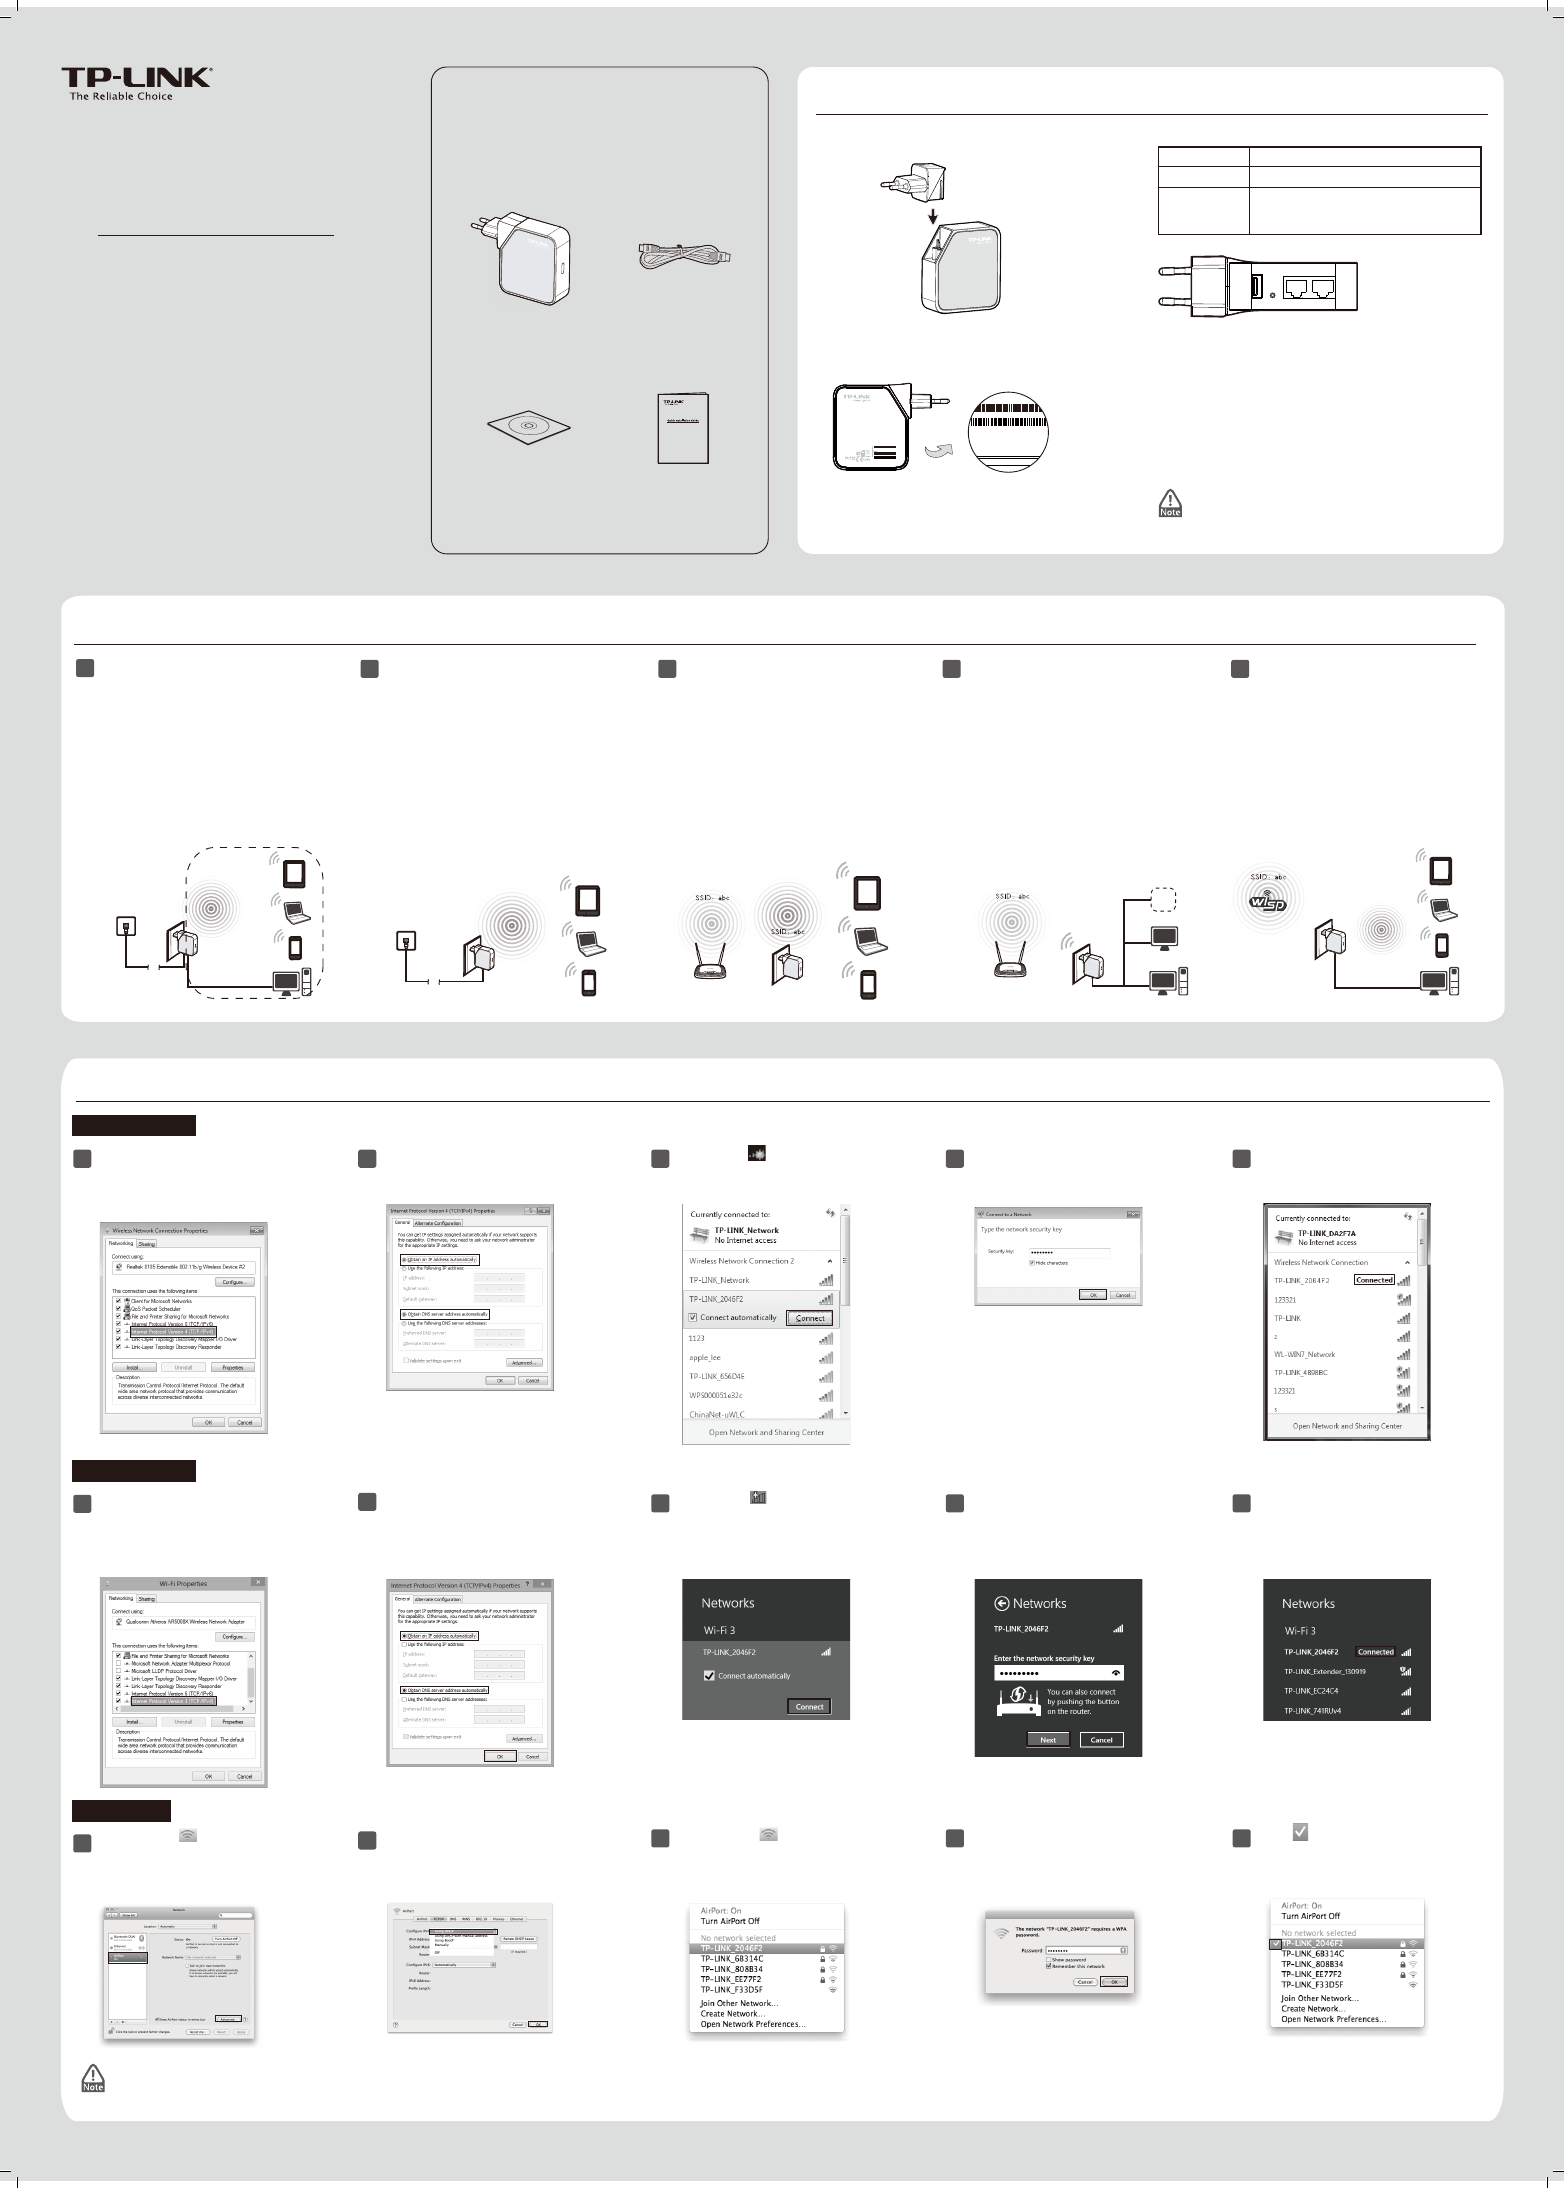
Physical Description
Hardware Connection
Wireless Router Mode (Default)
As the supplement of wired LAN, TL-WR710N
enables the wired LAN to connect to the
Internet wirelessly.
As a wireless router, TL-WR710N create an
instant private wireless network and share
Internet to multiple Wi-Fi devices.
Access Point Mode
2
1
After hardware connection, please write down the
Wireless Password and SSID on the label of your
Router for later use. Both are case-sensitive.
SSID
: Wireless Network Name of TL-WR710N.
*
Wireless Password/PIN
: Pre-encryption password of
TL-WR710N.
*
LAN/WAN
: This port works as LAN in Access Point/Repeater/
Client/WISP Client Router mode and as WAN in Wireless Router
mode.
Reset
It is used to reset the Router to its factory defaults.
Indication
TL-WR710N LED:
Status
Solid Blue
The device is working properly.
Blinking
Condition 1: System is booting.
Condition 2: The Ethernet Cable or USB Device
is connecting to the product.
For more detailed information about
Reset
, please refer to
Appendix: Troubleshooting
.
Client Mode
TL-WR710N is used as a wireless network
card to connect the wireless network signal
or wireless router.
34
WISP Client Router Mode
In WISP mode, TL-WR710N enables multiple
users to share Internet connection from WISP.
5
For Windows 7
Click the icon at the bottom of your desktop.
Click refresh button, and then select the target
network. Click Connect.
34
Enter the Security key. Click OK.
For Mac OS
Click the icon at the right top of your
desktop. Click refresh button, and then select
the target network.
34
The screen will appear as shown below. Enter
the Password, and then click OK.
LAN
: This port works as LAN in Wireless Router/Access
Point/Repeater/Client/WISP Client Router mode .
USB
It is used to connect USB Flash or Hard Disk for le sharing and
Mobile devices for charging.
S/N:XXXXXXXXXXXX
Model:TL-WR710N(EU) Ver:1.0
Wireless Password/PIN:12345678
SSID:TP-LINK_663D6C
MAC:B0487A663D6C
Repeater Mode
TL-WR710N is used to extend the range of
wireless signal of the existing AP or wireless
router.
The LAN devices share the same IP from ISP
through Wireless or Wired port. While
connecting to Internet, the LAN/WAN
Ethernet port works as a WAN port at
Wireless Router mode. It’s suitable for most
hotel and home network with Plug-N-Play
after nishing Instant Wireless Connection.
In this mode, this device can be connected to a
wired network and transform the wired access
into wireless that multiple devices can share
together, especially for a home, oce or hotel
where only wired network is available.
In this mode, this device can copy and
reinforce the existing wireless signal to
extend the coverage, especially for a large
space to eliminate signal-blind corners.
In this mode, this device can be connected to
another device via Ethernet port and act as
an adapter to grant your wired devices
access to a wireless network, especially for a
Smart TV, Media Player, or game console only
with an Ethernet port.
In this mode, the device enables multiple
users to share Internet connection from
WISP. The LAN port devices share the same IP
from WISP through Wireless port.
Go toStart > Control Panel > View network
status and tasks > Change adapter settings.
Right clickWireless Network Connection,
and select Properties. Double clickInternet
Protocol Version 4 (TCP/IPv4)in the item list.
12
Set up the TCP/IP Protocol in "Obtain an IP
address automatically" mode on your PC. Click
OK.
Click the icon at the right top of your
desktop. Then click Open Network
Preferences…. The screen will appear as
shown below. Choose AirPort and click
Advanced….
2
Set the Congure IPv4 as “Using DHCP”. Click
OK.
1
Go toMetro interface> Control Panel > View
network status and tasks > Change adapter
settings.Right clickWireless Network
Connection,
and select Properties. Double
clickInternet Protocol Version 4 (TCP/IPv4)in
the item list.
2
Set up the TCP/IP Protocol in "Obtain an IP
address automatically" mode on your PC.
Click OK.
1
The default SSID of the network is TP-LINK_xxxxxx
(The TP-LINK_xxxxxx is the SSID on the label. )
The pre-encryption function is enabled by default and the default Network key/Security key is the Password on the
label. The password is case-sensitive.
1.
2.
5
When you can see Connected as shown in the
following screen, you’ve successfully
connected to the wireless network.
5
When Connected appears behind the SSID,
you have successfully connected to the target
network.
5
When appears before the SSID, you have
successfully connected to the target network.
(This method is for connecting to the default Wireless Router Mode. If you want to configure Wireless Router Mode or choose other modes, please skip to Router Conguration.)
S/N:XXXXXXXXXXXX
Model:TL-WR710N(EU) Ver:1.0
Wireless Password/PIN:12345678
SSID:TP-LINK_663D6C
MAC:B0487A663D6C
IC: 8853A-WR710N
FCC ID: TE7WR710N
1PXFS
7
_
)["
.PEFM5-
83/
%FGBVMU"DDFTT
IUUQUQMJOLMPHJOOFU
6TFSOBNFBENJO
1BTTXPSEBENJO
.CQT8JSFMFTT/.JOJ1PDLFU3PVUFS
Reset
LAN/WANLAN
USB
Protected by
NAT Firewall
Wired Network
Cable
Wired Network
Cable
SSID: def
Connect the plug directly to the TL-WR710N to finish
hardware connection.
The provided power plug may differ from the picture due
to different regional power specifications. Here we take
Gebruikershandleiding.com neemt misbruik van zijn services uitermate serieus. U kunt hieronder aangeven waarom deze vraag ongepast is. Wij controleren de vraag en zonodig wordt deze verwijderd.
Product:
Spelregels forum
Om tot zinvolle vragen te komen hanteren wij de volgende spelregels:
lees eerst de handleiding door;
controleer of uw vraag al eerder door iemand anders is gesteld;
probeer uw vraag zo duidelijk mogelijk te stellen;
heeft u een probleem en al geprobeerd om dit op te lossen, vermeld dit erbij aub;
heeft u een oplossing gekregen van een bezoeker dan horen wij dat graag in dit forum;
wilt u een reactie geven op een vraag of antwoord, gebruik dan niet dit formulier maar klik op de knop 'reageer op deze vraag';
uw vraag wordt direct op de website gezet; vermijd daarom persoonlijke gegevens in te vullen;
Belangrijk! Als er een antwoord wordt gegeven op uw vraag, dan is het voor de gever van het antwoord nuttig om te weten als u er wel (of niet) mee geholpen bent! Wij vragen u dus ook te reageren op een antwoord.
Belangrijk! Antwoorden worden ook per e-mail naar abonnees gestuurd. Laat uw emailadres achter op deze site, zodat u op de hoogte blijft. U krijgt dan ook andere vragen en antwoorden te zien.
Abonneren
Abonneer u voor het ontvangen van emails voor uw TP-LINK TL-WR710N bij:
nieuwe vragen en antwoorden
nieuwe handleidingen
U ontvangt een email met instructies om u voor één of beide opties in te schrijven.
Ontvang uw handleiding per email
Vul uw emailadres in en ontvang de handleiding van TP-LINK TL-WR710N in de taal/talen: Engels als bijlage per email.
De handleiding is 2,19 mb groot.
U ontvangt de handleiding per email binnen enkele minuten. Als u geen email heeft ontvangen, dan heeft u waarschijnlijk een verkeerd emailadres ingevuld of is uw mailbox te vol. Daarnaast kan het zijn dat uw internetprovider een maximum heeft aan de grootte per email. Omdat hier een handleiding wordt meegestuurd, kan het voorkomen dat de email groter is dan toegestaan bij uw provider.
Uw handleiding is per email verstuurd. Controleer uw email
Als u niet binnen een kwartier uw email met handleiding ontvangen heeft, kan het zijn dat u een verkeerd emailadres heeft ingevuld of dat uw emailprovider een maximum grootte per email heeft ingesteld die kleiner is dan de grootte van de handleiding.
Er is een email naar u verstuurd om uw inschrijving definitief te maken.
Controleer uw email en volg de aanwijzingen op om uw inschrijving definitief te maken
U heeft geen emailadres opgegeven
Als u de handleiding per email wilt ontvangen, vul dan een geldig emailadres in.
Uw vraag is op deze pagina toegevoegd
Wilt u een email ontvangen bij een antwoord en/of nieuwe vragen? Vul dan hier uw emailadres in.