English
Befor
Thank you for choosing the Sony radio!
It will give you many hours of reliable
service and listening pleasure.
Before operating the radio, please read
these instructions thoroughly and retain
them for future reference.
These instructions cover these models:
ICF-M260 and ICF-M260L.
Their differences are shown below.
Model Number ICF-M260 ICF-M260L
Band FM/AM FM/LW
Featur
• Quartz-controlled PLL(Phase Locked
Loop) synthesizer system using a
microcomputer for easy pinpoint
tuning.
• Up to 10 stations in FM and 5 stations
in AM can be preset.
• Tuned frequency is digitally
displayed to make searching for the
desired station easier.
Notes on AM Channel Step
The AM channel step differs depending
on areas. The channel step of this unit is
factory-set to 10 kHz (models for North
and South America)/9 kHz (models for
other countries).
Area Channel step
North and South 10 kHz
American countries
Other countries 9 kHz
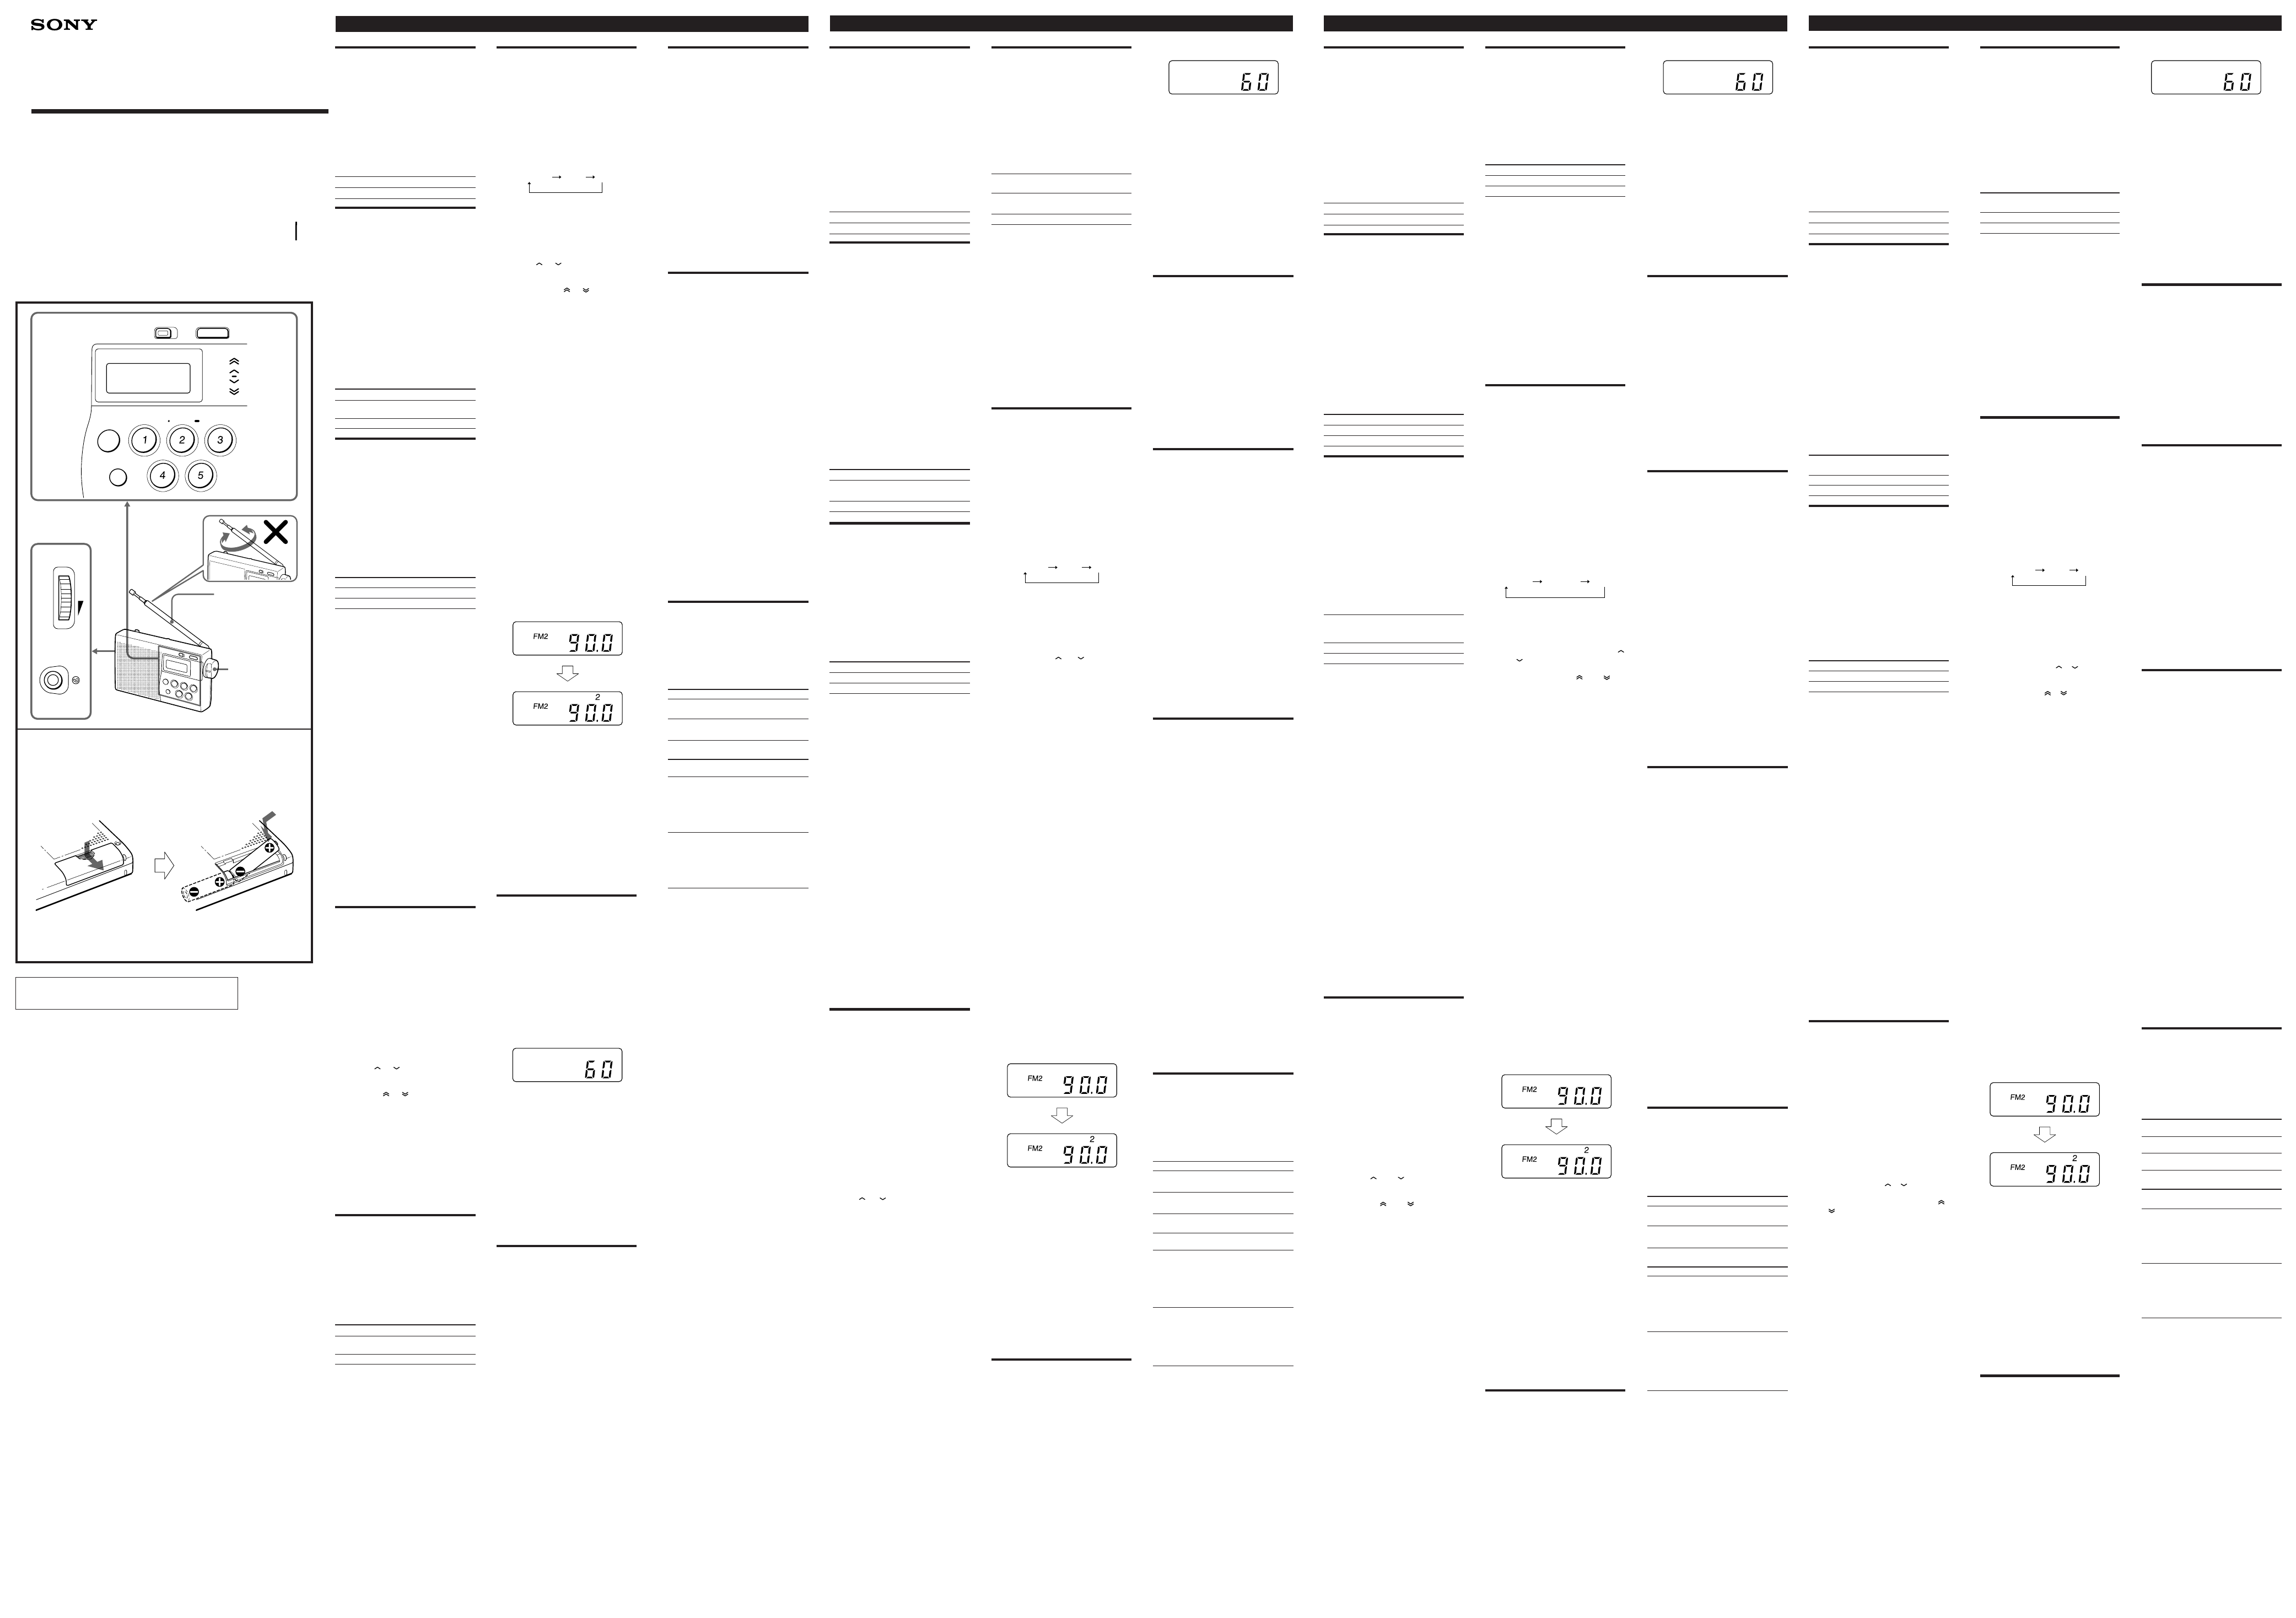
Installing the
Batteries (See Fig. A)
1 Open the lid at the rear of the
radio.
2 Install two R6 (size AA)
batteries (not supplied) with
correct polarity.
3 Close the lid.
Battery Life for using
Sony batteries R6 (AA)
Band (Approx. hours)
FM 17 hours
AM/LW 23 hours
Knowing When to Replace the
Batteries
• When the batteries become weak, the
sound becomes weak and distorted.
Replace the batteries with new ones.
When the batteries are completely
exhausted, the radio is turned off and
“i ” flashes.
• Before replacing the batteries, make
sure that the radio is turned off.
• Replace the batteries within about one
minute. Otherwise, the memories for
the clock and the preset stations will
be erased and “AM 12:00” or “0:00”
will flash in the display.
Notes on Batteries
• Insert the batteries with correct
polarity.
• Do not charge the dry batteries.
• Do not use different types of batteries
at the same time.
• When you replace the batteries,
replace both with new ones.
• When the unit is not being used for a
long period of time, remove the
batteries to avoid damage from
battery leakage and corrosion.
• If a battery leakage occurs, wipe the
battery compartment with a soft cloth
before inserting new ones.
Setting the Clock
The display will flash “AM 12:00” or
“0:00” when the batteries are first
installed.
Set the clock when the radio is turned
off.
1 To stop flashing of the display,
press SLEEP/CLOCK .
2 While holding down SLEEP/
CLOCK, turn TUNE/TIME SET
to set the clock to the current
time.
When you turn the control knob a
little to
or , the clock digits
move forward or back one by one,
and when you turn the control knob
further to
or , the clock digits
move rapidly.
When you release SLEEP/CLOCK , the
clock starts operating, and “:” starts
flashing.
• The clock system varies depending on
the model you own.
12-hour system :
“AM12:00” = midnight
24-hour system :
“0:00” = midnight
Changing AM
Channel Step
The channel step of this unit is factory-
set to
9 kHz or 10 kHz to match the frequency
allocation system of the country as listed.
When needed, change the channel step
before listening to the radio.
Area Channel step
North and South 10 kHz
American countries
Other countries 9 kHz
1 Press POWER to turn off the
power.
2 While holding down SLEEP/
CLOCK, keep pressing POWER
for more than 5 seconds.
The AM channel step will be
changed.
If you proceed to step 2 again, the
channel step changes again.
Note
• When the AM channel step is changed,
the preset stations and the clock will be
erased, and “AM 12:00” or “0:00”
flashes in the display.
Operating the
Radio
Manual Tuning
1 Press POWER .
2 Adjust VOL (volume).
3 Press BAND to select the band.
Each press of the button changes the
band in the following order.
AM (LW) F
* When using FM1 or FM2 preset
mode, you may listen to the radio
on either mode.
(See “Preset Tuning”)
4 Turn TUNE/TIME SET
When you turn the control knob a
little to
or , the frequency digits
move forward or back one step at a
time, and when you turn the control
knob further to
or , the
frequency digits move rapidly.
• To turn off the radio, press POWER .
• For private listening, connect an
earphone to the @ jack.
• To improve radio reception
FM: Extend the telescopic antenna
and adjust the length.
AM/LW: Rotate the unit
horizontally for optimum
reception. A ferrite bar antenna
is built in the unit.
Preset Tuning
You can preset up to 10 stations in FM (5
stations in FM1, 5 stations in FM2), and 5
stations in AM.
Presetting a Station
Example: To set FM 90 MHz in preset
button 2 for FM2.
1 Press POWER .
2 Press BAND to select FM2.
3 Tune in FM 90 MHz.
Press the desired preset button for more
than a few seconds (i.e., in this case,
preset button 2).
You can hear the confirmation beep
and preset number "2" appears in the
display.
PRESET
MHz/kHz
PRESET
MHz/kHz
To preset another station, repeat
these steps.
• To change the preset station, preset a
new station number. The previous
station will be cancelled.
Tuning in a Preset Station
1 Press POWER .
2 Select the band with BAND .
3 Press the desired preset tuning
button.
4 Adjust VOL (volume).
Setting the Sleep
Timer
By setting the sleep timer, you can fall
asleep to the radio sound. The radio
turns off after 60 minutes.
1 Press POWER .
2 Select the band with BAND .
3 Tune to the desired station.
4 Adjust VOL (volume).
5 Press SLEEP/CLOCK .
PRESET
MHz/kHz
The sleep mode will appear in the
display and the minutes will start to
elapse.
• To turn off the sleep timer before the
time has elapsed, press POWER .
• When you press SLEEP/CLOCK during
the sleep mode, the sleep timer will
start again at 60 minutes.
• When you press the control button for
the radio during the sleep mode, the
button function will operate and the
frequency will be displayed for about
3 seconds and then return to the sleep
mode display.
Using other
Functions
To Prevent
Accidental Change
–HOLD function.
Press HOLD . “H ” is displayed,
indicating that all the functions of the
buttons are locked.
To release the key protection, press
HOLD again to “H ” disappear.
Français
Pr
• Operate the unit only on 3 V DC with
two R6 (size AA) batteries.
• Avoid exposure to temperature
extremes, direct sunlight, moisture,
sand, dust or mechanical shock.
Never leave in a car parked in the
sun.
• Should anything fall into the unit,
remove the batteries, and have the
unit checked by qualified personnel
before operating it any further.
• To clean the casing, use a soft cloth
dampened with a mild detergent
solution.
• In vehicles or buildings, radio
reception may be difficult or noisy.
Try listening near a window.
If you have any questions or problems
concerning your unit, please consult
your nearest Sony dealer.
T
Guide
Should any problem persist after you
have made the following checks, consult
your nearest Sony dealer.
The front panel buttons do not
operate at all.
•“H ” is displayed. Press the HOLD
button so that “ H ” will disappear.
Display is dim, or no indication is
displayed.
• Weak batteries.
• The unit is being used in extremely
high or low temperatures or in a place
with excessive moisture.
Very weak or interrupted sound, or
unsatisfactory reception.
• Weak batteries
• In a vehicle or in a building, listen
near a window.
The station cannot be received when a
preset tuning button is pressed.
• The station has not been preset.
• The memory of the station has been
erased, preset the station again.
Sound is not heard and “ i “ flashes
in the display.
• Weak batteries.
Specifications
Time display:
North and South America: 12-hour
system
Other countries: 24-hour system
Frequency range:
Model for North and South America
Band ICF-M260 Channel step
FM 87.5 – 108 MHz 0.1 MHz
AM 530 – 1,710 kHz 10 kHz
FM 87.5 – 108 MHz 0.05 MHz*
AM 531 – 1,710 kHz 9 kHz
Model for Other Countries
Band ICF-M260 ICF-M260L Channel
step
FM 87.5 – 87.5 – 0.05 MHz*
108 MHz 108.0 MHz
AM 531 – — 9 kHz
1,602 kHz
LW — 153 – 9 kHz
279 kHz
FM 87.5 – 87.5 – 0.1 MHz
108 MHz 108 MHz
AM 530 – — 10 kHz
1,610 kHz
LW — 153 – 9 kHz
279 kHz
* The frequency display is raised or
lowered by a step of 0.1 MHz.
(Example: Frequency 88.05 MHz is
displayed as “ 88.0 MHz”.)
Speaker: 6.6 cm (2
5
⁄
8
inches) 4 ohm
Power output: 120 mW (at 10%
harmonic distortion)
Output: @ (earphone) jack (minijack)
Power requirements:
3 V DC, two R6(size AA) batteries
Dimensions: Approx. 130 x 80 x 31 mm
(w/h/d) (Approx. 5
1
⁄
8
× 3
1
⁄
4
×
1
1
⁄
4
inches) not incl. projecting parts and
controls
Mass: Approx. 260 g (9.2
oz
) incl.
batteries
Design and specifications are subject to
change without notice.
A
commencer
Nous vous remercions de votre achat de
cet ampli-tuner Sony qui vous apportera
de nombreuses heures de service fiable
et de divertissement musical.
Avant d’utiliser cette radio, veuillez lire
attentivement ces explications que vous
conserverez pour les consulter
éventuellement par la suite.
Ce mode d’emploi couvre les modèles
ICF-M260 et ICF-M260L.
Ils different comme suit.
Numero de codele ICF-M260 ICF-M260L
Gamme FM/AM FM/GO
Caractéristiques
• Système de synthétisation PLL
(boucle à verrouillage de phase) piloté
par quartz, faisant appel à un micro-
ordinateur pour obtenir facilement
une syntonisation exacte.
• Mémorisation possible d’un
maximum de 10 stations FM et de 5
stations AM.
• La fréquence syntonisée est affichée
de façon numérique pour faciliter la
recherche de la station souhaitée.
Remarques sur l’intervalle
d’accord AM
L’intervalle d’accord AM est différent
selon les pays.
L’intervalle d’accord de cette radio a été
réglé en usine sur 10 kHz (modèles pour
l’Amérique du Nord et l’Amérique su
Sud) 9kHz (modèles pour les autres
pays).
Pays Intervalle d’accord
Amérique du 10 kHz
Nord et du Sud
Autres pays 9 kHz
Mise en place
des piles (cf. Fig. A)
1 Ouvrez le couvercle à l’arrière
de la radio.
2 Installez deux piles R6 (format
AA) en respectant leurs
polarités.
3 Refermez le couvercle.
Autonomie à l’emploi de piles
Sony R6 (AA)
Gamme (Env. Heures)
FM 17 heures
AM/GO 23 heures
Quand faut-il remplacer les
piles?
• Lorsque les piles faiblissent, le son
devient faible et distordu. Remplacez
les piles par des neuves. Quand les
piles sont épuisées, la radio s’arrête et
le voyant “
i
” clignote.
• Avant de remplacer les piles, assurez-
vous que la radio est hors tension.
• Remplacez les piles en moins d’une
minute; faute de quoi le contenu de la
mémoire de l’horloge et des stations
préréglées sera effacé et l’indication
“AM 12:00” ou “0:00” clignotera sur
l’affichage.
Remarques à propos des piles
• Insérez les piles en respectant leurs
polarités.
• Ne rechargez pas des piles usées.
• N’utilisez pas en même temps des
piles de types différents.
• Lors du remplacement, utilisez des
piles neuves.
• Si vous prévoyez de ne pas utiliser
l’appareil pendant une longue
période, retirez-en les piles pour
éviter des dégâts et une corrosion
provoqués par un suintement
d’électrolyte.
• En cas de fuite d’électrolyte, nettoyez
le logement des piles avec un linge
doux avant d’en installer des neuves.
Réglage de
l’horloge
L’affichage clignote et indique “AM
12:00” ou “0:00” lors de la première
installation des piles.
Réglez l’horloge alors que la radio est
hors tension.
1 Pour arrêter le clignotement de
l’affichage, appuyez sur SLEEP/
CLOCK.
2 En maintenant SLEEP/CLOCK
enfoncé, tournez TUNE/TIME
SET pour régler l’horloge à
l’heure actuelle.
Si vous tournez légèrement le bouton
vers
ou , les chiffres de l’horloge
avancent ou reculent d’une unité à la
fois; ils changent rapidement si vous
continuez à tourner le bouton.
Lorsque vous relâchez SLEEP/
CLOCK, l’horloge commence à
fonctionner et le symbole “:”
clignote.
• Le système d’horlogerie diffère selon
le modèle que vous avez acheté.
Cycle de 12 heures: “AM12:00” =
minuit
Cycle de 24 heures: “0:00” = minuit
Changement de
l’intervalle
d’accor
L’intervalle d’accord de cette radio a été
réglé en usine sur 9 kHz ou 10 kHz en
fonction du système d’allocation des
fréquences des pays indiqués ci-dessous.
Au besoin, changez l’intervalle d’accord
avant d’écouter la radio.
Pays Intervalle
d’accord
Amérique du 10 kHz
Nord et du Sud
Autres pays 9 kHz
1 Appuyez sur POWER pour
mettre l’appareil hors tension.
2 En maintenant SLEEP/CLOCK
enfoncé, appuyez pendant plus
de 5 secondes sur POWER .
L’intervalle de canal AM a ainsi été
changé.
Si vous effectuez à nouveau l’étape 2,
l’intervalle de canal changera à
nouveau.
Remarque
• Un changement de l’intervalle de canal
AM a pour effet d’effacer le contenu
des stations préréglées en mémoire et
l’indication “AM 12:00” ou “0:00” de
l’horloge clignote sur l’affichage.
Utilisation de la
radio
Accord manuel
1 Appuyez sur POWER .
2 Ajustez VOL (intensité sonore).
3 Appuyez sur BAND pour
sélectionner la gamme d’onde.
A chaque poussée sur le bouton,
la gamme change dans l’ordre
suivant.
AM (GO) FM1* FM2*
* A l’enploi du mode de préréglage
FM1 ou FM2, vous pouvez écouter
la radio selon l’un ou l’autre mode.
(Cf. “Accord préréglé”)
4 Tournez TUNE/TIME SET .
Si vous tournez légèrement le
bouton vers ou , les chiffres
de la fréquence avancent ou
reculent d’une unité à la fois; ils
changent rapidement si vous
continuez à tourner le bouton.
• Pour mettre la radio hors tension,
appuyez sur POWER .
• Pour une écoute en privé, raccordez
un écouteur sur le jack
@
.
• Pour améliorer la réception radio:
FM: Déployez l’antenne télescopique
et ajustez sa longueur.
AM/GO: Tournez l’appareil dans le
sens horizontal pour rechercher
la réception optimale. Une
antenne à tige de ferrite est
incorporée.
Accord préréglé
Vous pourez prérégler jusqu’à 10
stations en FM (5 en FM1, 5 en FM2) et 5
stations en AM.
Préréglage d’une station
Exemple: Pour mémoriser FM 90 MHz
par la touche de préréglage 2
sur FM2.
1 Appuyez sur POWER .
2 Appuyez sur BAND pour
sélectionner FM2.
3 Faites l’accord sur FM 90 MHz.
Appuyez pendant plusieurs
secondes sur la touche de préréglage
voulue (c.à.d. sur la touche de
préréglage 2 dans ce cas).
Un bip de confirmation se fait
entendre et le numéro de préréglage
“2” apparaît sur l’affichage.
PRESET
MHz/kHz
PRESET
MHz/kHz
Pour prérégler une autre station,
répétez les mêmes démarches.
• Pour changer la station préréglée,
préréglez un nouveau numéro de
station et la précédente sera annulée.
Accord d’une station
préréglée
1 Appuyez sur POWER .
2 Sélectionnez la gamme par
BAND.
3 Appuyez sur la touche d’accord
préréglé souhaitée.
4 Ajustez VOL (intensité sonore).
Réglage du
temporisateur
En programmant le temporisateur, vous
pouvez vous endormir au son de votre
radio qui sera mise hors tension après 60
minutes.
1 Appuyez sur POWER .
2 Sélectionnez la gamme d’onde
par BAND .
3 Faites l’accord sur la station
souhaitée.
4 Ajustez l’intensité sonore par
VOL.
5 Appuyez sur SLEEP/CLOCK .
Le mode temporisateur apparaît sur
l’affichage et le compte à rebours des
secondes commence.
• Pour mettre le temporisateur hors
service avant la fin du compte à
rebours, appuyez sur POWER .
• Si vous appuyez sur SLEEP/CLOCK
pendant le compte à rebours, celui-ci
recommencera à partir de 60 minutes.
• Si vous appuyez sur la touche de
commande pour la radio pendant le
compte à rebours du temporisateur, la
fonction de la touche agira et la
fréquence sera affichée pendant 3
secondes environ, puis l’affichage du
mode temporisateur réapparaît.
Autr
Prévention d’un
changement
accidentel —
Fonction de
maintien (HOLD)
Appuyez sur HOLD , ce qui affiche le
voyant “H ” pour signaler que toutes les
fonctions des touches sont verrouillées.
Pour annuler cette protection des
touches, appuyez à nouveau sur HOLD ,
ce qui fait disparaître le voyant “H ” .
Précautions
• Alimentez cet appareil uniquement
sur courant continu (CC) de 3 volts
par deux piles R6 (format AA).
• Evitez d’exposer l’appareil à des
températures extrêmes, aux rayons
directs du soleil, à l’humidité, au
sable, à la poussière ou à des chocs
mécaniques. Ne le laissez jamais dans
un véhicule exposé en plein soleil.
• Si un corps étranger pénètre à
l’intérieur du coffret, retirez-en les
piles et faites vérifier l’appareil par un
technicien avant de l’utiliser à
nouveau.
• Pour nettoyer le coffret, utilisez un
linge doux trempé dans une solution
de détergent doux.
• Dans des véhicules ou des bâtiments,
la réception radio s’avère parfois
difficile ou parasitée. Essayez
d’écouter votre radio près d’une
fenêtre.
Pour toute question ou difficulté relative
à cet appareil, veuillez vous adresser à
un concessionnaire Sony.
Guide de
dépannage
En présence d’une difficulté que ne
permettent pas de solutionner les
vérifications suivantes, demandez
conseil à un concessionnaire Sony.
Les touches du panneau avant
n’agissent pas du tout.
• Le voyant “H ” est affiché. Appuyez
sur la touche HOLD de manière à
faire disparaître le voyant “H”.
L’affichage est terne ou aucune
indication n’est visible.
• Piles faibles.
• L’appareil est utilisé dans un endroit
très chaud ou très froid ou dans un
lieu très humide.
Son très faible ou interrompu, ou
réception laissant à désirer.
• Piles faibles.
• Dans un véhicule ou un immeuble,
écoutez près d’une fenêtre.
La station ne peut pas être reçue
quand une touche de préréglage de
station est actionnée.
• La station n’a pas été préréglée.
• La station a été effacée de la mémoire.
Elle doit être à nouveau mémorisée.
Aucun son n’est audible et le voyant
“ i “ clignote sur l’affichage.
• Piles faibles.
Fiche technique
Affichage horaire:
Amérique du Nord et du Sud: Cycle de
12 heures
Autres pays: Cycle de 24 heures
Plage des fréquences:
Modèle pour Amérique du Nord et du Sud
Gamme ICF-M260 Intervalle de canal
FM 87,5 – 108 MHz 0,1 MHz
AM 530 – 1.710 kHz 10 kHz
FM 87,5 – 108 MHz 0,05 MHz*
AM 531 – 1.710 kHz 9 kHz
Modèle pour autres pays
Gamme ICF-M260 ICF-M260L Intervalle de
canal
FM 87,5 – 87,5 – 0,05 MHz*
108 MHz 108 MHz
AM 531 – — 9 kHz
1.602 kHz
GO — 153 – 9 kHz
279 kHz
FM 87,5 – 87,5 – 0,1 MHz
108 MHz 108 MHz
AM 530 – — 10 kHz
1.610 kHz
GO — 153 – 9 kHz
279 kHz
* L’affichage de la fréquence augmente
ou diminue par palier de 0,1 MHz.
(Exemple: la fréquence 88,05 MHz est
affichée comme “88,0 MHz”.)
Haut-parleur: 6,6 cm (2
5
⁄
8
pouces)
4 ohms
Puissance de sortie: 120 mW (à 10% de
distorsion harmonique)
Sortie: jack: @ (écouteur) (minijack)
Alimentation: Courant continu 3 V,
2 piles R6 (format AA)
Dimensions: Env. 130 x 80 x 31 mm
(l/h/p) (Env. 5
1
⁄8 × 3
1
⁄4 × 1
1
⁄4 pouces)
parties saillantes et commandes
non comprises
Poids: Env: 260 g (9,2 onces) piles
comprises
Conception et spécifications sous réserve
de changements sans préavis.
V
Wir beglückwünschen Sie zu Ihrem
neuen Sony Receiver, und sind
überzeugt davon, daß Sie lange Freude
an diesem zuverlässigen Gerät haben
werden.
Bevor Sie das Gerät in Betrieb nehmen,
lesen Sie diese Anleitung sorgfältig
durch. Bewahren Sie sie zum späteren
Nachschlagen gut auf.
Dies Anleitung bahandelt die Modelle
ICF-M260 und ICF-M260L, die sich wie
folgt unterscheiden:
Modell ICF-M2 ICF-
Wellenbereich UKW/MW UKW/LW
Merkmale
• Quarzgesteuerter PLL-Synthesizer
(Phase Locked Loop) mit
Mikrocomputer-Steuerung für
haargenaues Abstimmen.
• Bis zu zehn UKW- und fünf MW-
Sender vorwählbar.
• Digitale Frequenzanzeige zur
Erleichterung des Abstimmvorgangs.
Hinweise zum MW-Kanalraster
Das MW-Kanalraster ist von Land zu
Land verschieden. Werksseitig ist das
Raster auf 10 kHz (bei Modell für Nord-
und Süd-Amerika) bzw. 9 kHz (bei
Modellen für andere Länder)
voreingestellt.
Gebiet Kanalraster
Nord- und Süd-Amerika 10 kHz
Andere Länder 9 kHz
Einlegen der
Batterien
(Siehe
Abb. A )
1 Öffnen Sie den Deckel an der
Rückseite des Radios.
2 Legen Sie zwei Mignonzellen
(R6/Größe AA) mit richtiger
Polarität ein.
3 Schließen Sie den Deckel.
Lebensdauer von
Sony Mignonzellen (R6/AA)
Wellenbereich (Ungefähre
Lebensdauer in
Stunden)
UKW 17
MW/LW 23
Wann müssen die Batterien
ausgewechselt werden?
• Bei schwachen Batterien ist der Ton
leise oder verzerrt. Wechseln Sie die
beiden Batterien dann aus. Sind die
Batterien ganz leer, schaltet sich das
Radio aus und die Anzeige i blinkt.
• Vor dem Auswechseln der Batterien
schalten Sie das Radio stets aus.
• Achten Sie darauf, daß der
Batteriewechsel nicht länger als eine
Minute dauert, da sonst die Uhrzeit
und die gespeicherten Sender
gelöscht werden. In einem solchen
Fall blinkt AM 12:00 bzw. 0:00 im
Display.
Hinweise zu den Batterien
• Legen Sie die Batterien
polaritätsrichtig ein.
• Versuchen Sie niemals,
Trockenbatterien aufzuladen.
• Legen Sie zwei identische Batterien
ein.
• Wechseln Sie stets beide Batterien
aus.
• Nehmen Sie bei längerer
Nichtverwendung die Batterien
heraus, um Beschädigungen durch
Auslaufen und Korrosionsschäden zu
vermeiden.
• Wenn eine Batterie ausgelaufen ist,
wischen Sie das Batteriefach mit
einem weichen Tuch gut sauber,
bevor Sie neue Batterien einlegen.
Einstellung der
Uhr
Beim ersten Einlegen der Batterien
blinkt AM 12:00 bzw. 0:00 im Display.
Stellen Sie die Uhr dann bei
ausgeschaltetem Radio wie folgt ein:
1 Drücken Sie SLEEP/CLOCK , um
das Blinken im Display
abzuschalten.
2 Während Sie SLEEP/CLOCK
gedrückt halten, stellen Sie
durch Drehen von TUNE/TIME
SET die Uhrzeit ein.
Wird der Knopf nur geringfügig in
Richtung
oder gedreht, ändern
sich die Ziffern schrittweise. Durch
weiteres Drehen des Knopfes bis zur
Markierung
oder ändern sich
die Ziffern in schneller Abfolge.
Beim Loslassen von SLEEP/CLOCK
nimmt die Uhr den Betrieb auf, und
“:” beginnt zu blinken.
• Je nach Modell werden zwei
verschiedene Uhrzeit-
Anzeigesysteme verwendet.
Beim 12-Stunden-System: AM 12:00 =
Mitternacht
Beim 24-Stunden-System: 0:00 =
Mitternacht
Umstellen des
MW-Kanalrasters
Das MW-Kanalraster ist werksseitig in
Übereinstimmung mit dem örtlichen
Frequenzraster auf 9 kHz oder 10 kHz
voreingestellt (siehe folgende Tabelle).
Falls erforderlich, stellen Sie das Raster
vor dem Radiobetrieb um.
Gebiet Kanalraster
Nord- und Süd-Amerika 10 kHz
Andere Länder 9 kHz
1 Drücken Sie POWER , um das
Gerät auszuschalten.
2 Während Sie SLEEP/CLOCK
gedrückt halten, drücken Sie
POWER mindestens fünf
Sekunden lang.
Das MW- und UKW-Raster wird
umgeschaltet.
Durch Wiederholen von Schritt 2
kann wieder auf das ursprüngliche
Raster zurückgeschaltet werden.
Hinweis
• Beim Ändern des MW-Rasters wird
die Uhrzeit und die
Senderspeicherung gelöscht; AM 12:00
bzw. 0:00 blinkt dann im Display.
Betrieb des
Radios
Manuelle
Abstimmung
1 Drücken Sie POWER .
2 Stellen Sie an VOL die
Lautstärke ein.
3 Wählen Sie durch Drücken von
BAND den Wellenbereich. Beim
Drücken dieser Taste wird in
der folgenden Reihenfolge
umgeschaltet:
AM FM1* FM2*
(MW/LW) (UKW1) (UKW2)
* Sowohl für FM1 als auch für FM2
können Sender gespeichert
werden (siehe
“
Sendervorwahl”).
4 Drücken Sie TUNE/TIME SET .
Wird der Knopf leicht in Richtung
oder gedreht, ändern sich die
Frequenzziffern schrittweise. Wird
der Knopf ganz bis zu
oder
gedreht, ändern sich die
Frequenzziffern schnell.
• Zum Ausschalten des Radios drücken
Sie POWER .
• Zum individuellen Hören schließen
Sie einen Ohrhörer an die @-Buchse
an.
• Für optimalen Empfang...
UKW: Ziehen Sie die
Teleskopantenne heraus, und
stellen Sie sie optimal ein.
MW/LW: Drehen Sie das Gerät um
die vertikale Achse. In
diesem Wellenbereich
arbeitet die eingebaute
Ferritstabantenne.
Sendervorwahl
Insgesamt zehn UKW-Sender (fünf aus
dem FM1- und fünf aus dem FM2-Band)
und fünf MW/LW-Sender können
gespeichert werden.
Speichern eines Senders
Beispiel: 90 MHz wird für FM2 auf
Taste 2 gespeichert.
1 Drücken Sie POWER .
2 Schalten Sie durch Drücken von
BAND auf FM2.
3 Stimmen Sie auf 90 MHz ab.
Drücken Sie die gewünschte
Speichertaste mindestens zwei
Sekunden lang (im Beispielsfall Taste
2).
Ein akustischer Bestätigungston ist
zu hören, und die Ziffer 2 erscheint
im Display.
PRESET
MHz/kHz
PRESET
MHz/kHz
Zum Speichern weiterer Sender
wiederholen Sie diese Schritte.
• Zum Ändern der Speicherung
speichern Sie den gewünschten neuen
Sender ab. Die alte Speicherung wird
dabei gelöscht.
Abrufen eines gespeicherten
Senders
1 Drücken Sie POWER .
2 Wählen Sie mit BAND den
Wellenbereich.
3 Drücken Sie die gewünschte
Stationstaste.
4 Stellen Sie an VOL die
Lautstärke ein.
V
Einschlaftimers
Bei aktiviertem Einschlaftimer können
Sie in der Gewißheit einschlafen, daß
sich das Gerät automatisch nach 60
Minuten ausschaltet.
1 Drücken Sie POWER .
2 Wählen Sie mit BAND den
Wellenbereich.
3 Stimmen Sie auf den
gewünschten Sender ab.
4 Stellen Sie an VOL die
Lautstärke ein.
5 Drücken Sie SLEEP/CLOCK .
Die Einschlaftimeranzeige erscheint
im Display; die Minuten zählen auf
Null zurück.
• Zum vorzeitigen Ausschalten drücken
Sie POWER .
• Wenn bei aktiviertem Einschlaftimer
SLEEP/CLOCK erneut gedrückt wird,
bleibt das Gerät ab diesem Zeitpunkt
noch 60 Minuten eingeschaltet.
• Wenn bei aktiviertem Einschlaftimer
eine Funktionstaste gedrückt wird,
zeigt das Display etwa drei Sekunden
lang die Frequenz an und die
betreffende Funktion wird aktiviert;
danach erscheint wieder die Anzeige
des Einschlaftimers.
V
anderer
Funktionen
Sperren der
Bedienungselemente
– HOLD-Funktion
Durch Drücken von HOLD erscheint das
Symbol H im Display. Alle
Funktionstasten sind dann gesperrt, so
daß keine versehentliche Verstellung
möglich ist.
Zum Abschalten dieser Funktion
drücken Sie HOLD erneut, so daß H
wieder erlischt.
Zur besonderen
Beachtung
• Betreiben Sie das Gerät nur an 3 V
Gleichspannung mit zwei
Mignonzellen (R6/Größe AA).
• Setzen Sie das Gerät keinen extremen
Temperaturen, keinem direkten
Sonnenlicht, keiner Feuchtigkeit,
keinem Sand, keinem Staub und
keinen mechanischen Stößen aus.
Lassen Sie es auch nicht in einem in
der Sonne geparkten Auto zurück.
• Wenn ein Fremdkörper in das Gerät
gelangt, trennen Sie die Batterien ab,
und lassen Sie das Gerät von einem
Fachmann überprüfen, bevor Sie es
weiterverwenden.
• Zum Reinigen des Gehäuses
verwenden Sie ein weiches, leicht mit
mildem Haushaltsreiniger
angefeuchtetes Tuch.
• In einem Auto oder einem Fahrzeug
kann der Empfang schwach und
verrauscht sein. Halten Sie das Gerät
dann möglichst in die Nähe eines
Fensters.
Bei weiterführenden Fragen wenden Sie
sich bitte an den nächsten Sony Händler.
Störungsüberprüfungen
Bei einer Störung gehen Sie die folgende
Zusammenstellung durch. Wenn das
Problem nicht behoben werden kann,
wenden Sie sich an Ihren Sony Händler.
Keine Taste an der Vorderseite
arbeitet.
• Die Haltefunktion ist aktiviert (im
Display ist H zu sehen). HOLD
drücken, so daß H erlischt.
Die Anzeigen im Display sind nur
schwach oder gar nicht zu sehen.
• Die Batterien sind erschöpft.
• Die Umgebungstemperaur ist sehr
hoch oder sehr niedrig oder die
Feuchtigkeit ist sehr hoch.
Schwacher oder unterbrochener Ton
oder unbefriedigender Empfang.
• Die Batterien sind schwach.
• In einem Fahrzeug oder einem
Gebäude möglichst das Gerät in die
Nähe eines Fensters halten.
Der gewünschte Sender kann nicht
durch Drücken der Stationstaste
abgerufen werden.
• Der Sender wurde nicht gespeichert.
• Die Speicherung wurde gelöscht. Den
Sender erneut speichern.
Kein Ton, i blinkt im Display.
• Die Batterien sind erschöpft.
T
Uhrzeitanzeige:
Nord- und Süd-Amerika: 12-Stunden-
System
Andere Länder: 24-Stunden-System
Empfangsbereich:
Modell für Nord- und Süd-Amerika
Wellenbereich ICF-M260 Abstimmraster
UKW 87,5 – 108 MHz 0,1 MHz
MW 530 – 1.710 kHz 10 kHz
UKW 87,5 – 108 MHz 0,05 MHz*
MW 531 – 1.710 kHz 9 kHz
Modell für andere Länder
Wellenbereich ICF-M260 ICF-M260L Kanalraster
UKW 87,5 – 87,5 – 0,05 MHz*
108 MHz 108.0 MHz
MW 531 – — 9 kHz
1.602 kHz
LW — 153 – 9 kHz
279 kHz
UKW 87,5 – 87,5 – 0,1 MHz
108 MHz 108 MHz
MW 530 – — 10 kHz
1.610 kHz
LW — 153 – 9 kHz
279 kHz
* Die Frequenzanzeige im Display
ändert sich in 0,1-MHz-Schritten.
(Beispiel: Bei der Empfangsfrequenz
88,05 MHz wird 88.0 MHz angezeigt.)
Lautsprecher: 6,6 cm, 4 Ohm
Ausgangsleistung: 120 mW (bei 10%
Klirrgrad)
Ausgang: @-Buchse (Minibuchse)
Stromversorgung:
3 V Gleichspannung, zwei
Mignonzellen R6 (AA)
Abmessungen: ca. 130 x 80 x 31 mm
(B/H/T), ausschl. vorspringender
Teile und Bedienungslemente
Gewicht: ca. 260 g, einschl. Batterien
Änderungen, die dem technischen
Fortschritt dienen, bleiben vorbehalten.
Antes de
comenzar
¡Muchas gracias por la elección de esta
radio Sony!
El receptor le ofrecerá muchas horas de
servicio fiable y placer de escucha.
Antes de utilizar la radio, lea
detenidamente estas instrucciones y
consérvelas para futuras referencias.
Estas instrucciones cubren los tres
modelos: ICF-M260 e ICF-M260L. Sus
diferencias se indican en la tabla
siguiente.
Número del modelo ICF-M260 ICF-M260L
Banda FM/AM FM/LW
Características
• Sistema sintetizador con bucle de
enganche de fase (PLL) controlado por
cuarzo, que utiliza un
microprocesador para facilitar la
sintonía precisa.
• Posibilidad de memorización de hasta
10 emisoras de FM y 5 de AM.
• La frecuencia sintonizada se
visualizará digitalmente para facilitar
la búsqueda de la emisora deseada.
Notas sobre el intervalo entre
canales de AM
El intervalo entre canales de AM varía
dependiendo de la zona. El intervalo
entre canales de esta unidad ha sido
ajustado en fábrica a 10 kHz (modelos
para Norte y Sudamérica)/9 kHz
(modelos para otros países).
Área Intervalo entre
canales
Norte y Sudamérica 10 kHz
Otros países 9 kHz
Instalación de las
pilas (Consulte la fig.
A)
1 Abra la tapa de la parte
posterior de la radio.
2 Instale dos pilas R6 (tamaño
AA) con la polaridad correcta.
3 Cierre la tapa.
Duración de las pilas utilizando pilas
R6 (AA) Sony
Banda (Horas aproximadas)
FM 17 horas
AM/LW 23 horas
Cuándo reemplazar las pilas
• Cuando las pilas se debiliten, el sonido
se oirá débil o distorsionado. En este
caso, reemplace las pilas por otras
nuevas. Cuando las pilas se agoten
completamente, la radio se
desconectará y parpadeará “i ”.
• Antes de reemplazar las pilas,
cerciórese de que la alimentación de la
radio esté desconectada.
• Reemplace las pilas antes de un
minuto. De lo contrario, los datos del
reloj y de las emisoras almacenadas se
borrarán de la memoria, y en el
visualizador parpadeará “AM “12:00”
o “0:00”.
Notas sobre las pilas
• Inserte las pilas con la polaridad
correcta.
• No cargue las pilas.
• No utilice tipos diferentes de pilas al
mismo tiempo.
• Cuando tenga que reemplazar las
pilas, reemplace ambas por otras
nuevas.
• Cuando no vaya a utilizar la unidad
durante mucho tiempo, extráigale las
pilas para evitar el daño que podría
causar el electrólito de las mismas en
caso de fugarse.
• Si se fuga el electrólito de las pilas,
limpie el compartimiento de las
mismas con un paño suave antes de
insertar otras nuevas.
Ajuste del r
Cuando instale por primera vez las
pilas, parpadeará “AM 12:00” o “0:00”.
Ajuste el reloj con la alimentación de la
radio desconectada.
1 Para parar el parpadeo del
visualizador, presione SLEEP/
CLOCK.
2 Manteniendo pulsada SLEEP/
CLOCK, gire TUNE/TIME SET
para ajustar al reloj a la hora
actual.
Si gira el mando de control
ligeramente hasta
o , los dígitos
del reloj avanzarán o retrocederán de
uno en uno, y si lo gira más hasta
o , cambiarán con mayor rapidez.
Cuando suelte SLEEP/CLOCK , el reloj
se pondrá en funcionamiento, y
comenzarán a parpadear los dos
puntos “:”.
• El sistema de reloj variará
dependiendo del modelo que posea.
Sistema de 12 horas:
“AM 12:00” = medianoche
Sistema de 24 horas:
“0:00” = medianoche
Deutsch
Español
Cambio del
intervalo entr
canales de AM
El intervalo entre canales de AM ha sido
austado en fábrica a 9 kHz o a 10 kHz de
acuerdo con el sistema de asignación de
frecuencias de AM del país de destino,
como se indica a continuación.
Cuando sea necesario, cambie el
intervalo entre canales antes de escuchar
la radio.
Área Intervalo entre
canales
Norte y Sudamérica 10 kHz
Otros países 9 kHz
1 Presione POWER para
desconectar la alimentación.
2 Manteniendo pulsada SLEEP/
CLOCK, mantenga presionada
POWER durante más de 5
segundos.
El intervalo entre canales cambiará.
Si realiza de nuevo el paso 2, el
intervalo entre canales volverá a
cambiar.
Nota
• Cuando cambie el intervalo entre
canales, los datos del reloj y de las
emisoras almacenadas se borrarán de
la memoria, y en el visualizador
parpadeará “AM “12:00” o “0:00”.
Operación de la
radio
Sintonía manual
1 Presione POWER .
2 Ajuste VOL (volumen).
3 Presione BAND para seleccionar
la banda.
Cada vez que presione la tecla, la
banda cambiará en el orden
siguiente:
AM (LW) FM1* FM2*
* Cuando utilice el modo de
memorización de FM1 o FM2, podrá
escuchar la radio en cualquiera de
los modos.
(Consulte “Sintonía memorizada”.)
4 Gire TUNE/TIME SET .
Si gira el mando de control
ligeramente hasta
o , los dígitos
de la frecuencia avanzarán o
retrocederán de uno en uno, y si lo
gira más hasta
o , cambiarán
con mayor rapidez.
• Para desconectar la alimentación de la
radio, presione POWER .
• Para escuchar en privado, conecte un
auricular a la toma @.
• Para mejorar la radiorrecepción
FM: Extienda la antena telescópica y
ajuste su longitud.
AM/LW: Gire horizontalmente la
unidad hasta obtener la óptima
recepción. La unidad tiene
incorporada una antena de barra
de ferrita.
Sintonía
memorizada
Usted podrá memorizar hasta 10
emisoras de FM (5 en FM1 y otras 5 en
FM2), y 5 de AM.
Memorización de una emisora
Ejemplo: Para almacenar FM 90 MHz en
la tecla de memorización 2 para FM2
1 Presione POWER .
2 Presione BAND para seleccionar
FM2.
3 Sintonice FM 90 MHz.
Mantenga presionada la tecla de
memorización deseada durante
algunos segundos (es decir, en este
caso, presione la tecla 2).
Usted podrá oír el pitido de
confirmación, y en el visualizador
aparecerá el número de
memorización “2”.
PRESET
MHz/kHz
PRESET
MHz/kHz
Para memorizar otra emisora, repita
estos pasos.
• Para cambiar una emisora
memorizada, almacene otra en el
mismo número de memorización. La
previamente almacenada se borrará.
Sintonía de una emisora
memorizada
1 Presione POWER .
2 Seleccione la banda con BAND .
3 Presione la tecla de
memorización deseada.
4 Ajuste VOL (volumen).
Activación del
cr
Activando el cronodesconectador, podrá
dormirse con el sonido de la radio. La
alimentación de la radio se desconectará
automáticamente después de 60
minutos.
1 Presione POWER .
2 Seleccione la banda con BAND .
3 Sintonice la emisora deseada.
4 Ajuste VOL (volumen).
5 Presione SLEEP/CLOCK .
El modo del cronodesconectador
aparecerá en el visualizador y
comenzará la cuenta atrás de los
minutos.
• Para desactivar el cronodesconectador
antes de que transcurra el tiempo,
presione POWER .
• Si presiona SLEEP/CLOCK mientras el
cronodesconectador esté activado, éste
volverá a comenzar desde 60 minutos.
• Si presiona la tecla de control para la
radio mientras el cronodesconectador
esté activado, ésta no funcionará, se
visualizará la frecuencia durante unos
3 segundos, y después volverá a
aparecer la visualización del
cronodesconectador.
Utilización de
otras funciones
Para evitar el
cambio accidental -
Función de bloqueo
Presione HOLD . Se visualizará “H”
para indicar que todas las funciones de
las teclas de la radio están bloqueadas.
Para desbloquear las funciones de las
teclas, vuelva a presionar HOLD . “ H”
desaparecerá.
Precauciones
• Alimente la unidad sólo con 3 V CC
con dos pilas R6 (tamaño AA).
• Evite la exposición a temperaturas
extremadas, la luz solar directa, la
humedad, la arena, el polvo, y los
golpes. No deje nunca la unidad en un
automóvil estacionado al sol.
• Si dentro de la unidad cae algo,
extraiga las pilas y haga que sea
comprobada por personal cualificado.
• Para limpiar la caja, utilice un paño
suave humedecido en una solución de
detergente suave.
• En vehículos o en edificios, es posible
que la radiorrecepción resulte difícil o
sea ruidosa. Pruebe a escuchar cerca
de una ventana.
Si tiene alguna pregunta o problema en
relación con esta unidad, consulte a su
proveedor Sony.
Solución de
problemas
Si el problema persiste después de haber
realizado las comprobaciones siguientes,
consulte a su proveedor Sony.
Las teclas del panel frontal no
funcionan en absoluto.
• Está visualizándose “H ”. Presione la
tecla HOLD para hacer que
desaparezca “H”.
La visualización es débil, o no se
visualiza ninguna indicación.
• Las pilas están débiles.
• Está utilizando la unidad a
temperaturas extremadamente altas o
bajas, o en un lugar con excesiva
humedad.
El sonido es débil o se oye
interrumpido, o la recepción es
insatisfactoria.
• Las pilas están débiles.
• En un vehículo o en un edificio, trate
de escuchar cerca de una ventana.
No es posible recibir una emisora al
presionar una tecla de memorización.
• La emisora no está memorizada.
• La emisora se ha borrado de la
memoria. Vuelva a memorizarla.
No se oye sonido, y en el visualizador
parpadea “i”.
• Las pilas están débiles.
Especificaciones
Visualización de la hora:
Norte y Sudamérica: Sistema de 12
horas
Otros países: Sistema de 24 horas
Gama de frecuencias:
Modelo para Norte y Sudamérica
Banda ICF-M260 Intervalo
entre canales
FM 87,5 – 108 MHz 0,1 MHz
AM 530 – 1.710 kHz 10 kHz
FM 87,5 – 108 MHz 0,05 MHz*
AM 531 – 1.710 kHz 9 kHz
Modelo para otros países
Banda ICF-M260 ICF-M260L Intervalo
entre canales
FM 87,5 – 87,5 – 0,05 MHz*
108 MHz 108 MHz
AM 531 – — 9 kHz
1.602 kHz
LW — 153 – 9 kHz
279 kHz
FM 87,5 – 87,5 – 0,1 MHz
108 MHz 108 MHz
AM 530 – — 10 kHz
1.610 kHz
LW — 153 – 9 kHz
279 kHz
* La visualización de la frecuencia
aumentará o se reducirá en pasos de
0,1 MHz. (Ejemplo: la frecuencia de
88,05 MHz se visualizará como “88.0
MHz”.
Altavoz: 6,6 cm, 4 ohmios
Salida de potencia: 120 mW (al 10% de
distorsión armónica)
Salida: Toma (minitoma) para
auricular @
Alimentación:
3 V CC, dos pilas R6 (tamaño AA)
Dimensiones: Aprox. 130 x 80 x 31
mm, excluyendo partes y controles
salientes
Masa: Aprox. 260 g, incluyendo las
pilas
El diseño y especificaciones están sujetos
a cambios sin previo aviso.
You are cautioned that any changes or modifications not
expressly approved in this manual could void your authority
to operate this equipment.
INFORMATION
This equipment has been tested and found to comply with the
limits for a Class B digital device, pursuant to Part 15 of the
FCC Rules. These limits are designed to provide reasonable
protection against harmful interference in a residential
installation. This equipment generates, uses, and can radiate
radio frequency energy and, if not installed and used in
accordance with the instructions, may cause harmful
interference to radio communications. However, there is no
guarantee that interference will not occur in a particular
installation. If this equipment does cause harmful interference
to radio or television reception, which can be determined by
turning the equipment off and on, the user is encouraged to try
to correct the interference by one or more of the following
measures:
— Reorient or relocate the receiving antenna.
— Increase the separation between the
equipment and receiver.
— Connect the equipment into an outlet on a
circuit different from that to which the
receiver is connected.
— Consult the dealer or an experienced radio/
TV technician for help.
HOLD POWER
PRESET
MHz/kHz
TUNE/
TIME SET
PRESET TUNING
STATION SELECT/ PRESET
BAND
SLEEP/
CLOCK
VOL
Rear
Arrière
Rückseite
Parte posterior
Telescopic Antenna
Antenne télescopique
Teleskopantenne
Antena telescópica
A
TUNE/TIME SET
R6 (AA) X 2
3-856-959-11 (1)
Sony Corporation © 1996 Printed in China
FM/AM PLL Synthesized
Radio ICF-M260
FM/L
Radio ICF-M260L
Operating Instructions
Mode d’emploi
Bedienungsanleitung
Manual de instrucciones
Gebruiksaanwijzing
(achterzijde)
Bruksanvisning
(pa baksidan)
Istruzioni per l’uso
(facciata opposta)
Manual de instruções
(lado inverso)