3-089-566-23 (1)
BC-TRP
Battery charger
Chargeur de Batterie
Operating instructions
Mode d’emploi
Manual de instrucciones
© 2004 Sony Corporation Printed in Japan
A
•The BC-TRP battery charger can only be used to charge a
lithium ion type “InfoLITHIUM” battery pack (H series,
P series).
•
type or nickel metal hydride type battery pack.
•
, mark.
•
•Le chargeur de batterie BC-TRP ne peut être utilisé que
pour la recharge de batteries au lithium-ion de type
« InfoLITHIUM » (série H, série P).
•Ce chargeur ne peut pas être utilisé pour charger les
batteries au nickel-cadmium ou aux hydrures
métalliques de nickel.
•
portent le repère , .
•« InfoLITHIUM » est une marque de fabrique de Sony
Corporation.
WARNING
To reduce fire or shock hazard, do not expose the unit to
rain or moisture.
To avoid electrical shock, do not open the cabinet.
Refer servicing to qualified personnel only.
Notes on Use
This unit does not have dust-proof, splash-proof or
waterproof specifications.
Precautions on Use
• Connect the battery charger to an available wall socket. Even
though the CHARGE lamp of this battery charger is off, it is
not disconnected from the power source. If any trouble occurs
while the unit is in use, unplug the battery charger from the
wall socket to disconnect the power source.
• This unit cannot be used to charge a nickel cadmium type, or
nickel metal hydride type battery pack.
• Attach the battery pack to the unit firmly when you charge the
battery pack.
• The battery terminal may be damaged if the battery pack is not
attached correctly.
• To protect the battery pack, remove the battery pack from the
unit as soon as the charging is completed.
• Do not apply mechanical shock or drop the unit.
• Keep the unit away from a TV or AM receivers.
In particular, noise from the device may enter a TV or radio if
it is placed nearby.
• Unplug the unit from the wall socket if it will not be used for
extended period of time. To disconnect the mains lead, pull it
out by the plug. Never pull the mains lead itself.
• Be sure that nothing metallic comes into contact with the metal
parts of the unit. If it does, a short may occur and the unit may
be damaged.
• The battery pack and battery charger can become warm during
or immediately after recharging.
Where not to place this unit
Regardless of whether this unit is in use or in storage, do not
place it in any of the following locations. Doing so may lead to
breakdown.
• Placing this unit in locations subject to the direct sunlight such
as on dashboards or near heating apparatus may cause this
unit to deform or malfunuction.
• Locations of excessive vibration
• Locations with strong electromagnetism or radiant rays
• Locations with excessive sand
In locations such as the seashore and other sandy areas or
where dust clouds occur, protect the unit from sand and dust.
There is a risk of breakdown.
Maintenance
• Wipe the unit with a soft dry cloth when it is dirty.
• If the unit is very dirty, wipe it using a cloth with a little
neutral solvent added, and then wipe it dry again.
• Do not use thinners, benzine, alcohol, etc., as they will damage
the surface of the unit.
• When you use chemical cleaning clothes, refer to their
instruction manual.
• Using a volatile solvent like an insecticide, or keeping the unit
touching a rubber or vinyl plastic product for a long time may
cause a deterioration or damage to the unit.
Warranty for Recorded Content
Contents of the recording cannot be compensated if recording or
playback is not made due to a malfunction of the battery pack,
battery charger, etc.
To Charge the Battery Pack
Charging by attaching the battery pack to this unit.
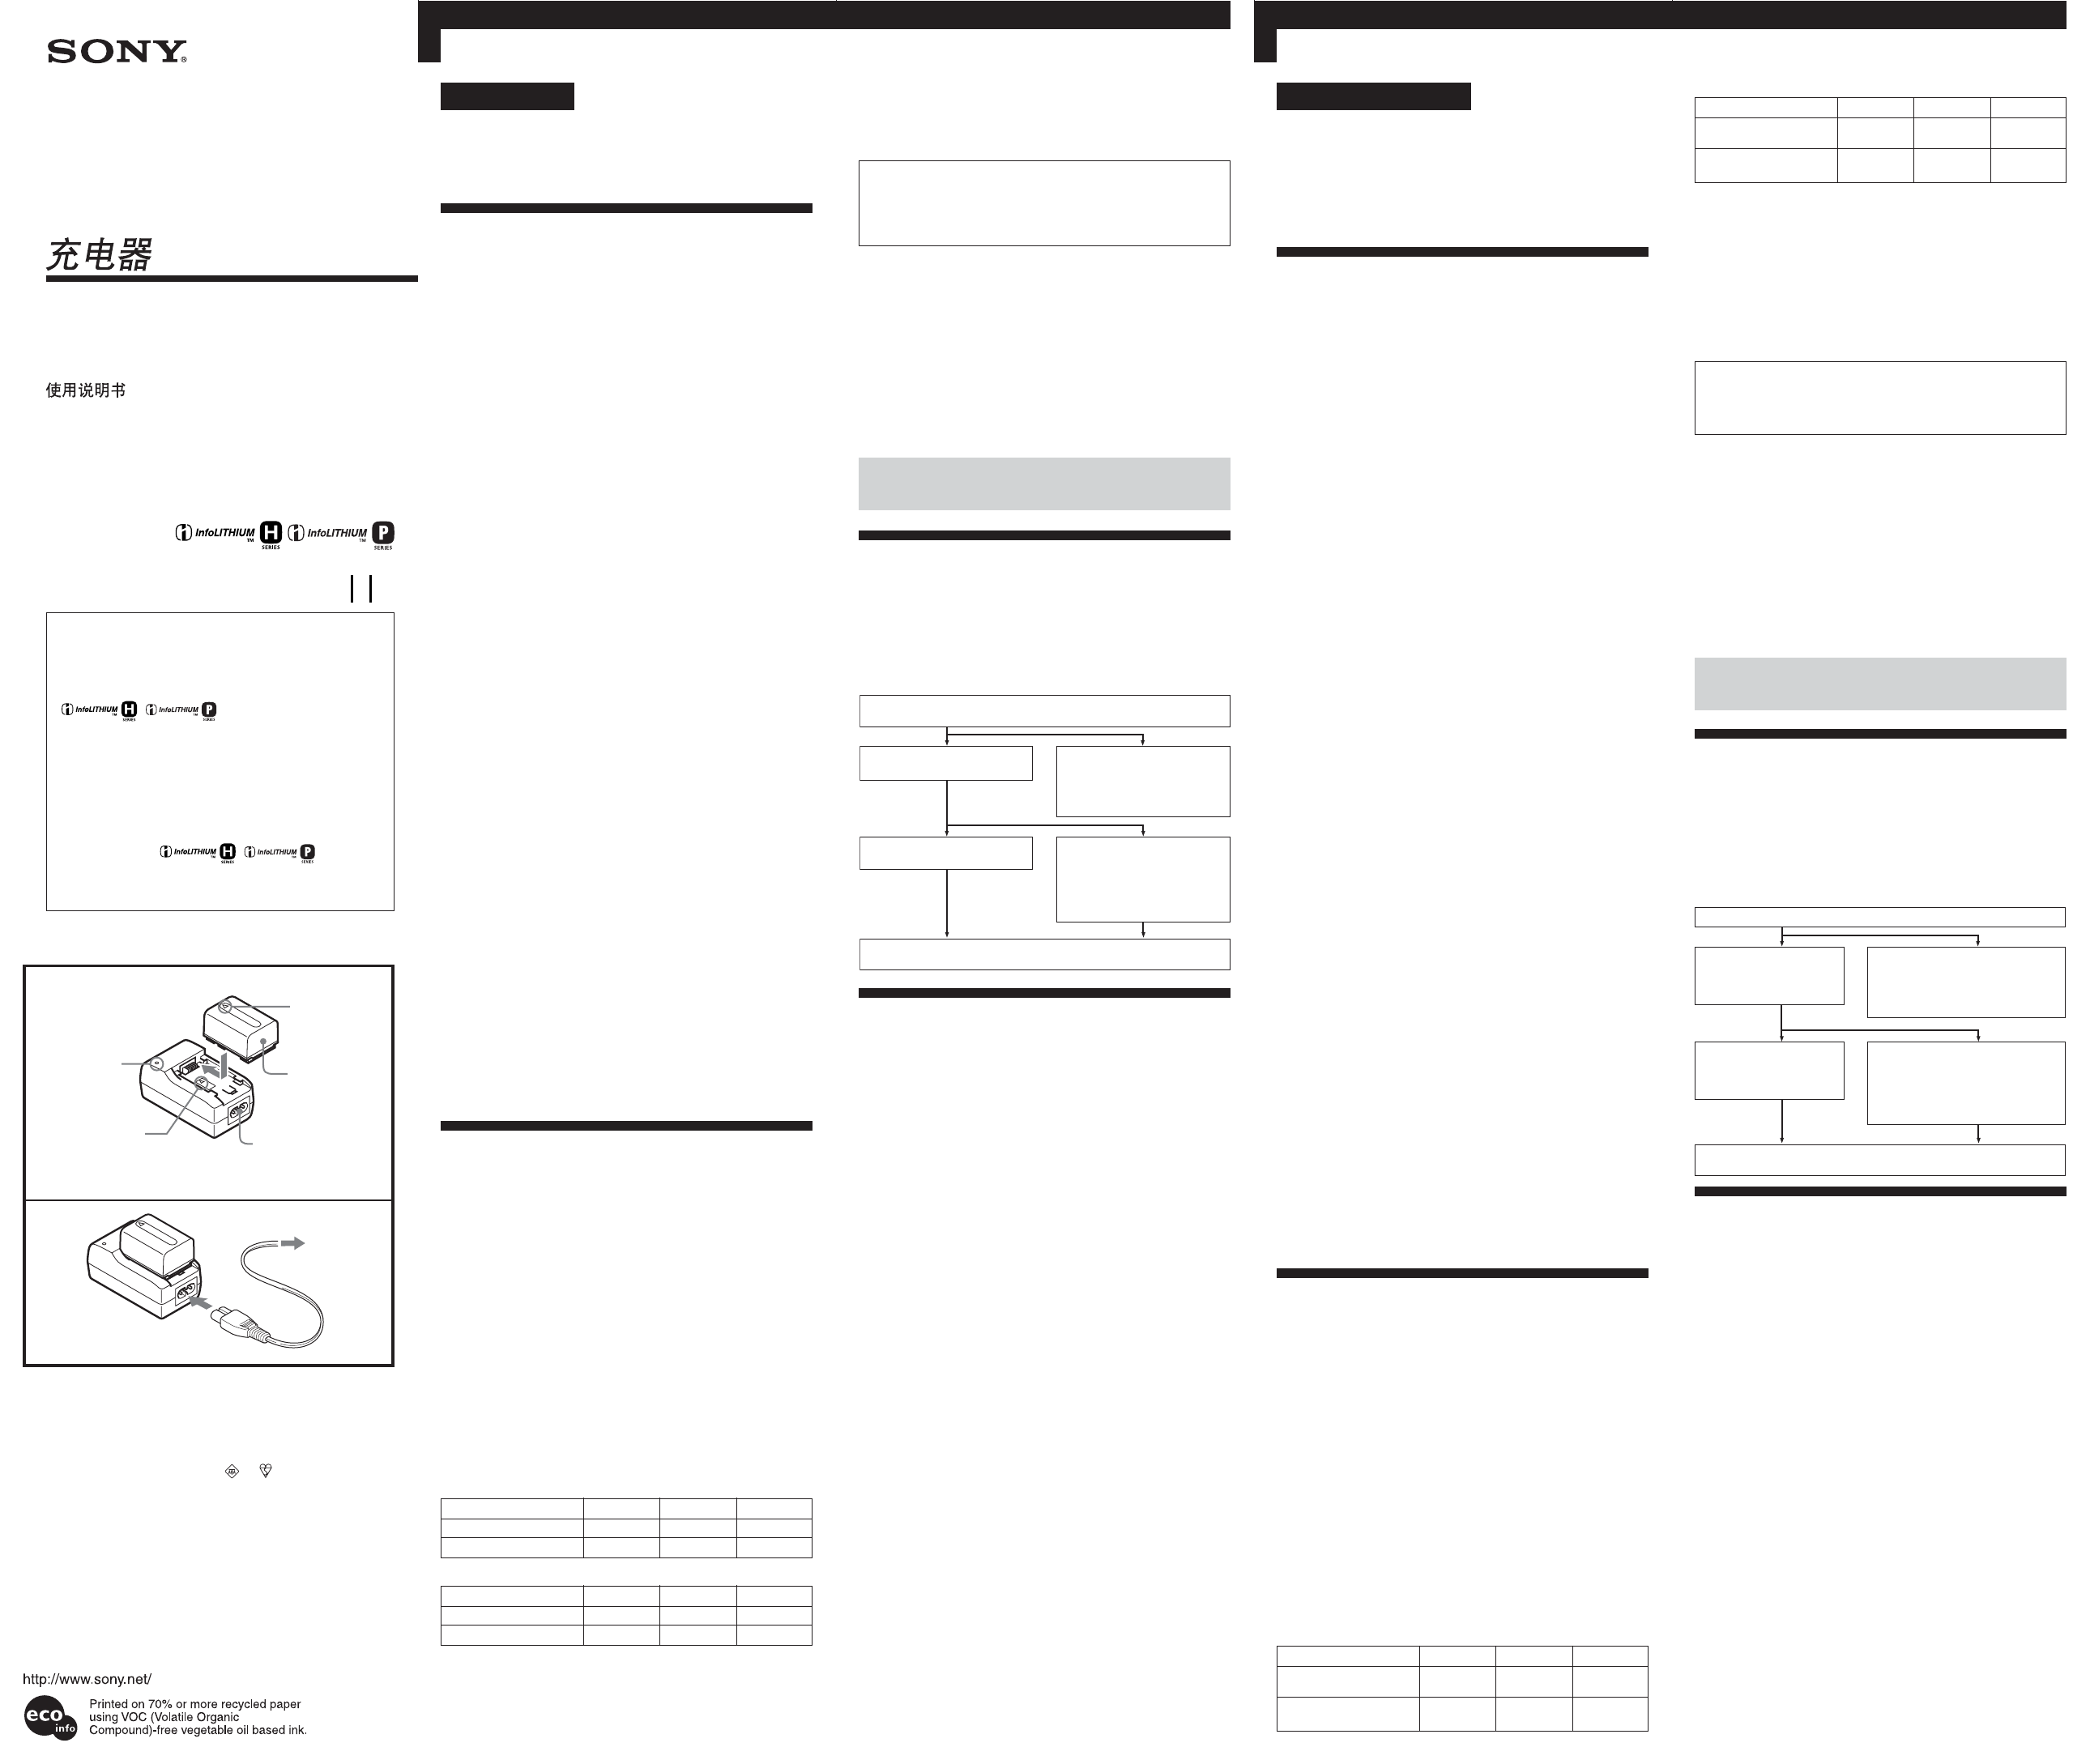
1 Attach the battery pack. (See Illustration A )
Align the battery V mark with the charger V mark and insert
the battery in the direction of the arrow until it clicks into
place.
2 Connect the mains lead to the battery charger and then
to a wall socket. (See Illustration B )
The CHARGE lamp (orange) will light up and charging will
begin.
When the CHARGE lamp goes out, normal charging is
completed (Normal charge ).
For a full charge, which allows you to use the battery longer
than usual, leave the battery pack in place for approximately
another one hour (Full charge ).
To remove the battery pack
Slide the battery out in the opposite direction to when it was
fitted.
Charging time
The following table shows the charging time for a battery pack
that is discharged completely.
“InfoLITHIUM” battery pack H series
“InfoLITHIUM” battery pack P series
• Approximate number of minutes to fully charge an empty
battery pack (Full charging time).
• Numbers in parentheses indicate the time to charge normally
(Normal charging time).
• To ascertain the battery life, refer to the instruction manual of
the digital still camera that you use.
English
• The charging time may differ depending on the condition of
the battery pack or the temperature of the environment.
• The times shown are for charging an empty battery pack
which has been run down with a video camera etc., using this
unit at an ambient temperature of 25 °C.
Charging temperature
The temperature range for charging is 0 °C to 40 °C.
However, to provide maximum battery efficiency, the
recommended temperature range when charging is 10 °C to
30 °C.
To use the battery pack quickly
You can remove the battery pack from the unit and use it even
though the charging is not completed yet. However, the time
that the battery pack can be used differs depending on the
charging time.
Notes
• Check if the battery pack is attached to this unit firmly when
the CHARGE lamp does not light.
• When a fully charged battery pack is installed, the CHARGE
lamp will light up once, then go out.
• When charging a battery pack which has not been used for a
long time, it may take longer than usual to charge.
Do not connect the battery charger to a voltage adaptor
(travel converter) for overseas travel. This may result in
overheating or other malfunction.
Troubleshooting
When the CHARGE lamp blinks, check through the following
chart.
When charging a battery pack that has not been used for a long
time, the CHARGE lamp may blink in some rare cases.
If this happens, remove the battery pack from the battery
charger and then install and charge it again.
If the CHARGE lamp still blinks, check the battery pack
according to the following procedure.
Specifications
Input rating 100 - 240 V AC 50/60 Hz 5 W
Output rating Battery charge terminal:
8.4 V DC 350 mA
Operating temperature 0 °C to 40 °C
Storage temperature –20 °C to +60 °C
Dimensions Approx. 42 × 32 × 76 mm (w/h/d)
Mass Approx. 60 g
Design and specifications are subject to change without notice.
Please contact your nearest Sony dealer in connection with the product
with the problem.
Remove the battery that is being charged and firmly attach the same
battery again.
The CHARGE lamp blinks again:
Install another battery pack.
The CHARGE lamp lights up
and does not blink again:
If the CHARGE lamp goes out
because the charging time has
passed, there is no problem.
The CHARGE lamp blinks again:
The problem is with this unit.
The CHARGE lamp lights up
and does not blink again:
If the CHARGE lamp goes out
because the charging time has
passed, the problem is with the
battery pack first installed.
B
AVERTISSMENT
Afin de réduire les risques d’fincendie ou de décharge
électrique, n’fexposez pas cet appareil à la pluie ou à
l’humidité.
Afin d’écarter tout risque d’électrocution, garder le boîtier
fermé.
Ne confier l’entretien de l’appareil qu’à un technicien
qualifié.
Remar
Cet appareil n’est pas étanche à la poussière, aux projections
d’eau et à l’eau en général.
Précautions d’emploi
• Raccordez le chargeur de batterie à une prise secteur. Même
lorsque le témoin CHARGE est éteint, le chargeur n’est pas
isolé de la source d’alimentation. En cas de problème,
débranchez immédiatement le cordon d’alimentation de la
prise murale pour isoler le chargeur de la source
d’alimentation.
• Ce chargeur ne peut pas être utilisé pour charger les batteries
au nickel-cadmium ou aux hydrures métalliques de nickel.
• Rattachez correctement la batterie rechargeable à l’appareil
lorsque vous la rechargez.
• La borne de la batterie peut être endommagée si la batterie
n’est pas rattachez correctement.
• Pour protéger la batterie, retirez-la de l’appareil dès que la
charge est terminée.
• Ne pas appliquer de chocs mécaniques au chargeur, ni le
laisser tomber.
• Ne pas laisser le chargeur à proximité d’un téléviseur ou d’un
récepteur AM.
Il peut parasiter la réception télévisée ou radio s’il est placé
trop près.
• Débranchez l’appareil de la prise murale s’il ne doit pas être
utilisé pendant longtemps. Pour débrancher le cordon, tirez
sur la fiche. Ne tirez jamais sur le cordon proprement dit.
• Evitez que des objets métalliques ne touchent les parties
métalliques du chargeur. Un court-circuit pourrait se produire
et endommager l’appareil.
• La batterie et son chargeur risquent de chauffer pendant ou
immédiatement après la recharge.
Endroits à éviter
Qu’il soit en service ou rangé, le chargeur ne devra pas être posé
dans les types d’endroits suivants au risque de l’endommager.
• Placer cet appareil dans des endroits soumis à la lumière
directe du soleil comme sur un tableau de bord ou à proximité
d’un chauffage peut entraîner sa déformation ou un
dysfonctionnement.
• Endroits soumis à de fortes vibrations
• Endroits exposés à un électromagnétisme ou à des radiations
puissantes
• Environnement très sablonneux
En bord de mer et dans les autres types de régions sableuses
ou soumises à des nuages de poussière protégez le chargeur
du sable et de la poussière. Risques de détérioration.
Entretien
• Essuyez l’appareil avec un chiffon sec et doux lorsqu’il est sale.
• Lorsqu’il est très sale, essuyez-le avec un chiffon imprégné
d’un peu de solvant neutre, et séchez-le bien.
• Ne pas utiliser de diluants, benzine, alcool, etc. car ils peuvent
endommager la surface de l’appareil.
• Si vous utilisez des tissus de nettoyage chimique, lisez
attentivement le mode d’emploi.
• L’appareil peut se décolorer ou être endommagé à l’emploi de
solvants volatils, comme les insecticides, ou s’il reste
longtemps au contact de produits en caoutchouc ou en vinyle.
Garantie concernant l’enregistrement
Aucune compensation ne peut être accordée si l’enregistrement
ou la lecture n’a pas pu être effectué en raison d’un problème de
batterie, de chargeur, etc.
Pour charger la batterie
Mettez la batterie sur le chargeur pour la recharger.
1 Rattachez la batterie (Voir l’illustration A ).
Alignez le repère de batterie V sur le repère de chargeur V et
insérez la batterie dans le sens de la flèche jusqu’à ce qu’elle
s’encliquette.
2 Raccordez le cordon d’alimentation au chargeur puis à
une prise secteur (Voir l’illustration B ).
Le témoin CHARGE (orange) s’allume et la recharge
commence.
Lorsque le témoin CHARGE s’éteint, la recharge normale est
terminée (Recharge normale ).
Pour une recharge complète, qui permettra d’utiliser la
batterie plus longtemps, laissez la batterie en place encore
une heure environ (Recharge complète ).
Pour enlever la batterie
Faites glisser la batterie dans le sens opposé de l’insertion.
Temps de recharge
Le tableau suivant indique le temps de recharge quand la
batterie est complètement déchargée.
Batterie « InfoLITHIUM » série H
Batterie « InfoLITHIUM » série P
• Temps de recharge approximatif en minutes pour recharger
complètement une batterie vide (Temps de recharge complète).
• Les chiffres entre parenthèses indiquent le temps normal
(Temps de recharge normale).
• Voir le mode d’emploi de l’appareil photo utilisé pour
l’autonomie de la batterie.
• Le temps de recharge varie selon l’état de la batterie et la
température ambiante.
• Les temps indiqués correspondent à la charge d’une batterie
vide déchargée avec une caméra vidéo etc., à l’aide de cet
appareil à une température ambiante de 25 °C.
Température de recharge
La batterie peut être rechargée à une température comprise
entre 0 °C et 40 °C. Cependant, pour que son efficacité soit
optimale, il est conseillé de la recharger entre 10 °C et 30 °C.
Pour utiliser rapidement la batterie
Vous pouvez utiliser la batterie même si elle n’a pas été
complètement chargée. Son autonomie sera toutefois moins
grande.
Remarques
• Vérifiez si la batterie est bien fixée au chargeur si lorsque
témoin CHARGE ne s’allume pas.
• Quand vous insérez une batterie pleine dans le chargeur, le
témoin CHARGE s’allume puis s’éteint.
• Il faudra probablement plus de temps que d’habitude pour
recharger une batterie qui n’a pas été utilisée depuis
longtemps.
Si vous voyagez à l’étranger, n’utilisez pas le chargeur avec
un adaptateur de tension (adaptateur portatif). Cela peut
provoquer une surchauffe et des dysfonctionnements.
En cas de panne
Lorsque le témoin CHARGE clignote, consultez le tableau
suivant.
Lorsque vous chargez une batterie qui n’a pas été utilisée
pendant longtemps, il est possible que le témoin CHARGE
clignote dans certains cas.
Dans ce cas, retirez la batterie du chargeur, puis réinstallez-la
pour la charger à nouveau.
Si le témoin CHARGE reste allumé, vérifiez la batterie en
suivant la procédure suivante.
Spécifications
Tension déntrée Secteur 100 - 240 V 50/60 Hz 5W
Tension de sortie Borne de recharge de la batterie:
CC 8,4 V 350 mA
Température de fonctionnement
0 °C à 40 °C
Température d’entreposage –20 °C à +60 °C
Dimensions hors tout Env. 42 × 32 × 76 mm (l/h/p)
Poids Env. 60 g
La conception et les spécifications peuvent être modifiées sans
préavis.
Veuillez contacter votre revendeur Sony et lui apporter l’appareil qui ne
fonctionne pas.
Retirez la batterie chargée et remettez-la fermement en place.
Si le témoin CHARGE
clignote encore:
Installez une autre batterie
rechargeable.
Si le témoin CHARGE s’allume mais
ne clignote pas de nouveau:
Si le témoin CHARGE s’éteint parce
que la recharge est terminée, il n’y a
aucun problème.
Si le témoin CHARGE
clignote de nouveau:
Le problème vient de
l’appareil.
Si le témoin CHARGE s’allume mais
ne clignote pas de nouveau:
Si le témoin CHARGE s’éteint parce
que la recharge est terminée, le
problème vient de la première
batterie rechargeable installée.
Français
CHARGER V mark
Repère de
CHARGER V
CHARGE lamp
Témoin
CHARGE
Battery pack
Batterie
AC input terminal
Borne d’entrée CA
BATTERY V
mark
Repère de
BATTERY V
NOTICE FOR THE CUSTOMERS IN THE UNITED KINGDOM
A moulded plug complying with BS 1363 is fitted to this
equipment for your safety and convenience.
Should the fuse in the plug supplied need to be replaced, a fuse
of the same rating as the supplied one and approved by ASTA
or BSI to BS1362 (i.e., marked with or mark) must be used.
If the plug supplied with this equipment has a detachable fuse
cover, be sure to attach the fuse cover after you change the fuse.
Never use the plug without the fuse cover. If you should lose the
fuse cover, please contact your nearest Sony service station.
Battery Pack NP-FP50 NP-FP70 NP-FP90
Full charging time 185 315 490
Normal charging time (125) (255) (430)
Battery Pack NP-FH50 NP-FH70 NP-FH100
Full charging time 215 355 715
Normal charging time (155) (295) (655)
Batterie rechargeable NP-FH50 NP-FH70 NP-FH100
Temps de recharge
215 355 715
complète
Temps de recharge
(155) (295) (655)
normale
Batterie rechargeable NP-FP50 NP-FP70 NP-FP90
Temps de recharge
185 315 490
complète
Temps de recharge
(125) (255) (430)
normale