ƜƷƨƼƸŴ
ǛƝችᛠƷɥŴȬȳǺ
ϙჇજࢨǛƓಏƠLjƘƩƞƍŵ
ƢƷưŴ
ଢNjƋǘƤƯƝᚁƘƩƞƍŵ
ӲᢿỉӸᆅί
1
ὸ
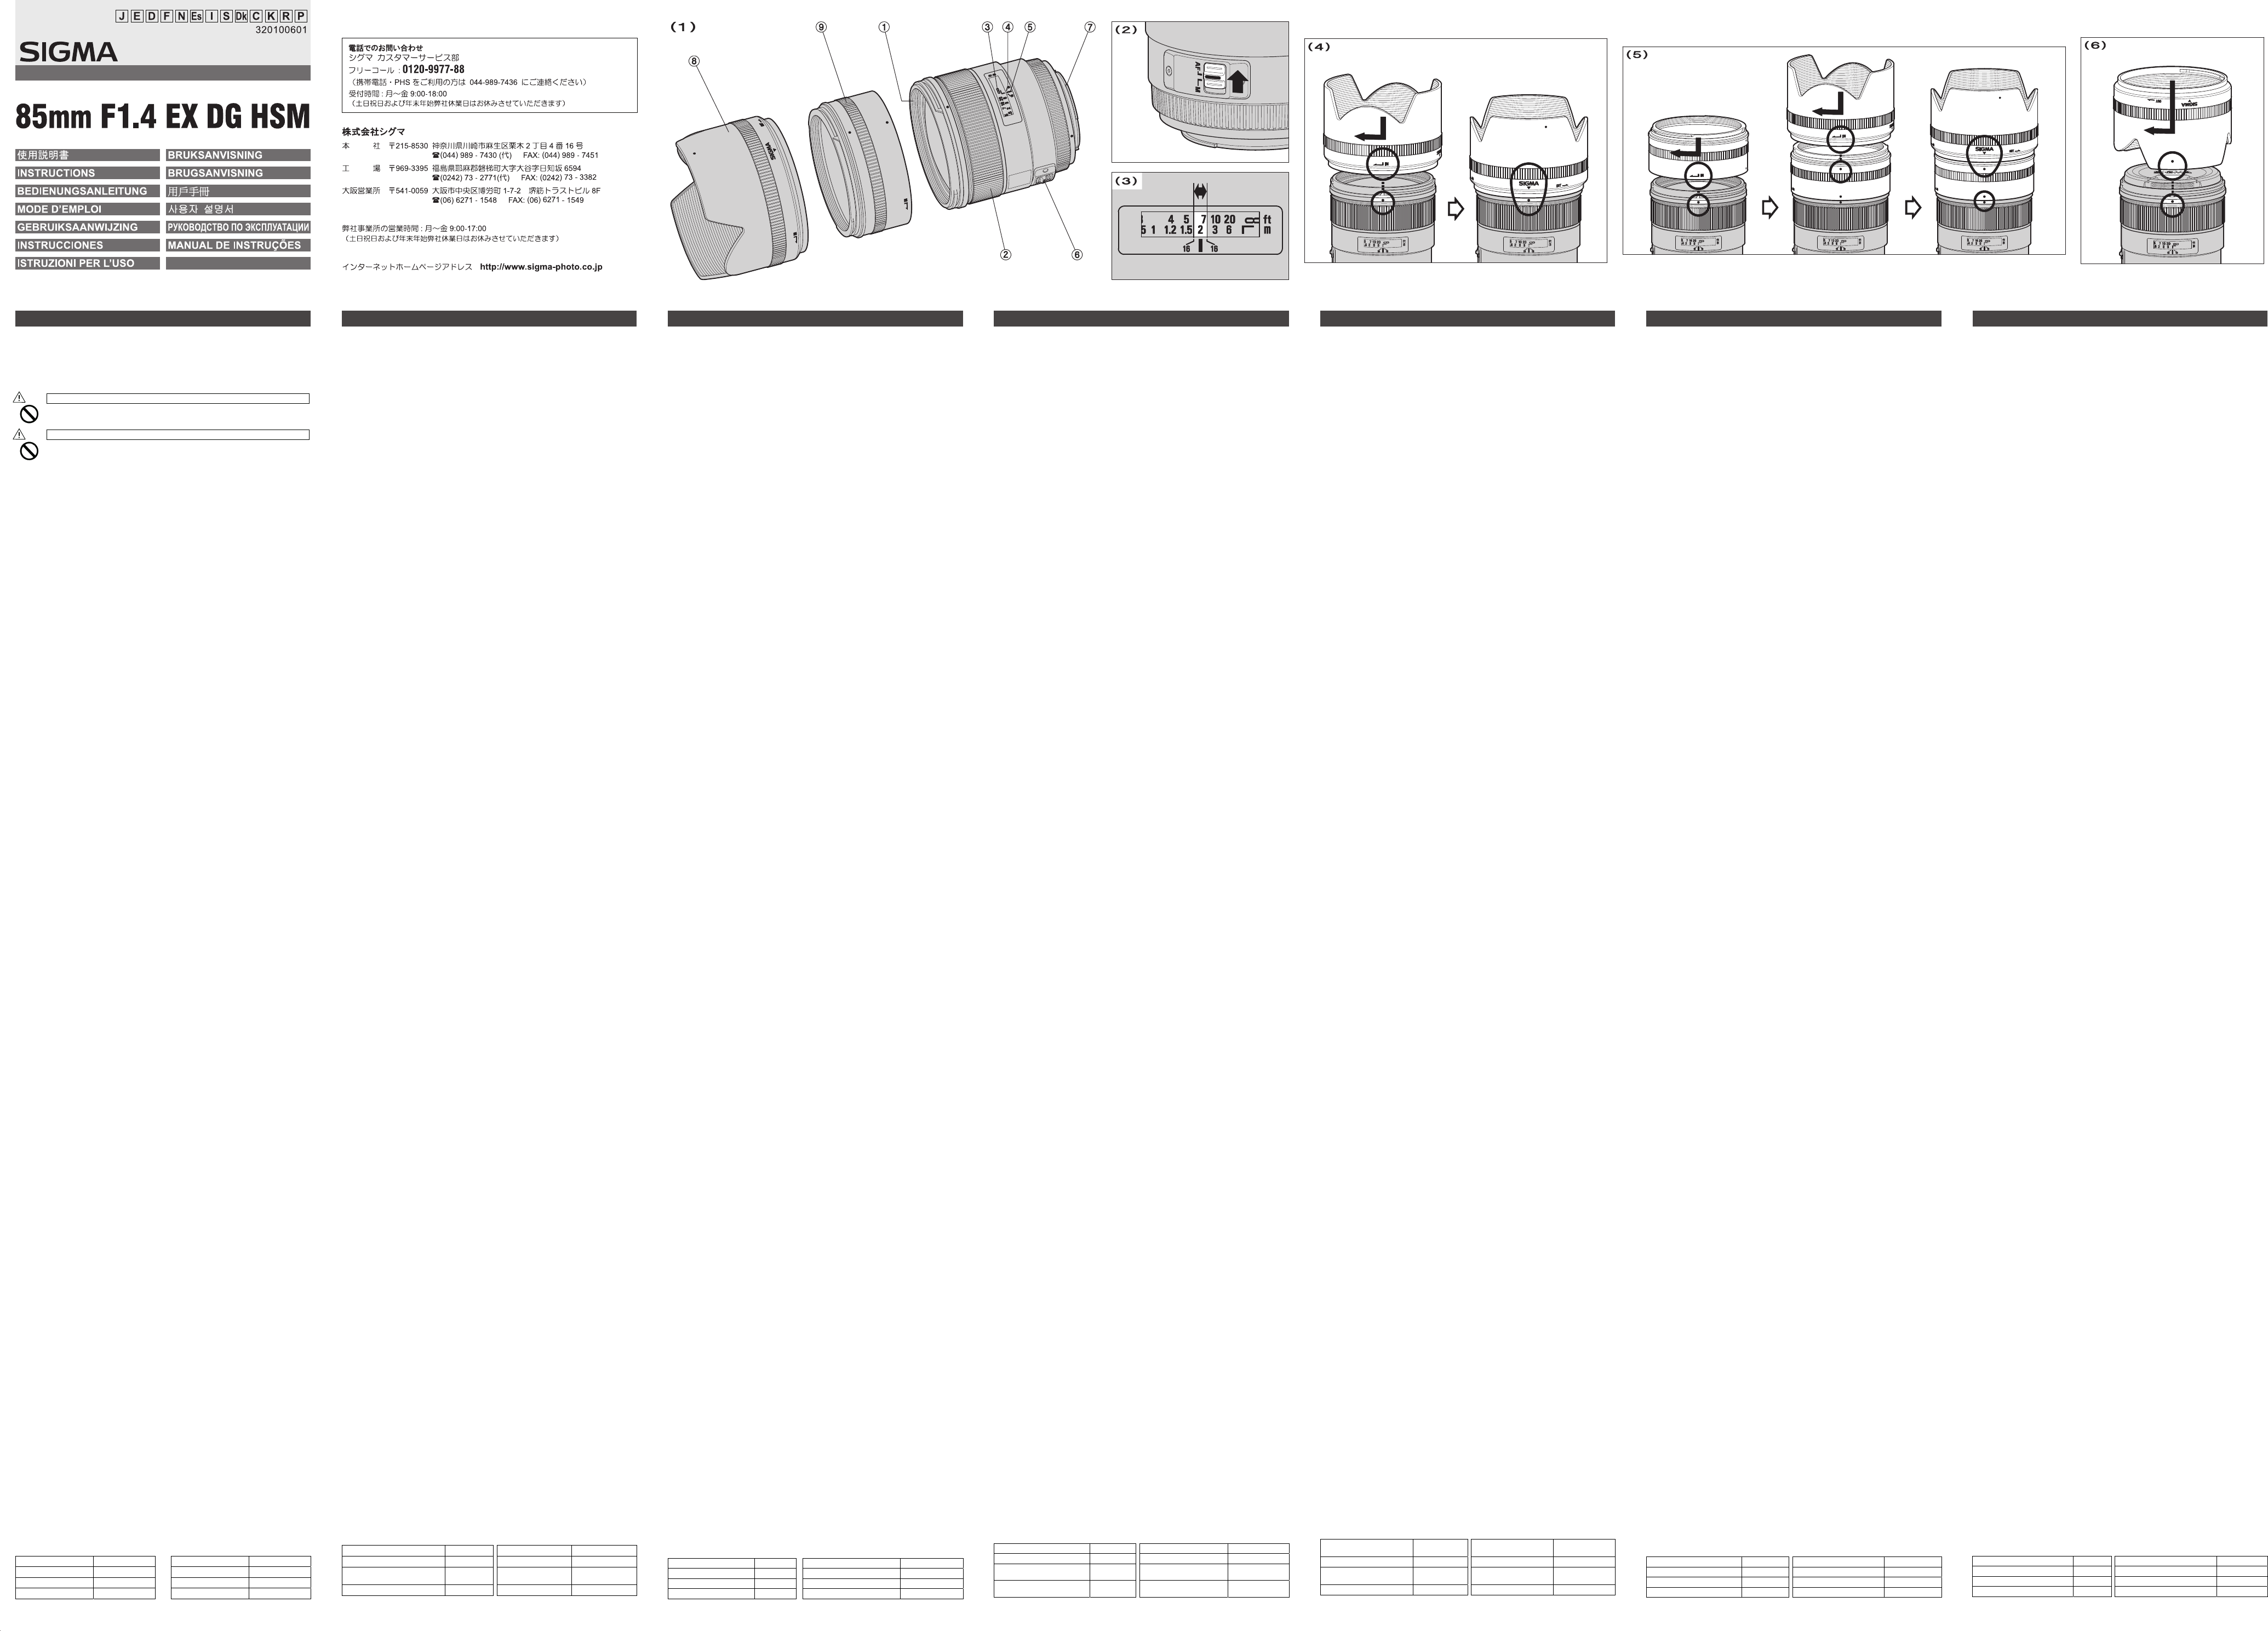
Ĭ ȕǣȫǿȸƶơ
ĭ ȕǩȸǫǹȪȳǰ
Į ᙀяႎុᩉႸႮ
į ᘮϙမขࡇႸႮ
İ ਦዴ
ı
ȕǩȸǫǹȢȸȉЏ੭ƑǹǤ
IJ ȞǦȳȈ
ij ȬȳǺȕȸȉ
Ĵ ȕȸȉǢȀȗǿȸ
Ἕἅὅ AF ဇỆếẟề
ƜƷȬȳǺƸŴȋdzȳᙌ AF ȬȳǺƴƓƚǔŴG ǿǤȗᲢǓȪȳǰƷƳƍǿǤ
ȗᲣƱӷሁƷˁಮƴƳƬƯƍLJƢŵ
ưǔئӳƕƋǓLJƢŵᛇƠƘƸƝ̅ဇƷǫȡȩƷᛟଢሁǛƝӋༀƘƩƞƍŵ
ἬὅἑἕἁἋ AF ဇỆếẟề
ƜƷȬȳǺƸŴȚȳǿȃǯǹᙌ AF ȬȳǺƴƓƚǔŴFA J ǿǤȗᲢǓȪȳǰƷ
Ƴ
ƍǿǤȗᲣ
ᨂƕưǔئӳƕƋǓLJƢŵᛇƠƘƸƝ̅ဇƷǫȡȩƷᛟଢሁǛƝӋༀ
ἾὅἌỉბᏮ૾ඥ
ǫȡȩǁƷბᏮ૾ඥƸŴƓਤƪƷǫȡȩƷᛟଢƴࢼƬƯƘƩƞƍŵ
ŦȞǦȳȈ᩿ƴƸǓᡲѣဇŴAF ᡲѣဇƷᘺፗǍŴ
ǕƕƭƘƱᛚ˺ѣǍᨦƷҾ׆Ʊ
ŦȪȤdzȳȐȸǿȸሁƷǢǯǻǵȪ
ӕǓ˄ƚưƖƳƍئӳǍᡲѣƠƳƍئӳƕƋǓLJƢŵƝទλЭƴӕǓ˄ƚŴӏƼ˺
ѣǛƝᄩᛐƘƩƞƍŵ
ᩧЈỆếẟề
ᩧЈƷൿܭ૾ඥƸŴƓਤƪƷǫȡȩƷᛟଢƴࢼƬƯƘƩƞƍŵ
ἦὅἚӳỪẶ
ẎἉἂἰ AF ဇẆỿἶἠὅ AF ဇẏ
ǪȸȈȕǩȸǫǹưજࢨƢǔئӳƸŴȕǩȸǫ AF
ƴǻȃȈƠLJƢ 2 Უ
ƑǹǤȃȁǛ M ƴǻȃȈƠŴȕǩȸǫǹȪȳǰǛׅƠƯȔȳȈǛӳǘƤLJƢŵ
ẎἝἅὅဇẆἬὅἑἕἁἋ AF ဇẆἏἝ
ǪȸȈȕǩȸǫǹưજࢨƢǔئӳƸŴǫȡȩǛ AF ȢȸȉƴǻȃȈƠƯŴȬȳǺ
ƷȕǩȸǫǹȢȸȉЏǓ੭ƑǹǤȃȁǛ AF ƴǻȃȈƠLJƢ 2 Უ
ưજࢨƢǔئӳƸŴ M ƴǻȃȈƠŴ
ǫǹȪȳǰǛׅƠƯȔȳȈǛӳǘƤLJƢŵ
Ŧ
ǫȡȩƷȕǩȸǫǹȢȸȉƷЏǓ੭ƑƸŴ
ŦȋdzȳŴȚȳǿȃǯǹŴǽȋȸဇƸŴឬ᪦ඬȢȸǿȸƴݣࣖƠƨǫȡȩƱƷኵӳƤ
ưǪȸȈȕǩȸǫǹજࢨƕӧᏡưƢŵឬ᪦ඬȢȸǿȸƴݣࣖƠƯƍƳƍǫȡȩƱƷ
ኵӳƤưƸŴȞȋȥǢȫȕǩȸǫ
ŦƜƷȬȳǺƸŴAF ƴǻȃȈ
ưƢŵ AF ȢȸȉƴǻȃȈƠƯŴ
ǿȳǛҞ
ƠƷLJLJưȕǩȸǫǹȪȳǰǛׅƠƯȔȳȈǛᛦૢƠƯƘƩƞƍŵ
ŦȞȋȥǢȫưȔȳȈǛӳǘƤǔᨥƴƸŴႸႮƕĐᲢᨂᢒᲣƷˮፗưNjᢒƴȔȳ
ȈƕӳǘƳƍƜƱƕƋǓLJƢƷưŴȕǡǤȳȀȸưᄩᛐƠƳƕǒȔȳȈǛӳǘƤƯ
ƘƩƞƍŵ
ᘮϙမขࡇႸႮ
ᘮϙမขࡇႸႮƴǑƬƯŴƓƓǑƦƷᘮϙမขࡇᲢȔȳȈƷӳƬƯᙸƑǔርᲣ
ǛჷǔƜƱƕưƖLJƢŵ 3 ᲣƸŴǓǛ F16 ƴƬƨئӳƷᘮϙမขࡇǛᅆ
ƠƯƍLJƢŵ F1 ƷLjưƢŵ
ἾὅἌἧὊἛ
ȬȳǺȕȸȉƸŴ
૾ඥƸŴ
ܱƴӕǓ˄ƚƯƘƩƞƍŵ 4 Უ
Ŧ
ƜƷȬȳǺƸ
APS-C
ǵǤǺજእ܇ƷȇǸǿȫǫȡȩƱƷኵӳƤư̅ဇƢǔᨥƴ
Ŵ
Ǒ
Ǔ᭗ƍᢚήјௐƕࢽǒǕǔȕȸȉǢȀȗǿȸǛ˄ޓƠƯƍLJƢ
ŵ
5
Უ
ƷǑƏƴŴȬ
ȳǺƱȬȳǺȕȸȉƷ᧓ƴȕȸȉǢȀȗǿȸǛӕǓ˄ƚƯ̅ဇƠLJƢŵ
ŦȕȫǵǤǺŴ APS-H ǵǤǺ
ဇƷئӳƸȬȳǺȕȸȉҥ˳ưƝ̅ဇƘƩƞƍŵȕȸȉǢȀȗǿȸǛ̅ဇƢǔƱŴ
ဒ᩿ƴDZȩȬƕဃơLJƢŵ
Ŧ
ઃ࠘ƴƸŴȬȳǺȕȸȉǛᡞƞƴƸNJᡂLjŴᚘ૾ӼƴׅƠƯӕǓ˄ƚǔƜƱƕư
ƖLJƢᲢ
6
ᲣᲢȬȳǺƴȕȸȉǢ
ȸƷέᇢƴȬȳǺȕȸȉƷᡞƞ˄ƚŴƓǑƼȬȳǺǭȣȃȗƷӕǓ˄ƚƕưƖLJƢŵᲣ
ἧỵἽἑὊ
Ŧဒ᩿ԗᡀƕƚǒǕǔऀǕƕƋǔƷưŴ
ƘƩƞƍŵ
Ŧ͞ήȕǣȫǿȸǛ̅ဇƢǔئӳƸŴPL Უ
ƘƩƞƍŵ
ŦȕȸȉǢȀȗǿȸǛƝ̅ဇƷئӳưNjŴ
ƴӕǓ˄ƚƯƘƩƞƍ
ŵ
ȕȸȉǢȀȗǿȸƴӕǓ˄ƚǔƱ
Ŵ
ဒ᩿ƴDZȩȬƕဃ
ơǔऀǕƕƋǓLJƢ
ŵ
̬ሥẆӕৢɥỉදॖ
ŦൢƸǫȓǍᥢƷҾ׆ƱƳǓLJƢŵᧈ᧓̅ဇƠƳƍئӳƸŴ
ࣱ݅Ʒᑣƍܾ֥ƴλǕƯ̬ሥƠƯƘƩƞƍŵȊȕǿȪȳሁŴ
ƴƸ̬ሥƠƳƍưƘƩƞƍŵ
ŦȬȳǺ᩿ƴƸႺਦưᚑǕƳƍưƘƩƞƍŵǴȟǍ൲Ǖƕ˄ƍƨƱƖƴƸŴ
ȭǢȸƔȬȳǺȖȩǷưӕǓᨊƍƯƘƩƞƍŵਦƷួƳƲƸŴ
ȪȸȊȸ෩ƱȬȳǺǯȪȸȋȳǰȚȸȑȸư
ǷȳȊȸሁƷஊೞ๋дƸዌݣƴ̅ǘƳƍưƘƩƞƍŵ
ŦƜƷȬȳǺƸ᧸൦ನᡯưƸƋǓLJƤǜŵᩋټǍ൦ᡀưƷ̅ဇưƸŴ
ǑƏƴදॖƠƯƘƩƞƍŵ൦ƕȬȳǺϋᢿƴλǓᡂljƱŴ
ƳǓŴ̲ྸɧᏡƴƳǔئӳƕƋǓLJƢŵ
Ŧ࣯ນƳภࡇ٭҄ƴǑǓŴȬȳǺϋᢿƴ൦ƕဃơǔƜƱƕƋǓLJƢŵ
Ɣǒଡ଼ƔƍܴϋƴλǔƱƖƳƲƸŴDZȸǹǍȓȋȸȫᘥƴλǕŴ
ƳơLJƤƯƔǒƝ̅ဇƘƩƞƍŵ
Լឋ̬ᚰểỴἧἑὊἇὊἥἋỆếẟề
Լឋ̬ᚰƱǢȕǿȸǵȸȓǹƴ᧙ƠƯƸŴ
ɼễˁಮ
ȬȳǺನᲢ፭ᲧᲣ 8Ყ11இٻજࢨ̿ྙ 1:8.6
ဒ ᚌ 28.6° ȕǣȫǿȸǵǤǺ 77mm
இݱǓ 16 இٻࢲ X μᧈ 86.7
x
87.6mm
இჺજࢨុᩉ 85cm 725g
ٻƖƞƞƸŴǷǰȞȞǦȳȈƷNj
ଐ
ӕǓৢƍǛᛚǔƱŴ̅ဇᎍƕͻǛƏӧᏡࣱƕƋǓLJƢŵ
Š
ȬȳǺǛ˄ƚƨǫȡȩưŴ
ǓLJƢŵཎƴȬȳǺҥ˳ưٽᨗǛႺ
⼊๔
ӕǓৢƍǛᛚǔƱŴ̅ဇᎍƕᨦܹǛƏƔŴཋႎܹƕႆဃƢǔӧᏡࣱƕƋǓLJƢŵ
ŠЭࢸƷǭȣȃȗǛƸƣƠƨLJLJȬȳ
ྵᝋǛƓƜƠŴ້໎ƷҾ׆ƴƳǔئ
Š
ȞǦȳȈᢿƸᙐᩃƳ࢟ཞǛƠƯƓǓLJƢ
ŠɤᏩƸҗЎƴࢍࡇƷƋ
ƱŴ᠃͂ƢǔऀǕƕƋǓLJƢŵ
ᵈᗧ
Thank you
performance and
booklet thoro
DESCRIPTION OF THE P
Ĭ
Filter Attachment Thread
ĭ Focus Ring
Į Distance Scal
į
Depth of Field
İ
ı
IJ Mount
ij Lens Hood
Ĵ
APS-C Hood
NIKON A
This lens
an aperture ri
combination. F
PENT
This Lens fu
Pentax lens. De
its functi
the camera
A
When this lens i
same way as y
camera body
ŦOn the lens
contact
damaging the l
while changi
ŦMany accessor
are specially
accessories,
and that the
SETTING THE EXPOSURE MODE
The sigma l
refer to the camera inst
FOCUSING
This lens fe
quick and qu
䇶SI䇷
For autofocus AF”
position (fi
lens toM ” position.
䇶NIKON A䇷
For autofoc
switch on the lensAF ” position (fig.2). If y
the focus modM ” posit
by turning th
ŦPlease refer
camera’s
ŦFor Nikon, Pe
bodies which
will not funct
ŦThis lens a With the
camera set to
override the
ŦWhen opera
correct focu
distance
changes in t
expand
DEPTH OF FIELD SCALE
The depth
sharpness)
is shown w
LENS HOOD
A
to prevent flare
and turn cloc
ŦThe APS-C Hood Adapter is this lens.
hood adapte
provides more ef
between the
ŦWhen using this
image sensor as well as film cameras, please do not at
Adapter
will occur
ŦIn order to
remove the ho
possib
to the tip of the APS-C Hood Adapter
attached
FIL
ŦOnly one filter sh
thicker filt
ŦWhen using
ŦWhen using filters with the APS-C Hood Adapter
filter att
APS-C Hood
BASIC CARE
ŦAvoid a
humidity
ŦFor extend
ventilation. T
naphthalene ga
ŦDo not use th
finger print
cloth or lens tissue.
ŦThis lens is no
keep it from gettin
lens element
ŦSudden tempe
surface
advisable to
approaches ro
TECHNICAL
Lens construction 8 – 1 Magnification 1: 8.6
Angle of View 28.6° Filter Size 77mm
Minimum Aperture 16
Dimensions
Dia.g Len
th
86.4g 87.6mm
3.4g 3.45 in
Minimum Focusing Dist 85cm (2.8 f Weight 725g (25.6 oz)
Dimensions and weight include th
ENGLISH
Wir dank
Produktes erw
Benutzung d
BESCHREIBURUNG DER TEILE (Abb.1)
Ĭ Filtergewind
ĭ Entfer
Į Entfernu
į Schärfentief
İ Einstellind
ı Fokussiersc
IJ Anschluß
ij Gegenlichtbl
Ĵ Gegenlichtbl
für das APS-C Format.
KAMERAS VOM TYP NIKON
Dieses Obj
ohne Blendenri
können einige Fun
schlagen Sie
KAMERAS VOM TYP PENT
Dieses Obje
T
Kamera könne
hierüber sch bitte in der Bedienungsanleitung der verwen nach.
ANSETZEN AN DAS
An die Kamera a
Normalobjektiv
Kamera.
Halten Sie die Kontakte und Kupplungselemente am Objektiv
S
eine Beschädingung der
Vieles zur V
wie T
Prüfen Sie deshalb
damit kompatibel u
EINSTELLEN DER BETRIEBSART
Das SIGMA
automatisch zur V
der Kamera.
EINSTELLUNG VON SCHÄRFE
Dieses Objek
(HSM).
䇶
SIGMA
䇷
Für die autom
Objektiv auf die “AF”-Position (Abb
wollen, schaltM ”-Position. Sie
können die S
䇶
NIKON AF
䇷
Für die automat
AF-Betrieb und
“AF ”-Position (Abb.2). S
Sie den FokuM ”-Position. Sie kö
Schärfe nun
Hinweise zum We
der Bedienungsanleitung
Bei Nikon, Pentax
benutzt werden, die Ultraschallmo
wird nicht funktionieren, wenn die
Dieses Objektiv kann auch man
AF-Betriebsart eingestellt
ist, können Sie, na
zum S
einstellen. Der
Bei manueller Fokussierung sollte die Schärfe auf der Mattscheibe e
da durch T
auftreten können
SCHÄRFENTIEFESKALA
Die Schärfent
Ihrer Ei
Schärfentief
GEGENLICHTBLENDE
Eine abnehmb
Objektivs. Die Ge
die durch S
entsprec
Uhrzeigersi
Der Gegenlichtblenden-Adap
Wenn Sie den Geggitalkameras mit APS-C zum Einsatz
bringen, bewirkt dieser ei
den Gegenlichtblenden-Adapter zwischen Objektiv und Gegenlichtb
Abb.5
).
Wenn Sie
oder Analog-Kameras anse
bitte nicht. W
Kameras zum Einsatz bringen, würde
Wenn Sie das Obje
entfernen Sie zuerst die Gegenlichtblende vom Ob
,
um sie anschließend in umgekehrter
Position auf dem
umgekehrter Position au
Frontde an dem am O angebrach Gegenlichtble anzub
FIL
Bei Einsatz von Pol
ausschließlich Zirkular-Polfilter
Autofokus und Belichtungsautoma
V
stärkere S
Filterfassung — kö
Wenn Sie zusammen mit dem Ge
schrauben Sie den
Sie den Filte
hervorrufen.
PFLEGE UND
Setzen Sie das Objektiv
T
Wählen Sie für lä
belüfteten Ort.
Dämpfe die V
V
keinesfalls V
sauberes, feuchtes Optik-Reinigungstu
Das Objektiv ist ni
Regen oder in der Nähe v
Objektives mit W
T
führen. Beim W
Objektiv solange im Köch
Zimmertemperatur angenommen hat.
TECHNISCHE DA
Glieder – Linsen 8 – 1
Größter Ab
1: 8.6
Diagonaler Bildwinkel 28.6° Filterdurchmesser 77mm
Kleinste Blende 16
Abmessungen Ø ×
Baulänge
86.4g 87.6mm
Naheinstellgrenze 85cm 725g
Abmessungen und Gewicht b
DEUTSCH
Nous vous remer
profit et le plus
d’emploi avant tou
DESCRIPTION DES ELEMENTS (fig.1)
Ĭ Filetage po
ĭ
Į
į
champ
İ Repère de dist
ı
IJ Baïonnette
ij Pare-Soleil
Ĵ Adaptate
APS-C
POUR LES BOITIERS NIKON A
Cet objectif
autofocus N
en foncti
d'emploi du boî
POUR LES BOITIERS PENT
Cet objectif
autofocus PE
possibles
reporter au mo
FIXA
Lorsque l’object
avec vos obj
l’apparei
Sur la monture se tro
Gardez-les bi
jamais l’objecti
Il existe de m
etc... Av
objectif Sigma.
REGLAGE DU SYSTEME D’EXPOSITION
Cet objectif Sigma fon
V
MISE AU POINT
Cet objectif est
Motor” (HSM). Elle rend la m
䇶SIGMA䇷
Pour une mise a
position “AF ” (fig.2). Pour un
position “M ” po
䇶NIKON A䇷
Pour une mise
sélecteur de misAF ” (fig.2). Pour une mise au point
manuelle, plM ” position, et ajuste
tournan
V
mise au point d
Dans les v
possible qu'
ultrasonique
avec les autr
Cet objectif pe
l’apparei
retoucher la mise au po
point automatique
En cas d’utili
recommandé de
effet,
modifications
point. Une toléran
ECHELLE DE PROFONDEUR DE CHAMP
L'échelle de
(zone de ne
profonde
PA
Un pare-sol
réflexions i
pare-solei
d'une montre
Un adaptateur pou
meilleure ef
pourvu d'un capteu
(fig.5)
N'utilisez p
APS-H, ou avec un app
indésirable.
Pour ranger
placez- (il est po
en position
maintenu
FIL
N’employez jam
filtre très ép
vignett
Si vous so
type “circulai . Avec un filt
d’exposition po
Les filtres doiv
l'adaptateur APS-C est plac
d'apparaît
PRECAUTIONS ELEMENT
Ne pas
l’humidité.
Si l’objectif n’
bien vent
anti-mites afin
Ne pas
nettoyage de
Cet objectif
l’eau, veuill
élément
possibles en
Des écart
la buée pe
local chauf
l’objectif dans un étu
CARACTERISTIQUES
Construction de l’ 8 – 1 Rapport de reproduction 1: 8.6
Angle de champ 28.6° Diamétre de filtre 77mm
Ouverture minimale 16
Dimension:
diamentre×longueu
86.4g 87.6mm
Distance minimale de mise
au point
85cm Poids 725g
Dimensions et poids donnés pour l
FRANÇAIS
Wij stellen het
maximaal profijt e
deze gebruiksa
gebruiken.
BESCHRIJVINS V
Ĭ Filterschroef
ĭ Scherps
Į Afstan
į Scherptedie
İ Index te
ı
Scherpstelkeuze schakelaar
IJ V
ij Zonnekap
Ĵ
APS-C zonnekap-adapter
NIKON AF CAMERA
Dit objec
diafragmaring)
er enkele beper
camera.
PENT
Dit objec
diafragmaring)
kunnen er enkele
van uw camer
BEVESTIGING OP
Wanneer uw Sigma obje
automatisch net Le
gebruiksaanw
ŦOp de vatti
Deze moeten
verzekerd te
voorzijde en
ŦV
voor bepaal
aanschaf
gecombineerd ka
BELICHTINGSINSTELLING
Wanneer een Sigma obje
geheel automatis Lees hie
SCHERPSTELLEN
Deze lens heef De HSM
maakt snel en geluidlo
䇶Sigma A䇷
Om de autofocus fun
AF postitie te zetten.
objectief op de M
te draaien.
䇶Nikon 䇷
Om de autofocus fun
camera op AF positie te zetten (fig.
het schuiM positie. V
door aan de f
Raadple
instellingen
V
met de camera welke
AF zal niet f
Handmatig s
de camera o
eventueel handm
heeft ge
Wanneer .u dit object
correcte sc
mogelijke scherp
waardoor mee
instelling op
SCHERPTEDIEPTE SCHAAL
De scherptedi
scherpte zone
zone aangeg
ZONNEKAP
Bij het obj
“flare”
draai deze met
ŦBij het objec
met de zonnekap bij camera
bescher
zonnekap-ad
ŦGebruik
digitale camera’s met een fu
dat geval zal
ŦIndien u
zonnekap te v
(fig.6). (
zonnekap-ad
FIL
ŦGebruik slecht
filters-zoals ee
ŦGebruik uit
autofocus came
wordt gebruik
belichtingsre
ŦDe zonnekap
kunnen plaat
ONDERHOUD EN OPSLAG
ŦV
lage temperatu
ŦIndien h
koele, droge
beschadigin
naft
ŦGebruik geen thin
vuil of vingeraf
daarvoor een spe
ŦDit objectief is Zorg er bij regen of in de
voor dat het niet
electrische c
gevallen niet
ŦPlotselin
oppervlak v
buitenlucht, i
temperatuur
TECHNISCHE GEGEVENS
Lensconstructie
(groepen – elementen)
8 – 1
Maximale vergrotings
maatsta
1: 8.6
Beeldhoek 28.6°
Kleinste diafragma 16
Afmetingen
(diam.g lengte)
86.4g 87.6mm
Kortste instela 85cm Gewicht 725g
Opgegeven afmetingen en g
NEDERLANDS
Le agradecemos la compr Para conseguir los mejores
resultad
utilizarlo.
DESCRIPCION DE LOS COMPONENTES (fig.1)
Ĭ
ĭ Aro de enfoque
Į
į
Indice de p
İ
ı Selector de enfoq
IJ Montura
ij Paraso
Ĵ
Adapt
CÁMARAS TIPO
Éste objetiv
focus de Nik
algunas re
instruc
CÁ
Éste objetiv
auto focus
aparece
instruc
CONEXION A
Cuando el o
objetivos ori Consulte el man
ŦEn la superfi
acoplador
Para pre
cambie de optica.
ŦAlgunos acc
especialmente di
accesorios, com
MODE A
Los objetiv
Por favor
ENFOQUE
Este objetiv
proporciona
䇶
SIGMA
䇷
Para utilizar el autofAF ” (fig.2).Si quiere
enfocar manM”
moviendo el aro de enf
䇶
NIKON A
䇷
Para utilizar
la ópticAF ” (fig.2). Si quiere enfocar
selectM ”.
Para cambiar el modo de enf
instruc
En las monturas
soporten
contrario el
Este objetiv
automático.
(AF-S) puede
enfocado au
suavemente pres
Cuando ut
comprobar v
debido a que los
internos se exp
distanci
ajuste
ESCALA
La escala de pr
(zona enfoca
zona de prof
PA
Este objetiv
parasol ay
gire en sentido horar
El adaptador APS-C s
protección m
sensor de imagen con tamaño APS-C. Po
APS-C entre e
Cuando se u
cuadro co
monte el adaptador APS-
mencionadas, se pro
A
volver a col
parasol
adaptador APS-C montado en el objetivo.)
FIL
ŦSolamente
especialmente
ŦCuando utilice un filtr
circula Si ut
la exposición aut
ŦCuando use f
para el tipo de
producir
CUIDADOS BA
ŦEvite los golpes o la ex
humedad
ŦEn caso de alm
preferiblement
de los
ŦNo utilice diluy
suciedad de l
limpia objetiv
ŦEstos objetiv Cuando los utilic
del agua, aseg
reparar l
eléctricos daña
ŦSi hay cambios s
la superficie Cuando entre
un lugar frío, es
temperatura se
CA
Construcción del o 8 – 1 Ampliación 1: 8.6
Ángulo de visión 28.6° Diámetro filtro 77mm
Apertura mínima 16
Dimensiones (d
g
long)
86.4g 87.6mm
Distancia mínima 85cm Peso 725g
Dimensiones y peso incluyen montura SIGMA.
ESP
Vi ringr
obiettivo S
istruzioni prima
ottenerne le mi
ELEMENTI CONSTITUTIVI (fig.1)
Ĭ
ĭ
Ghiera di messa a fuoco
Į
į
di campo
İ
ı Selettore di fuoco
IJ Innesto
ij Paraluce
Ĵ Adattato
per APS-C
FOTOCA
Il funzionam
Nikon aut
sulla qual
maggiori dett
FOTOCA
Il funzionam
PENT
fotocamera sull
attive. Per mag
APPLICAZIONE SUL
Una volta ch
funzionerà aut
istruzioni pe
ŦLa superficie dell’
elementi di ac Vi raccoma
sono molto del
l’obiettivo su
lente f
ŦDiversi compleme
i tubi estenso
Prima di procu
Sigma sia comp
cui tratt
IMPOST
Una volt
Si consultino
M
Questo obiettiv
più veloce e
䇶SIGMA䇷
Per attivare l’Auto
posizione “AF ” (fig 2). Quando si desi
scegliere, sulM ”. In
ruotando
䇶NIKON A䇷
Per attivare
sull’obiettivAF ” (fig.2). Quando si desider
manualmente, M ”. In qu
fuoco ruo
ŦConsultare
messa a fuoco.
Ŧ
Per atta
il corpo
AF non è po
ŦQuesto obiettiv
autofocus i
funzionamento O
pulsante di
automatica (con su
messa a fuoco m
ŦSe usate l’ob
quadro mediant
L
ai quall il pian
temperatura, p
dilatar
prevista un
SCALA
La scala delle p
fuoco della fotogra
visualizzat
P
Assieme all’
serve a prev
Inserire il p
ŦL
assieme alle fotoca
delle luci. In
ŦQuando si usa qu
formato APS-H, l’adatt
risulterà v
ŦQuando si ripone
rimetterlo al cont
con il coperchiet
FIL
ŦSi può usare u
molto spessi (
ŦSe volete ad
tipo “circolar
funzionamento
ŦQuando si u
avvit
l’immagine sarà vign
CURA
ŦProteggete l’
temperature o umidit
ŦIn previsione
posto fresco,
di canf
ŦNon usate s
eliminare dagli el
invece con u
ŦL
la pioggia o v S
i componenti
da renderne impossi
ŦImprovvisi sb
provocare l
mentre fuori fa m
custodia finché la s sa adattata alla te
CARA
Costituzione ottica (G
8 – 1 Rapporto d’ingrandim. 1: 8.6
Angoli di campo 28.6° Diamentro filtri 77mm
Apertura minima 16
Dimensioni (diametro lunghezza)
86.4
g
87.6mm
Distanza min. messa fuoco
85cm Peso 725g
Dimensioni e pesi s’intendono com
IT