ƜƷƨƼƸŴ
ǛƝችᛠƷɥŴȬȳǺ
ϙჇજࢨǛƓಏƠLjƘƩƞƍŵ
ƢƷưŴ
ଢNjƋǘƤƯƝᚁƘƩƞƍŵ
ӕǓৢƍǛᛚǔƱŴ̅ဇᎍƕͻǛ
ŠȬȳǺǛ˄ƚƨǫȡȩưŴٽᨗǍࢍƍήเ
LJƢŵཎƴȬȳǺҥ˳ưٽᨗǛႺᙸǔƱŴڂଢƷҾ׆ƱƳǓLJƢŵ
ӕǓৢƍǛᛚǔƱŴ
ŠȬȳǺŴLJƨƸȬȳǺǛ˄ƚƨǫȡȩǛŴ
ƍưƘƩƞƍŵٽᨗƷήƕᨼήྵᝋǛឪƜƠŴ້໎ƷҾ׆ƱƳǔئӳƕƋǓLJƢŵ
ŠȞǦȳȈᢿƸᙐᩃƳ࢟ཞǛƠƯƓǓLJƢƷưŴ
ŠɤᏩƸҗЎƴࢍࡇƷƋǔNjƷǛƝ̅ဇƘƩ
᠃͂ƢǔऀǕƕƋǓLJƢŵ
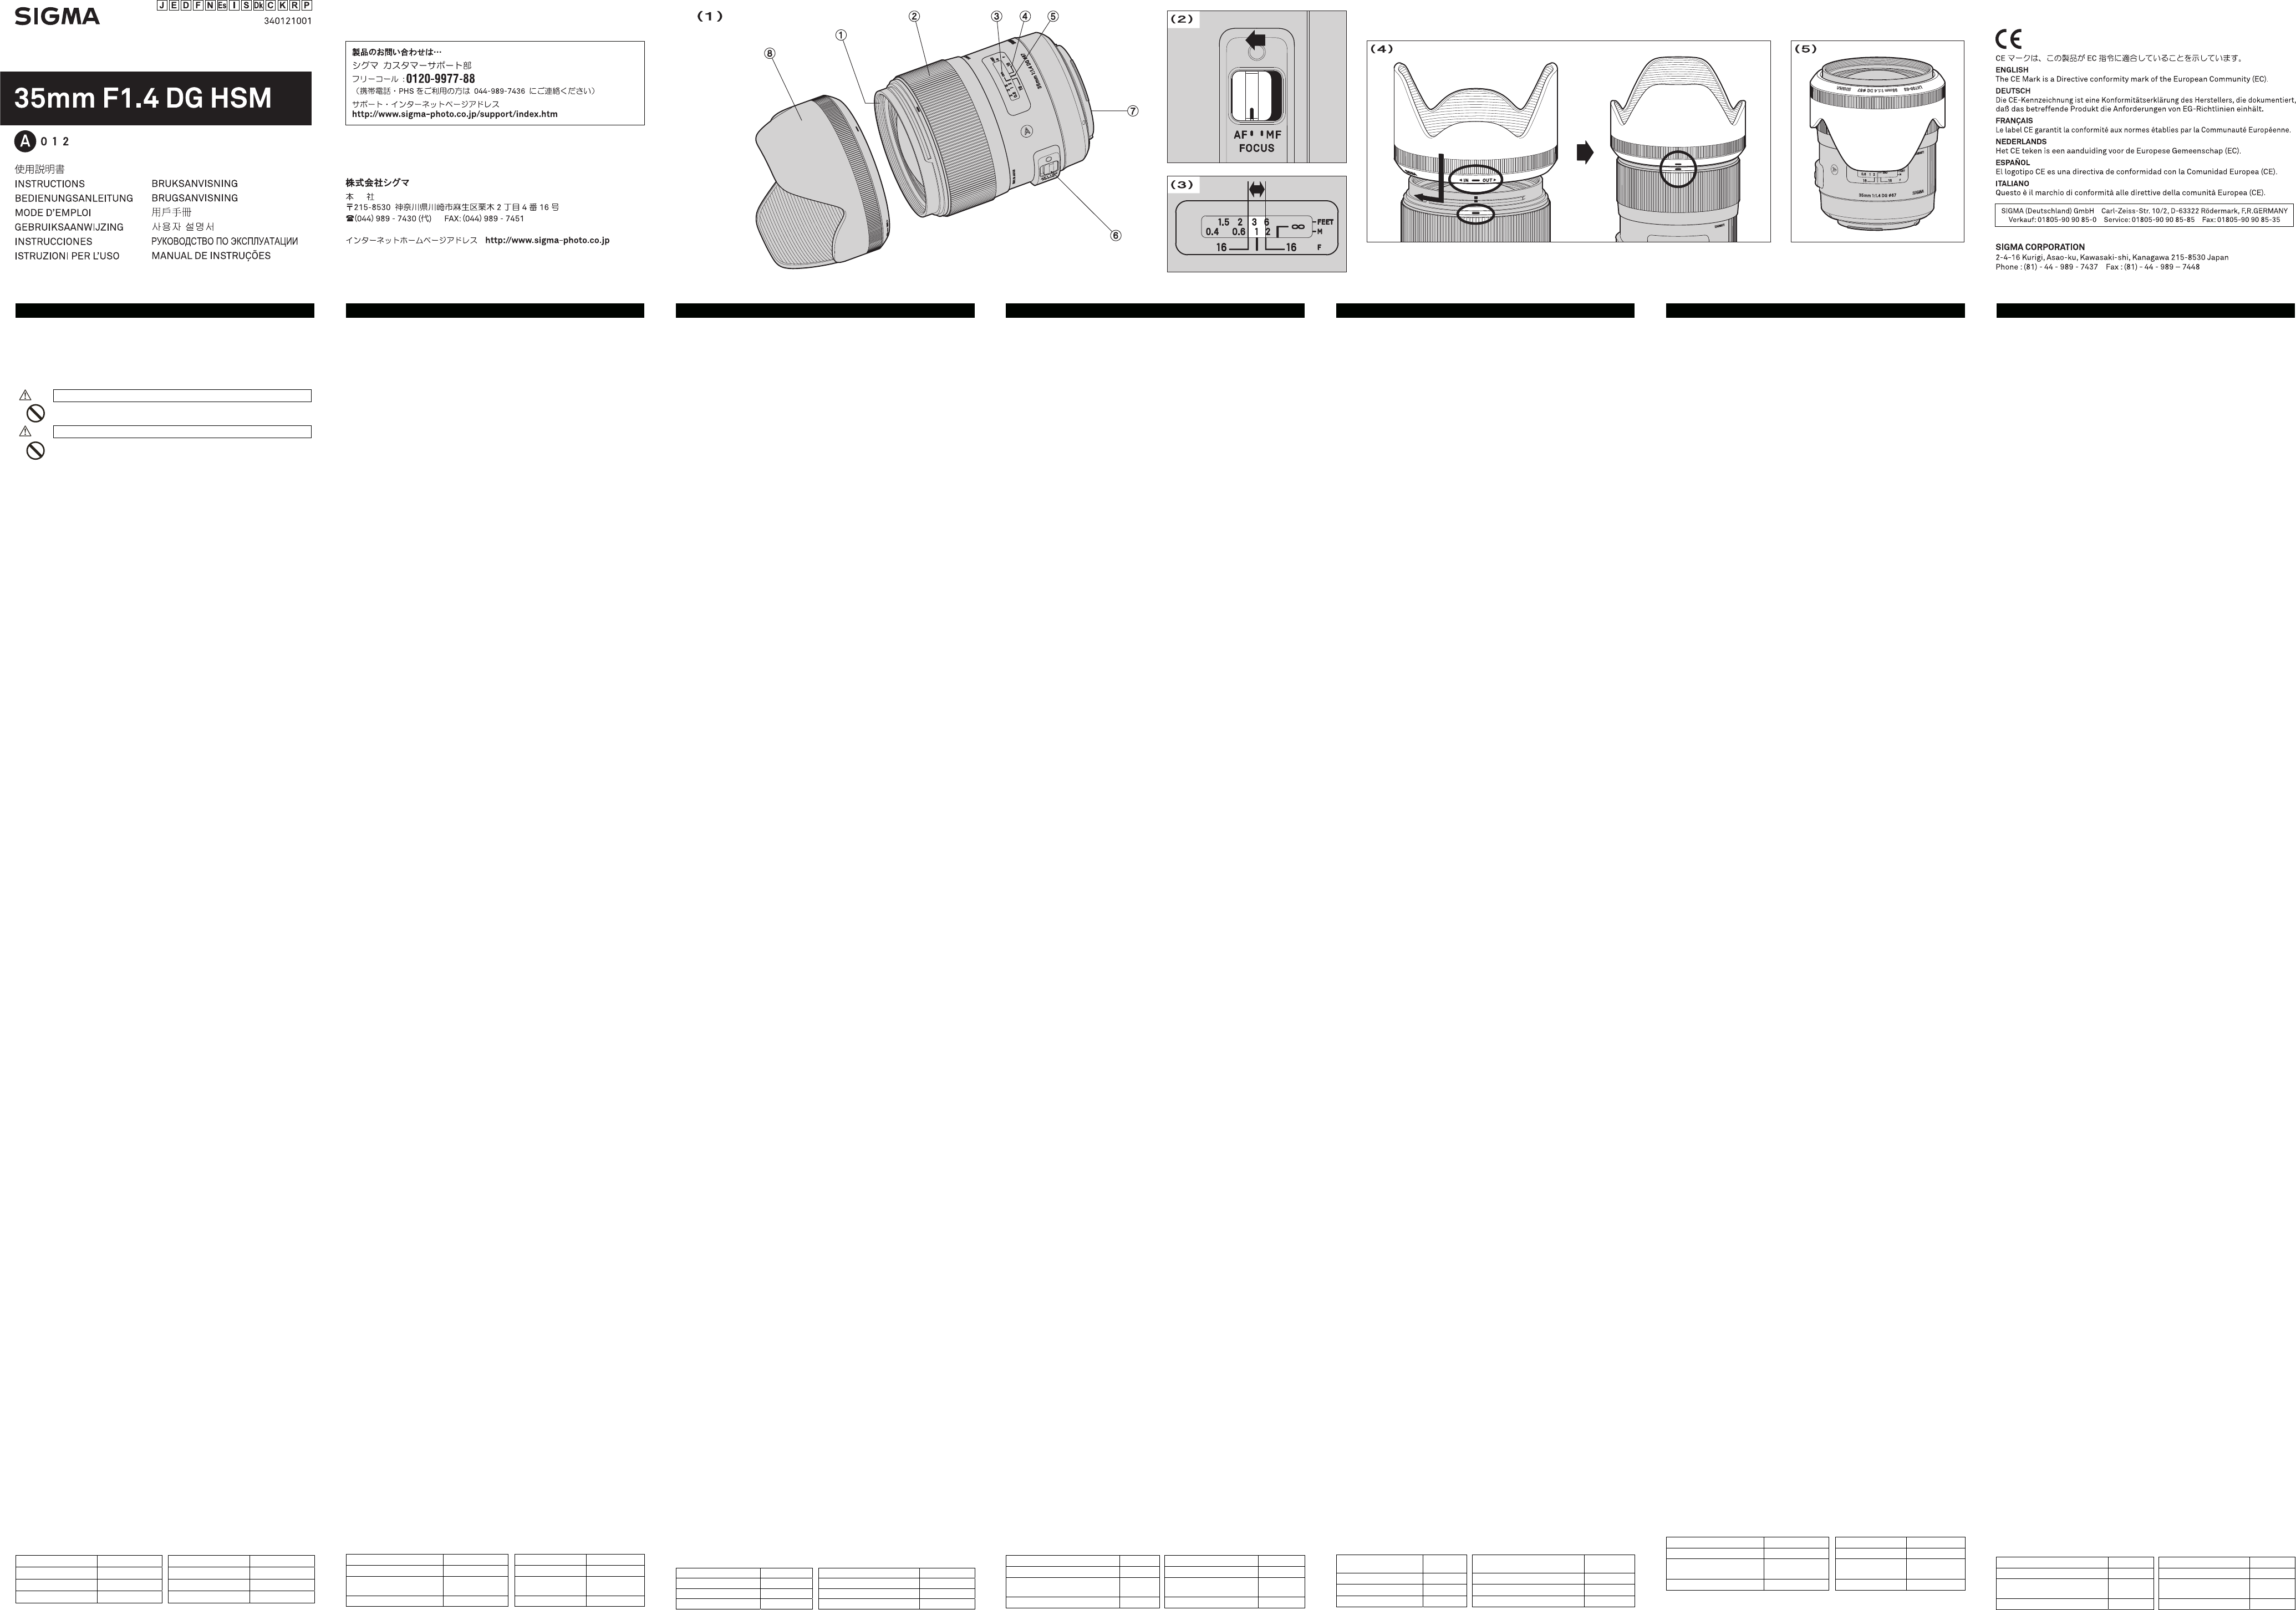
ӲᢿỉӸᆅί
1
ὸ
Ԙȕǣȫǿȸƶơ
ԙȕǩȸǫǹȪȳǰ
ԚᙀяႎុᩉႸႮ
ԛᘮϙမขࡇႸႮ
Ԝਦዴ
ԝȕǩ
ȸ
ǫǹȢ
ȸ
ȉЏ੭ƑǹǤȃȁ
ԞȞǦȳȈ
ԟȬȳǺȕȸȉ
Ἕἅὅ AF ဇỆếẟề
ƜƷȬȳǺƸŴȋdzȳᙌ AF ȬȳǺƴƓƚǔŴG ǿǤȗᲢǓȪȳǰƷƳƍǿǤ
ȗᲣƱӷሁƷˁಮƴƳƬƯƍLJƢŵ
ưǔئӳƕƋǓLJƢŵᛇƠƘƸƝ̅ဇƷǫȡȩƷᛟଢሁǛƝӋༀƘƩƞƍŵ
ἬὅἑἕἁἋ AF ဇỆếẟề
ƜƷȬȳǺƸŴ
AF
ȬȳǺƴƓƚǔŴ
FA J
ǿǤȗ
ƍǿǤȗᲣ
ƕưǔئӳƕƋǓLJƢŵᛇƠƘƸƝ̅ဇƷǫȡȩƷᛟଢሁǛƝӋༀƘƩƞƍŵ
ἾὅἌỉბᏮ૾ඥ
ǫȡȩǁƷბᏮ૾ඥƸŴƓਤƪƷǫȡȩƷᛟଢƴࢼƬƯƘƩƞƍŵ
ŦȞǦȳȈ᩿ƴƸǓᡲѣဇŴAF ᡲѣဇƷᘺፗǍŴᩓൢໜሁƕƋǓ
ǺǍ൲ǕƕƭƘƱᛚ˺ѣǍᨦƷҾ׆ƱƳǓLJƢƷưƝදॖƘƩƞƍŵ
ŦȪȤdzȳȐȸǿȸሁƷǢǯǻǵȪȸƸŴཎܭƷೞᆔݦဇƴᙌᡯƞǕƨNjƷƕ
ٶƘŴӕǓ˄ƚưƖƳƍئӳǍᡲѣƠƳƍئӳƕƋǓLJƢŵ
ƚŴӏƼ˺ѣǛƝᄩᛐƘƩƞƍŵ
ᩧЈỆếẟề
ᩧЈƷൿܭ૾ඥƸŴƓਤƪƷǫȡȩƷᛟଢƴࢼƬƯƘƩƞƍŵ
ἦὅἚӳỪẶ
ẎἉἂἰ AF ဇẆỿἶἠὅ AF ဇẏ
ǪȸȈȕǩȸǫǹưજࢨƢǔئӳƸŴȕǩȸǫ AF
ƴǻȃȈƠLJƢ 2 Უ
ƑǹǤȃȁǛ M ƴǻȃȈƠŴȕǩȸǫǹȪȳǰǛׅƠƯȔȳȈǛӳǘƤLJƢŵ
ẎἝἅὅဇẆἬὅἑἕἁἋ AF ဇẆἏἝ
ǪȸȈȕǩȸǫǹưજࢨƢǔئӳƸŴǫȡȩǛ AF ȢȸȉƴǻȃȈƠƯŴȬȳǺ
ƷȕǩȸǫǹȢȸȉЏǓ੭ƑǹǤȃȁǛ AF ƴǻȃȈƠLJƢ 2 Უ
ưજࢨƢǔئӳƸŴ M ƴǻȃȈƠŴ
ǫǹȪȳǰǛׅƠƯȔȳȈǛӳǘƤLJƢŵ
ŦǫȡȩƷȕǩȸǫǹȢȸȉƷЏǓ੭ƑƸŴƝ̅ဇƷǫȡȩƷᛟଢƴࢼƬƯƘ
Ʃƞƍŵ
ŦȋdzȳŴȚȳǿȃǯǹŴǽȋȸဇƸŴ
ӳƤưǪȸȈȕǩȸǫǹજࢨƕӧᏡưƢŵ
ȡȩƱƷኵӳƤưƸŴȞȋȥǢȫȕǩȸǫǹưƷƝ̅ဇƱƳǓLJƢŵ
Ŧ
ƜƷȬȳǺƸŴ
AF
ƴǻȃȈƠƨLJLJưȞȋȥǢȫưƷȔȳȈᙀദǛƢǔƜƱNj
ӧᏡưƢŵ
AF
ȢȸȉƴǻȃȈƠƯŴ
ȳǛҞƠƷLJLJưȕǩȸǫǹȪȳǰǛׅƠƯȔȳȈǛᛦૢƠƯƘƩƞƍŵ
ŦȞȋȥǢȫưȔȳȈǛӳǘƤǔᨥƴƸŴႸႮƕĐᲢᨂᢒᲣƷˮፗưNjᢒƴ
ȔȳȈƕӳǘƳƍƜƱƕƋǓLJƢƷưŴ
ӳǘƤƯƘƩƞƍŵ
ᘮϙမขࡇႸႮ
ᘮϙမขࡇႸႮƴǑƬƯŴƓƓǑƦƷᘮϙမขࡇᲢȔȳȈƷӳƬƯᙸƑǔርᲣ
ǛჷǔƜƱƕưƖLJƢŵ̊Ƒƹ( 3) ƸŴǓǛ F16 ƴƬƨئӳƷᘮϙမขࡇ
ǛᅆƠƯƍLJƢŵᲢƜƷȬȳǺƴᘙ F16 ƷLjưƢ
ἾὅἌἧὊἛ
ȬȳǺȕȸȉƸŴ
૾ඥƸŴ
ܱƴӕǓ˄ƚƯƘƩƞƍŵ 4 Უ
ŦƝ̅ဇƷǫȡȩƴǑƬƯƸŴȬȳǺȕȸȉƴǑǓϋᔺȕȩȃǷȥƷήƕƞƑƗ
ǒǕǔӧᏡࣱƕƋǓLJƢŵʙЭƴȆǹȈજࢨǛᘍƍŴ
ǒǕǔئӳƸŴȬȳǺȕȸȉǛٳƠƯજࢨƠƯƘƩƞƍŵ
Ŧઃ࠘ƴƸŴȬȳǺȕȸȉǛᡞƞƴƸNJᡂLjŴᚘ૾
ƱƕưƖLJƢŵᲢ 5Უ
ἧỵἽἑὊ
Ŧဒ᩿ԗᡀƕƚǒǕǔऀǕƕƋǔƷưŴȕǣȫǿȸƸҾЩƱƠƯᲫư̅ဇƠƯ
ƘƩƞƍŵ
Ŧ͞ήȕǣȫǿȸǛ̅ဇƢǔئӳƸŴPL Უ
ƘƩƞƍŵ
̬ሥẆӕৢɥỉදॖ
ŦൢƸǫȓǍᥢƷҾ׆ƱƳǓLJƢŵᧈ᧓̅ဇƠƳƍئӳƸŴʑ༞дƱ
ࣱ݅Ʒᑣƍܾ֥ƴλǕƯ̬ሥƠƯƘƩƞƍŵȊȕǿȪȳሁŴ
ƴƸ̬ሥƠƳƍưƘƩƞƍŵ
ŦȬȳǺ᩿ƴƸႺਦưᚑǕƳƍưƘƩƞƍŵǴȟǍ൲Ǖƕ˄ƍƨƱƖƴƸŴȖ
ȭǢȸƔȬȳǺȖȩǷưӕǓᨊƍƯƘƩƞƍŵਦƷួƳƲƸŴ
ȪȸȊȸ෩ƱȬȳǺǯȪȸȋȳǰȚȸȑȸư
ǷȳȊȸሁƷஊೞ๋дƸዌݣƴ̅ǘƳƍưƘƩƞƍŵ
ŦƜƷȬȳǺƸ᧸൦ನᡯưƸƋǓLJƤǜŵᩋټǍ൦ᡀưƷ̅ဇưƸŴǒ
ǑƏƴදॖƠƯƘƩƞƍŵ൦ƕȬȳǺϋᢿƴλǓᡂljƱŴ
ƳǓŴ̲ྸɧᏡƴƳǔئӳƕƋǓLJƢŵ
Ŧ࣯ນƳภࡇ٭҄ƴǑǓŴȬȳǺϋᢿƴ൦ƕဃơǔƜƱƕƋǓLJƢŵ݊
Ɣǒଡ଼ƔƍܴϋƴλǔƱƖƳƲƸŴDZȸǹǍȓȋȸȫᘥƴλǕŴ
ƳơLJƤƯƔǒƝ̅ဇƘƩƞƍŵ
Լឋ̬ᚰểỴἧἑὊἇὊἥἋỆếẟề
Լឋ̬ᚰƱǢȕǿȸǵȸȓǹƴ᧙ƠƯƸŴ
ɼễˁಮ
ȬȳǺನᲢ፭ᲧᲣ 11Ყ13 இٻજࢨ̿ྙ 1:5.2
ဒ ᚌ 63.4° ȕǣȫǿȸǵǤǺ 67mm
இݱǓ 16 இٻࢲ X μᧈ 77
x
94mm
இჺજࢨុᩉ 30cm 665g
ٻƖƞƞƸŴǷǰȞȞǦȳȈƷNj
ᣣ
⺆㩷
දॖ
ԓ
Thank you very much for
maximum performance and enjoyment out o
this instruction booklet thor
DESCRIPTION OF
㽲Filter Attachment Thread
㽳Focus Ring
㽴Distance Scale
㽵Depth of Field Read Out Index
㽶Focus Index Line
㽷Focus Mode Switch
㽸Mount
㽹Lens Hood
NIKON AF
This lens functions in the same way as a G T
(without an aperture ring).
lens/
instruction manual.
PENT
This Lens functions same as a F
Pentax lens
with its functions may result.
manual of the camera in use e
A
When this lens is attached to the camera body it will automaticall
the same way as your normal lens
your camer
ŦOn the lens mount surface,
contacts.
damaging the lens,
down while changing the lens
ŦMany accessories such as rear mounted t
etc.,
accessories,
compatible and that the accessories will function pr
SETTING THE
The sigma lens functions automaticall
refer to the camer
FOC
This lens features Sigma
quick and quiet autof
䇶SIGMA AF and C䇷
For autoAF”
position (fig.2)
the lens to the “M”
ring.
䇶NIKON AF䇷
For auto
switch on the lens to the “AF ”
set the focus mode switch on the lM ”
focus by turning th
ŦPlease refer to camer
camera
Ŧ
Fo
bodies which support motors driven b
will not function if the camera body does not sup
ŦThis lens also permits manual focusing even in the autofocus mode With
the camera set to the One-Shot AF (AF
override the autofocus while the shutt
ŦWhen operating this lens in manual focus mode
corre
distance scale
changes in temperature which ca
expand and co
DEPTH OF FIELD SC
The depth of field scale helps you to check the dep
sharpness) of your composition.
zone is shown when the aperture F16 is used.
LENS HOOD
A bayonet type
helps to prevent flare and ghost
outside the picture area.
rotation.
ŦWhen taking photographs using the built-in flash,
the lens hood so as to avoid cutting off any of the
cause a shadow in the picture
ŦIn order to place the lens and hood into the storage case
remove the hood,
FIL
ŦOnly one filter shoul
thicker filters
ŦWhen using a polarizing filter with AF
BASIC CARE AND S
ŦAvoid any shocks or ex
humidity
ŦFor extended stor
ventilation.
or naphthalene gas.
ŦDo not use thinner
or finger prints from the lens elements.
lens cloth or lens tissue
ŦThis lens is not waterpr
keep it from ge
mechanism,
ŦSudden temperature changes may
the surface of the l
it is advisable to k
approaches r
TECHNICAL
Lens construction 11 – 13 Magnification 1:5.2
Angle of 63.4° Filter Size 67mm
Minimum Aperture 16
Dimensions
Dia.g Leng
77g 94mm
(3.03g 3.7 in)
Minimum Focusing D
30 cm (0.99 ft) Weight 665g (23.5o
Dimensions and w
ENGLISH
Wir danken Ihnen für das Vertrauen,
Produktes erwiesen haben.
Benutzung des Gerät
BESCHREIBURUNG DER
㽲Filtergewinde
㽳Entfer
㽴Entfer
㽵Schärfentiefenindex
㽶Einstellindex
㽷Fokussierschalter
㽸Anschluß
㽹Gegenlichtblende
KAMERAS VO
Dieses Objektiv funktioniert genau so wie ein Nikon AF
T
einer Kamera können einige F
Informationen hierüber schlagen Sie bitte in der Bedienungsanleitung der
verwendeten Ka
KAMERAS V
Dieses Objektiv funktioniert genau so wie ein PENT
T
einer Kamera können einige F
Informationen hierüber schlagen Sie bitte in der Bedienungsanleitung der
verwendeten Kam
ANSETZEN AN DAS KAMERA
An die Kamera angesetzt,
lhr Normalo
zur Kam
ŦHalten Sie die Kontakte und Kupplungselemente am Objektivansc
sauber
unten ab,
ŦVieles zur Verwendung zwischen
Zubehör
abgestimm
lhr Sigma Objektiv damit kom
Zubehörs ge
EINSTEL
Das SIGMA Objektiv stellt nach dem Ansetzen an die Kamer
automatisch zur V
Gebrauchsanleitung der Kamera.
EINSTEL
Dieses Objektiv verfügt über einen eingebauten SIGMA Hyper Sonic Motor
(HSM).
䇶SIGMA AF und C䇷
Für die automatische Scharfeins
am Objektiv auf die “AF ”-Position (Ab
einstellen wollen,
“M ”-Position.
einste
䇶NIKON AF䇷
Für die automatische Scharfeinst
AF-Betrieb und schalt
“AF ”-Position (Ab
schalten Sie den FokussierM ”-Position.
können die Schärfe nun durch Dre
Hinweise zum W
bitte der Bedienungsanleitung der Kamera.
Bei Nikon,
benutzt werden,
Autofokus
unterstützt.
Dieses Objektiv kann auch manuell scharfgestellt werden,
AF-Betriebsart einges
eingestellt ist,
scharfgest
Drehen am Fokussierring manuell einstellen.
durchg
Bei manueller Fokussierung sollt
werden,
auftreten können.
SCHÄRFENTIEFESKALA
Die Schärfentiefeskala hilft Ihnen die Schärfentiefe (scharf abge
Bereich) Ihrer Einst
Schärfentiefebereich angezeigt wenn Blende F16 verwende
GEGENLICHTBLENDE
Das Objektiv wird mit einer abnehmbaren Bajonett-Gegenlich
Diese hilft,
einfallendes Licht entstehen können.
Gegenlichtblende an den aufgedru
daß die Blende korr
ŦFür Aufnahmen mit dem eingebauten Blitzgerät der Kamera sollte die
Gegenlichtbl
werden.
ŦZum T
abgenommen und umgestülpt a
FIL
ŦBei Einsatz von Polfiltern verwenden Sie an einer Autof
ausschlie
sich bei Autofok
ŦVerwenden Sie grundsätzlich nur ein Filter
gleichzeitig bzw
mit beson
PFLEGE UND AUFBEWAHRUNG
ŦSetzen Sie das Objektiv nicht harten Stößen,
T
ŦWählen Sie für längere Lagerung einen kühlen,
belüfteten Ort.
Dämpfe die Vergütung angreifen könnten.
ŦVerwenden Sie zur Entfernung von Schmutz oder Fingerabdrücken auf
Glasflächen keinesfalls Verdünner
Reinigungsmittel,
Optik-Reinig
ŦDas Objektiv ist nicht wasserg
Regen oder in der Nähe von Wasser für ausreic
eines Objektives mit Wasser
ŦT
Glasflächen führen.
empfiehlt es sich,
belassen,
TECHNISCHE DA
Glieder – Linsen
11 –
Größter Abbildungsmaßstab
1:5.2
Diagonaler
63.4°
Filterdurchmesser
67mm
Kleinste Blende
16
Abmessungen Ø ×
Baulänge
77g 94mm
Naheinstellgrenze
30 cm
Gewich
665g
Abmessungen
DEUT
Nous vous remer
meilleur profit et l
attentivement le mode d’
DESCRIPTION DES ELEMENT
㽲Filetage pour filatre
㽳Bague des distances
㽴Echelle des distances
㽵Echelle de profondeur de champ
㽶Repère de distance
㽷Sélecteur de mise au point
㽸Baïonnette
㽹Pa
POUR LES BOITIERS NIK
Cet objectif est dépourvu de bague de diaphragme comme l
autofocus
possibles en fonction du boîtier utilisé
reporter au mode d'empl
POUR LES BOITIERS PENT
Cet objectif est dépourvu de bague de diaphragme comme l
autofocus PENT
possibles en fonction du boîtier utilisé
reporter au mode d'empl
FIXA
Lorsque l
comme avec vos objectif
d’emploi de l
ŦSur la monture se trouvent plusieurs contacts électriques e
Gardez-l
jamai
ŦIl existe de mombreux a
etc...
objectif Sigma.
REGLAGE DU S
Cet objectif Sigma fonctionne aut
boîtier
MISE AU POINT
Cet objectif est équipé de la motorisation à haute fréquence Sigm
Sonic Motor” (HS
䇶SIGMA AF et C䇷
Pour une mise au point aut
position “AF ”
position “M ”
point.
䇶NIKON AF䇷
Pour une mise a
sélecteur de mise au point en position “AF ”
manuelle,M ”
tournant la bague de mise au point.
Veuill
mise au point de l'appareil.
Dans les versions pour Nikon,
possible qu'avec les boîtiers permettant d'activer un mot
ultrasonique du type de celui de la motorisa
avec les autres boîtier
Cet objectif permet la mise au point manuell
Avec l
pouvez retoucher la mise au
la mise au point automatiquement en maintenant l
à mi-course
En cas d’utilisa
recommandé de vérifier la qualité de la mise a
effet,
modifications de
au point.
ECHEL
L
(zone de nette
de champ à l'ouverture F16.
P
Un pare-soleil démontable avec fixation à baïonnett
Ce pare-soleil protège l
Assurez-v
ŦLors de prises de vues av
pare-soleil pour éviter que sa pr ésence dans le champ d’
provoque une zon
ŦPour replacer l'objectif et le pare-soleil dans la valise de transport, veill
détacher d'abord le par
(fig.5)
FIL
ŦN’employ
d’un filtr
un vignettage.
ŦSi vous souhaitez utiliser un filtre polarisant sur un zoom AF
de type “cir
d’exposition pourr
PRECA
ŦNe pas exposer l
l
ŦSi l
et bien ventilé.
anti-mites
ŦNe pas utiliser de dissolvant, d’
nettoy
ŦCet objectif n
de l
des éléments optiques et/
possibles en cas de dommages
ŦDes écarts soudains de température peuvent causer de la condensation ou
de la buée peut apparaître sur la l
dans un local chauffé en venant d’
placer l
du local.
CARA
Construction de l 11 – 13 Rapport de repr 1:5.2
Angle de cham 63.4° Diamétre de filtr 67mm
Ouverture minimal 16
Dimension:
diamentre×longueur
77g 94mm
Distance minimale de
30 cm Poids 665g
Dimensions et poi
FRAN
AIS
Wij stellen het op prijs dat u een Sigma objectief heeft aangeschaft.
T
adviseren wij u deze gebruiksaan
objectief gaat gebruik
BESCHRIJVINS
㽲Filterschroefdraad
㽳Scherpstelring
㽴Afstandschaal
㽵Scherptediepteschaal
㽶Index teken
㽷Scherpstelkeuze schakelaar
㽸Vatting
㽹Zonnekap
NIKON AF
Dit objectief werkt op identieke wijze als de objectieven van het G type
(zonder diafragmaring) voor Nik
cameratype kunnen er enk
gebruiksaanwijzing van u
PENT
Dit objectief werkt op identieke wijze als de objectieven van het F
(zonder diafragmaring) voor PENT
cameratype kunnen er enk
gebruiksaanwijzing van u
BEVES
Wanneer uw Sigma objectief op de camerabody is bevestigd,
automatisch net z Lees hiervoor
de gebruiksaanwijzing van uw
ŦOp de vatting bevindt zich een aantal electrische contacten en
koppelstukken. Deze moeten goe
een goed contact verzek
objectieven deze altijd met de voorzijde en niet met
ter voorkoming van beschadiging
ŦVeel accessoires z
voor bepaalde objectieven ontwoepen.
aanschaft, is
gecombineerd kan w
BELICHTINGSINSTEL
Wanneer een Sigma objectief op uw camerabody is beves
geheel automatisch. Lees hiervoor de gebruiksaanwijzing van uw ca
SCHERPSTEL
Deze lens heeft de ingebouw
HSM maakt snel en geluidloos automatisch scherps
䇶Sigma AF en Canon AF 䇷
Om de autofocus functie t
de AF postitie te zetten.
op het objectief op de M positie.
focusring te draai
䇶Nikon AF䇷
Om de autofocus
de camera op AF positie te zetten ( Wilt u handmatig scherpstellen ze
dan het schuifje op het objectief op de M positie.
scherpstellen door aan de f
Raadpleeg a.u.b.
instellingen op uw camera te
Voor Nikon
met de camera welk
AF zal niet functi
Handmatig scherpstellen kan bij bit objectief ook in de auto
Als de camera op “One-Shot”
eventueel handmatig corriger
heeft gedaan,
Wanneer .u dit objectief op handmatige instelling gebruikt,
de correcte scherps
een mogelijke scherpte v
temperatuurs
uitzetten.
SCHERPTEDIEPTE SCHAAL
De scherptediepte schaal is een goed hulpmiddel om de scherpt
scherpte zone) t
zone aangegeven bij diafr
ZONNEKAP
Bij dit objectief wordt een losse zonnekap me
meegeleverd. De zonnekap draagt bij tot het voorkomen van
nevenbeelden,
onderwerp direct in het objectief valt. Let er
zonnekap deze voll
ŦBij het maken van flitsfot
zonnekap te verwijderen,
afschermt.
ŦOm objectief en zonnekap op te k
zonnekap afnemen en deze omg
FIL
ŦGebruik slechts 1 filter te
filters-zoals een
ŦGebruik uitsluitend een “
autof
wordt gebruikt,
belichtingsregeling niet correct
ONDERHOUD EN OPSLAG
ŦVermijd vallen of stoten en s
lage temperature
ŦIndien het objectief voor langere tijd wordt opgeborgen,
koele,
om beschadiging van de lenscoating te voork
naftalinegas.
ŦGebruik geen thinner
om vuil of vingeraf
daarvoor een speciaal lensdoekje of l
ŦDit objectief is niet waterbest
water voor dat het nie
delen en electrische componenten die door wat
meeste
ŦPlotselinge temperatuur verandering k
oppervlak van d
buitenlucht,
temperatuur van het o
TECHNISCHE GEGEVENS
Lensconstructie
(groepen – elementen)
11 –
Maximale ve
1:5.2
Beeldhoek 63.4 67mm
Kleinste diafragma 16 Afmetingen (diam.g lengte) 77g94mm
Kortste instelafst 30 cm Gewicht 665g
Opgegev
NEDERLANDS
Le agradecemos
mejores resultados de su objetivo lea atentament
instrucciones ant
DESCRIPCION DE L
㽲Rrosca para filatr
㽳Aro de enfoque
㽴Escala de distancias
㽵Indice de profundidad de campo
㽶Linea de indice
㽷Selector de enfoque
㽸Montura
㽹Pa
CÁMARAS
Éste objetivo funciona igual que
auto focus
aparecer algunas r
de instrucciones de la cámar
CÁMARAS
Éste objetivo funciona i
auto focus
aparecer algunas r
de instrucciones de la cámar
CONEXION AL
Cuando el objetivo se conecta a la cámara f
objetivos originales. Consulte el manual de instrucciones de su cámara.
ŦEn la superficie de la montura exist
acopladores.
Para prev
cuando cambie de optica.
ŦAlgunos accesorios tales como con
están especialmente diseñados para un tipo de
adquirir estos accesorios,
compatibilidad de estos
MODE AJUSTE DE EXPOSICION
Los objetivos Sigma funcionan aut
Por fav
ENFOQUE
Este objetivo
Éste pr
䇶SIGMA AF y CAN䇷
Para utilizar el autofAF ”
enfocar manualmente ponga el M ”
moviendo el aro d
䇶NIKON AF䇷
Para utilizar el auto
de la óptica en la posición “AF ”
el selector en la posición M ”
Para cambiar el modo de enf
instrucciones de la cáma
En las monturas Nikon,
soporten los motor
contrario el AF
Este objetivo también permite el enfoque manua
automático Con la cámara prepar
(AF-S) puede ajustar el enf
enfocado automá
disparador suavemente pr
Cuando utilice estos objetivos en modo d
recomendable comprobar visual
enfoque.
distintos elementos int
coincida con la escala de distancias con la medición ef
puede ser más ostensibl
ESCALA DE PROFUNDID
La escala de profundidad de campo le ayuda a r
campo (zona enf
muestra la zona d
P
Se incorpora con el objetivo un parasol e
parasol ayuda a p
ambiental.
ŦCuando tome fot
parasol para evitar viñet
ŦPara guardar el objetivo y el parasol en su caja primero tiene que sacar el
parasol y después invertirlo en el objetivo (fig
FIL
ŦSolamente debe utilizarse un filtro cada vez.
vez,
viñeteos.
ŦCuando utilice un filtro polarizador en una cámar
tipo circular
automático y la e
CUIDADOS BASICOS
ŦEvite los golpes o la exposición a temper
humedad.
ŦEn caso de almacenaje por un tiempo prol
seco,
tratamiento de l
ŦNo utilice diluyente,
suciedad de los objetivos. Para limpiarlos utilice un paño de t
limpia objetivos.
ŦEstos objetivos no son impermeables.
cerca del agua,
imposible reparar l
componentes eléctricos dañados
ŦSi hay cambios súbitos de temperatura puede haber condensación
la superficie del objetivo. Cuando entre en una habitación cálida,
de un lugar frío,
su temperatur
CARA
Construcción del objetivo 11 – 13 Ampliación 1:5.2
Ángulo de visión 63.4° Diámetro filtr 67mm
Apertura mínima 16
Dimensiones
(diámg long)
77g 94mm
Distancia mínima enfoque 30 cm Peso 665g
Dimensiones y peso incluyen montura SIGMA
ESP
Vi ringraziamo della preferenza acco
obiettivo Sigma.
istruzioni prima di cominciare a
ottenerne le migliori prestazioni e s
ELEMENTI CONSTITUTIVI (fig.1)
㽲Portafiltri frontale a vite
㽳Ghiera
㽴Sc
㽵Sc
campo
㽶Indice di collimazione
㽷Selettore di fuoco
㽸Innesto
㽹Pa
FOTOCAME
Il funzionamento di quest
Nikon autof
sulla quale viene montato
maggiori dettagli bisogna legger
FO
Il funzionamento di quest
PENT
fotocame
attive
APPLICAZIONE SUL
Una volta che avrete innes
funzionerà auto
istruzioni per l
ŦLa superficie dell
altri elementi di accoppiamento
contatti sono molto delicati.
appoggiate l
la parte della lent
ŦDiversi complementi ottici,
posteriore
obiettivo predisposti. Prima di pr
che il vostro obiettivo Sigma sia compa
con i complementi ottici di cui tra
IMPOST
Una volta montato sulla fot
automaticament Si consultino le is
MESSA A FUOCO
Questo obiettivo incorpora un
più veloce e
䇶SIGMA AF e CA䇷
Per attivare l
la posizione “AF ”
scegliere,M ”
ruotando la ghiera di messa a
䇶NIKON AF䇷
Per attivar
scegliere,AF ”
fuoco manualmente,M ”
si mette a fuoco r
ŦConsultare il libretto d’istr
messa a fuoco
ŦPer attacchi Nikon,
AF quando il corp
La modalità AF non è possible se il corpo macchin
tipo di motore
ŦQuesto obiettivo lascia la facoltà
ad autofocus
funzionamento One Sho
pulsante di scatto e da far intervenire il meccan
automatica (con successivo
messa a fuoco manuale
ŦSe usate l
del quadro mediante osservazione dire
mirino.
scostamenti ai quall il piano di messa a fuoco può andar soggetto in
tori sbalzi di tempera
dell
regolazione sull
SCALA DEL
La scala delle profondità di campo aiuta a s
fuoco della fot
visualizzata la zona della pr
F16.
P
Il vostro obiettivo è corredato da un par
baionetta. Il paraluce previene efficace
fantasma che possono prodursi con un
applicato il par
ŦPer riporre l
(fig.5)
FIL
ŦSi può usare un solo filtro per v
filtri molto spessi (come i polarizzatori) è fa
ŦSe volete adoperare un polarizza
tipo “cir
regolare funzion
automatica.
CURA E CONSERV
ŦProteggete l
temperature o umidità eccessiva.
ŦIn previsione di un prolungato
un posto fresco Evitate
vapori di canfor
rivestimenti antiriflessi.
ŦNon usate solventi,
eliminare dagli elementi ottici tracce di sporco o impr
invece con un panno morbido inumidito o con una cartina per l
ŦL
la pioggia o vicino all
e i componenti elettrici vengono danneggiati irrimediabilment
tanto da renderne impossibile qualsiasi riparazione
ŦImprovvisi sbalzi di temperatur
condensa o provocare la velatur
vano riscaldato mentr
l
adattata alla tempera
CARA
Costituzio
11 – 13 Rapporto d’ingra 1:5.2
Angoli di campo 63.4° Diamentro filtri 67mm
Apertura minima 16
Dimensioni
(diametro × lung
77g 94mm
Distanza min. 30 cm Peso 665g
Dimensioni e pe
IT