D15T
- 1 -
1. Introduction
Dear customer:
Thank you for purchasing a DECT SAGEM telephone we appreciate your trust in us. This
product was manufactured with the utmost care, should you encounter difficulties d
We recommend that you refer to
site:
http://www.sagem.com/faq
For your comfort and safety, we ask that you read the following paragraph carefully:
Recommendations and safety instructions
Your DECT telephone must not be installed in a humid room (
bathroom, laundry room, kitchen, etc.) unless it is 1.50 m away from a water point
outside. Your telephone must be operated at
45°C.
Only use the supplied power adapter, connect it to the base socket a
installation instructions provided in this boo
identification label affixed to it (volt
precaution, in case of danger, the mains adapters disconnecting mechanism
for the 230V power supply. They should be placed near the device and should be
easily accessible.
This telephone was designed for use
(PSTN). In case of a problem you must first contact your reseller. Only use the
supplied telephone cord.
To avoid damaging your handset, only
non rechargeable batteries, respect po
handset battery compartment.
For your personal security, never place your handset on the base without the
batteries, or without the battery
At the end of the battery life, batteries must b
instructions presented in this book
Your DECT telephone has an inside radio range of about 50 metres and up to
300 metres in open space. The immediate presence of metal parts, (of a television for
example), of any electric appliance may result in range reduction.
In areas where storms are frequent, we reco
line using a surge protection device.
This equipment does not function in the case
for emergency calls, it is recomme
The CE marking certifies that th
Directive 1999/5/CE of the European Parliament and of the Co
microwave radio equipment and telecommunication terminal equipment, for the safety
and health of users, for electromagnetic
the frequency spectrum attributed to ground and spatial communication to pr
damaging interference.
The declaration of compliance
"support" or can be obtained from the following ad
Sagem Communication - Customer relations department
4, rue du Peti
D15T
- 2 -
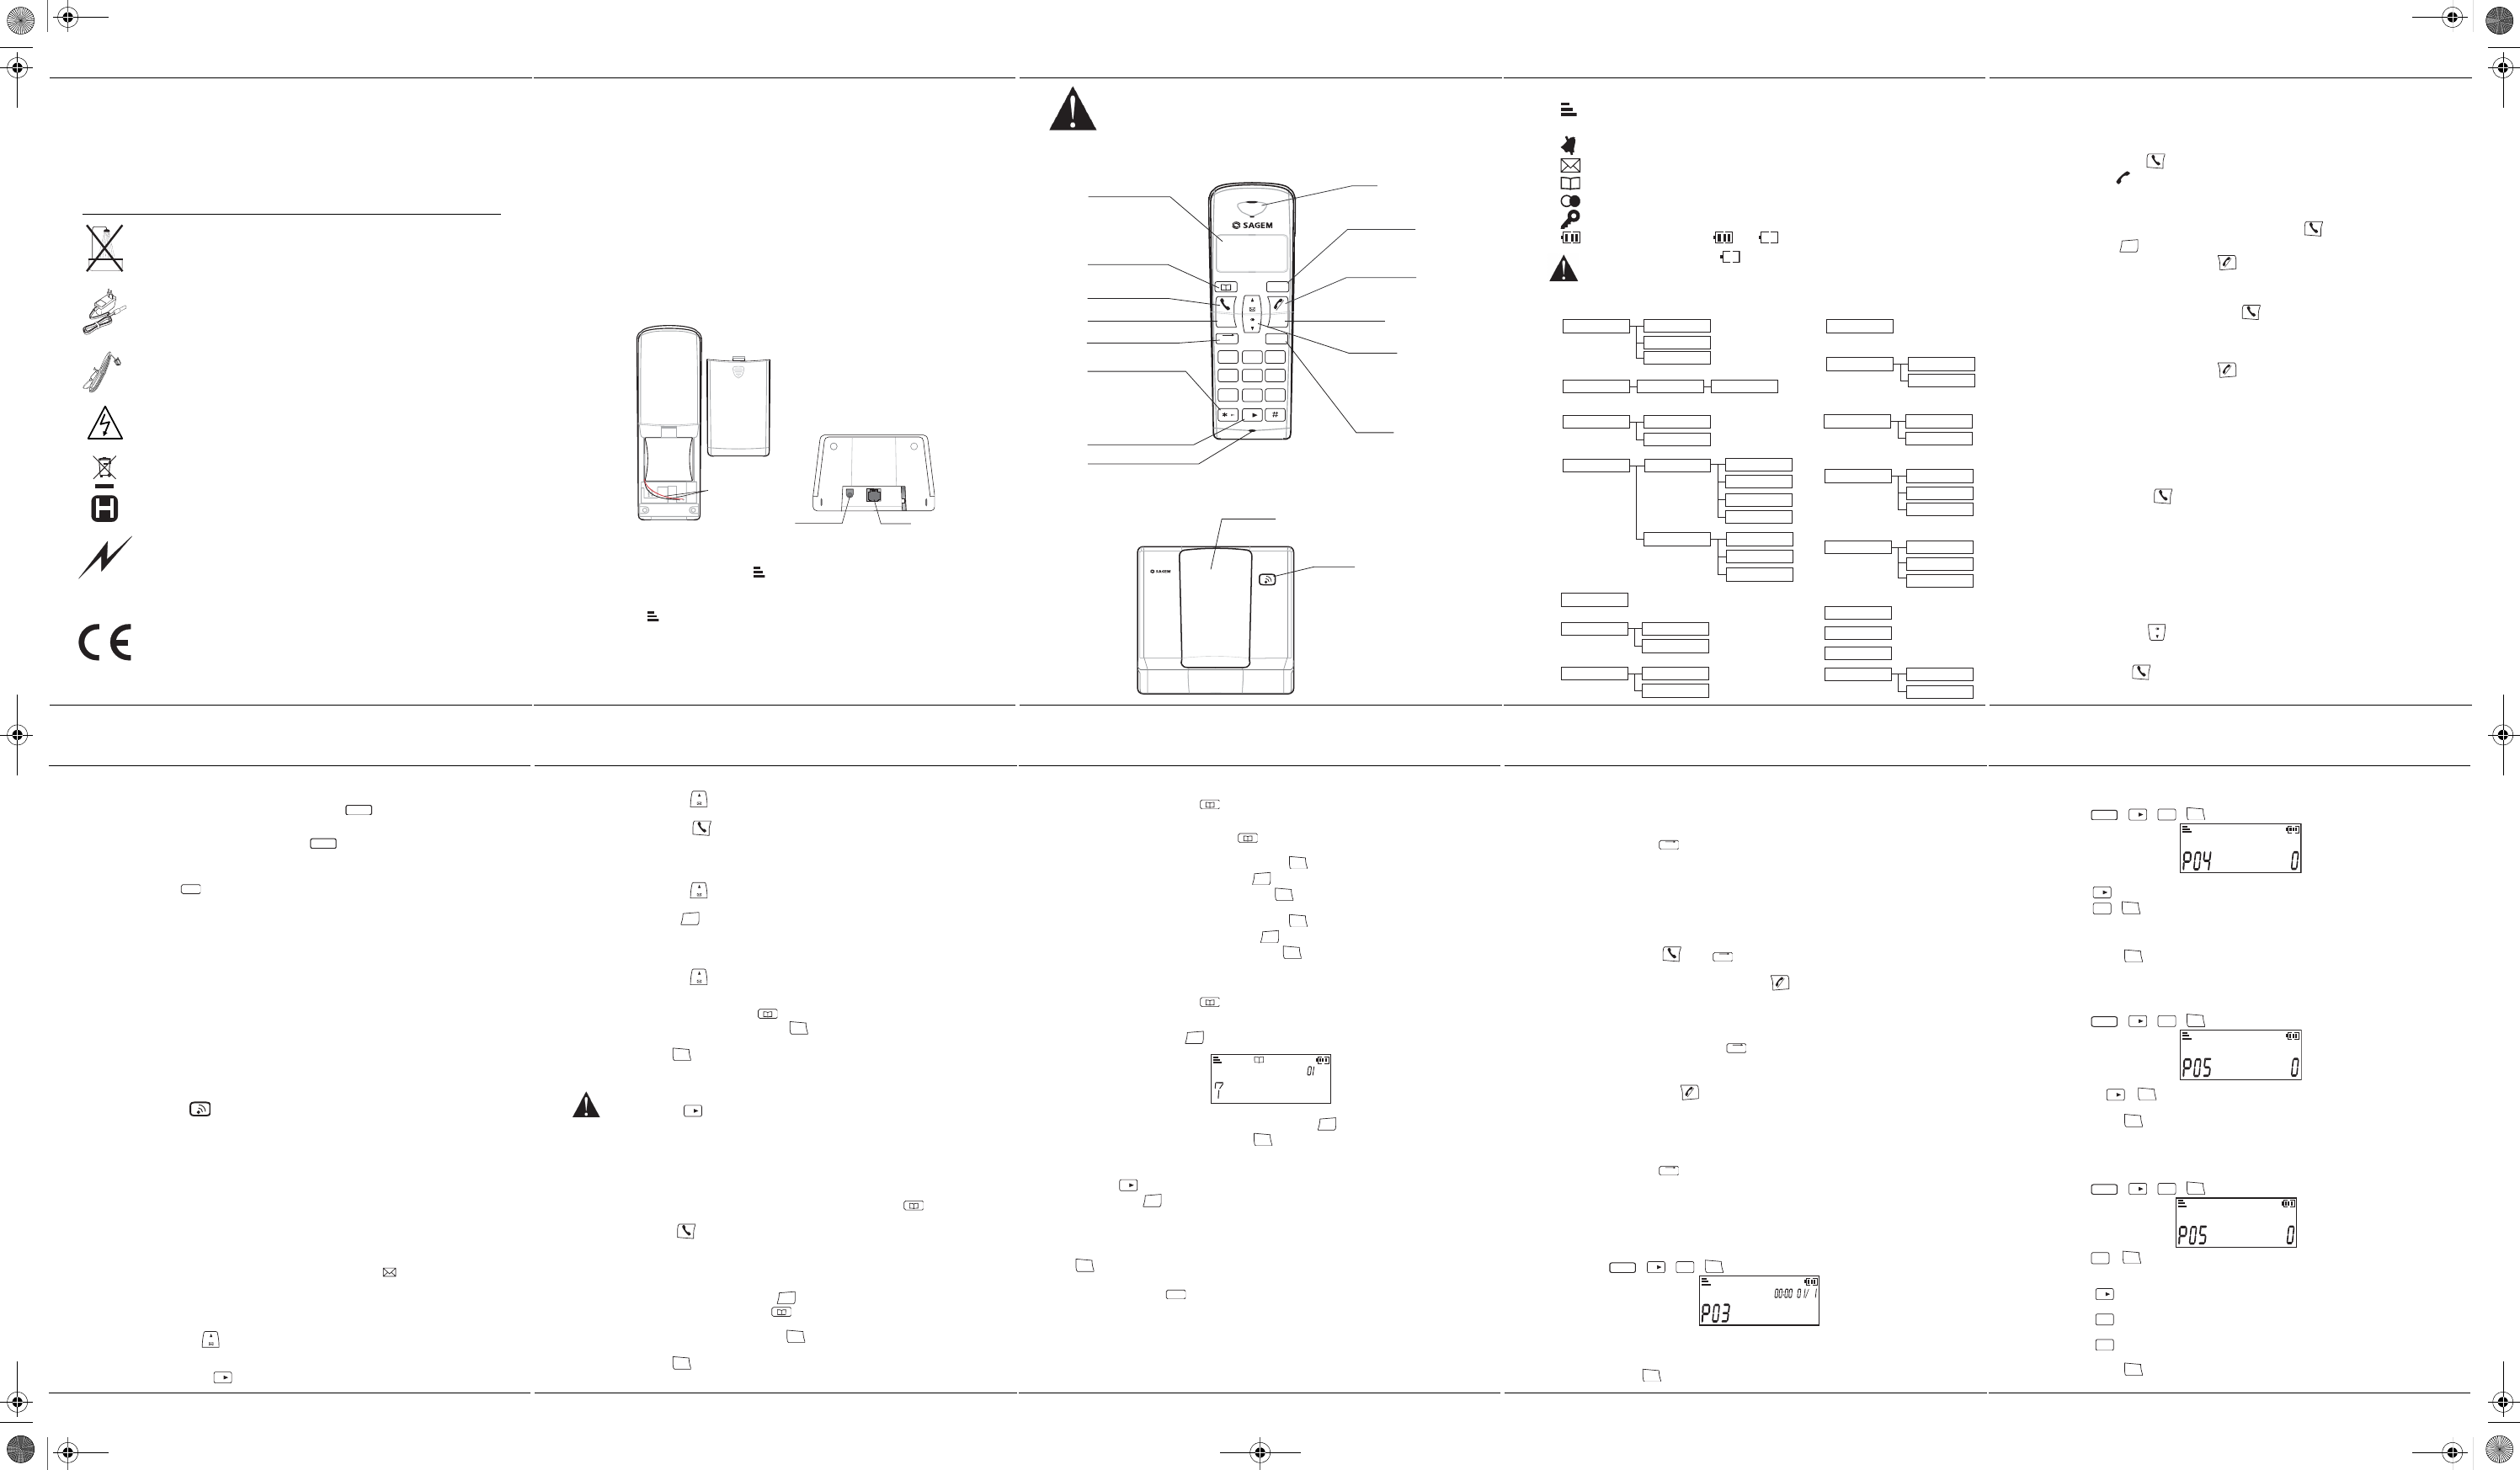
2. Before you begin
PARTS CHECKLIST
Make sure your package includes
1. Base
2. Handset,
3. Handset
4. Telephone
5. A
In the case of purchasing a pack io, you will find in addition for each additional handset:
1. A
2. A
3. T
2.1. Digital security system
Your cordless phone uses a secu
unauthorised acces
When you place the handset
outage or battery replacement, you should place the handset in the base
to reset the code.
2.2. Installing the phone
TEL LINE
Power socket
Battery Wire
NOTE: for desktop charging only, the handset is only able to
1. Rof handset.
2. Insom left direction into the jack inside the handset.
3. P
icon blinking.
4. Plug the power supply cord into AC outlet an
base bottom. 1 Beep sound emitted . Wire the cord around the ribs and then insert the
cord into groove as shown in
5. Wait
icon stop blinking.
Place the handset in the base station to charge for 15 hours prior to first use. if you don’t
properly charge the phone, battery performance will be compromised.
6. P
into the jack on the base marked TEL LINE. Then, insert the line cord into the groove.
7. A
D15T
- 3 -
Only
use the supplied power adapter, connect it to the base socket according to the
installation instructions provided in this booklet and the indications on the identification label
affixed to
the power adaptors to cut off the 230V current in case of danger. They
the device, and must be easily a
2.3. Handset keys
OK
C
1
2
abc
3
def
4
ghi
5
jkl
6
mno
7
pqrs
8
tuv
9
wxyz
0
MENU
INT
R
Display
Shows in second row
time, handset number, date
Phonebook key
access to Phonebook
T
Accept call,
Dial number
INT key
Key Lock key
activate / deactivate, keypad lock.
Next key
Microphone
Earpiece
Menu/Mute key
Access to settings
Mute the microphone
T
End call
End a call/Reject a call,
Cancel a menu entry
Switch handset on/off
Navigation key
Scroll option
REDIAL / CALLER LIST / P
Access the last five dialled number,
Access the caller list,
Insert a pause.
R key
Recall/Flash
Select a menu entry
V
C key
Correction
2.4. Base Station
Base button
Pressed briefly:
- telephone set paging.
Held down (4 seconds minimum):
- telephone set registration.
D15
T
Handset location
D15T
- 4 -
2.5. Quick guide to handset display icons
Signal strength icon (blinking when no signal or the signal strength is weak).
INT
Internal Call icon.
Do not disturb (handset ringer muted).
Caller list active (icon is blinking when a new call is in the caller list).
Memory active.
Redial list active.
Keypad lock active.
Charging status icon ( : Full; : Flat; blinking during charging).
If you see the icon change into
, that means your battery is low and your handset
keyboard is not available to use, please put the handset in cradle of base to recharge
your battery.
3. Menu structure
01 - Phoneb
03 - time / DA
04 - alarm clock
05 - hs ringer
06 - hs namin
07 - a
08 - key tone
09 - area code
10 - CID mode
11 - call l
12 - FLASh timING
13 - t
14 - regis
15 - de-regis
16 - chan
17 - RE-INIT
01_0 - add
01_ 1 - edit
01_2 - delete
04_0 - OFF
04_ 1 - ON
05_0 - VOL
05_ 1 - MELODy
07_0 - OFF
07_ 1 - ON
08_0 - OFF
08_ 1 - ON
10_0 - FSK
10_ 1 - D
11_0 - all callS
11_ 1 - missed call
12_0 - 1
12_ 1 - 250
12_2 - 600
13_0 - t
13_ 1 - mbr 66/33
13_2 - pbr 60/40
17_0 - handset
17_ 1 - base
time
DATE
05_0_0 - OFf
05_0_ 1 - LOW
05_0_2 - MEDIUM
05_0_3 - HIGH
05_ 1_0 - MELODY 1
05_ 1_ 1 - MELODY 2
05_ 1_2 - MELODY 3
D15T
- 5 -
4. Calls
4.1.
Cordless phone basics
4.1.1. Make a call
Ensure that the handset is switched on.
1. Press the Talk key
, you will hear the dialling tone and the display will show you the
phone icon
.
2. Enter the phone number. The number is dialled.
- OR -
1. Enter the phone number first and then press the Talk key
. If you make a mistake,
press C key
C
to remove the last digit.
2. Ending a call press the Talk/Off key
or place the handset in the base station.
4.1.2. Answeri
(Refer to § 4.6 “Auto talk”)
1. WhenTalk key
to answer the call.
- OR -
2. If AUTO TALK MODE is ON, pick up the handset from the ba
3. Ending a call press the Talk/Off key
or place the handset in the base station.
4.1.3. Handset
You can adjust the volume of what you hear through the handset at any time by pressing
or key. You will hear a beep with each key press. You will hear a double beep when you
reach the highest or lowest setting.
4.1.4. Caller
After you press Talk key
20 seconds) and counts the length of time of the call on minutes and seconds.
4.1.5. Auto talk off
Placing the handset in the case c
automatically hangs up the handset.
4.1.6. Redialling a call
The last five numbers you have dialled can be quickly redialled.
Redialling from Standby Mode:
1. Press REDIAL key
. The phone number that was last
2. Press or key to review redial telephone list. (You can select to redial your last five
numbers called).
3. Press Talk key
to dial out the number.
D15T
- 6 -
4.1.7. Microphone
During a call you can switch OFF the microphone. The call is placed on
- Enable MUTE functi: Press the ME key
MENU
during a call. The display
shows ’0000’.
- Disable MUTE function : Press the MENU key
MENU
to continue the cal
4.1.8. Recall
Press the R ke
R
to access line transfer offered by
telephone Company.
TIP: Don’t use the Talk to activate custom calling serv
the phone.
4.1.9. Temporary
In pulse dialling, y
offered by banks.
1. Press the «*» key after call is answered.
2. Press the number key and follow the vo
3. After you hang up, the phone automatically returns to dial pulse (rotary) service.
4.1.10.
To locate a misplaced handset:
Press the Page key
at the base station, «INT » icon shown will blink until Talk is pressed.
Pressing tTalk/Of button will mute the page tone.
4.2. Calling line identification presentation (CLIP)
This CLIP phone stores and displays CLIP information provided by your local telephone
company.
You must subscribe to CLIP service in order to
If you have not subscribed to CLIP service or if the caller number is «suppressed», the display
shows unkno
Caller ID call waiting is not working in Pulse
4.2.1. Caller
CLIP of incoming Call are stored in the CALLER LIST menu.
When you enter the CALLER LIST menu, the display will show icon
.
Caller List stores the last 20 incoming calls and call time.
If no call number is transmitted (unknown event), only the call time
4.2.2. Accessing the caller list menu
1. Press CI key to enter the Caller List menu. The display shows t
phone number (up to 12 digits).
2. Press or key through the caller List.
3. Press 0/ key
0
to go to last number page for CID length.
D15T
- 7 -
4.2.3. Calling back a caller
1. Press CID key to enter the caller list menu.
2. Press or key to select a
3. Press Talk key
to dial the number.
4.2.4. Deleting caller list record
1. Press CID key to enter the caller list menu.
2. Press or key to select a
3. Press C key
C
for 1 second to delete the current record. If you press
longer than 5 seconds, the entire Caller list will be deleted.
4.2.5. Storing memory from the ca
1. Make sure your handset is on standby mode.
2. Press CID key
.
The caller list appears on
3. Use or to select the desired calle
4. Press and hold the phonebook key
.
5. Enter the name of the entry. Press OK key
OK
to confirm the name.
The number is shown on the screen.
6. Press OK key
OK
to confirm the number.
The entry is stored in the phonebook. You will hear a confirmation tone.
If the number is too long, the screen will not show the number in full.
Press 0/Next key
0
to go to last number page for CID length.
5. Phonebook
Store up to thirty 24-digit numbers and 12 characters in memory for quick dialling.
5.1. Dialling a memory
1. Make sure your handset is at stand .
2. Press or key to view the phonebook locations.
3. Press Talk key
. The display number is dialled.
5.2. Storing a memory
1. Make sure your handset is on standby mode.
2. Enter the numbe
If you enter an invalid digit, press C key
C
to erase the incorrect digit.
3. Press and hold t
.
The name input screen appears.
4. E
OK
to confirm the name.
The number then appears on the screen and the cursor is at the end of the number.
5. Press OK key
OK
to confirm the number.
The entry is stored in the phonebook. You will hear a confirmation tone.
D15T
- 8 -
5.3. Editing a memory
1. Make su
2. Press PHONEBOOK key
.
The list of phonebook entries organised in alphabetical order
3. Select the entry you want to edit using or .
4. Press
.
You will then enter the name input screen and the cur
- The information isOK key
OK
.
- To correct the name, press C key
C
to delete characters.
Enter the neOK key
OK
.
5. You will then enter the number screen and the cursor will be at the end of the num
- The information isOK key
OK
.
- To correct the number, press C key
C
to delete the numbers.
Enter the OK key
OK
.
6. The entry is then modified and you will hear a confirmation tone.
5.4. Deleting a memory
1. Press PHONEBOOK key .
The list of phonebook entries organised in alphabetical order
2. Select the entry you want to delete using or .
3. Press C key
C
, display will prompt ’’? ’’.
4. Use
- If you do not wish to delete the entry, press C key
C
.
- To delete the entry, press OK key
OK
.
The entry ibook. You will hear a confirmation tone.
NOTE: Pr
0
to show the remaining digits let in the memory. If you enter the wrong di
press C key
C
to delete the incorrect digits.
5.5. Inserting a pause
You can insert a pause in thOK key
OK
. The pause time is fixed to 3 seconds .
Press and holdR key
R
during edit mode to inset the pause.
H
’’.
D15T
- 9 -
6. Using the Multi-Handset capabilities
These functions are used for handset management when two or more handsets are registered
on the same base.
6.1. Intercom Call/Intercom
1. Make sure your handset is on standby mode.
2. Press INT key
INT
on the handset. The display shows the INT icon and the number of
all registered handsets.
3. Enter the desired handset number.
Press the 9 key if you w
The called handset number is
blinking stops and thINT» icon is ON.
6.2. Answering a
1. The ring melody from an internal call is different from an extINT » icon and
the calling handset number are blinking.
2. Press Talk key
or INT
INT
key to answer. TINT » icon and the calling
handset number stop blinking.
3. Ending an internal Talk/Off ke
or place the handset in the base
station.
6.3. Transferring an external call
You can transfer an external call to another handset that is registered to the base station.
- DuINT » key
INT
. The external user is put on h
- E
- Press Talk/Off key
to transfer the cal
6.4. Making conference calls (3-way
You can connect one external call to two handsets registered at the base station. All users can
talk and listen simultaneously.
You are conducting a call with an external user.
1. Press INT key
INT
. The external user is put on hold.
2. Enter the internal call number. Wait until the internal user answers.
3. Press and hold the key “*” to setup a 3 way-call (the two parties and yourself).
7. PHONE
7.1.
Time and date
1. Make sure your handset is on standby mode.
2. Press
MENU
+
0
+
3def
+
OK
.
The time / date icons (format is HH:MM DD/MM where hour is of 24 hour format) are displayed
at the icon line.
3. Use the touch tone pad to enter the current time and date.
4. Press OK key
OK
to confirm your selection.
D15T
7.2. Alarm clock
To set the date and time :
1. Make su
2. Press
MENU
+
0
+
4
ghi
+
OK
.
3. Use the keypad :
- Press
0
to deactivate Alarm clock.
- Press
1
+
OK
to activate Alarm c
Use the touch tone pad to enter the current alarm time. Enter minut
is HH:MM).
4. Press OK key
OK
to confirm the entry.
7.3. Handset ringer level
You can choose from four ringer volumes.
1. Make su
2. Press
MENU
+
0
+
5
jkl
+
OK
.
3. Press
0
+
OK
to access HS ringer volume.
4. Use or to select the volume level.
5. Press OK key
OK
to confirm your selection.
7.4. Handset ringer melody
This function allows you to
1. Make su
2. Press
MENU
+
0
+
5
jkl
+
OK
.
3. Press
1
+
OK
to access HS ringer melody.
4. Use the keypad :
- Press
0
to select the melody 0.
- Press
1
to select the melody 1.
- Press
2
abc
, to select the melody 2.
5. Press OK key
OK
to confirm your selection.
Dépliant LU 252604978A D15T