-
-
Dear customer:
Thank you for purchasing a DECT SAGEM telephone we appreciate your trus
manufactured with the utmost care, should you encounter difficulties during its use.
For your comfort and safety, we ask that you read the follo
Recommendations and safety
Your DECT telephone must not be installed in a humid room
laundry room, kitchen, etc.) unless it is 1.50 m away from a water point or outside. Your
telephone must be operated at temperatures ranging from 5°C and 45°
Only use the supplied power adapter, connect it to the base socket according to the
installation instructions provided in this booklet and the indications on the identification
label affixed to it (voltage, current, electric network frequency)
(1)
.
This telephone was designed for use
case of a problem you must first contact your reseller. Only use t
cord.
To avoid damaging your handset, only use certified rechargeable batteries, never use non
rechargeable batteries, respect polarity when inserting the batteries in
compartment.
For your personal security, never place y
without the battery cover to avoid electric shocks.
At the end of their useful life, batteries must be disposed of according to the recycling
instructions presented in this booklet.
Your DECT telephone has an inside radio range of about 50 metres and up t
in open space. The immediate presence of metal parts, (of a television for example), of
any electric appliance may result in range reduction.
Some sensitive medical equipment and safety equipment may be affected by the radio-
frequency transmissions of your telephone, in all cases, we ask that you res
safety recommendations.
In areas where storms are frequent, we recommend that you protect your telephone line
using a surge protection device.
This equipment does
emergency calls, it is recommen
(2)
.
The CE marking certifies that the product meets the essential requirements of Directive
1999/ 5/CE of the European Parliament and of the Council pertaining to microwave radio
equipment and telecommunication terminal equipment, for the safety and health of users,
for electromagnetic interference, and furthermore it efficiently uses the freq
spectrum attributed to ground and spatial communication to prevent damaging
interferences.
(1) : With the
(2) : In this ca
-
-
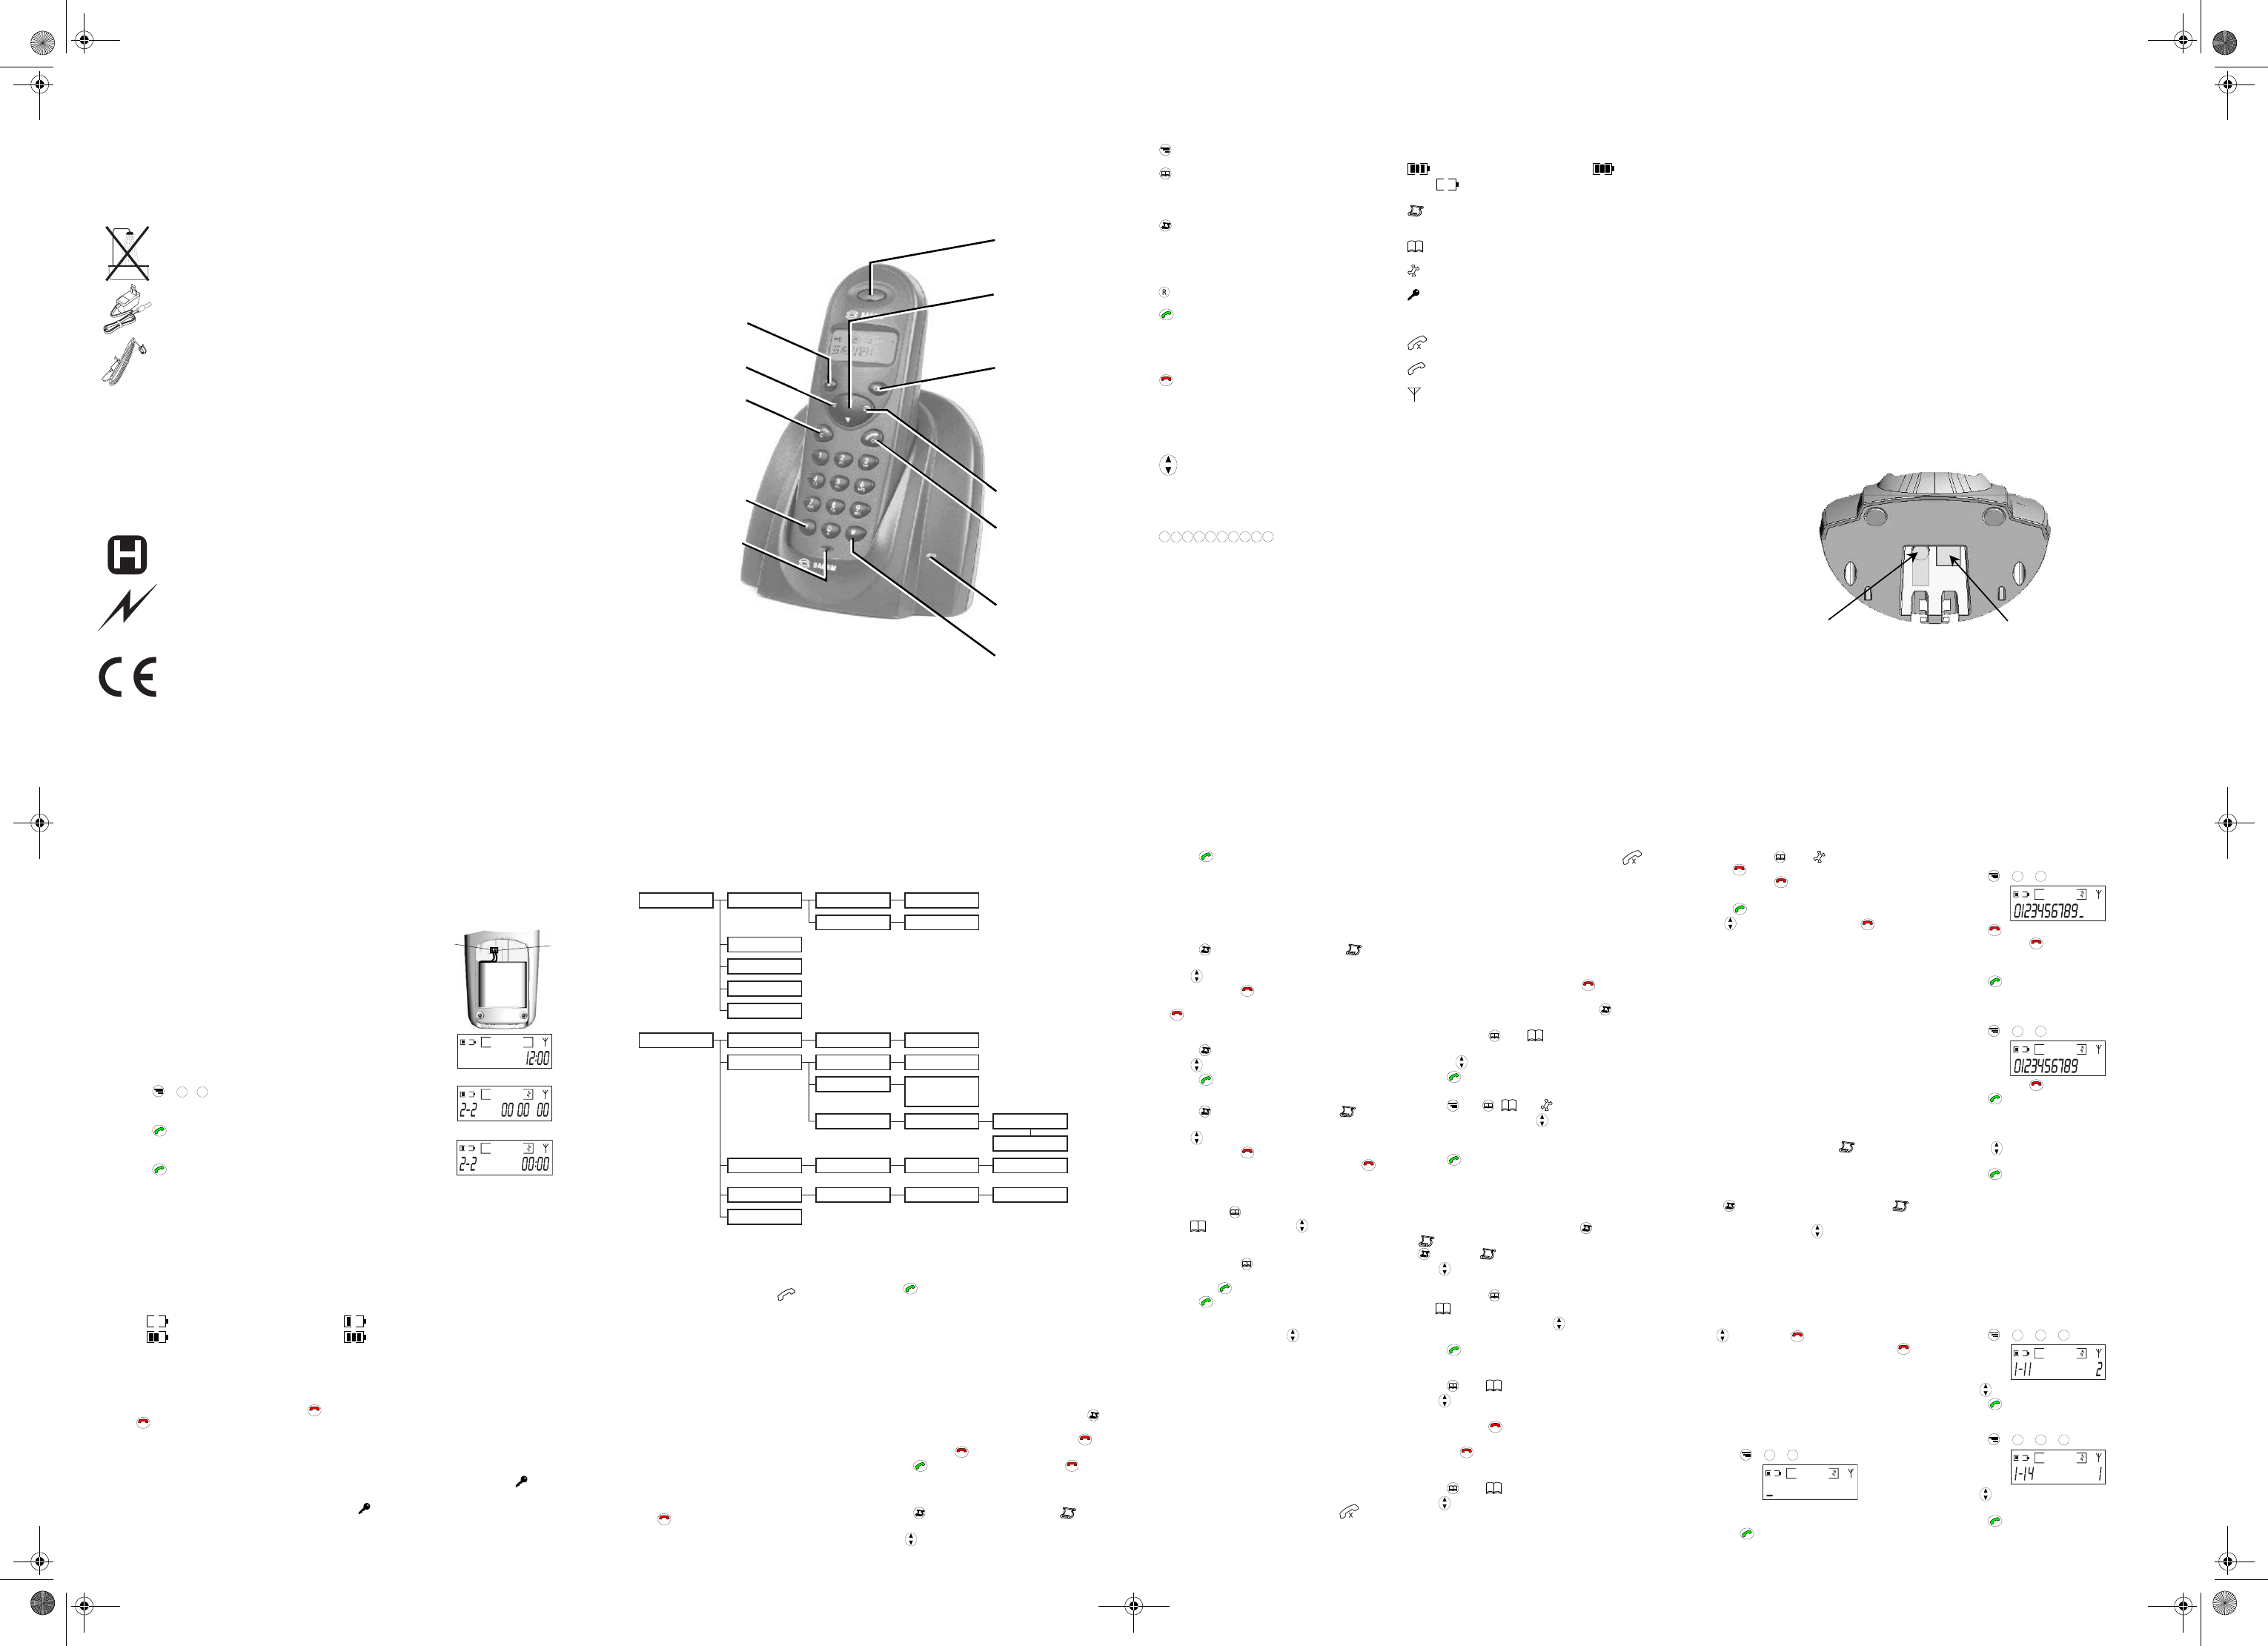
Base Station and Handset Overvie
¿ key
- Activate/deactivate
keyguard
Earpiece
- Receiver
- Ring sound
NAkey
- Scroll options
- Volume control
- Access to emergency
number
REDIAL /
CALLER ID LIST key
-
dialled numbers (first
push)
-
list (second push)
-
DIRECTORY key
- Access to directory
TAL
OK key
- Accept call
- Dial number
- Select a menu entry
# key
-
microphone during call
LED
- Flashes during a call
R key
- Call hold retrieve
(PABX only)
MENU key
- Access to settings
END CALL C key
- End a call
- Cancel a menu entry
- Switch handset OFF/ON
- Erase an entry
Microphone
-
-
Quick Guide to Handset Keys
MENU key
DIRECTORY key
Access to directory
Memorization of the number
REDIAL / CALLER ID LIST key
Access to last five dialled numbers
Access to Caller ID list
Insert a dialling pause
R key
OK
TALkey
Accept call
Dial number
Select a menu entry
C
END / CLEAR key
End a call
Cancel a menu entry
Erase numbers
Switch handset off/on
NAkey
Scroll options
Receiver volume control
Emergency dialling
1
2
3 4 5 6 7 8 9 0
DIALLINGkeys
À Keyguard
# Mute on/off during on-line state
Quick Guide to Handset
Display Symbols
CHARGING STATUS symbol ( : full,
: discharged, blinks when charging)
REDIAL / CALLER ID LIST active (symbol
blinks when a new call is in the Caller ID list)
DIRECTORY active
MENU SETTING active
KEYGUARD active (blinks when key pressed
while keyboard is locked or call is not
allowed)
MICROPHONE MUTE indicator
CAactive (blinks during incoming ring)
SIGNAL STRENGTH symbol (blinks when no
signal is being received from the base station
or the signal is weak)
Base Station
LED Flashes during an external call
.
-
-
1. Preparing your Phone for Use
Only a few simple operations are needed to prepare your handset for use. However, we suggest you first
read the general information below.
• The base station / charging unit and
installed and charged. The D10T handset has already been registered on the base station. With the
basic settings, you can start using it immediately.
• Your base
connected. However, the settings, directory entries and redialling memory in the han
retained in the event of a power failure.
• Use only the included AC adapter.
• Users of hearing aids should be awa
cause an unpleasant buzzing noise in their hearing aids.
• Use only the included battery pack. For your security, do NOT use non-recha
• Make sure that the charging contacts at the bottom of the handset do not come
metallic or greasy objects.
• You must set the time and date if they are to be shown on the display and to be stored with the calls in
the Caller ID list (see § 1.2).
1.1. Base
Connection
Insert the connectors in the order shown below:
Plug the phone line cord into
the corresponding base
station socket and push the
cord into the cord guide.
Connect the cord to the
telephone wall socket.
Plug the power cord from the
C adapter into the
corresponding base station
socket and push the cord into
the cord guide. Connect the
C adapter to the mains
socket. The green LED of the
base station lights.
-
-
1.2. Handset
Connecting the battery
The handset comes with a rechargeable NiMH battery (3.6 V, 300 mAh).
1.
battery connector is shaped to prevent reverse polarity, so
do not use force but check first whether the connector needs
to be turned round and to respect the position of the wire.
2.
Black wire
Red wire
After inserting the battery the fully charged, the handset is
switched on automatically and goes into standby mode with the
following display (with the time):
To set the date and time:
• Press
+
2
+
2
.
• The display shows 2-2 DD MM YY
• Use the keypad to enter the date (DD-MM-YY).
• Press
OK
to confirm.
• The display now shows 2-2 HH:MM.
• Use the keypad to enter the time (HH-MM).
• Press
OK
to confirm.
Charging the battery
As supplied, the battery is not charged. Place the handset on the base station to charge the battery.
charging state segments on the handset display keep blinking during the charging process. Three bars are
displayed when charging is complete (see below). Before using your
battery to charge for at least
charge/discharge cycles.
When the battery is nearly
warning signal. If this happens, replace the handset on the base station to recharge it.
Battery charging status
The various charging states are shown below:
Battery discharged Battery about 1/3 charged
Battery about 2/3 charged Battery full
Charging is indicated by blinking segments in the CHARGING STsymbol. The symbol stops blinking
when the battery is full.
Switching your Handset On an
To switch your handset off, press and hold the
C
key for more than 5s. To switch your handset
press the
C
key.
The handset is automatically switched back on when placed on the base station.
Keyguard
The keyguard function blocks the handset keys to avoid pressing them unintentionally (e.g., when carrying
the handset in your pocket). To activate keyguard: press and hold down À key until the
symbol is
shown on the display.
To deactivate keyguard: press and hold the À key until the
symbol disappears from the display.
Keyguard is also deactivated when you replace the handset on the base station.
-
-
2. Menu
3. Calls
3.1.
When you receive a call. ---- and are sho
the handset display. If you have subscribed to the
Caller ID service, the ---- is replaced with the
phone number.
T
If the handset is on the base station:
•
If the auto-pickup function is enabled you can
now answer the call directly (refer to § 7.1.3
“Activating/Deactivating the Auto-Pickup
Mode”).
Otherwise, press any key to answer the call.
If the handset is not on the base station:
• Press any key to answer the call.
When keyguard is on, an incoming call will disable
keyguard during the call.
Ending a Call
Press
C
or put the handset back on the base
station.
3.2.
3.2.1. Direct
Press
OK
and enter the phone number. The
number digits appear on the display as they are
dialled.
3.2.2. Prepared
With call preparation the phone number is first
selected from the memory (Caller ID list, Directory,
Redialling) or entered manually, then dialled.
Manual Call Preparation
1.
pauses (2 seconds) between digits using the
key (shown as P on the display).
To clear the last entered digit, briefly press
C
.
Press and hold
C
to cancel the entry.
2. Press
OK
. The number is dialled. Press
C
to
cancel dialling.
3.2.3. Calling
1. Press . The number last dialled and are
displayed.
2. Use
to select the desired phone number.
1 - HANDSET
1.1 V
Beep ON/OFF
1.14 - KEY BEEP
1.1 -
1-T
1.2 -
1.3 - EMERGENCY
1.6 - DELETE LIST
00 - SET DEF
2 - BASE DA TIME
1-85ms/2-100ms
3-250ms/4-600ms
2.32 - FLASH
2.2 - DA
2.31 - DIAL
2.33 - PBX Prefix Prefix number ___
__ Dial length
Prefix ON/OFF
2.4 -
CALL BARRING
00 - SET DEF
____(PIN code)
1 ___- (N° restricted)
Barring ON/OFF
2.6 - BASE CODE ____(old code) ___- (new code) ___- (new code)
-
-
3. Press
OK
. The number is dialled.
The five numbers stored in the redial memory are
the last five numbers that you have dialled directly
from the keypad. Any dialling pauses you may have
entered are also stored.
Clearing a Phone Number from
Memory
1. Press
. The last dialled number and are
displayed.
2. Use
to select the desired phone number.
3.
C
to clear the selected number.
To clear the entire redialling memory, hold down
C
for more than 5 seconds.
3.2.4. Dialling from the Caller ID List
1. Press twice. The latest entry is displayed.
2. Use
to select the desired entry.
3. Press
OK
. The phone number is dialled.
Clearing a Phone Number from the Ca
4. Press
twice. The last number and
are
displayed.
5. Use
to select the desired phone number.
6.
C
to clear the selected number.
To clear the entire caller ID list, hold down
C
for
more than 5 seconds.
3.2.5. Dialling from the Directory
1. Briefly . The first number in the directory
and
are displayed. Use to select the
desired phone number.
or
Press and hold
. One dashes blink on the left
of the display. Enter the directory location number
and press
OK
, the phone number appears.
2. Press
OK
. The phone number is dialled.
3.2.6. Adjusting the Receiver Volume
During a call, you can use to select one of the
three receiver volume levels available (displayed as
1 or 2 or 3 on the right of the display). The volume
setting is saved after hanging up.
3.2.7. Call
The call timer display starts 10
make a call. It remains on for 5
call is completed.
3.2.8. Microphone MUTE Function
During a call you can switch off ("mute") the
microphone. The call is placed on hold.
Activating the MUTE Functi
During a call, press and hold # until the
symbol
is displayed.
Deactivating the MUTE Func
To resume the call, press and hold # until the
symbol disappears.
4. Directory
You can store up to 15 phone numbe
directory. The entries can be created manually or
taken from the Caller ID list or redialling memory.
4.1.
1.
C
if
necessary. You can insert dialling pauses
(2 seconds) between digits by using the
key
(shown as P on the display).
2.
. The symbol displayed.
3.
with the
key if necessary.
4. Press
OK
or
1. Press
and . and are display
2.
or enter the slot
number manually.
3.
4. Press
OK
to confirm.
4.2.
from the Redialling Memory or
Caller ID List
1. once, the
symbol is displayed) or Caller ID list (press
twice, the symbol blinks).
2. Use
to select the phone number you want to
store in the directory.
3.
. The directory is opened and
the
symbol blinks.
4.
key if necessary
(only free slots are displayed).
5. Press
OK
to confirm.
4.3.
1. Press . The symbol is displayed
2. Use
to select the phone number you want to
clear.
3.
C
.
4.
and hold
C
for more than 5 seconds.
4.4.
1. Press . The symbol is displayed
2. Use
to select the phone number you want to
edit.
-
-
3. . The sy
Press
C
to clear one digit.
Press and hold
C
delete all the number.
4.
5. Press
OK
to confirm.
6. Use
to edit other entries. Press
C
when you
are finished.
5. Call
Using the Caller ID List
This function is available only if you have
subscribed to the Caller ID service.
Incoming Call Storage
The last 20 incoming calls are stored in the Caller ID
list with the phone number and the date and time
the phone number was transmitted (the date and
time must have been set on the handset).
If no phone number has been transmitted,
dashes are displayed in place of the phone number.
The calls are registered regardless of whether or not
they have been answered. New, unanswe
are shown on the display by the
symbol blinking
in the standby state.
The oldest entry is cleared when the memory is full.
Opening the Caller ID List
Press
twice to open the Caller ID list.
will
blink on the top line next to the last caller’s number.
Use the navigator keys
to scroll through the
Caller ID list. The memory slot number is displayed
next to the phone number. To display the date and
time, press #. If the number has more than
the first 13
stay on when you press À.
Clearing an Entry from the Caller ID List
To clear an entry from the Caller ID list, select it first
with
then press
C
. The entire Caller ID list
memory will be cleared if you hold dow
C
for
more than 5 seconds.
6. Emergency
6.1.
Number
• Press +
1
+
3
.
•
maximum).
• Press
OK
to confirm.
6.2.
To modify
Emergency Number
• Press +
1
+
3
.
• Press
C
to clear one digit.
• Press and hold
C
delete all the number.
• Enter the ne
maximum).
• Press
OK
to confirm.
6.3.
To disable
Emergency Number
• Press +
1
+
3
.
• Press and hold
C
delete all the number.
• Press
OK
to confirm.
6.4. Calling an Emergency Number
• Press . The
displayed.
• Press
OK
to dial.
Note: The call duration timer will not be displayed
during an emergency call.
7. Settings
All settings, both for the handset and for the base
station, are performed from the handset.
7.1. Handset
7.1.1. Setting the Handset Ringer Volume
You can choose from three ringer volumes:
• Press
+
1
+
1
+
1
.
• Use to select the ringer volume.
• Press
OK
to confirm.
7.1.2. Switching Key Beep On/Off
• Press +
1
+
1
+
4
.
• Use to choose betw
- key beep off (0).
• Press
OK
to confirm.
There are three different key beeps:
Dépliant D10T.fm Page 1 Mercredi, 12. novembre 2003 12:26 12