For apprthe
at waist level and the needle observed from above.
Working in terrain
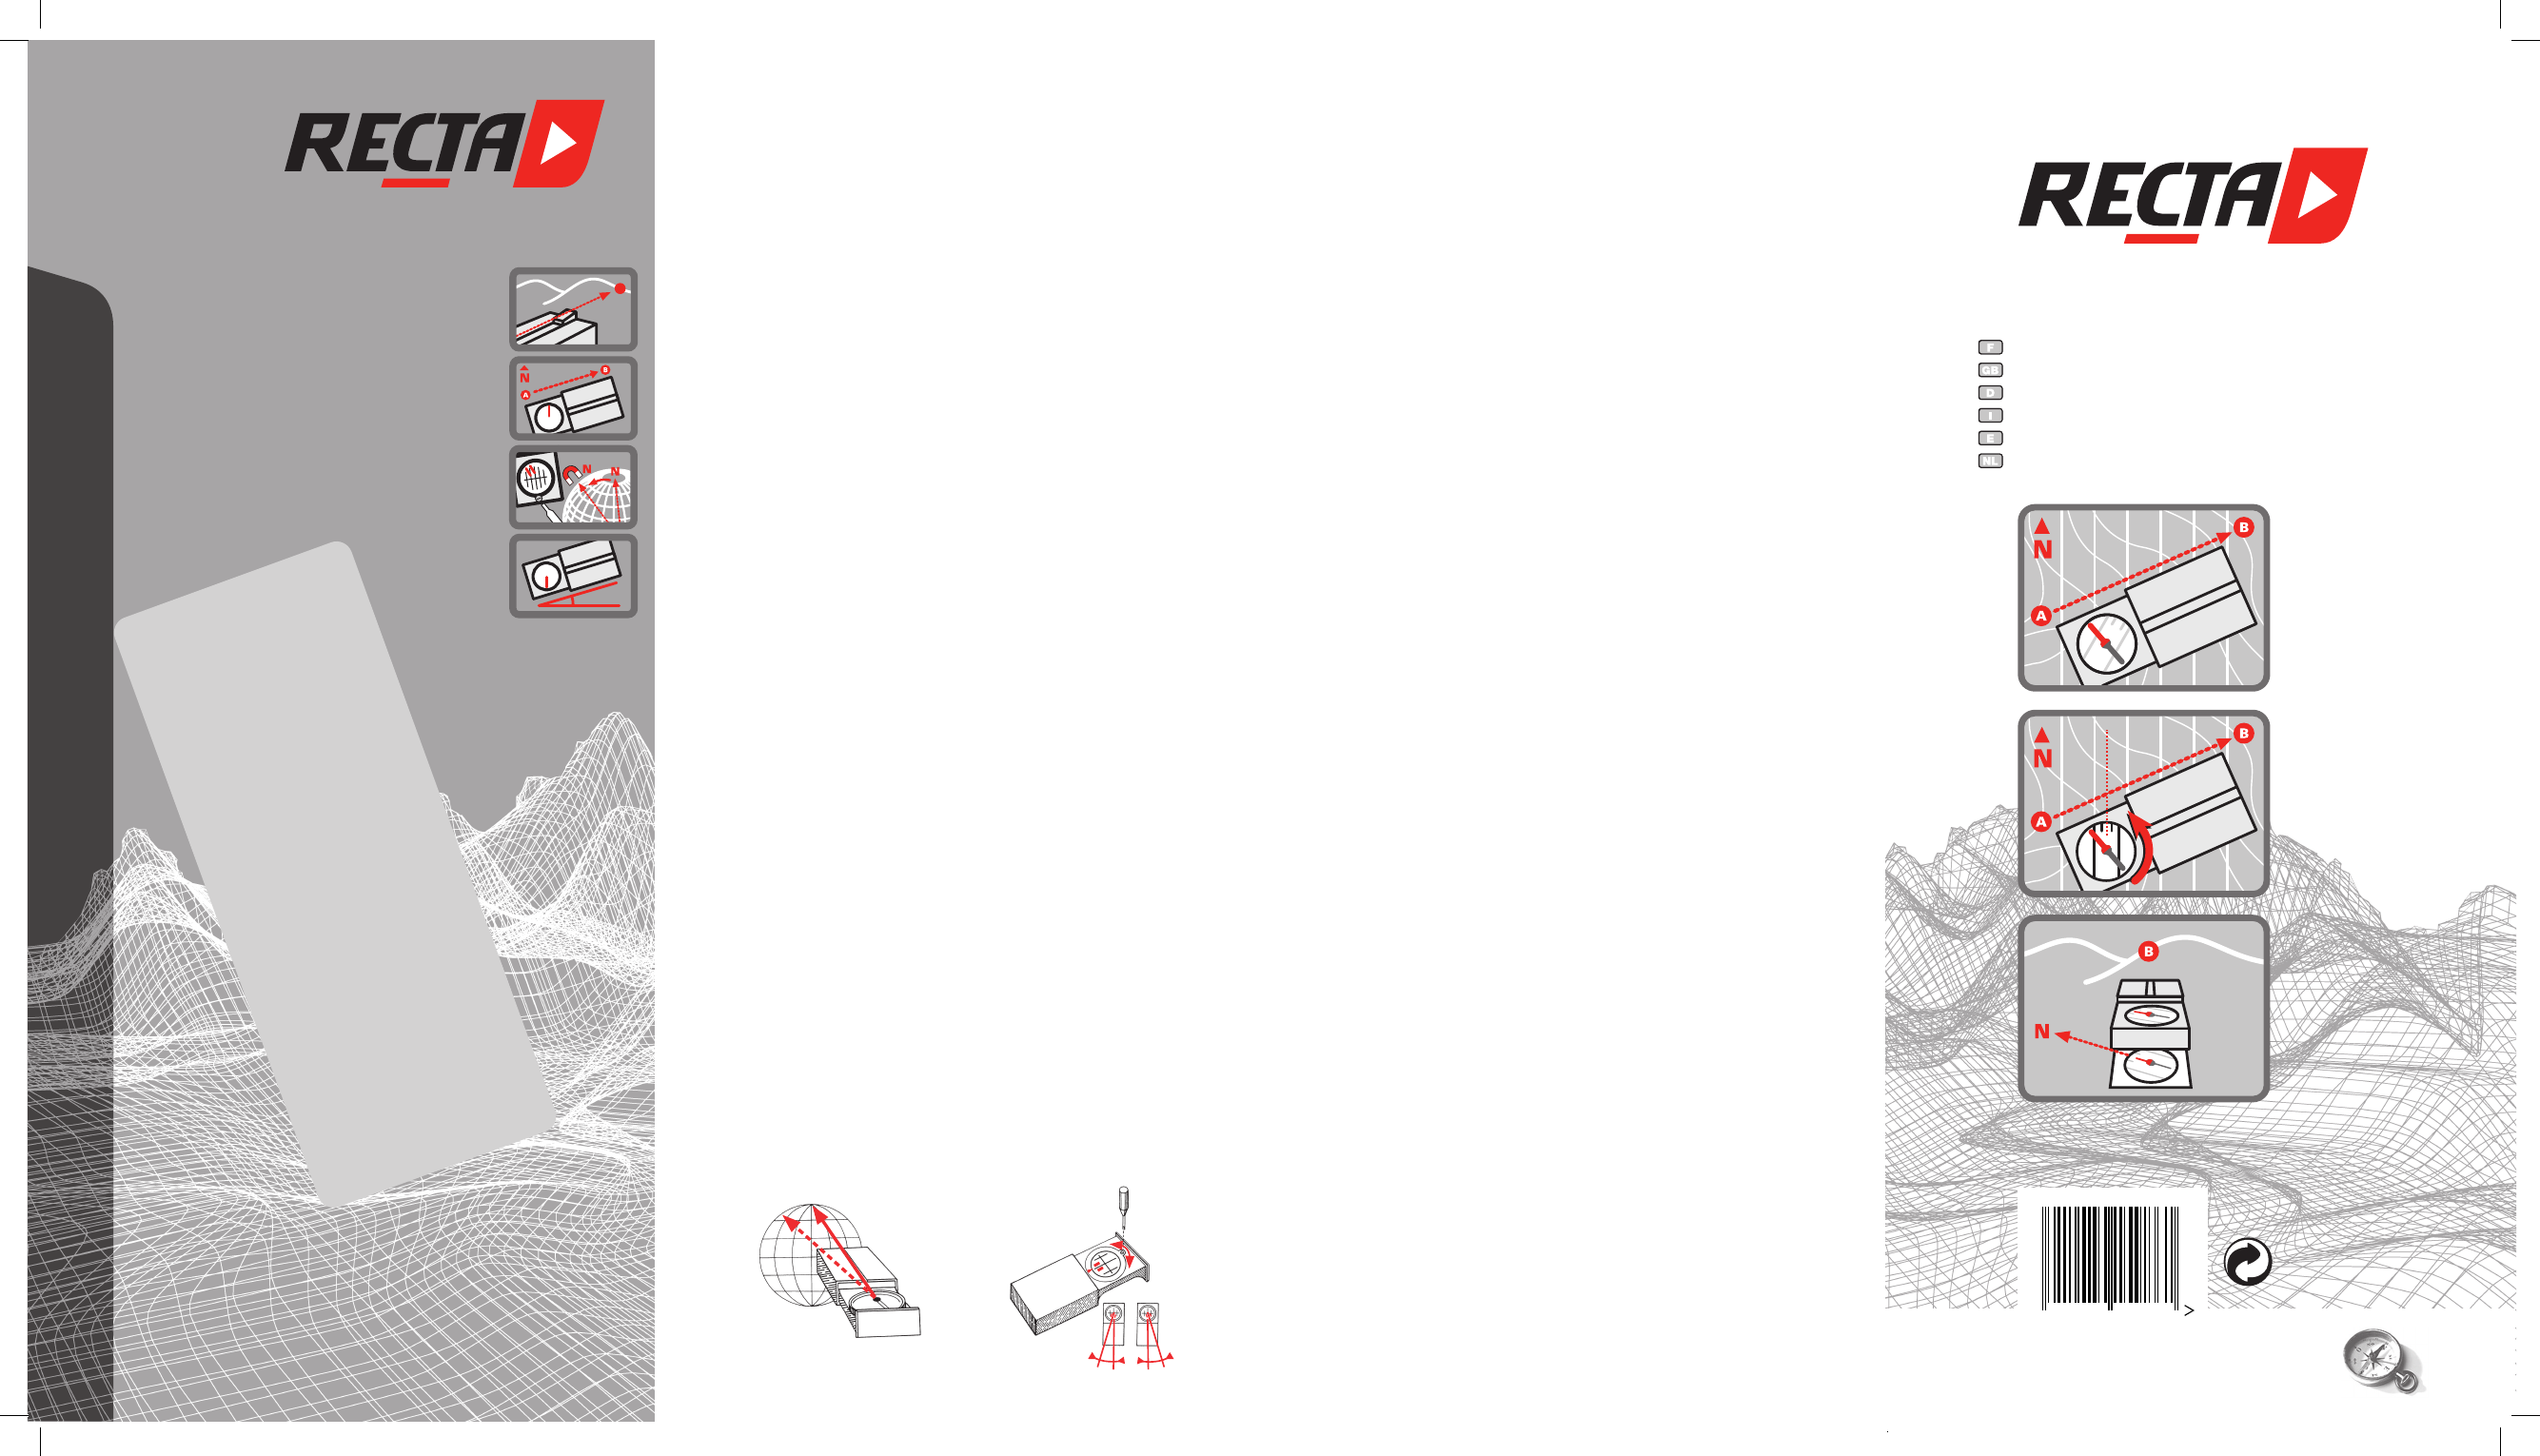
A Orienting the map
[
5
]
a) Adjust bearing to N = 0°.
b) Lay
on the map.
c) T and compass until the point of the
needle comes to rest between the N marks.
Important: On maps
be drawn in every 1 1/2“ (3-4 cm).
B Determining the direction of travel on the map
[
6
]
a)
Place
line
front pointing towards
position A.
b) T
is parallel to the N-S grid lines of the map.
c) If you
red tip
of
direction
the line of travel.
C Sighting a visible point of the terrain
[
7
]
a)
T
by turning the
are over the north end of the needle.
b) Mark your own position on the map.
c) Place
drawer your
compass until the N-S line on the dial is parallel to the
N-S grid lines of the map.
d) The point to
long edge of the compass
D Locating your own position
[
8
]
a) T
adjust the angle of the dial.
b) Place the
and turn
N-S grid lines of the map.
c) Draw a line
the compass and parallel to the long edge.
d) Sight a second point and repeat processes a-c.
e) The intersection of the two lines gives the desired
position (the
lines is
position can be determined).
E Avoiding an obstacle
[
9
]
When you encounter an obstacle such as a thicket,
swamp, hill, lake, etc.:
a) Change your r
(north end
Count your paces.
b) As
line of march I.
c) Once r
end of needle under the other pair of detour marks).
d)
After
original direction I.
Clinometer: measure of inclines Lateral
measurement
[
10
]
– Slide in mirror and hold back with finger
– Place the compass across line of vision on line of
inclination or
the edge of the com
– Read off angle of inclination (on red scale) dir
Longitudinal measurement
[
11
]
–
Open light
pressure
– Hold
of desired point over upper edge
– Read off angle of inclination in the mirr
scale)
Precision measurement of angles by prism optical
system (DP 10)
[
12
]
– Adjust
whether you are working with your right or left hand)
– Bring
adjust
focus through the lens
– T the object along
marking and read off the bearing (against magnetic
north).
Attention: Metal
deviate
some Therefor
it is advise
Small bubbles in the liquid are no im They
may appear
and air pressure.
Recta disclaims
of
compasses lasts for 5 years.
Arbeiten im Gelände
A Orientieren der Karte
[
5
]
a) Richtungswinkel N = 0° einstellen.
b)
Den Kompass
netzes auf Karte legen.
c) Karte
zwischen den Nord-marken liegt.
Wichtig: Auf Karten ohne N-S-Raster sind N-S-
Linien im Abstand von 3 bis 4 cm einzuzeichnen.
B Bestimmen der Marschrichtung auf der
Karte
[
6
]
a)
Kompass längsseitig
Standort A und Bestimmungspunkt B auf die Karte
legen. V
b) Kompasskapsel
sel parallel zum N-S-Rasternetz der Karte liegen.
c) Wenn Sie jetzt den Kompass zur
sich selbst dr rote Ende der Nadel
zwischen
Kompass
der Marschrichtung wähl
C Bestimmen
tes
[
7
]
a) Mit dem Kompass
visieren und
Kompasskapsel (Nordmarken Kapsel
über Norden der Nadel stellen).
b) Auf der Karte den (eigenen) Standort einzeichnen.
c) Kompass die Karte legen, V an den
Standort-Punkt anlegen, Kompass um den Standort
drehen, N-S-Linien der Kapsel parallel zum
N-S-Rasternetz der Karte liegen.
d) Der zu bestimmende Punkt
Längsseite des Kompasses gebildeten Linie.
D Bestimmen des eigenen Standortes
[
8
]
a) Einen im Gelände anvisieren
Richtungswinkel einstellen.
b) Kompass auf
Punkt
passkapsel parallel zum N-S-Raster Karte
liegen.
c) Linie
Längsseite
Kompassfrontseite.
d) Einen zweiten
wiederholen.
e) Der Schnittpunkt der zweiten Linie
ten
zwei Linien
Standort ermitteln).
E Umgehen eines Hindernisses
[
9
]
Bei
Hügel oder Seen:
a) Rechtzeitig Ausweichrichtung II einschlagen
(N-Nadel
einstellen). Schritte zählen.
b) Sobald der W
hen.
c)
Wenn das Hindernis überwunden ist,
Ausweichrichtung III einschlagen (N-Nadel unter
dem anderen Paar Umgehungsmarken).
d) Nach der gleichen Anzahl Schritte in der
ur
Gebrauch des Klinometers
Quermessung
[
10
]
– Spiegel einschieben und mit Finger blockieren.
–
auflegen oder geneigte Linie über Kompasskante
anvisieren.
– Neigungswinkel: Marke auf roter direkt able-
sen.
Neigungswinkelmessung längs
[
11
]
– Spiegel
unten fixieren.
– Kompass seitlich senkrecht halten und über
Oberkante gewünschten Punkt anvisieren.
– Neigungswinkel: Marke auf roter Skala im Spiegel
ablesen.
Prismenoptische Präzisions (DP
10)
[
12
]
– Skala auf
ob mit der rechten oder linken Hand gearbeitet
wird).
– Kompass in Augenhöhe bringen, horizontal halten,
Distanz zum
klar lesbar
– Anvisieren des Objektes in V der
Strichmarke und Ablesen des Richtungswinkels
(gegenüber magnetischer Nordrichtung).
Achtung: Metallische Gegenstände oder
Starkstromleitungen in der Nähe können die
Kompassnadel fehlleiten. Starke Magnetfelder bewir
ken unter
Umstän
Kontr Sie deshal regelmä die Funkti
Ihre Kompas
ohne
V
Recta
ihrer Produkte.
Die Hersteller-Garantie für RECT
Kompasse beträgt 5 Jahre.
T the technology
of decli
lines do not
angle decli-
nation
[
1
]
.
country and another. certain models, the appro-
priate set per with simpler
models, this has to be calculated.
Declination correction
[
2
]
RECT
nation correction
have an adjusting screw on the reverse
side
ings (magnetic
declination changes against
with the aid of a special index.
Example:
Declination 20° W: Increase in azimuth of 20°.
Declination 20° E: Decrease in azimuth of 20°.
The ver of the magnetic field, known as
inclination, is not the same every and this in-
fluences the horizontal posi of the needle. RECT
compen for this effect by means of two different
capsules: one for the
hemisphere.
[
3a
]
HoweverGlobal System
function at all latitudes wit being ne to
exchange the capsules.
[
3b
]
Operation
1) Hold the compass in one hand and pull the
cord with the other
2) Fold out the mirror by tipping the compass. Push
mirror
to see through the dial onto the map).
Side scale
The
housing
2“
and the end of the drawer frame.
Direction of travel (azimuth/bearing)
[
4
]
The bearing is the angle between true north and
the line of travel. It can be read off on the index.
T the technology
of decli
lines do not
angle decli-
nation
[
1
]
.
country and another. certain models, the appro-
priate set per with simpler
models, this has to be calculated.
Declination correction
[
2
]
RECT
nation correction
have an adjusting screw on the reverse
side
ings (magnetic
declination changes against
with the aid of a special index.
Example:
Declination 20° W: Increase in azimuth of 20°.
Declination 20° E: Decrease in azimuth of 20°.
The ver of the magnetic field, known as
inclination, is not the same every and this in-
fluences the horizontal posi of the needle. RECT
compen for this effect by means of two different
capsules: one for the
hemisphere.
[
3a
]
HoweverGlobal System
function at all latitudes wit being ne to
exchange the capsules.
[
3b
]
Operation
1) Hold the compass in one
the other
2) Fold out the mirror by tipping the compass. Push
mirror
to see through the dial onto the map).
Side scale
The
housing
2“
and the end of the drawer frame.
Direction of travel (azimuth/bearing)
[
4
]
The bearing is the angle between true north and the line
of travel. It can be read off on the index.
Sighting with the mirror
[
4
]
The positioning of the mirror on the RECTA
offers you the advantage of accurate, uncomplicated
sighting of the line of travel while observing the com-
pass capsule. By turning yourself with the compass
in to settle
with the red end between the parallel north markings
on the capsule.
[
1
]
[
2
]
Zwei Begrif sind für das V der Kompass-
TDekli
on.
der geographischen Nordrichtung überein. Der W
zwischen diesen beiden Nordrichtungen wird Deklinati-
on
[
1
]
zum andern
die entsprechende
einfacheren Modellen muss sie berechnet wer
Einstellen der Deklination
[
2
]
Bei RECT mit einstell-
barer Deklinations-Korrektur befindet sich die
Korrekturschraube
Drehen Stellschraube werden die Nordmarken
mit besonderem Index (magnetisch Nord) gegenüber
Skala
der Deklination verstellt.
Beispiel: 20° W Deklination:
V
20° E Deklination:
V
Auch die vertikale Intensität des Magnet
Inklination genannt, ist nicht überall gleich, was
die Horizontallage der Nadel beeinflusst. RECT
kompensiert diesen Effekt mit zwei verschiedenen
Kapseln: eine für
Hemisphäre.
[
3a
]
RECT Kompasse mit dem Global System funktio-
nieren über alle Breiten-grade hinweg ohne T
Kapsel.
[
3b
]
Handhabung
1) Kompass
ren Hand an der Schnur ziehen.
2) Durch
auf
Kapsel auf Karte).
Seitenmassstab
Die Distanz zwischen den Strichmarken auf der
Gehäuseaussenseite
sind
Schiebervorderkante verfügbar
Richtungswinkel
(Azimut, Marschrichtungszahl)
[
4
]
Zwei Begrif sind für das V der Kompass-
TDekli
on.
der geographischen Nordrichtung überein. Der W
zwischen diesen beiden Nordrichtungen wird Deklinati-
on
[
1
]
zum andern
die entsprechende
einfacheren Modellen muss sie berechnet wer
Einstellen der Deklination
[
2
]
Bei RECT mit einstell-
barer Deklinations-Korrektur befindet sich die
Korrekturschraube
Drehen Stellschraube werden die Nordmarken
mit besonderem Index (magnetisch Nord) gegenüber
Skala
der Deklination verstellt.
Beispiel: 20° W Deklination:
V
20° E Deklination:
V
Auch die vertikale Intensität des Magnet
Inklination genannt, ist nicht überall gleich, was
die Horizontallage der Nadel beeinflusst. RECT
kompensiert diesen Effekt mit zwei verschiedenen
Kapseln: eine für
Hemisphäre.
[
3a
]
RECT Kompasse mit dem Global System funktio-
nieren über alle Breiten-grade hinweg ohne T
Kapsel.
[
3b
]
Handhabung
1) Kompass
ren Hand an der Schnur ziehen.
2) Durch
auf
Kapsel auf Karte).
Seitenmassstab
Die Distanz zwischen den Strichmarken auf der
Gehäuseaussenseite
sind
Schiebervorderkante verfügbar
Richtungswinkel (Azimut, Marschrichtungszahl)
[
4
]
Der
fisch
ablesbar
Visieren mit Hilfe des Spiegels
[
4
]
Der untenliegende Spiegel am RECTA Kompass bie-
tet Ihnen den Vorteil eines genauen und übersichtli-
chen Peilens der Marschrichtung und die gleichzeitige
Beobachtung der Kom
eigene Achse muss sich die rote N-Spitze der
schen den Nordmarken der Kapsel einpendeln.
Für eine grobe Richtungs hält man
den Kompass auf Gürtelhöhe und beobachtet von
oben das Einschwingen der Nadel.
DP 6 Global System
Mode d’emploi à l’intérieur
Operating instructions inside
Bedienungsanleitung inliegend
Instruzioni all'interno
Instrucciones en el interior de la caja
Handleiding ingesloten
1
2
3
www.recta.ch
F
GB
D
I
E
NL
RECTA, MORE THAN 100 YEARS OF HERITAGE.
6 41 1