Complies
appro
This product has been tes
applying versions v
EN55022: 2010
EN55024: 2010
SPECIFICA
• Ultra small activity cam
• Lens color CMOS
• 75° wide angle l
• Auto sound detection video
rec
• Video ratio: 4:3
• Fr
• Vi
• Lens focus range is 12cm
to infinity
• Video format: A
• Video encoding: M-JPEG
• Built-in Microphone
P
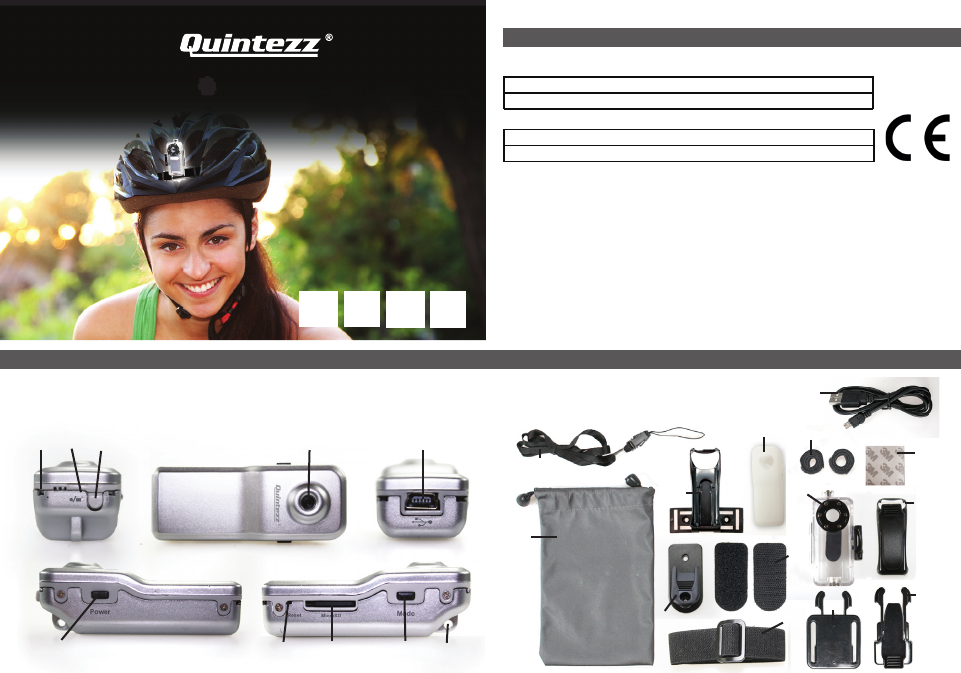
SEE ILLUS
1. Power Button 13. 3M
2. MODE Button 14. USB cabl
3. USB Socket 15. V
4. Blue LED indicator 16. Mounting/arm strap
5. Red LED indicator 17. Silicone pr
6. Lens camera 18.
W
7. Recor 19. Mounting clip
8. Lanyar 20.
Mo
9. Micro SD Car
10. Reset Button
Fl
11. Acces 23. Mounting holder f
12. Lanyar 24. 3M T
* When used with the waterproof housing, no sound will be r
MOUNTING
See separate ‘MOUNTING SHEET’ f
CHARGING
1.
Pl
2. Plug
charging de
3. The
and
Mini Cam & Kit starts char
4.
Bl
Note: For first time use it is also
It could take some time bef
OPERA
Getting started
1)
Make surwww) is
inserted into the Micro USB Car slot (9) befor you start using the
Quintezz Activity Mini Cam & Kit.
Place the card into the
finger nail so that it clicks into place.
(T the Micro SD-car pr the car gently again with your
finger nail so that it pops out)
Note: Make sur
2)
a. T
indicator
Activity Mini Cam & Kit is now in Standby mode.
b. Press and hold
blue
quickly on and off
3)
Note:
you first need to
website: www.quin.
a. Plug
& Kit. Plug the other end of the USB cabl
b. Click on the r
when a
the ‘T
c. Now set the correct time and date:
e.g.: ‘2013-11-02 23:59:59 ’
Mak
exac
abov
d. In the menu, choose ‘Fil and then ‘Save’, or press ‘Ctrl and ‘S’
simultaneously on y
e. Corr
→ now you ar
Video rec
• Start recor Make Activity
on and in Standby Mode (blue (4) is the
Recor Button (7) so that the r LED indicator (5) starts flashing
slowl
• Stop recShortly pr
The r LED indic (5) will flash quickl before turning off
The Activity Mini Cam & Kit is now automaticall
piece. LED (4) will device back
Standby Mode.
• Continue r Pr the Recor Button (7) once more to
continue rec
again= rec
Note:
• Make
automatically after 30 sec. and nothing will be r
• Automa
pr
• During on
or
guarantees correct, natural, clear and stabl
Playing/saving your r
• Make sur
• Plug
& Kit. Plug the other end of the USB cabl
• Click on the r
when a pop-up screen appear
• Y
files ar
•
Y
Note:
• When
first need
website: www.quin
• If your
please insert it again.
• We recommend cop
disk
files from
large data files c
AUTOMA
The Quintezz
off function:
• Under Standby Mode, when no
device will automatic
• When you are recActivity
is low, the c
• When disk space on ycamera will
automaticall
RESET
Whenever f
Us
AUTOMA
The
detection
&
voices ar
* This function will not work when used with the waterproof housing
T
• Make surActivity Mini Cam
Mode (blue LED indicator(4) is ON).
• Pres
blue
flash quickly indicating that the sound activ
• When~65 d
Acti
2 mi
• When
and switch
it will continue r
T:
• Pres the MODE butt (2) shortly again to stop ‘automatic sound
detection video r
USER GUIDELINES
• Concerning l usage of this pr please check with y
particular country law for mor
• Windows: XP, Vista, 7 and MAC: 10.4 or higher
• Operating temperatur
• Operating humidity: 20% ~ 80%
• Make
wet without the waterpr
• Make sure
aim the c
not to damage optical parts of the camer
• Make sur very dusty ar which may
cause damage to the l
• This
Instead,
by handing
waste el
CUSTOMER SUPPORT
F@ q
GUARANTEE
Copyright©Quintezz. Quintezz is a r
NV The Quintezz brand stands f superior product quality and
outstanding
against two
years
of
guarantee can be downl
• Supports high c SD (SDHC)
memory car
• High capacity lithium polymer
battery inside for s
(max 2 hours)
• Standby time: max. 250 h
•
Vide
• Time and date stamp
• Power save
• Auto sound r
• W
• Size: 55 x 20 x 16 mm
*Not included, see www
DECLARA
----------------------------- Manual/Mini Activity Cam&kit/11-13/V01 --------------------------------
Cop
We, the undersigned
Company: TE-GROUP nv
Address: Kapelsestraat 61, 2950 Kapellen - B
declare, that the following equipment:
Product Name: Quintezz Acvity Mini Cam & Kit
Product Type: Acvity Mini Camera
GB NL
FR D
USER’S
MANUAL
GB
ILLUSTRA
Illustration 2
Illustration 1
11
12
14
13
20
19
18
17
16
15
21
22
23
24
NL
_
year
month
day 1 space clock
1
2
3 5 7 6
8
ACTIVITY MINI CAM &
KIT
SPECIFICA
• Extreem kl
• CMOS kleur
• 75 ° breedhoekl
• Automatische geluidsdetectie video-opname
• Video : 4:3
• Beeldsnelheid: 29-30 FPS
• Video resolutie : 720 * 480 V
• Lens scherpstelafst
• Video formaat : A
• Video- encoding : M – JPEG
• Ingebouwde microf
• Ondersteunt hoge c
• Hoge
max. 2 uur )
• Stand-by tijd : max . 250 h
• Video-opname en afspelen (via PC )
• Tijd en datum stempel
• Power save
• Auto geluidsopname
• Gewicht : 15 gram
• Afmetingen: 55 x 20 x 16 cm
* Niet inbegrepen, zie www
ONDERDELEN EN FUNCTIES
ZIE ILLUSTRA
1. AAN/UIT-knop 13.
3
2. MODE-knop 14. USB-kabel
3. USB-poort 15. Klittenband
4. Blauwe LED-indicator 16. Montageriem / riem voor arm
5. Rode LED-indicator 17. Silic
6. Cameralens 18
montagestuk
7. Opnameknop 19. Bevestigingsclip
8. Gaatje voor ketting 20. Montageclip v
behuizing
9. Micro SD-kaart sl 21. Montagebeugel met magneet
10. Reset-knop 22. Vlakke montageclip v
water
11. Acces 23. Montagehouder voor fiets / helm
12. Ketting 24. 3M T
* In combinatie met de water
worden.
MONT
Zie apart blad ‘Mounting Sheet’ voor montage-instructies.
LADEN
1
.
2 . Plaats het andere uit
USB-oplaadapparaat .
3 . De rode LED-indic
en de
Activity Mini Cam & Kit begint met opladen.
4 Blauwe LED-indicator (4)
(max. 2 uur ).
Opmerking :
Bij dat laag zodat
het enige tijd kan dur v de LED-lampjes beginnen branden.
WERKING
Aan de slag!
1) Plaats een micro SD-kaart
Plaawww)
in
Kit te gebruiken.
Plaats de
nagel zodat deze als het ware “v
(Om
vingernagel op de kaart, zodat deze naar boven “springt”)
Opmerking
2) Schakel de Activity Mini Cam & Kit AAN en weer UIT:
a) Aanschakel Houd tot de blauwe
LED-indicator begint De licht
éénmalig op. De Activity Mini Cam & Kit is nu in de standby modus.
b) Uitschakelen: Houd
totdat
snel aan en weer uitgaat.
3 ) Aansluiten op een pc om Datum/Tijd aan te passen :
Opmerking: Wanneer voorzien is van Windows
hogere versie,
u downloaden van onze website: www.
a)
Plaats het andere uit
b)
... )
‘T
c)
Bvb : ‘2013 -11-02 23:59:59‘
Zorg erv
in e
manier als hierboven
ingeeft, dus als volgt:
d)
drukt
op te slaan.
e) De juiste datum en tijd zijn nu ingest
→
gaan gebruiken!
Video-opnames:
• Opname starten: Zor ervoor dat de Activity Mini Cam & Kit
aangeschakeld is en zich in standby modus be (blauwe LED-
indicator (4) brandt).
indicator (5) langzaam knippert = st
• Opname Druk
stoppen.
uit te Activity & Kit opgenomen stuk
automatisch opslaan. De blauw (4) blijft br
aangezien het apparaat zicht terug in st
• Opname ver zetten: Druk nogmaals op de Record-knop (7) om
de De opnieuw
langzaam knipperen = opname.
Opmerking: :
• Kijk
zal
dus niets opgenomen worden.
• Het automatische opslaan heeft altijd een bepaalde tijd nodig, gelieve
dus niet
onderbrok
• Tijdens video-opname:
meer
Dit laatste staat garant voor correcte, natuurlijke, heldere en stabiele
beelden.
Spelen / opslaan van uw opnamen op een PC
• Zorg ervoor dat de Activity Mini Cam & Kit uitgeschak
• Plaat
Kit.
•
Klik
of w
• De
map:
.
• U kunt nu de opgenomen bestanden naar hartelust selecter
afspelen / monter
Opmerking :
• Als uw
eerst
onze website: www.quin .
• Als
herkent dan plaatst u deze best even opnieuw
• W aan opgenomen naar har
computer te kopiëren en deze van daar af te lezen / af te spelen. De
opgenomen bestanden rechtstr
voor
kunnen worden afgespeeld.
AUTOMATISCH O
De Kit voorzien een
uitschakelfunctie:
• Onder
de 45 sec., wor
• Wanneer
leeg
schakel
• Wanneer de
automatisch het bestand opslaan al
RESET
W het apparaat e niet functioneert dient u het te resetten.
Gebruik een paperclip of een kleine pin om de Reset-knop (10) in te
drukken en op die manier het apparaat t
AUTOMA
De Quint Activity Mini Cam & Kit is v v
geluidsdetectie video-opname’.
Cam
geluiden of stemmen detecteert die hoger zijn dan 60 ~ 65 dB. *
* Deze functie werkt niet in combinatie met de waterdich.
Om deze functie te activer
• Zorg
in standby modus bevindt (blauwe LED-indic
• Druk kort
De blauwe
snel knipperen wat aangeeft dat deze functie geactiv
• Wanneer hoger zijn
dB zal de Quintezz Activity Mini Cam & Kit automatisch beginnen
opnemen gedur
rode LED-indic
• W na 2 minut geluid wordt waargenomen, zal het
apparaat het bestand opslaan en overschakel
Als
doorgaan met opnemen.
Om deze functie te deactiver
• Druk opnieuw kortelings op de MODE -knop (2) om deze functie uit te
schakel
RICH
• Gelieve
gebruik van dit pr
• Windows: XP,Vista, 7 en Mac: 10.4 of hoger
• Bedrijfstemperatuur: -5 ° ~ 50 ° C
• Luchtvochtigheid : 20 % ~ 80 %
• Gebruik
regent of nat kan w
• Zorg dat aanwezig
opnames te maken. Richt
een
niet te beschadigen.
• Zor
die
• Dit
af
br app a t v naar een daar a
in
SUPPORT VOOR KLANTEN
V
support@ quintezz.com.
GARANTIE
Copyright©Quintezz. Quint een gedeponeerd handelsmerk van
TE-Group NV
en
Quintezz v pr gar tw jaar, vanaf de
originele aankoop van het pr biedt tegen alle materiaal- en
verwerkingsfout
van v Quintezz kader van
kunnen van onze website www
_
jaar
maand
dag 1 spatie clock