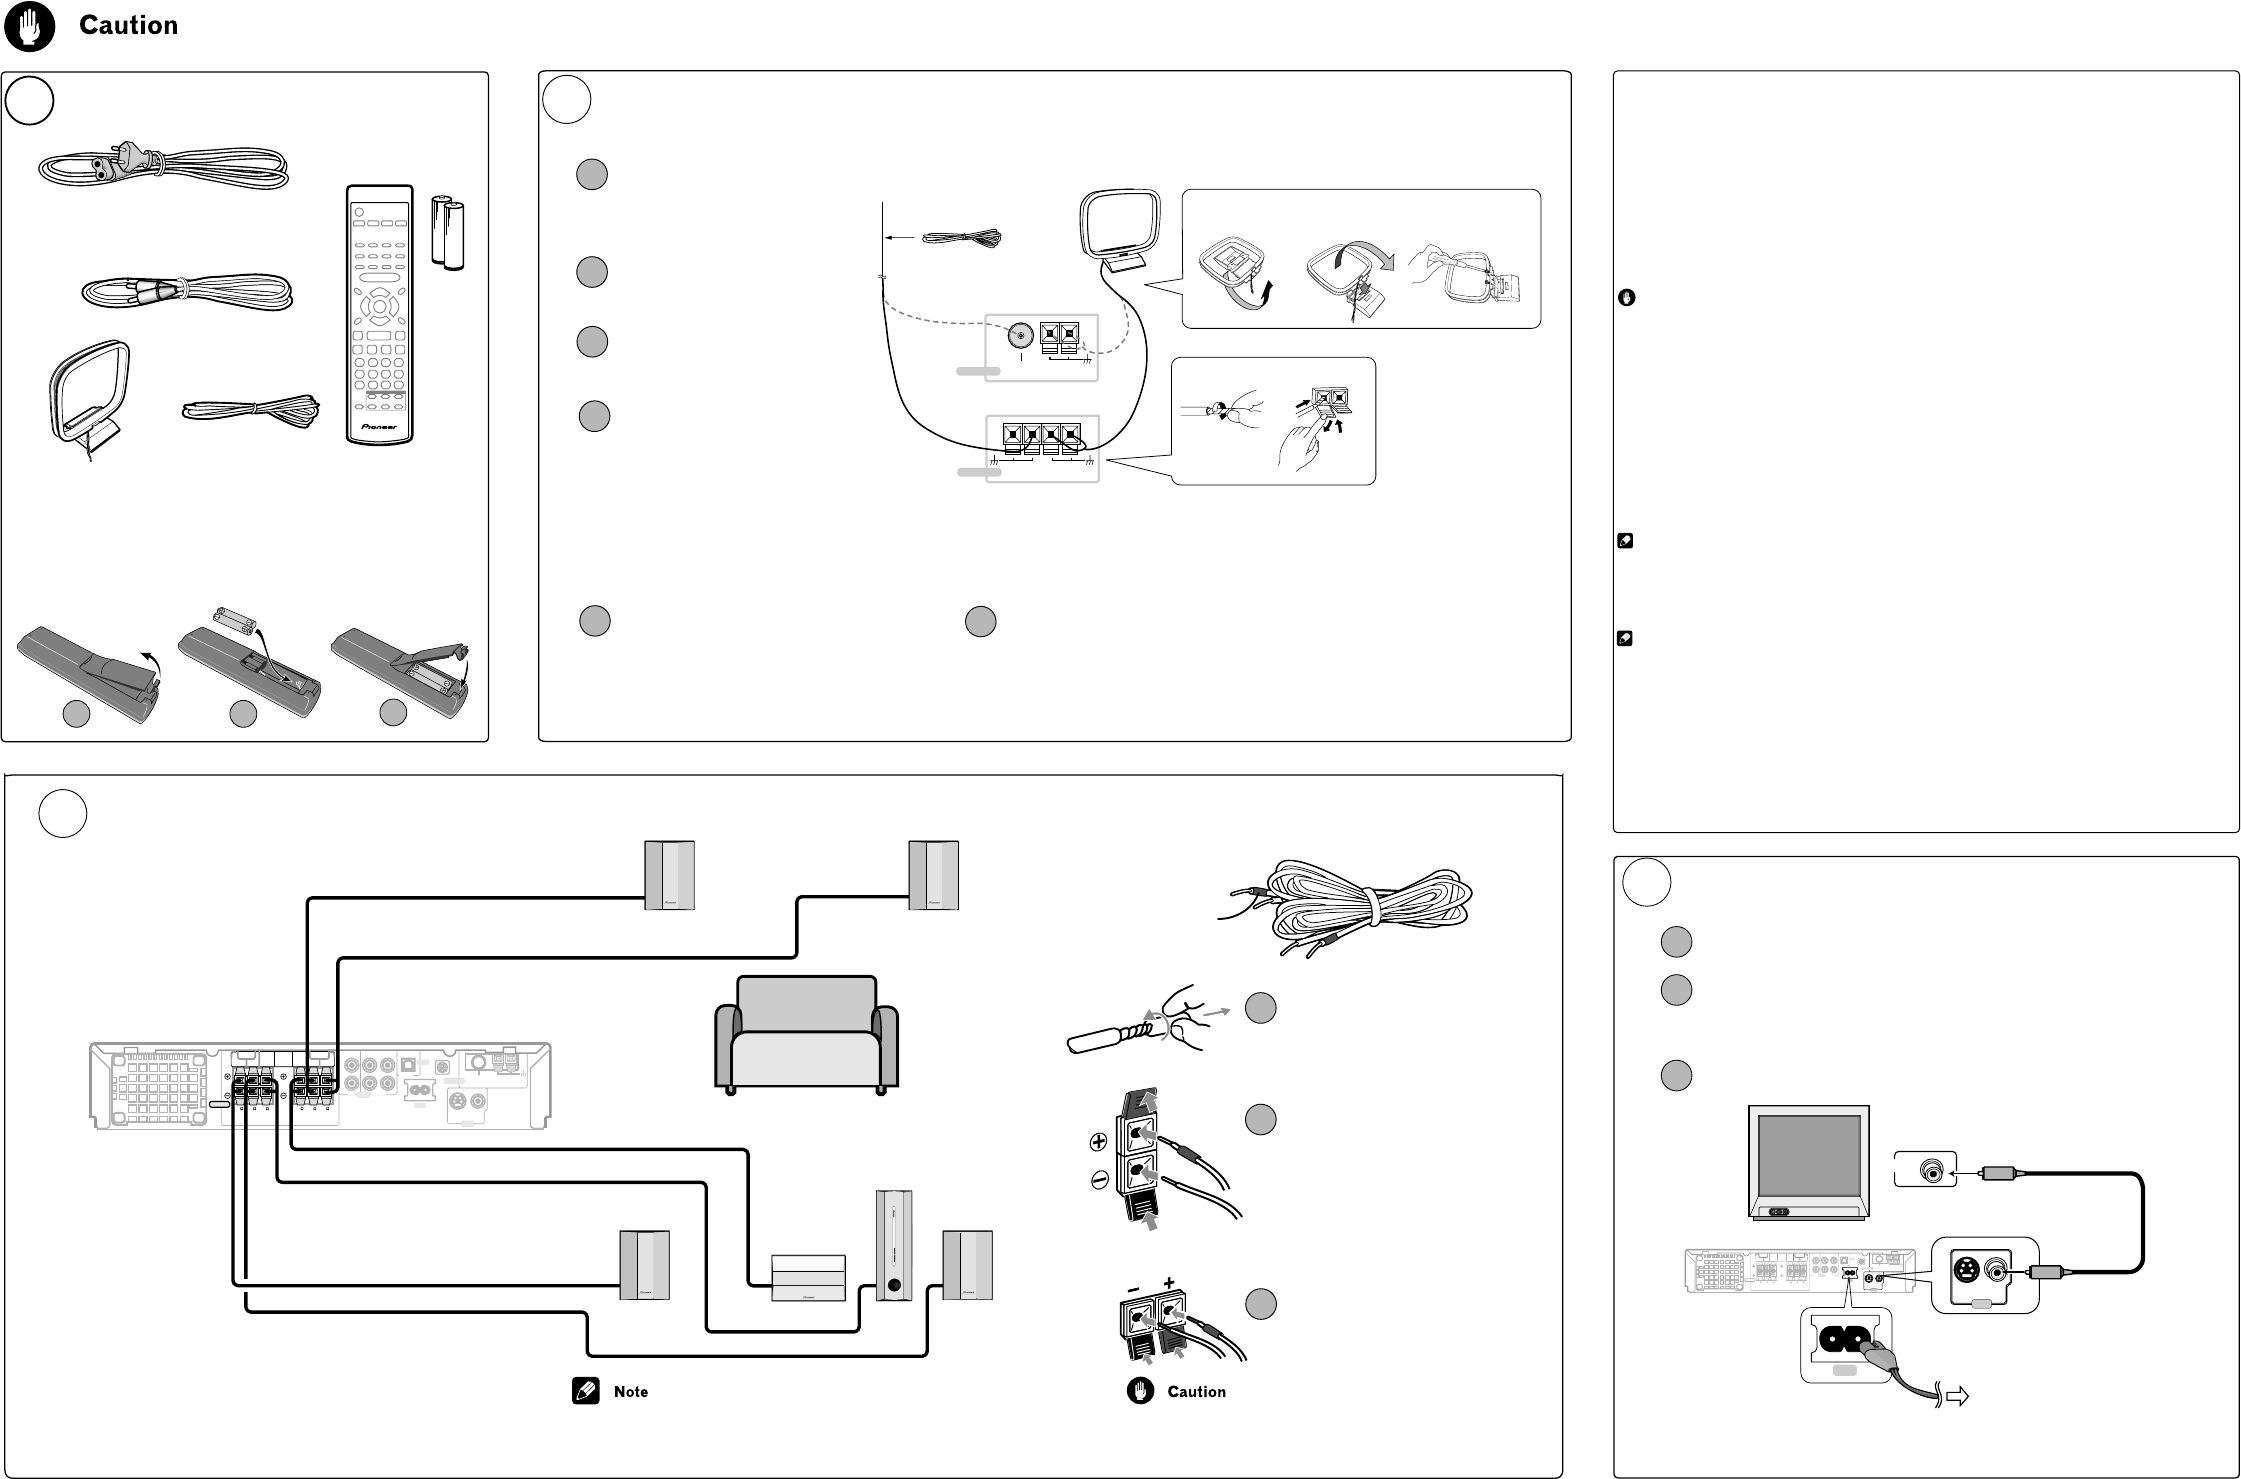
Connect the AM and FM antennas to the rear panel of the DVD receiver.
1
2
3
Push open the tabs, then insert
one wire fully into each terminal.
Release the tabs to secure the AM
antenna wires.
Pull off the protective
shields of both AM antenna
wires.
4
Fix the AM loop antenna to the
attached stand.
To fix the stand to the antenna, bend in the
direction indicated by the arrow (fig. A) then
clip the loop onto the stand (fig. B).
Note: If you plan to mount the AM antenna
to a wall or other surface, secure the stand
with screws (fig. C) before clipping the loop
to the stand. Make sure the reception is clear.
5
6
Place the AM antenna on a flat
surface and point in the direction
giving the best reception.
Don’t let it come into contact with metal
objects and avoid placing near computers,
television sets or other electrical appliances.
Connect the FM wire antenna to the FM UNBAL 75Ω antenna terminal.
For best results, extend the FM antenna fully and fix to a wall or door
frame. Don’t drape loosely or leave coiled up.
Note:
The signal earth (H) is designed to reduce noise that occurs when an
antenna is connected. It is not an electrical safety earth.
When connecting this system or changing connections, be sure to switch the power off with the STANDBY/ON button, and disconnect the power cord from the AC outlet.
Do not use these speakers with any other system or amplifier as this may result in damage or fire.
3
Connect each speaker using the color-coded
speaker cords. Match them to the colored labels
above the speaker terminals.
1
2
3
Connect each speaker as shown below.
Twist and pull off the
protective shields on each
wire.
Connect one end to the DVD
receiver. Match the colored
wire with the color-coded
label (above the tabs), then
insert the colored wire into
the red (+) tab and the other
wire with the black (–) tab.
Connect the other end to the
speaker in the same way.
Color coding
For the best surround sound, setup your
speakers as above. The front left and right
speakers should be about 1.8–2.7 m apart.
Remove the supplied non-slip pads from the paper, and stick four
onto the base of each satellite speaker.
Actual speakers supplied may differ from those shown.
Congratulations! You're done setting up.
These speaker terminals can be under HAZARDOUS VOLTAGE. When you
connect or disconnect the speaker cables, to prevent the risk of electric shock,
do not touch uninsulated parts before disconnecting the power cord.
Connect the DVD/CD receiver to your TV, then connect the
supplied power cord.
3
Connect the power cord to the AC inlet.
2
Connect one end to a video input on your TV.
4
1
Using the remote control
The remote control can be used within a range of about 7 meters from the remote sensor on the front panel, and within a
30 degree angle.
Precautions:
• The remote control may not work if there is an obstacle between the remote control and the display unit, or if the remote
control is not directed towards the remote sensor of the display unit at the correct angle.
• The remote control may not work properly if strong light such as direct sunlight or fluorescent light is shining onto the
unit’s remote sensor.
• The remote control may not work properly when this unit is used near devices emitting infrared rays, or when remote
controls of other devices which use infrared rays are used. Also, the use of this remote control may cause other devices to
work improperly.
• When the operating range of the remote becomes too short, replace the batteries.
Remote control battery caution
Incorrect use of batteries may cause leakage or rupture.
Always be sure to follow these guidelines:
• Always insert batteries into the battery compartment correctly matching the
positive ª and negative · polarities, as shown by the display inside the compartment.
• Never mix new and used batteries.
• Batteries of the same size may have different voltages, depending on brand. Do not mix different brands of batteries.
• When disposing of used batteries, please comply with governmental regulations or environmental public instruction's rules
that apply in your country or area.
• In order to prevent battery leakage, remove the batteries when not using the remote control for an extended period (one
month or more). If leakage occurs, carefully wipe away any battery fluid inside the compartment, and replace the batteries
with new ones.
• Do not allow books or other objects to rest on top of the remote control, since the buttons may be depressed, causing
faster exhaustion of the batteries.
Additional notes on connecting antennas
• Keep antenna cables away from other cables and the display unit and main set.
• To assure optimum reception, pull the FM antenna so that it is fully extended and not coiled or hanging at the rear of the unit.
• If reception with the supplied antenna is poor, see the Additional Connections section in the main operating instructions
for details on connecting outdoor antennas.
Additional notes on speaker placement
Place speakers as shown in step 4 to achieve the optimum surround sound effect
• Install the main front left and right speakers at an equal distance from the TV.
• For optimum effect, install the rear speakers slightly above ear level.
• This system's speakers are magnetically shielded, so there's virtually no picture color distortion when they are placed near
a TV. In the rare event that there is some picture color interference, switch power to the TV off, and wait 15 to 30 minutes
before switching on again.
• Install the center speaker above or below the TV so that the sound of the center channel is localized at the TV screen.
• When installing the center speaker on top of the TV, be sure to secure it with tape or some other suitable means.
Otherwise, the speaker may fall from the TV due to external shocks such as earthquakes, endangering those nearby or
damaging the speaker.
• Do not connect the supplied speakers with any other amplifier. This may result in malfunction or fire.
* In some countries or regions, the shape of the
power plug may sometimes differ from that
shown in the explanatory drawings.
Connect the other end to the video output of the DVD receiver.
This player is equipped with copy protection technology. Do not connect this
player to your TV via a VCR using AV cables, as the picture from this player will not
Hallo ik heb deze week een tweedehands home set gekocht hoe sluit ik mijn Pioneer home cinema set je XV-DV303 aan op tv zodat ik het geluid over de boxen kan horen vande tv?
Gesteld op 6-12-2012 om 17:19
Ik neem aan dat je het geluid over de boxen van de set wilt horen en niet van de boxen van de tv! Ik heb het setje niet meer, maar ik zette altijd de tv geluid op 0 en setje iets harder!
Geantwoord op 8-12-2012 om 16:43
Gebruikershandleiding.com neemt misbruik van zijn services uitermate serieus. U kunt hieronder aangeven waarom deze vraag ongepast is. Wij controleren de vraag en zonodig wordt deze verwijderd.
Product:
Spelregels forum
Om tot zinvolle vragen te komen hanteren wij de volgende spelregels:
lees eerst de handleiding door;
controleer of uw vraag al eerder door iemand anders is gesteld;
probeer uw vraag zo duidelijk mogelijk te stellen;
heeft u een probleem en al geprobeerd om dit op te lossen, vermeld dit erbij aub;
heeft u een oplossing gekregen van een bezoeker dan horen wij dat graag in dit forum;
wilt u een reactie geven op een vraag of antwoord, gebruik dan niet dit formulier maar klik op de knop 'reageer op deze vraag';
uw vraag wordt direct op de website gezet; vermijd daarom persoonlijke gegevens in te vullen;
Belangrijk! Als er een antwoord wordt gegeven op uw vraag, dan is het voor de gever van het antwoord nuttig om te weten als u er wel (of niet) mee geholpen bent! Wij vragen u dus ook te reageren op een antwoord.
Belangrijk! Antwoorden worden ook per e-mail naar abonnees gestuurd. Laat uw emailadres achter op deze site, zodat u op de hoogte blijft. U krijgt dan ook andere vragen en antwoorden te zien.
Abonneren
Abonneer u voor het ontvangen van emails voor uw Pioneer xv dv 303 bij:
nieuwe vragen en antwoorden
nieuwe handleidingen
U ontvangt een email met instructies om u voor één of beide opties in te schrijven.
Ontvang uw handleiding per email
Vul uw emailadres in en ontvang de handleiding van Pioneer xv dv 303 in de taal/talen: Engels als bijlage per email.
De handleiding is 0,47 mb groot.
U ontvangt de handleiding per email binnen enkele minuten. Als u geen email heeft ontvangen, dan heeft u waarschijnlijk een verkeerd emailadres ingevuld of is uw mailbox te vol. Daarnaast kan het zijn dat uw internetprovider een maximum heeft aan de grootte per email. Omdat hier een handleiding wordt meegestuurd, kan het voorkomen dat de email groter is dan toegestaan bij uw provider.
Uw handleiding is per email verstuurd. Controleer uw email
Als u niet binnen een kwartier uw email met handleiding ontvangen heeft, kan het zijn dat u een verkeerd emailadres heeft ingevuld of dat uw emailprovider een maximum grootte per email heeft ingesteld die kleiner is dan de grootte van de handleiding.
Er is een email naar u verstuurd om uw inschrijving definitief te maken.
Controleer uw email en volg de aanwijzingen op om uw inschrijving definitief te maken
U heeft geen emailadres opgegeven
Als u de handleiding per email wilt ontvangen, vul dan een geldig emailadres in.
Uw vraag is op deze pagina toegevoegd
Wilt u een email ontvangen bij een antwoord en/of nieuwe vragen? Vul dan hier uw emailadres in.