6634
1
Verklein
Vergroot
Pagina terug
1/8
Pagina verder
Note:
Check all connections and systems before final
installation.
Do not use unauthorized parts. The use of
unauthorized parts may cause malfunctions.
Consult with your dealer if installation requires
drilling of holes or other modifications of the
vehicle.
Do not install this unit where:
it may interfere with operation of the vehicle.
it may cause injury to a passenger as a result
of a sudden stop.
The semiconductor laser will be damaged if it
overheats. Install this unit away from hot places
such as near the heater outlet.
Optimum performance is obtained when the unit
is installed at an angle of less than 60°.
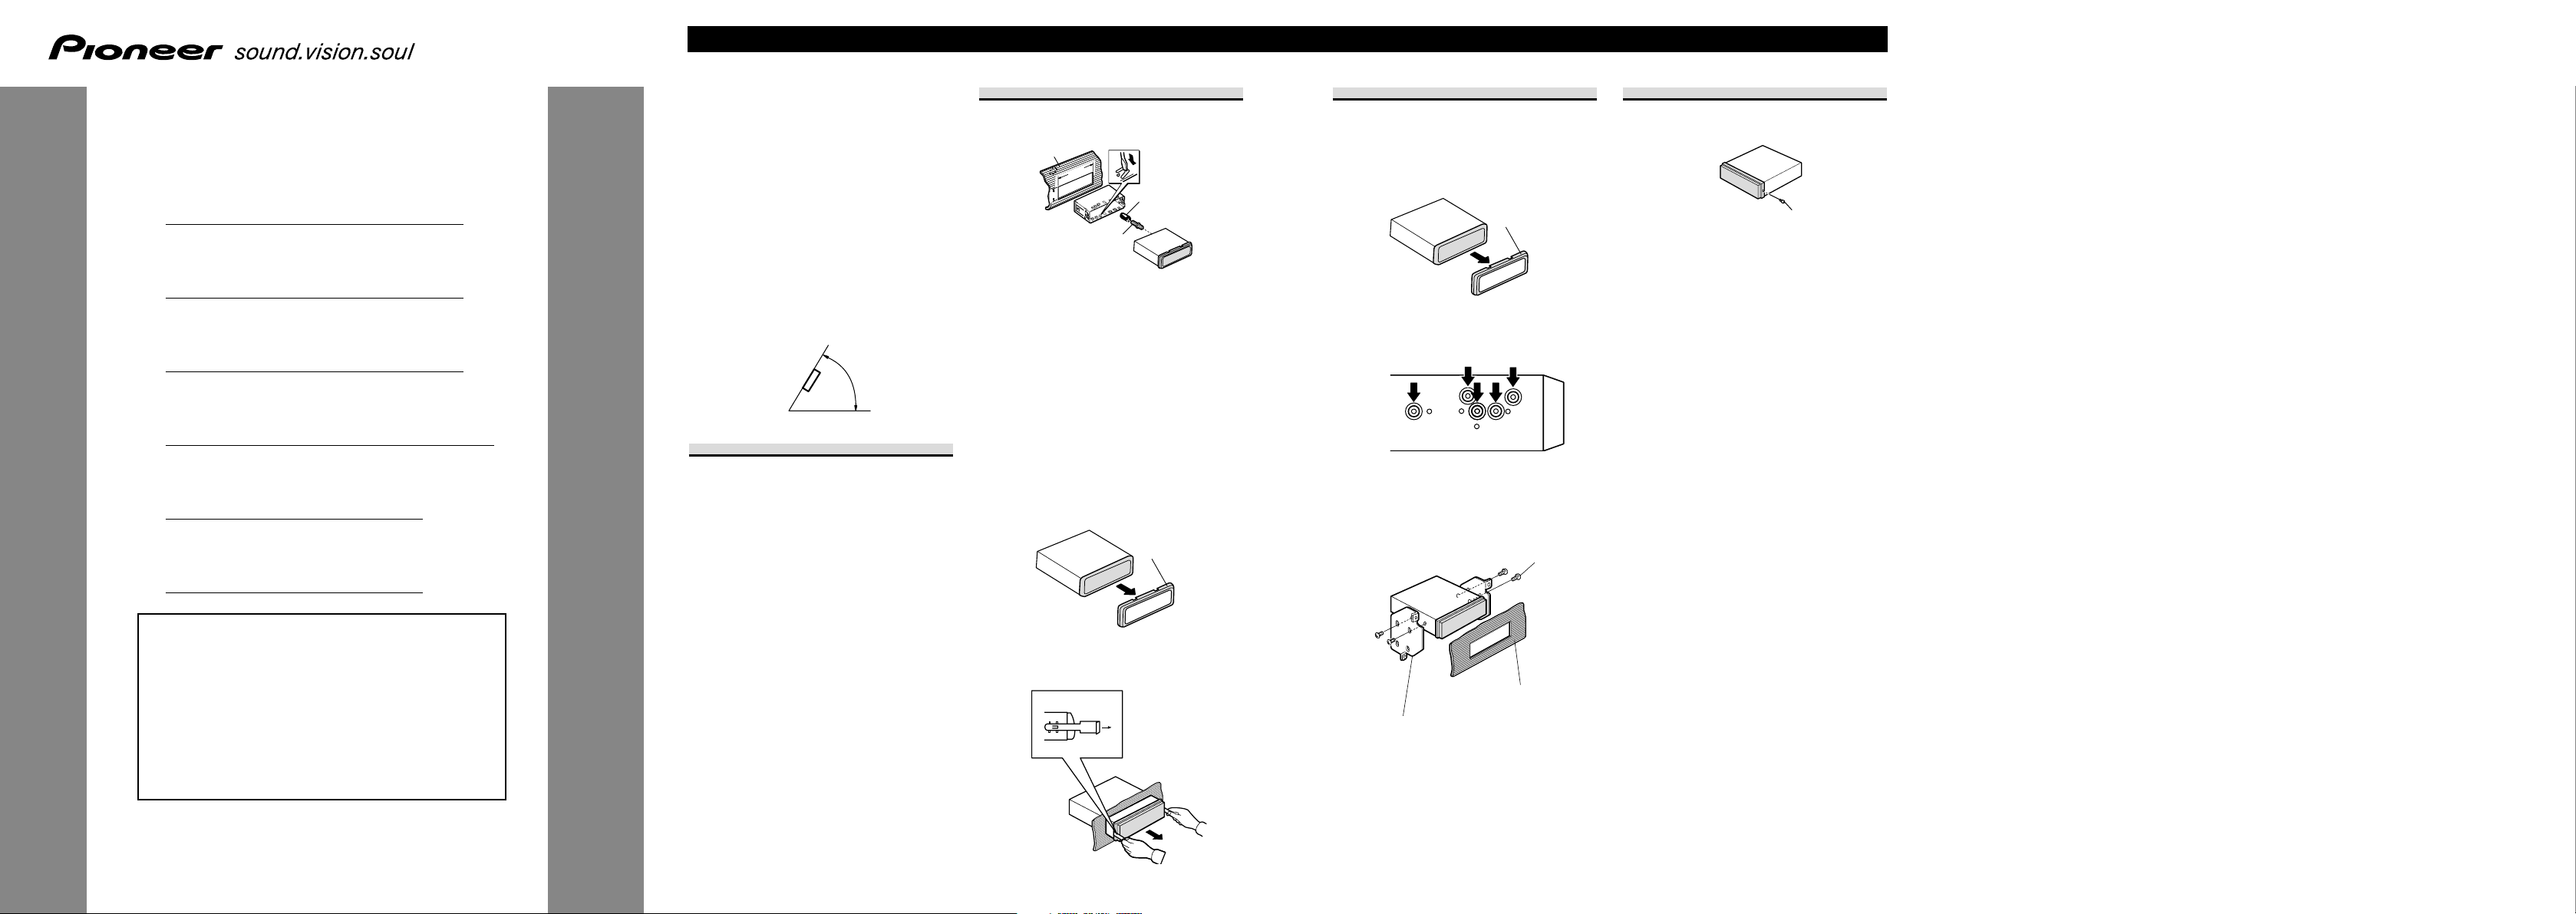
DIN Front/Rear-mount
This unit can be properly installed either from
“Front” (conventional DIN Front-mount) or
“Rear” (DIN Rear-mount installation, utilizing
threaded screw holes at the sides of unit chassis).
For details, refer to the following installation
methods.
DIN Front-mount
Installation with the rubber bush
1. Insert the mounting sleeve into the dashboard.
When installing in a shallow space, use a sup-
plied mounting sleeve. If there is enough
space behind the unit, use factory supplied
mounting sleeve.
2. Secure the mounting sleeve by using a screwdriv-
er to bend the metal tabs (90°) into place.
3. Install the unit as illustrated.
Removing the Unit
1. Extend top and bottom of the trim ring outwards
to remove the trim ring. (When reattaching the
trim ring, point the side with a groove down-
wards and attach it.)
It becomes easy to remove the trim ring if the
front panel is released.
2. Insert the supplied extraction keys into both sides
of the unit until they click into place.
3. Pull the unit out of the dashboard.
53
182
60°
Installation ENGLISH
INSTALLATION MANUAL
MANUEL D’INSTALLATION
<KSNNX> <06H00000>
DEH-3900MP
DEH-2920MP
DEH-2900MP
DEH-2900MPB
DEH-1920R
DEH-1900R
Printed in Thailand
Imprimé en Thaïlande
<CRD4131-A/N> EW
This product conforms to new cord colors.
Los colores de los cables de este producto se confor-
man con un nuevo código de colores.
Dieses Produkt entspricht den neuen Kabelfarben.
Le code de couleur des câbles utilisé pour ce produit
est nouveau.
Questo prodotto è conforme ai nuovi codici colori.
De kleuren van de snoeren van dit toestel zijn gewijzigd.
чÌÌÓ ÛÒÚÓÈÒÚ‚Ó ÒÓÓÚ‚ÂÚÒÚ‚ÛÂÚ ÌÓ‚˚Ï
Ú·ӂ‡ÌËflÏ Í ˆ‚ÂÚÛ ÔÓ‚Ó‰Ó‚.
Trim ring
DIN Rear-mount
1. Extend top and bottom of the trim ring outwards
to remove the trim ring. (When reattaching the
trim ring, point the side with a groove down-
wards and attach it.)
It becomes easy to remove the trim ring if the
front panel is released.
2. Determine the appropriate position where the
holes on the bracket and the side of the unit
match.
3. Tighten two screws on each side.
Use either truss screws (5 mm ×8 mm) or
flush surface screws (5 mm ×9 mm), depend-
ing on the shape of screw holes in the
bracket.
Fastening the front panel
If you do not plan to detach the front panel, the
front panel can be fastened with supplied screw.
Screw
Trim ring
Screw
Dashboard or Console
Factory radio mounting bracket
Rubber bush
Screw
Dashboard Mounting sleeve
1

Hulp nodig? Stel uw vraag in het forum

Spelregels

Misbruik melden

Gebruikershandleiding.com neemt misbruik van zijn services uitermate serieus. U kunt hieronder aangeven waarom deze vraag ongepast is. Wij controleren de vraag en zonodig wordt deze verwijderd.

Product:

Bijvoorbeeld antisemitische inhoud, racistische inhoud, of materiaal dat gewelddadige fysieke handelingen tot gevolg kan hebben.

Bijvoorbeeld een creditcardnummer, een persoonlijk identificatienummer, of een geheim adres. E-mailadressen en volledige namen worden niet als privégegevens beschouwd.

Spelregels forum

Om tot zinvolle vragen te komen hanteren wij de volgende spelregels:

Belangrijk! Als er een antwoord wordt gegeven op uw vraag, dan is het voor de gever van het antwoord nuttig om te weten als u er wel (of niet) mee geholpen bent! Wij vragen u dus ook te reageren op een antwoord.

Belangrijk! Antwoorden worden ook per e-mail naar abonnees gestuurd. Laat uw emailadres achter op deze site, zodat u op de hoogte blijft. U krijgt dan ook andere vragen en antwoorden te zien.

Abonneren

Abonneer u voor het ontvangen van emails voor uw Pioneer DEH-2900MPB bij:


U ontvangt een email met instructies om u voor één of beide opties in te schrijven.


Ontvang uw handleiding per email

Vul uw emailadres in en ontvang de handleiding van Pioneer DEH-2900MPB in de taal/talen: Nederlands, Duits, Engels, Frans, Italiaans, Spaans als bijlage per email.

De handleiding is 0,36 mb groot.


U ontvangt de handleiding per email binnen enkele minuten. Als u geen email heeft ontvangen, dan heeft u waarschijnlijk een verkeerd emailadres ingevuld of is uw mailbox te vol. Daarnaast kan het zijn dat uw internetprovider een maximum heeft aan de grootte per email. Omdat hier een handleiding wordt meegestuurd, kan het voorkomen dat de email groter is dan toegestaan bij uw provider.

Andere handleiding(en) van Pioneer DEH-2900MPB

Pioneer DEH-2900MPB Gebruiksaanwijzing - Nederlands - 87 pagina's

Pioneer DEH-2900MPB Gebruiksaanwijzing - Nederlands - 85 pagina's

Pioneer DEH-2900MPB Gebruiksaanwijzing - Deutsch, English - 60 pagina's

Pioneer DEH-2900MPB Gebruiksaanwijzing - Français, Italiano - 87 pagina's

Pioneer DEH-2900MPB Gebruiksaanwijzing - Espanôl - 60 pagina's

Pioneer DEH-2900MPB Gebruiksaanwijzing - Dansk, Svenska, Norsk, Suomi - 70 pagina's


Uw handleiding is per email verstuurd. Controleer uw email

Als u niet binnen een kwartier uw email met handleiding ontvangen heeft, kan het zijn dat u een verkeerd emailadres heeft ingevuld of dat uw emailprovider een maximum grootte per email heeft ingesteld die kleiner is dan de grootte van de handleiding.

Er is een email naar u verstuurd om uw inschrijving definitief te maken.

Controleer uw email en volg de aanwijzingen op om uw inschrijving definitief te maken

U heeft geen emailadres opgegeven

Als u de handleiding per email wilt ontvangen, vul dan een geldig emailadres in.

Uw vraag is op deze pagina toegevoegd

Wilt u een email ontvangen bij een antwoord en/of nieuwe vragen? Vul dan hier uw emailadres in.


Info