i.
(finis
Pul
i.
(st
TIME SWITCH
MODUL LOG/MINI LOG/MINI T LOG
DESCRIPTION
MODUL LOG / MINI LOG / MIN
switches with 1 changeover sw
designed for the control of any electrical insta
possibilities include short-duration (1-59 seconds) switching,
repeating cycles, rando
winter time change and a time counter.
Its menus can be displayed in 5 languages and it display
chronogram of that day'
section, each section representing 30
corresponding to the current time flash
INSTALLATION
ATTENTI
by author
VERY IMPORTANT: The
interference by a safety devi
electromagnetic fields may alter is operation. Such
interference can be avoided by adhering to the follow
recommendations during installation:
- The device should not be
(motors, transformers, contactor
- A separate power line is recommen
network filter if necessary
- Inductive loads should be e
suppressors (varistor, RC
If the timer switch is to be used in combination with other
devices in an installation, it is necessary to verify that no
parasitic disturbances will be caused by
ASSEMBLY: In panel (MODUL
mounting (MINI LOG) and flush mounting (M
CONNECTION: Connection
STARTI
Factory settings for
MODUL L
includes the current date and time and the following
configuration:
Time: Central European time (E.U.)
Clock: 24 h m
Winter-summer time change Automatic (last
Sun
Summer-winter time change Automatic (last
Sun
Holidays: NO
Random mode: NO (off)
C1 counter: Zeroed (0000 hours)
Programs: None (memory empty)
PROGRAMMING
Programming is menu-based (text messages).
If operations are programmed for the same time, remember
that some have priority over others
The order of priority is as follows:
PERMANENT MODE → HOLIDAY PROGRA→
RANDOM PROGRA→ PULSE ON →
PULSE OFF→ PROGRA→
PROGRAMMING ON→ CYCLE
The information being programmed
Pressing the “OK “ key brings up
If the language used is not right, reset th.
RESET
When all four key
existing programming is deleted
appears.
LANGUAGE SELEC
Use the ∆ and DO∇ keys to choose a langu
confirm pressing “OK .
automatically. (See ex
CLOCK SET
Press “OK“ to go into the∆
and ∇ keys to select the DATE menu. Confirm with “OK“ to go
into DATE YEAR. The numbers for the year flash on display
and are changed with th∆ and ∇ keys. Confirm with the
“OK“ key. The figures for MONTH and DATE are entered in
the same way. Press “OK
day of the week will be set automatically
change automatically to TIME∆ and ∇
keys to change, first, the hours, confirm w
repeat for the minutes. P
will appear.
If you first wish to check th
“C“ key and the timer goes back in
BASIC PROGRA
PROGRAM MENU
In normal mode, press the “OK“ key to bring up the
PROGRAM menu. P
PROGRAM PROG 01.
ON-OFF PROGRA
Press the “OK“ key again and y
01: PROGRAM. C
show PROG 01: ∆ and ∇ keys to choose
switch type ON-OFF, PU
with the “OK“ key. The display auto
YES. If you want the switch to be carried out on
press “OK,“ otherwise, press eith∆ and ∇ keys and
the display will show MON : NO. Press “OK“ and carr
same process for the other day
other, confirming them in the same way
When you have selected the day
time at which the switch will take place. Use the ∆ and ∇ keys
to set the hours and confirm with “OK, “ then do the same for
the minutes. When yo
display will show PROG 0
and the display will show PROG 02 C1 : ON. Follow the
same steps as for Program 01. There are 50 memory
(PROG 01 t
When you have finished programming, press the “C“
repeatedly until the nor
VIEWING PROGRA
Press “OK“ to go into the PROGR
to bring up PROGRAM PROG 01 on display. Press the ∆ and
∇ keys to see all the programs (1 to 50).
CHANGING OR
Press “OK“ to go into the PROGR
to bring u∆ and ∇
keys to select the program y
when you have it, press “OK“ and the program will be shown
on display w∆ and ∇ keys change
between CLEAR and
the “OK“ key.
If you chose CLEAR, the program will be eliminated
display will show PRO
(PROG XX).
If you have chosen MODIFY
type of switch selected (ON-OFF / PULSE / CYCLE) and you
should carry on as described in the section on
PROGRAMMING. To return to normal operation, press the
“C“ key repeatedly until the normal operating display
shown.
MANUA
The C1 circuit can be te
pressing the ∇ k
until a programmed switch
It is also possible to activate or deactivate ( any programed
maneouvre is made ) the circuit permanently by following
these steps:
Press the “OK“ key to go into
the ∆ and ∇ keys to change the 2nd
you see MANUAL. Confirm by pressing “OK“ and the display
will show MANUAL C1: ON. Use the∆ and ∇ keys to choose
between ON – OF (Permanent) – OFF
(Perm
normal mode by pressing the “C“ key repeatedly. To change
out of permanent
or OFF.
In the ON and O positions, you can also change
state of the circuit by pressing the ∇ key, in normal mode.
The symbols for activated o
ADVANCE PROGRA
(EXTR
PULSE PROGRA
With pulse programming, switche
be carried out, with both ON
In normal mode, press the “OK“ key
PROGRAM. Press “OK“ and th
PROGRAM PROG 01 .
Press the “OK“ key
PROGRAM. Press “OK“
appears. Use the ∆ and ∇ keys to select PULSE, press “OK“
to confirm and the display will show MO : YES. If you want the
switch to be carried out o
press either of the ∆ and ∇ keys and the display
MO : NO. Press “OK“ and carry out the same process for the
other days of the week, one after the other, confi
in the same way.
When you have selected the d
time at which the switch will take place. Use the ∆ and ∇ keys
to set the hours and conf
the minutes and when you confirm by pressing “OK,“ the
display will show PULSE ON
circuit is to be connected using ∆ and ∇ and confirm with
“OK“. The display w∆ and ∇ to
select the second at w
press “OK“ again to confirm.
If you want an "on" pu
PULSE OFF and the othe
WINTER / SUMMER TIME CHANGE
To go into the menu MENU, press the “OK“ key and use the ∆
and ∇ keys to find the EX
you will see EXTRAS SEASON on display, press “OK“ ag
and 3 options are displayed:
USE. Move between them with th∆ and ∇ keys and confirm
by pres
AUTO (the clock is automatically changed
in March and the last Sunday
No chan
the display shows SEA AUTO W Æ S and the date la of the
change from winter to summer time (last S
WÆ S DATE appears
and when the ∆ or ∇ key is pressed
(02:00:00) is show
SEA AUTOÆ W and the date of the summer-to-winter
time change (last Sunday
the date again and the ∆ or ∇ key lets you see the time when
the change will happen (03:00:00). P
back to the EXTRAS HOLIDAY
MA (Allows you to choose the date and time for the
time change).
When you select this option,
W Æ S and the date o
Press “OK“ and you can∆ and
∇
keys. When you confirm
Sunday“): YES. If y
chosen month for the change, press “OK,“ other
to LS: NO∆ and ∇ keys and con
If you accept LS: NO, t
the day of the month wh
followed by the hours and minutes. When you confirm with
“OK,“ the summer-to-winter time change (S Æ W)
program in the sa
EXTRAS HOLIDAYS menu.
DO NOT USE (no time change will be made)
If you select this opt
be made and you will be take
HOLIDAYS menu.
If there are any sw
time change, they will be
depending on the time change in
HOLIDAY PROGRA
This allows you
for a set period of time. When this time has passed,
programming is re-established.
Press “OK “ to g∆ and
∇ keys to find EXTRAS, press “OK“ and use the ∆ and ∇ keys
again to find HOLIDAYS
show HOLIDAYS BEGIN
HOUR. Use∆ and ∇ to
period
MONTH and DAY in the same way. Confir
“OK“ and the display w
in the same way as for HOLIDAYS BEGIN, entering y
chosen HOUR, MINU
period to end. When y
these, you will see EXTRAS RANDOM on d
“C“ key repeatedly to go back to n
During t
displ
DEACTIV
To deactivate the holiday program, go into EXTRAS
HOLIDAYS and with HOLIDAY
the ∆ and ∇ keys to select CLEAR, then press “OK
program will be erased. P
norm
RANDOM PROGRA
The MODUL LOG / MIN
random "on" and "off" switches. Random programs work
between
The program RANDOMÆ 1 carries out random switches of
variable duration, between 1
The program RANDOMÆ 1 carries out random switches of
variable duration, between 2
From the normal operating display, press “O∆ and
∇ to find EXTRAS RANDOM.
see RANDOM Æ 1. Use ∆ and ∇ to choose between the
options Æ 1, Æ 2 or STOP, which deactivates the rando
program. Press “OK“ to confirm and
repeatedly to go back to normal operating
random programs has been selected, the sy
displ
In random mode, programmed switche
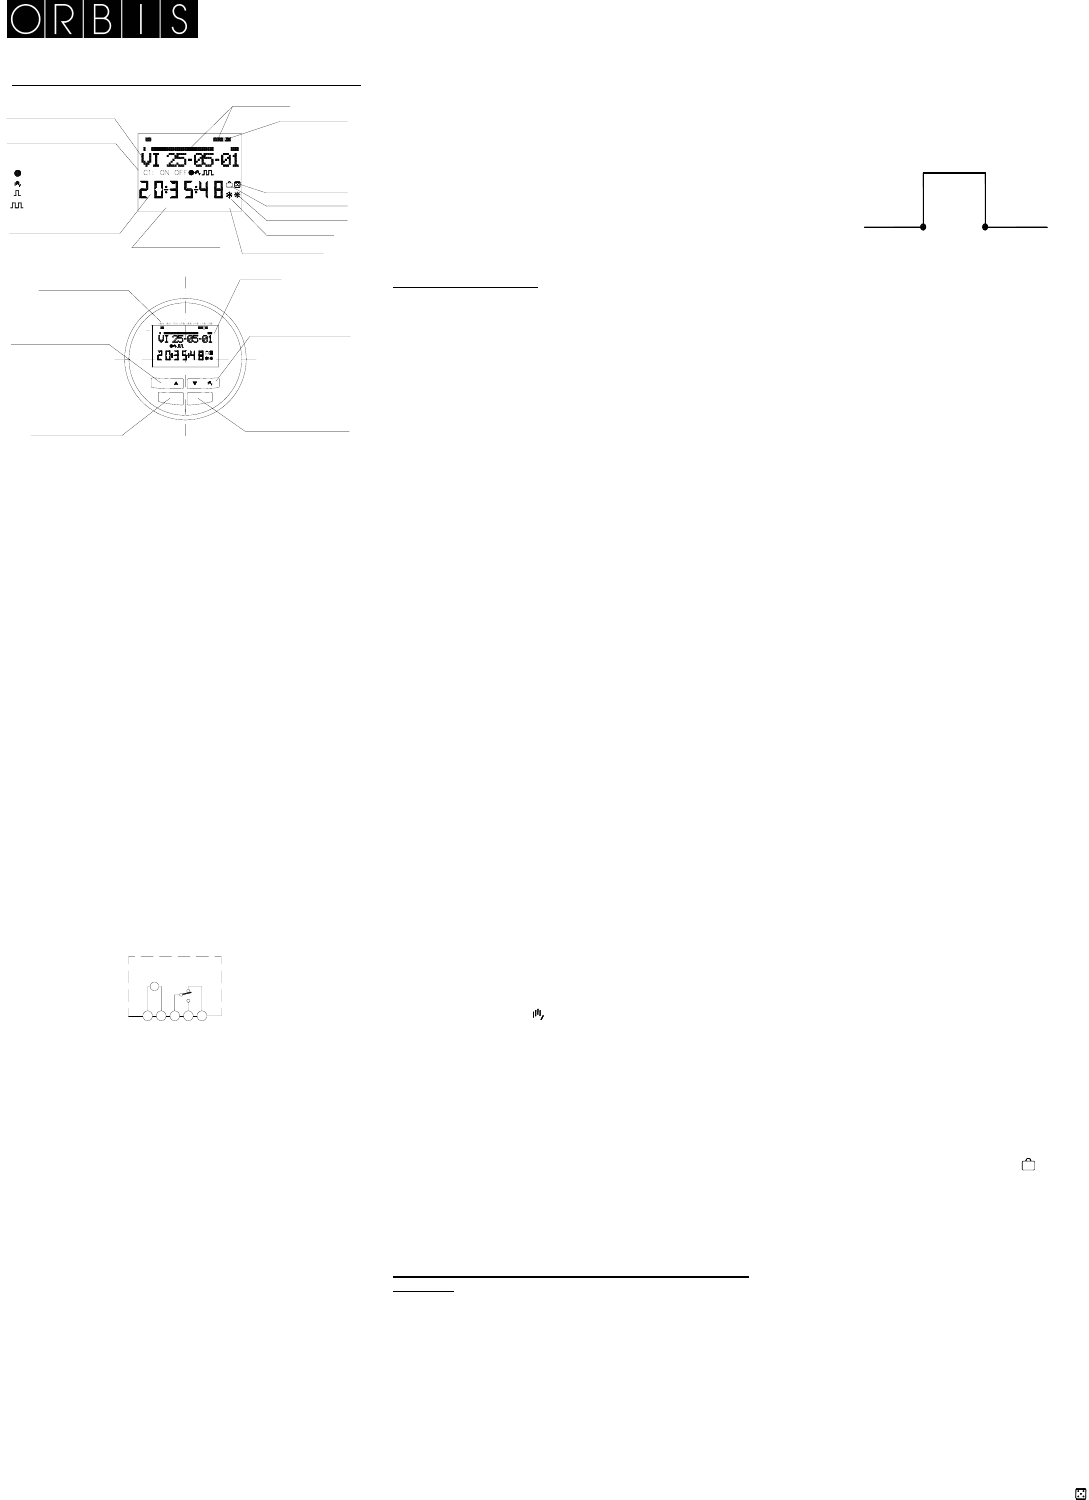
ON - ON
Current time
- Pulse
- Cycle
- Override
- Permanent
OFF - OFF
C1 circuit state
Day of the week/Date
(dd-mm-yy)
Day of the week
(1= Monday..)
AM/PM mode
Chronogram
1 2
AMPM
Holidays
Winter time
Summer time
Random
Currentime
(flashin
Cancel the selection
Move back in menu
Move up in menu
Time scale
12
Confirms the selection
Circuit C1 override
Move down in menu
Starts menu
C
Ok
1 2 3 4 5 6 7
C1: ON OFF
OFF
ON
03 9
6
PM
18
21 24
Display
MENU
M
1
3
4
5
N
L