549329
1
Verklein
Vergroot
Pagina terug
1/2
Pagina verder
Introduction
Thank you for purchasing the OMRON M3 Automatic Blood Pressure Monitor.
The OMRON M3 is a compact, fully automatic blood pressure monitor, operating on
the oscillometric principle. It measures your blood pressure and pulse rate simply
and quickly. For comfortable controlled inflation without the need of pressure
pre-setting or re-inflation the device uses its advanced “IntelliSense” technology.
Intended Use
This device is a digital monitor intended for use in measuring blood pressure and
pulse rate in adult patient population who can understand this instruction manual
with the arm circumference range printed on the arm cuff. The device detects the
appearance of irregular heartbeats during measurement and gives a warning signal
with the measurement result.
Please read this instruction manual thoroughly before using the device.
Please keep for future reference. For specific information about your own blood
pressure, CONSULT YOUR PHYSICIAN.
Important Safety Information
Warning: Indicates a potentially hazardous situation which, if not avoided,
could result in death or serious injury.
(General Usage)
Consult your physician before using the device in pregnancy including
pre-eclampsia, or if diagnosed with arrhythmia or arteriosclerosis.
Do not use the device on the injured arm or the arm under medical treatment.
Do not apply the arm cuff on the arm while being on an intravenous drip or blood
transfusion.
Consult your physician before using the device on the arm with an arterio-venous
(A-V) shunt.
Do not use the device with other medical electrical (ME) equipment
simultaneously.
Do not use the device in the area the HF surgical equipment, MRI, or CT scanner
exists, or in the oxygen rich environment.
The air tube or the AC adapter cable may cause accidental strangulation in
infants.
Contained small parts that may cause a choking hazard if swallowed by infants.
(AC Adapter (optional) Usage)
Do not use the AC adapter if the device or the power cord is damaged. Turn off
the power and unplug the power cord immediately.
Plug the AC adapter into the appropriate voltage outlet. Do not use in a
multi-outlet plug.
Never plug in or unplug the power cord from the electric outlet with wet hands.
Caution: Indicates a potentially hazardous situation which, if not avoided,
may result in minor or moderate injury to the user or patient or
damage to the equipment or other property.
(General Usage)
Always consult your physician. Self-diagnosis of measurement results and
self-treatment are dangerous.
People with severe blood flow problems, or blood disorders, should consult a
physician before using the device, as the arm cuff inflation can cause bruising.
If there are any abnormalities during the measurement, remove the arm cuff.
Do not use this device on infants or persons who cannot express their intentions.
Do not inflate the arm cuff more than necessary.
Do not use the device for any purpose other than measuring blood pressure.
Use only the approved arm cuff for this device. Use of other arm cuffs may result
in incorrect measurement results.
Do not use a mobile phone or other devices that emit electromagnetic fields,
near the device. This may result in incorrect operation of the device.
Do not disassemble the monitor or arm cuff.
Do not use in a location with moisture, or a location where water may splash on
the device. This may damage the device.
Do not use the device in a moving vehicle (car, airplane).
Do not take measurements more than necessary. It may cause bruising due to
blood flow interference.
Consult your physician before using the device if you had a mastectomy.
(AC Adapter (optional) Usage)
Fully insert the power plug into the outlet.
When disconnecting the power plug from the outlet, do not pull the power cord.
Be sure to pull from the power plug safely.
When handling the power cord, take care not to do the following:
Wipe the dust off from the power plug.
Unplug monitor when not in use.
Disconnect the power plug before cleaning.
Use only the original adapter designed for this device. Use of unsupported
adapters may damage and/or may be hazardous to the device.
(Battery Usage)
Do not insert the batteries with their polarities incorrectly aligned.
Use only 4 “AA” alkaline or manganese batteries with this device. Do not use
other types of batteries. Do not use new and used batteries together.
Remove the batteries if the device will not be used for three months or more.
General Precautions
Do not forcibly crease the arm cuff or the air tube excessively.
Do not press the air tube while taking a measurement.
To unplug the air plug, pull on the air plug at the connection with the monitor, not
the tube itself.
Do not drop the monitor or subject device to strong shocks or vibrations.
Do not inflate the arm cuff when it is not wrapped around your arm.
Do not use the device outside the specified environment. It may cause an
inaccurate result.
Read and follow the "Important information regarding Electro Magnetic
Compatibility (EMC)" in the "6. Specifications".
• Read and follow the "Correct Disposal of This Product" in "6. Specifications" when
disposing of the device and any
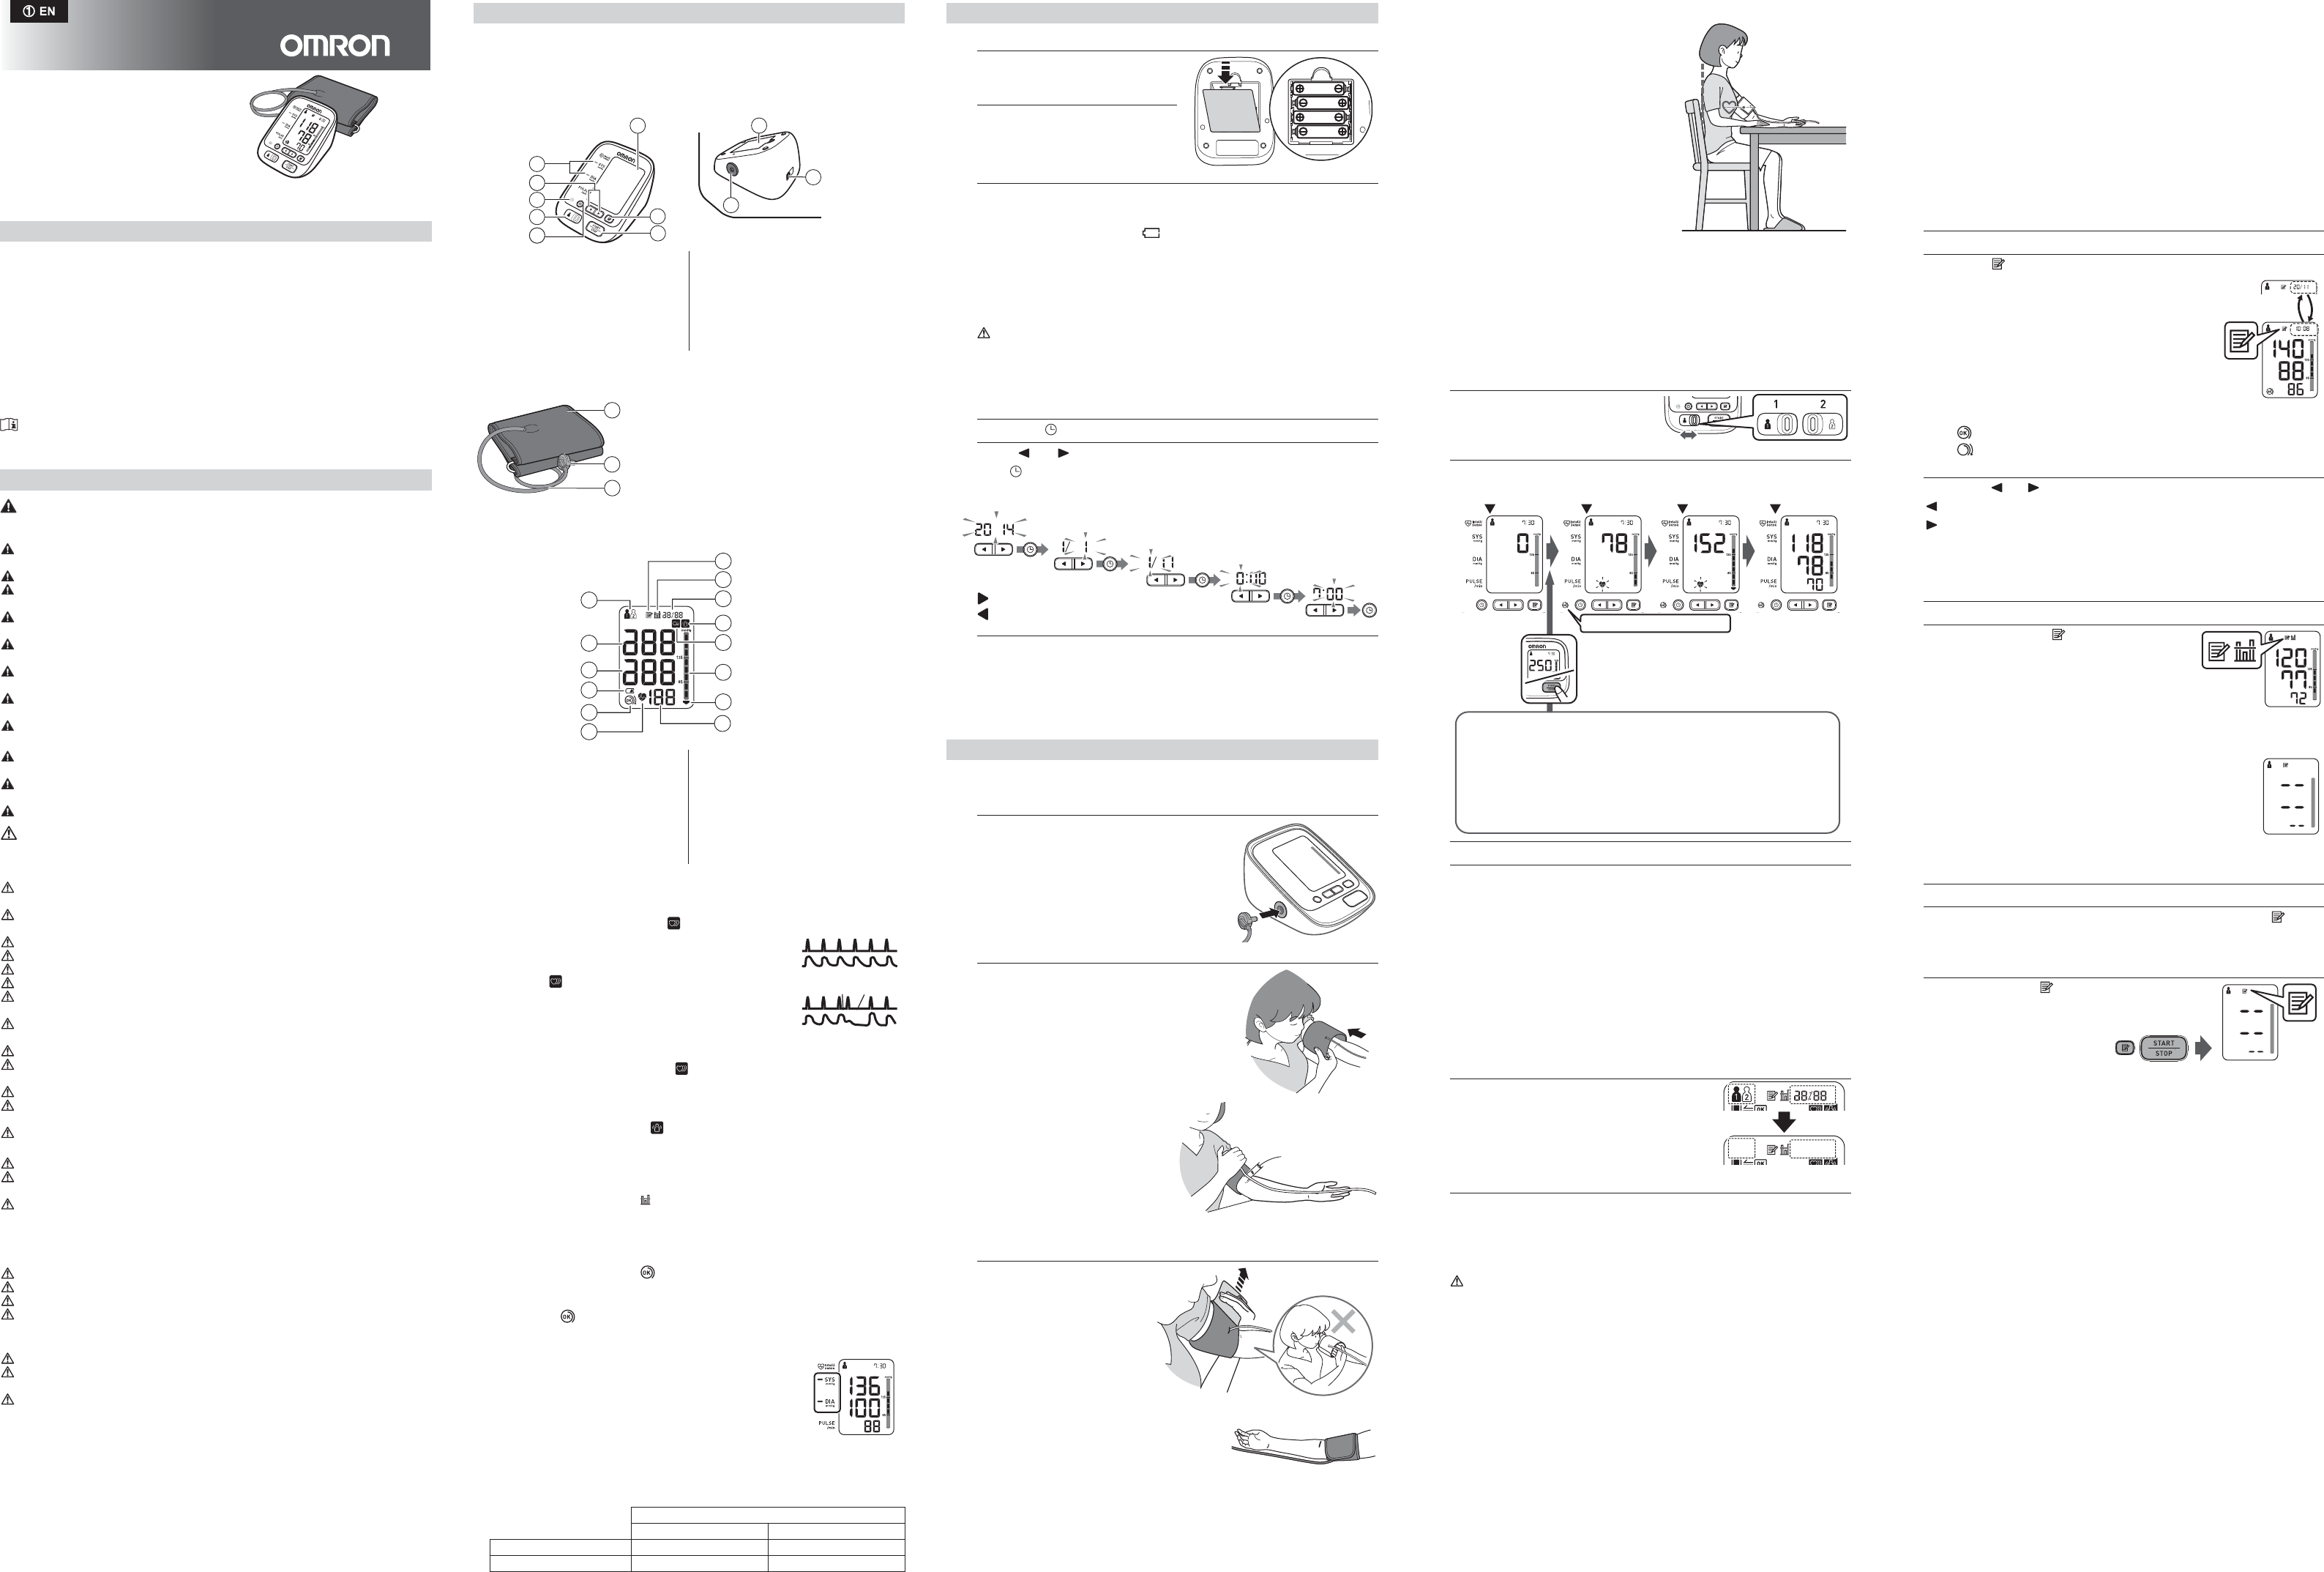
 used accessories or optional parts.
1. Know Your Device
Contents:
Monitor, arm cuff, instruction manual, storage case, battery set,
blood pressure pass
Monitor:
Arm cuff:
Display:
Display symbols:
Irregular Heartbeat Symbol ( )
When the monitor detects an irregular
rhythm two or more times during the
measurement, the irregular heartbeat
symbol ( ) will appear on the display
with the measurement values.
An irregular heartbeat rhythm is defined
as a rhythm that is 25% less or 25%
more than the average rhythm detected
while the monitor is measuring the systolic and diastolic blood pressure.
If the irregular heartbeat symbol ( ) displays with your measurement results,
we recommend you consult your physician. Follow the directions of your
physician.
Movement Error Symbol ( )
The movement error symbol is displayed if you move your body during the
measurement. Please remove the arm cuff, and wait 2 - 3 minutes.
Take another measurement, remain still during measurement.
Average Value Symbol ( )
The average value symbol is displayed when you press and hold the memory
button for more than 3 seconds. The most recent average value appears on
the display screen.
Cuff Wrap Guide Lamp ( )
If the cuff was wrapped too loosely, it may cause unreliable values. If the
wrapping of cuff is too loose, the cuff wrap guide lamp does not light.
Otherwise
lights in “green”. This is the function which is used as an aid in
determining if the cuff is wrapped snugly enough.
Blood Pressure Colour Indicator
If your systolic or diastolic pressure is above the
standard range (135 mmHg for the systolic blood
pressure and/or 85 mmHg for the diastolic blood
pressure), the blood pressure colour indicator will light
in “orange” when the measurement result is
displayed. If they are within the standard range, no
light will appear.
The JNC7* Guideline recommends the following guideline.
These are form statistical values for blood pressure.
* JNC7: The Seventh Report, 2003 Dec, of the Joint National Committee on
Prevention, Detection, Evaluation, and Treatment of Hi Blood Pressure.
2. Preparation
2.1 Battery Installation
1. Remove the battery cover.
2. Insert 4 “AA” batteries as
indicated in the battery
compartment.
3. Replace the battery cover.
Notes:
• When the low battery symbol ( ) appears on the display, turn the monitor
off, then replace all batteries at the same time. Long life alkaline batteries
are recommended.
• The measurement values continue to be stored in memory even after the
batteries are replaced.
• The supplied batteries may have a shorter life.
Disposal of used batteries should be carried out in accordance with the
national/local regulations for the disposal of batteries.
2.2 Setting the Date and Time
Set the monitor to the correct date and time before taking a measurement for
the first time.
1. Press the button.
2. Push or to change the year
Push button to confirm the year and then the month flashes. Repeat the
same steps to change the month, day, hour, and minutes.
3. Press the START/STOP button to turn the monitor off.
Notes:
• If the batteries have been replaced, the date and time setting will need to be
reset.
• If the date and time are not set, “-:--” appears during or after measurement.
3. Using the Device
3.1 Applying the Arm Cuff
Remove tight-fitting clothing or tight rolled up sleeve from your left upper arm.
Do not place the arm cuff over thick clothes.
1. Insert the air plug into the air jack
securely.
2. Wrap the arm cuff firmly in
place around your left upper
arm.
The bottom edge of the arm cuff
should be 1 to 2 cm above the elbow.
Air tube is on the inside of your arm
and aligned with your middle finger.
3. Secure closed with the
fabric fastener.
Notes:
• When you take a measurement on the right
arm, the air tube will be at the side of your
elbow. Be careful not to rest your arm on the
air tube.
• The blood pressure can differ between the right arm and the left arm, and
therefore also the measured blood pressure values can be different.
OMRON recommends to always use the same arm for measurement. If the
values between both arms differ substantially, please check with your
physician which arm to use for your measurement.
3.2 How to Sit Correctly
To take a measurement, you need to be
relaxed and comfortably seated, under
comfortable room temperature. Avoid
bathing, drinking alcohol or caffeine,
smoking, exercising or eating 30 minutes
before taking a measurement.
• Sit on a chair with your feet flat on the floor.
• Sit upright with your back straight.
• Sit with your back and arm being supported.
• The arm cuff should be placed on your arm at
the same level as your heart.
3.3 Taking a Measurement
Notes:
• To cancel a measurement, press the START/STOP button to release the air
in the arm cuff.
• Remain still while taking a measurement.
The monitor is designed to take measurements and store the measurement
values in the memory for 2 people using USER ID 1 and USER ID 2.
1. Select your User ID (1 or 2).
2. Press the START/STOP button.
The arm cuff will start to inflate automatically.
3. Remove the arm cuff.
4.
Press the START/STOP button to turn the monitor off.
The monitor automatically stores the measurement result in its memory.
It will automatically turn off after 2 minutes.
Note: Wait 2-3 minutes before taking another measurement. Waiting between
measurements allows the arteries to return to the condition prior to
taking a measurement.
Using the Guest Mode
The monitor stores measurement values for 2 users in the memory.
The guest mode can be used to take a single measurement for another user.
No measurement values are stored in the memory when the guest mode is
selected.
1. Press and hold the START/STOP
button for more than 3 seconds.
The USER ID symbol and the Date/Time
display will disappear.
2. Release the START/STOP button when the Date/Time display
turns off.
The arm cuff will start to inflate automatically.
Always consult your physician. Self-diagnosis of measurement results and
self-treatment are dangerous.
3.4 Using the Memory Function
The monitor automatically stores the results up to 60 sets for each user (1 and
2). It can also calculate an average value based on the last 3 measurement
values taken within 10 minutes.
Notes:
• If there are only 2 measurement values in the memory for that period, the
average will be based on these 2 values.
• If there is 1 measurement value in the memory for that period, this is
displayed as the average.
• If the memory is full, the monitor will delete the oldest value.
• When viewing the measurement value taken without setting the date and
time, “-:--” is displayed instead of the date and time.
To View the Measurement Values Stored in Memory
1. Select your User ID (1 or 2).
2. Press the button.
The Memory number appears for a second
before the pulse rate is displayed.
The newest set is numbered “1”.
Note: The cuff wrap guide result appears on
the display with the measurement
values. The cuff wrap guide lamp will not
light.
: The arm cuff was wrapped snugly enough.
: The arm cuff was loose or not wrapped correctly.
3. Press the or button to view the values stored in memory.
:
To the older values
: To the more recent values
To View the Average Value
1. Select your User ID (1 or 2).
2. Press and hold the button for
more than 3 seconds.
Notes:
• If the previous measurement was taken without setting the date and time,
the average value is not calculated.
• If there are no measurements results stored in the memory,
the screen to the right is displayed.
To Delete All the Values Stored in Memory
1. Select your User ID (1 or 2).
2. Press the Memory button, while the memory symbol ( )
appears.
3. While holding the button
down, press the
START/STOP button for
more than 3 seconds.
Note: You cannot partially delete the values stored in the memory.
All values for the user you select will be deleted.
Do not damage. Do not break it.
Do not tamper with it. Do not forcibly bend or pull.
Do not twist. Do not bundle during use.
Do not pinch. Do not place under heavy objects.
Automatic Blood
Pressure Monitor
Model M3
Instruction Manual
IM-HEM-7131-E-EN-01-08/2013
2298867-5A
A. Display
B. Memory button
C. START/STOP button
D. Date/Time setting button
E. USER ID selection switch
F. Cuff wrap guide lamp
G. Up/Down buttons
H. Blood pressure colour indicator
I. Battery compartment
J. AC adapter jack
(for optional AC adapter)
K. Air jack
O. USER ID symbol
P. Systolic blood pressure
Q. Diastolic blood pressure
R. Low battery symbol
S. Cuff wrap guide
T. Heartbeat symbol
(Flashes during measurement.)
U. Memory symbol
V. Average value symbol
W. Date/Time display
X. Movement error symbol
Y. Irregular heartbeat symbol
Z. Blood pressure level indicator
AA. Deflation symbol
AB. Pulse display / Memory number
General Guidelines for Blood Pressure
Prehypertension at Office Hypertension at Home
Systolic Blood Pressure 120 - 139 mmHg 135 mmHg
Diastolic Blood Pressure 80 - 89 mmHg 85 mmHg
I
K
J
D
A
B
C
G
F
E
DD
H
L
N
M
L. Arm cuff (Arm circumference 22 - 42 cm)
M. Air plug
N. Air tube
P
Q
R
U
O
V
W
S
T
X
Y
Z
AA
AB
Normal Heartbeat
Irregular Heartbeat
Long
Short
Blood pressure
Blood pressure
Pulse
Pulse
Minute
Change Confirm
Change Confirm
Change Confirm
Change Confirm
Change Confirm
Year
Month
Day
Hour
: Forward
: Back
1 - 2 cm
Cuff Wrap Guide Lamp
START INFLATE DEFLATE COMPLETE
If your systolic pressure is more than 210 mmHg
After the arm cuff starts to inflate, press and hold the START/STOP
button until the monitor inflates 30 to 40 mmHg higher than your
expected systolic pressure.
Notes:
The monitor will not inflate above 299 mmHg.
Do not apply more pressure than necessary.
Alternating date/time
display
1

Hulp nodig? Stel uw vraag in het forum

Spelregels
1

Forum

Omron-M3---HEM-7131-E

Zoeken resetten

Misbruik melden

Gebruikershandleiding.com neemt misbruik van zijn services uitermate serieus. U kunt hieronder aangeven waarom deze vraag ongepast is. Wij controleren de vraag en zonodig wordt deze verwijderd.

Product:

Bijvoorbeeld antisemitische inhoud, racistische inhoud, of materiaal dat gewelddadige fysieke handelingen tot gevolg kan hebben.

Bijvoorbeeld een creditcardnummer, een persoonlijk identificatienummer, of een geheim adres. E-mailadressen en volledige namen worden niet als privégegevens beschouwd.

Spelregels forum

Om tot zinvolle vragen te komen hanteren wij de volgende spelregels:

Belangrijk! Als er een antwoord wordt gegeven op uw vraag, dan is het voor de gever van het antwoord nuttig om te weten als u er wel (of niet) mee geholpen bent! Wij vragen u dus ook te reageren op een antwoord.

Belangrijk! Antwoorden worden ook per e-mail naar abonnees gestuurd. Laat uw emailadres achter op deze site, zodat u op de hoogte blijft. U krijgt dan ook andere vragen en antwoorden te zien.

Abonneren

Abonneer u voor het ontvangen van emails voor uw Omron M3 - HEM-7131-E bij:


U ontvangt een email met instructies om u voor één of beide opties in te schrijven.


Ontvang uw handleiding per email

Vul uw emailadres in en ontvang de handleiding van Omron M3 - HEM-7131-E in de taal/talen: Engels als bijlage per email.

De handleiding is 0,45 mb groot.


U ontvangt de handleiding per email binnen enkele minuten. Als u geen email heeft ontvangen, dan heeft u waarschijnlijk een verkeerd emailadres ingevuld of is uw mailbox te vol. Daarnaast kan het zijn dat uw internetprovider een maximum heeft aan de grootte per email. Omdat hier een handleiding wordt meegestuurd, kan het voorkomen dat de email groter is dan toegestaan bij uw provider.

Andere handleiding(en) van Omron M3 - HEM-7131-E

Omron M3 - HEM-7131-E Gebruiksaanwijzing - Nederlands - 2 pagina's

Omron M3 - HEM-7131-E Gebruiksaanwijzing - Deutsch - 2 pagina's


Uw handleiding is per email verstuurd. Controleer uw email

Als u niet binnen een kwartier uw email met handleiding ontvangen heeft, kan het zijn dat u een verkeerd emailadres heeft ingevuld of dat uw emailprovider een maximum grootte per email heeft ingesteld die kleiner is dan de grootte van de handleiding.

Er is een email naar u verstuurd om uw inschrijving definitief te maken.

Controleer uw email en volg de aanwijzingen op om uw inschrijving definitief te maken

U heeft geen emailadres opgegeven

Als u de handleiding per email wilt ontvangen, vul dan een geldig emailadres in.

Uw vraag is op deze pagina toegevoegd

Wilt u een email ontvangen bij een antwoord en/of nieuwe vragen? Vul dan hier uw emailadres in.


Info