n C H A R A C T E R I S T I C S
1. Current Time Mode
<Time> Hour, minute and second indication with
choice of 12-hour format or 24-hour format.
<Calendar> Month, date and day of the week
indication with choice of month- day format or
day-month format.
2. Stopwatch Mode: Measuring range up to 9 hours
59 minutes and 59.99 seconds in 1/100 -second
increments. Accumulated elapsed time and lap
time measurement functions. Maximum of 10 lap
times storable in memory.
3. Alarm Mode: Daily alarm and hourly chime. Alarm
sound demonstration function.
4. Pacer Mode : Regular beeps at a pre-defined
rate within a range between 30 and 180 beats per
minute (bpm).
5. Countdown Timer Mode: Measuring range up to
23 hours 59 minutes in 1-second increments.
6. D u a l T i m e M o d e :
H o u r, m i n u t e a n d s e c o n d
indication of the time in a different time zone area.
7. Illuminating light: The built-in electro-luminescent
(EL) light evenly illuminates the display for easy
viewing in darkness.
n B u T T o n S A n d d I S p l Ay
A (LIGHT)
B (START/STOP)
D (MODE)
C (LAP/RESET)
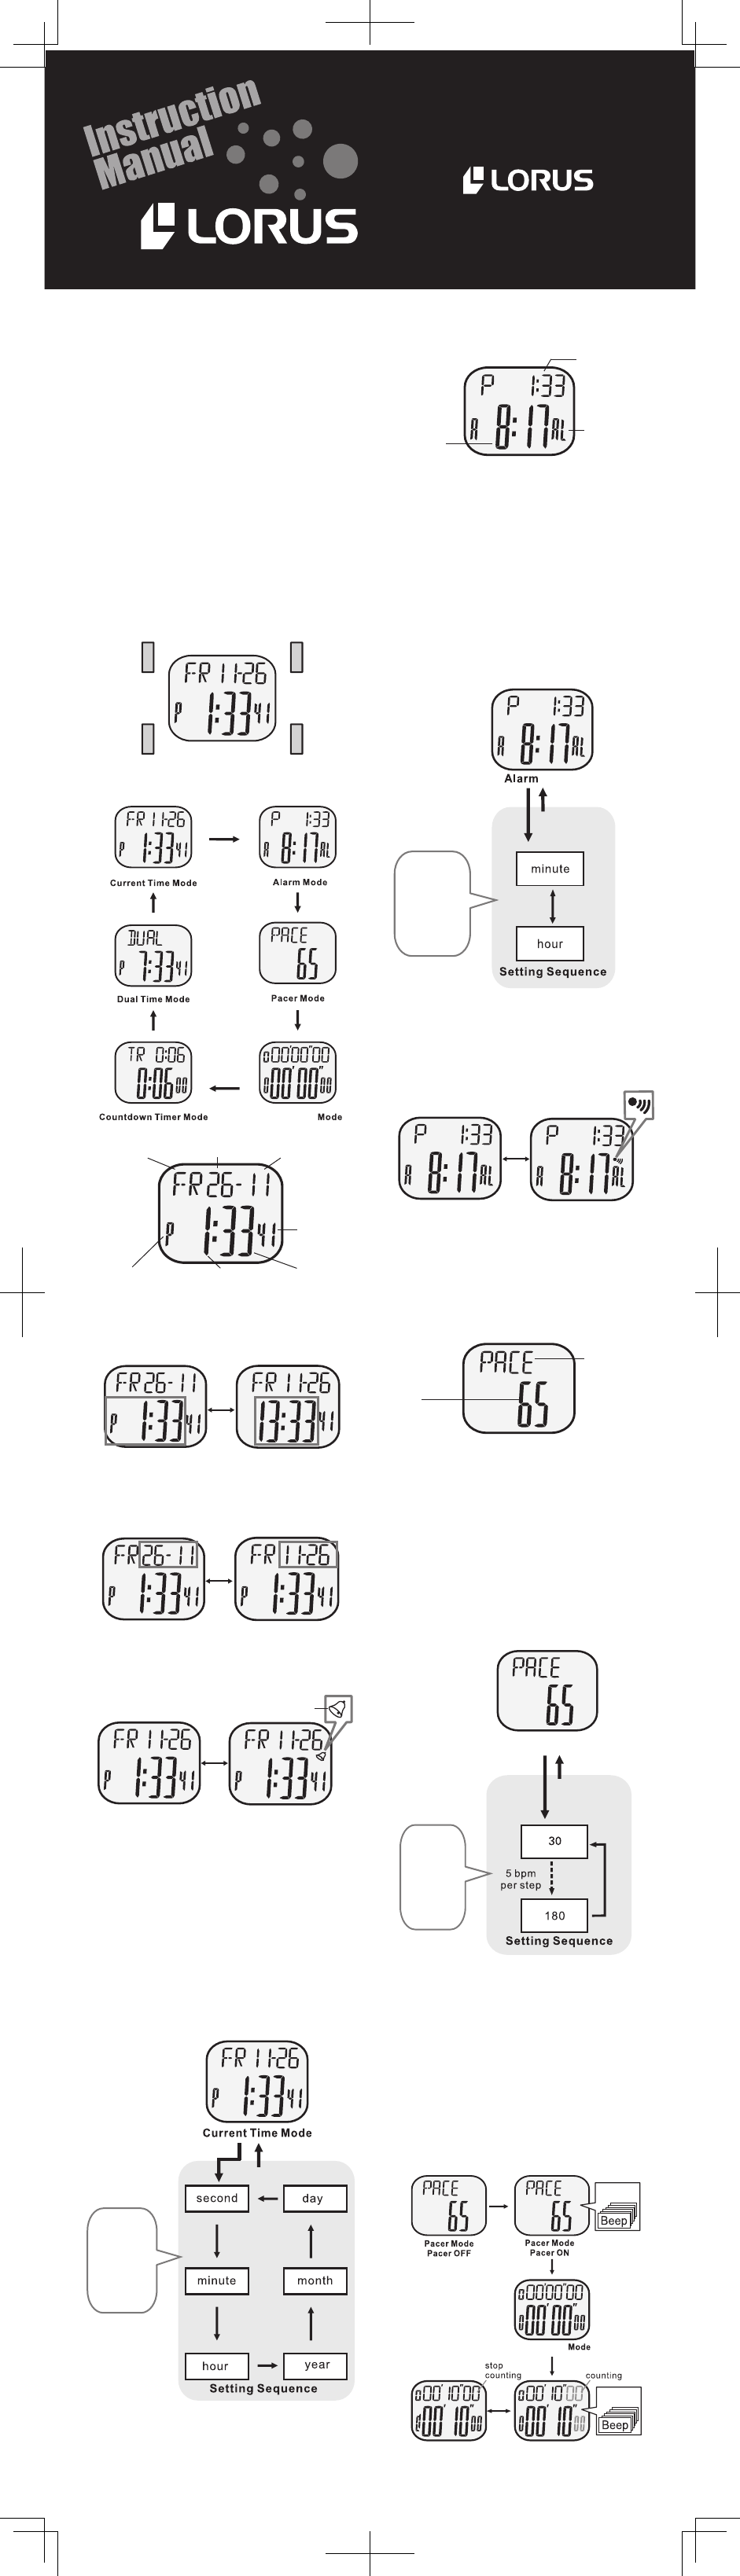
To change the display mode, press Button D. The
display mode changes in the following order.
n C u R R E n T T I m E m o d E
Choice of 12-Hour/24-Hour format
The time display format in either 12-hour indication
or 24-hour indication can be selected alternately
by pressing Button B. Under the 12-hour indication
f o r m a t , A M / P M i n d i c a t o r a p p e a r s o n t h e
display.
How to set the time
1 Keep holding down Button D for 2 seconds to
change the di splay to the TIME/CALENDAR
S E T T I N G m o d e. T h e s e c o n d d i g i t s st a r t
flashing.
2 <Second setting >
Press Button B in accordance with a time
signal. The second digits are reset to“00”
and start counting immediately.
When the second digits count any number
from “30” to “59” and Button B is pressed,
one minute is added and the seconds are
immediately reset to “00.”
3 Press Button B to confirm the second setting
and move on to the next item.
Selection of the item to be adjusted (flashing)
is made in the following order when Button B
is pressed.
4 To set the digits for each item, press Button
C. One digit (flashing) is increased with each
pressing of Button C. To move the digits quickly,
hold down the Button.
5 Af ter al l th e ad j us t m e nt s are co m p leted ,
press Button B to return to the TIME/CALENDAR
mode.
n A l A R m m o d E
Press Button D once to go to the ALARM mode. The
ALARM mode indicator appears on the display.
A l ar m t i m e
(h o u r , m i n u t e )
Cu r r e n t t i m e
(h o u r , m i n u t e )
A L A R M m o d e
i n d i c a t o r
How to set the alarm
1. In the ALARM mode, press Button D for 2 seconds
to change the display to the ALARM SETTING
mode. The minute digits start flashing.
2. Pres s Button C to set the minute digits. One
digit (flashing) is increased with each press of
Button C. To move the digits quickly, hold down
the Button.
3. Press Button B to confirm the minute setting and
move on to the hour setting. The hour digits start
flashing.
4. Press Button C to set the hour digits. One digit
(flashing) is increased with each press of Button
C. To move the digits quickly, hold down the
Button.
5. Press Button D to complete the alarm setting
and return to the ALARM mode.
Turning the alarm ON/OFF
To turn the alarm ON or OFF. press Button C in the
ALARM mode. When the alarm is turned ON, the
ALARM mode indicator appears on the display.
W h e n t h e a l a r m i s O N , t h e wa t c h b e e p s
for 20 s econds at t h e des ignated a larm time
everyday.
Alarm sound test function
To test the alarm sound, keep holding down Button
B in the ALARM mode. The alarm will sound as long
as the button is pressed.
n pA C E R m o d E
Pre ss B ut ton D t wo time s to go to t h e PAC ER
mode. The PACER mode indicator appears on
the display.
The pacer function generates regular beeps at a
pre-defined rate, which can be set within a range
between 30 to 180 beats per minute (bpm). The
pacer and stopwatch can be activated at the
same time.
How to set the pacer beeping rate
1. In the PACER mode, press Button D for 2 seconds
to change the display to the PACER SET TING
mode. The beeping rate digits start flashing.
2. Press Button C to set the beeping rate digits.
Five digits (flashing) are increased with each
press of Button C. To move the digits quickly,
hold down the Button.
3. Press Button D to complete the pacer beeping
rate setting and return to the PACER mode.
Pa c e r
b e e p i n g r a t e
(b p m )
PAC E R m o d e
i n d i c a t o r