SICHERHEIT
__________________________________________________________
7
Dieses Gerät ist für die Wiedergabe von Tonsignalen bestimmt. Jede andere Verwen-
dung ist ausdrücklich ausgeschlossen.
7
Schützen Sie das Gerät vor Feuchtigkeit (Tropf- und Spritzwasser). Stellen Sie keine mit
Flüssigkeit gefüllten Gefäße (Vasen oder ähnliches) auf das Gerät. Gefäße könnten
umkippen und mit der auslaufenden Flüssigkeit die elektrische Sicherheit beeinträchti-
gen.Stellen Sie keine offenen Brandquellen, z.B. Kerzen, auf das Gerät.
7
Sorgen Sie für ausreichende Belüftung des Gerätes. Bedecken Sie die Lüftungsschlitze
nicht mit Zeitungen, Tischtüchern, Vorhängen, etc.
7
Bitte beachten Sie beim Aufstellen des Gerätes, dass Oberflächen von Möbeln mit den
verschiedensten Lacken und Kunststoffen beschichtet sind, welche meistens chemische
Zusätze enthalten. Diese Zusätze können u.a. das Material der Gerätefüße angreifen,
wodurch Rückstände auf der Möbeloberfläche entstehen, die sich nur schwer oder nicht
mehr entfernen lassen.
7
Verwenden Sie keine Reinigungsmittel, diese können das Gehäuse beschädigen. Reini-
gen Sie das Gerät mit einem sauberen, feuchten Ledertuch. Sie dürfen das Gerät nicht
öffnen. Für Schäden, die durch unsachgemäße Eingriffe entstehen, geht der Anspruch
auf Gewährleistung verloren.
7
Das Typenschild befindet sich an der Unterseite des Gerätes.
DEUTSCH
DEUTSCH
DEUTSCH
DEUTSCH
DEUTSCH
DEUTSCH
DEUTSCH
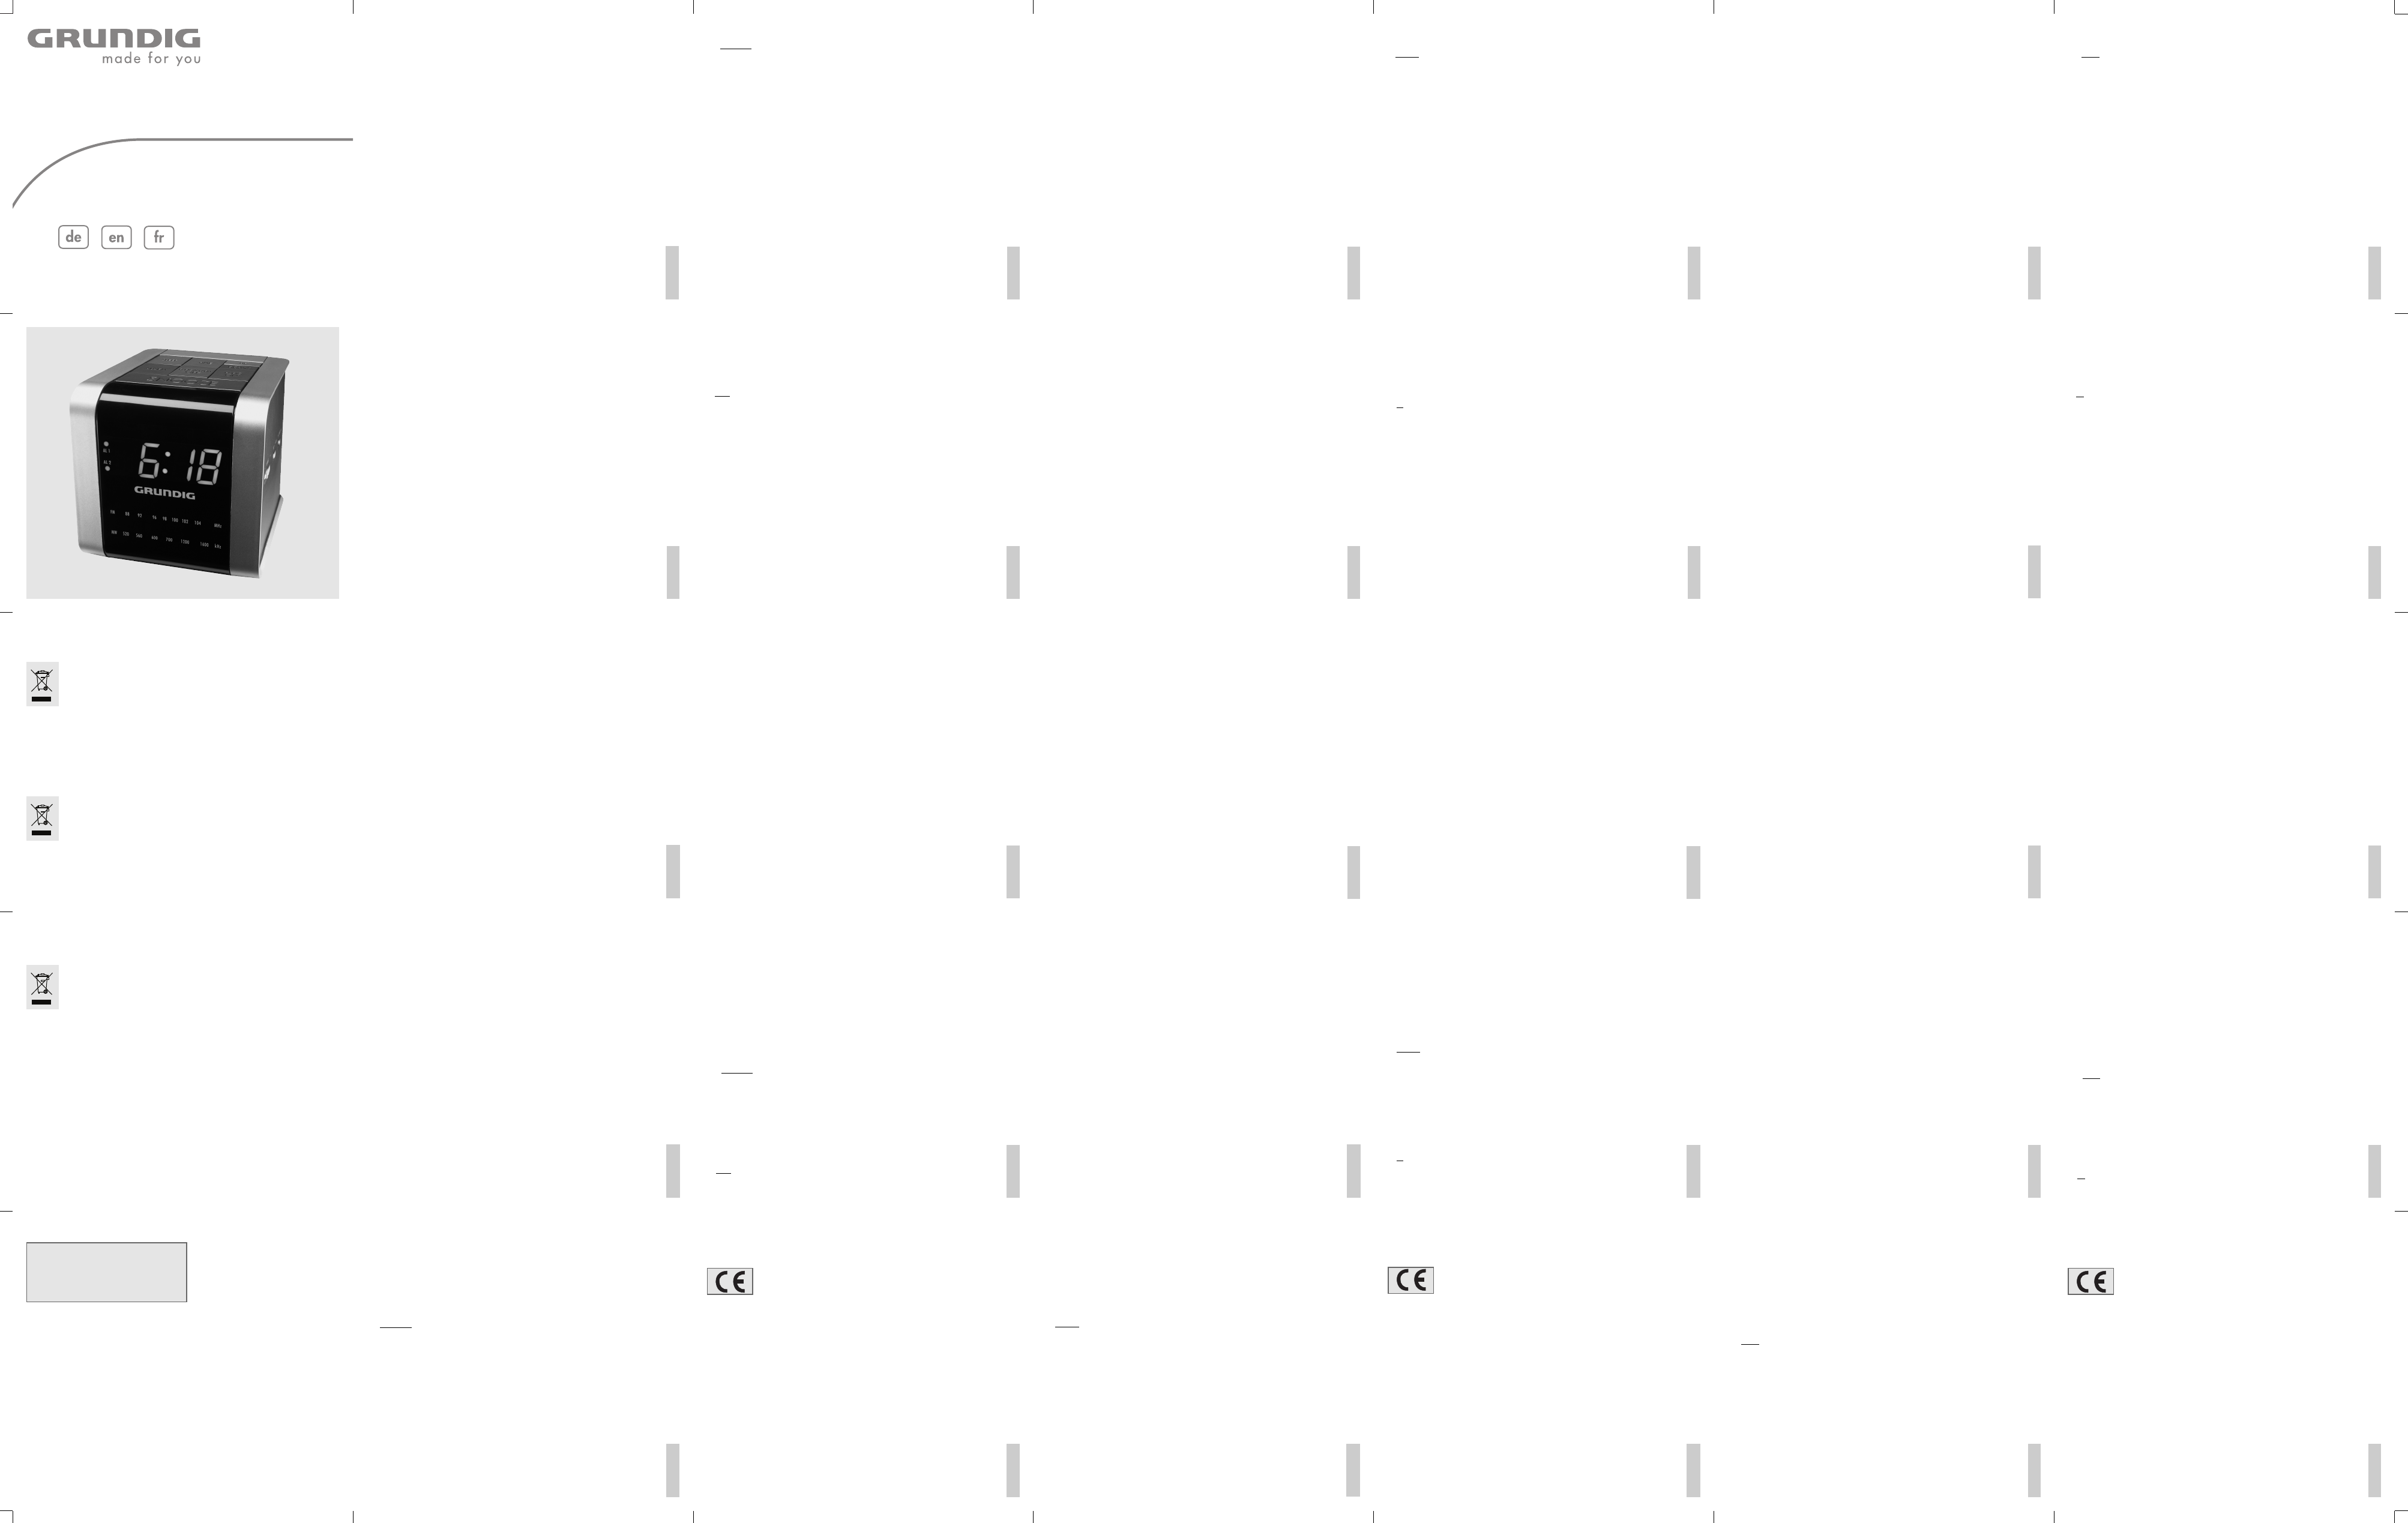
AUF EINEN BLICK
__________________________________________________
Bedienelemente an der Oberseite
SNOOZE Unterbricht die Weckfunktion; blendet die Sekunden ein.
TIME Drücken und gedrückt halten: aktiviert die Uhrzeit-Einstellung.
ALARM Drücken und gedrückt halten: aktiviert die Weckzeit-Einstellung;
blendet die Weckzeit ein (im Stand-by-Betrieb).
DOWN Zum langsamen Einstellen der Uhr- und Weckzeit rückwärts.
UP Zum schnellen Einstellen der Uhr- und Weckzeit vorwärts.
RADIO ON Schaltet das Radio aus Bereitschaft (Stand-by) ein.
RADIO/ALARM Schaltet das Gerät in Bereitschaft (Stand-by); beendet das
OFF Wecken für diesen Tag; deaktiviert den Sleep-Timer.
SLEEP Aktiviert den Sleep-Timer; blendet die Ausschaltzeit ein.
Bedienelemente an den Seiten
ALARM Schaltet zwischen den Weckzeiten 1 und 2 um;
1 1+2 2 aktiviert die Weckzeiten 1 und 2 bzw. 1+2; Schiebeschalter, linke
Geräteseite.
ALARM Deaktiviert die Weckbereitschaft;
9
ɷ
e schaltet für den Weck-Betrieb zwischen Rundfunk-Programm und Sig-
nalton um; Schiebeschalter, linke Geräteseite.
z VOLUME Ändert die Lautstärke, linke Geräteseite.
DIMMER Schaltet die Anzeige zwischen zwei Helligkeitsstufen
Ļ
ļ
um; Schiebeschalter, rechte Geräteseite.
FM•MW Wellenbereichsumschalter FM und MW, rechte
Geräteseite.
TUNING Drehregler zum Einstellen der Rundfunk-Programme, rechte Geräte-
seite.
Bedienelemente an der Rückseite
Ü Netzkabel.
y Wurfantenne für den FM-Empfang.
Für den MW-Empfang besitzt das Gerät eine eingebaute Antenne.
Zum Ausrichten der Antenne das Gerät um die eigene Achse drehen.
y Kopfhörerbuchse, zum Anschließen eines Kopf- oder Ohrhörers mit
Klinkenstecker (ø 3,5 mm).
– Der Lautsprecher des Gerätes wird abgeschaltet.
Bedienelemente an der Unterseite
Batteriefach für Stützbatterie.
Die Anzeigen
ALARM 1
•
Leuchtanzeige. Zeigt an, dass die Weckbereitschaft für Weckzeit 1
aktiviert ist.
ALARM 2
•
Leuchtanzeige. Zeigt an, dass die Weckbereitschaft für Weckzeit 2
aktiviert ist.
00:00 Zeigt die Uhrzeit, die Weckzeit und die Sleep-Timer-Zeit an.
FM 88 ... 108 MHz Leuchtanzeige. Betriebsanzeige für das Radio, Frequenz-
•
anzeige.
DEUTSCH
5 Mit »DOWN« (gedrückt halten) die Weckzeit langsam rückwärts einstellen;
und/oder
mit »UP« (gedrückt halten) die Weckzeit schnell vorwärts einstellen.
6 Zum Beenden der Einstellung »ALARM« loslassen.
– Das Gerät weckt zur eingestellten Zeit mit dem gewünschten Wecksignal.
Ein- und ausschalten
1 Gerät mit »RADIO ON« aus Bereitschaft (Stand-by) einschalten.
2 Gerät mit »RADIO/ALARM OFF« in Bereitschaft (Stand-by) schalten.
Radio-Betrieb
Für den bestmöglichen FM (UKW)-Empfang genügt es, die Wurfantenne entsprechend aus-
zurichten.
Rundfunk-Programme einstellen
1 Gewünschten Wellenbereich mit »FM• MW« auf der rechten Geräteseite einstellen.
2 Gewünschtes Rundfunk-Programm mit dem Drehregler »TUNING« (rechte Geräteseite)
einstellen.
Lautstärke ändern
1 Gewünschte Lautstärke mit dem Drehregler »
z VOLUME« (linke Geräteseite) ein-
stellen.
Helligkeit der Anzeige ändern
1 Helligkeit der Anzeige mit »DIMMER
ļ
« bzw. »DIMMER
Ļ
« erhöhen oder verrin-
gern.
DEUTSCH
Weck-Betrieb
Weckzeiten wählen
Voraussetzung hierfür ist, dass die Weckbereitschaft (»
ɷ
« oder »e«) aktiviert wurde.
1 Den Schiebeschalter »ALARM 1 1+2 2« (linke Geräteseite) auf »1« oder »2« stellen.
– Die Leuchtanzeige »ALARM 1
•
« oder »ALARM 2
•
« leuchtet;
oder
zum Aktivieren beider Weckzeiten den Schiebeschalter »ALARM 1 1+2 2« (linke
Geräteseite) auf »1+2« stellen.
– Die Leuchtanzeigen »ALARM 1
•
« und »ALARM 2
•
« leuchten.
Weckzeiten einblenden
Je nach Einstellung - »ALARM 1« oder »ALARM 2« - wird entweder die Weckzeit 1
oder die Weckzeit 2 eingeblendet.
1 »ALARM« drücken und gedrückt halten.
– Anzeige: die zuletzt eingestellte Weckzeit.
2 Zum Ausblenden der Weckzeit »ALARM« loslassen.
– Anzeige: die aktuelle Uhrzeit.
Hinweis:
Ist der Schiebeschalter »ALARM 1 1+2 2« (linke Geräteseite) auf »1+2« gestellt,
können die Weckzeiten nicht angezeigt werden.
Wecken mit Rundfunk-Programm
1 Gerät mit »RADIO ON« einschalten.
2 Gewünschten Wellenbereich mit »FM•MW« (rechte Geräteseite) einstellen.
3 Gewünschtes Rundfunk-Programm mit dem Drehregler »TUNING« (rechte Geräteseite)
einstellen.
DEUTSCH
4 Gewünschte Wecklautstärke mit dem Drehregler »z VOLUME« (linke Geräteseite)
einstellen.
5 Wecksignal Rundfunk-Programm (»
ɷ
«) mit »ALARM
9
ɷ
e« (linke Geräteseite)
einstellen.
– Das Gerät weckt zur eingestellten Zeit mit Runfunk-Programm (Weckdauer 59 Minu-
ten).
Wecken mit Signalton
1 Wecksignal Signalton (»e«) mit »ALARM
9
ɷ
e« (linke Geräteseite) einstellen.
– Das Gerät weckt zur eingestellten Zeit mit Signalton (Weckdauer 59 Minuten).
Wecken unterbrechen
1 Während des Weckens »SNOOZE« drücken.
– Das Wecksignal (Rundfunk-Programm oder Signalton) stoppt.
– Das Wecken setzt in 6-Minuten-Intervallen von neuem ein (die Gesamtweckzeit beträgt
59 Minuten).
Wecken für diesen Tag beenden
1 Während des Weckens »RADIO/ALARM OFF« drücken.
– Das Wecksignal (Signalton oder Rundfunk-Programm) stoppt, die Weckbereitschaft
bleibt mit der eingestellten Zeit für den nächsten Tag erhalten.
Weckbereitschaft deaktivieren/aktivieren
1 Weckbereitschaft deaktivieren, dazu mit »ALARM
9
ɷ
e« (linke Geräteseite) auf
»
9
« (Stand-by) schalten.
– Anzeige: Die Leuchtanzeigen »ALARM 1
•
« und »ALARM 2
•
« erlöschen.
– Die eingestellten Weckzeiten bleiben erhalten.
Stromversorgung
Netz-Betrieb
Prüfen Sie, ob die auf dem Typenschild (an der Unterseite des Gerätes) angegebene Netz-
spannung mit der örtlichen Netzspannung übereinstimmt. Ist dies nicht der Fall, wenden
Sie sich an Ihren Fachhändler.
1 Stecker des Netzkabels in die Steckdose (230V~, 50 Hz) stecken.
Vorsicht:
Über das Netzkabel ist das Gerät mit dem Stromnetz verbunden. Wenn Sie das Gerät
vollständig vom Stromnetz trennen wollen, müssen Sie das Netzkabel ziehen.
Mit dem Netzstecker trennen Sie das Gerät vom Stromnetz. Sorgen Sie daher dafür,
dass der Netzstecker während des Betriebes frei zugänglich bleibt und nicht durch
andere Gegenstände behindert wird.
Stützbatterie einsetzen
Im Netz-Betrieb sorgt die Stützbatterie dafür, dass im Falle eines Stromausfalls, oder wenn
Sie kurz den Netzstecker ziehen, die gespeicherten Einstellungen erhalten bleiben.
1 Batteriefach an der Geräteunterseite öffnen, dazu auf die markierte Fläche drücken, den
Deckel zurückschieben und abnehmen.
2 Beim Einlegen der Batterie (Typ 9 V, 6LF 22) die durch die Kontakte vorgegebene Polung
beachten.
3 Den Deckel wieder einlegen und nach vorne schieben, bis er einrastet.
Hinweis:
Entfernen Sie die Stützbatterie, wenn Sie das Gerät längere Zeit nicht betreiben. Für
Schäden, die durch ausgelaufene Batterien entstehen, kann nicht gehaftet werden.
BETRIEB
_______________________________________________________________
Uhrzeit einstellen
Wird das Gerät erstmals in Betrieb genommen, blinkt in der Anzeige die Uhrzeit als Zei-
chen dafür, dass sie eingestellt werden muss. Das gleiche gilt nach einem Stromausfall oder
wenn das Gerät vom Netz getrennt war und keine Stützbatterie eingesetzt ist.
1 »TIME« drücken und gedrückt halten.
2 Mit »DOWN« (gedrückt halten) die Uhrzeit langsam rückwärts einstellen;
und/oder
mit »UP« (gedrückt halten) die Uhrzeit schnell vorwärts einstellen.
3 Zum Beenden der Einstellung »TIME« loslassen.
Hinweis:
Mit »SNOOZE« (drücken und gedrückt halten) können die Sekunden eingeblendet wer-
den ( Uhrzeit z.B. »12:15« und 20 Sekunden, Anzeige: »5:20«).
Weckzeiten einstellen
1 Mit dem Schiebeschalter »
9
ɷ
e « (linke Geräteseite) das gewünschte Wecksignal
(»
ɷ
« = Rundfunk-Programm, »e« = Signalton) einstellen.
2 Den Schiebeschalter »ALARM 1 1+2 2« (linke Geräteseite) auf »1« oder »2« stellen.
– Die Leuchtanzeige »ALARM 1
•
« oder »ALARM 2
•
« leuchtet.
3 »ALARM« drücken.
4 »ALARM« drücken und gedrückt halten.
2 Weckbereitschaft aktivieren, dazu mit »ALARM
9
ɷ
e« (rechte Geräteseite) von
»
9
« (Stand-by) auf »
ɷ
« oder »e« schalten.
– Anzeige: Die Leuchtanzeigen »ALARM 1
•
« oder »ALARM 2
•
« leuchten.
Timer-Betrieb
Das Gerät verfügt über einen Sleep-Timer, der es während des Radio-Betriebes zu einer
voreingestellten Zeit ausschaltet. Die Ausschaltzeit lässt sich zwischen 0 Minuten (aus) und
59 Minuten einstellen.
Sleep-Timer aktivieren
1 Gerät mit »SLEEP« einschalten.
– Anzeige: Die Ausschaltzeit »0:59« (59 Minuten).
2 Zum Einstellen der gewünschten Ausschaltzeit »SLEEP« drücken und gedrückt halten.
3 Mit »DOWN« (gedrückt halten) die Ausschaltzeit langsam rückwärts einstellen;
und/oder
mit »UP« (gedrückt halten) die Ausschaltzeit schnell vorwärts einstellen.
Hinweis:
Wird allein »SLEEP« länger als 3 Sekunden gedrückt, verringert sich die verbleibende
Ausschaltzeit in Schritten von 1 Minute.
4 Zum Beenden der Einstellung »SLEEP« loslassen.
– Nach Ablauf der eingestellten Ausschaltzeit schaltet sich das Gerät automatisch aus.
Sleep-Timer deaktivieren
1 Sleep-Timer vorzeitig deaktivieren, dazu »RADIO/ALARM OFF« drücken;
oder
Ausschaltzeit mit »DOWN« (gedrückt halten) auf » 0 « stellen.
– Das Gerät schaltet sich in Bereitschaft (Stand-by).
INFORMATIONEN
_________________________________________________
Technische Daten
Dieses Gerät ist funkentstört entsprechend den geltenden EU-Richtlinien.
Dieses Produkt erfüllt die europäischen Richtlinien 2004/108/EC,
2006/95/EC.
Dieses Gerät entspricht der Sicherheitsbestimmung VDE 0860 und somit
der internationalen Sicherheitsvorschrift IEC 65.
Spannungsversorgung: 230 Volt, 50 Hz
Max. Leistungsaufnahme: <3 W (Betrieb), <2 W (Stand-by)
Ausgangsleistung: 400 mW
Wellenbereiche: FM 87,5 ...108,0 MHz
MW 526,5 ...1606,5 kHz
Abmessungen und Gewicht: B x H x T 110 x 110 x 110 mm
Gewicht ca. 0,6 kg
Technische und optische Änderungen vorbehalten!
Umwelthinweis
Dieses Produkt wurde aus hochwertigen Materialien und Teilen hergestellt, die für das
Recycling tauglich sind und wiederverwendet werden können.
Das Produkt darf daher am Ende seiner Lebensdauer nicht über den normalen
Hausmüll entsorgt werden, sondern muss an einem Sammelpunkt für das
Recycling von elektrischen und elektronischen Geräten abgegeben werden.
Nebenstehendes Symbol am Produkt, in der Bedienungsanleitung oder auf der
Verpackung weist darauf hin.
Bitte informieren Sie sich über die örtlichen Sammelstellen bei Ihrer Gemeindeverwaltung.
Mit der Verwertung von Altgeräten leisten Sie einen wichtigen Beitrag zum Schutze unserer
Umwelt.
Environmental note
This product has been made from high-quality parts and materials which can be re-used
and recycled.
Therefore, do not throw the product away with normal household waste at the
end of its life. Take it to a collection point for recycling electrical and electronic
devices. This is indicated by this symbol on the product, in the operating
manual and on the packaging.
Please find out about collection points operated by your local authority.
Help protect the environment by recycling used products.
Remarque relative à l’environnement
Ce produit a été fabriqué à partir de matériaux et pièces de grande qualité qui peuvent
être recyclés.
Ce produit n’est donc pas destiné aux ordures ménagères. Il doit être déposé
dans un centre de collecte destiné au recyclage d’appareils électriques et élec-
troniques. Ceci est indiqué par le symbole ci-contre figurant sur le produit,
dans la notice ou sur l’emballage.
Veuillez vous adresser à votre commune pour connaître les centres de collecte
situés près de chez vous.
Le recyclage des appareils usagés est une contribution importante à la protection de l’envi-
ronnement.
Umwelthinweis:
Die Batterien – auch schwermetallfreie – dürfen nicht im Hausmüll entsorgt werden. Ver-
brauchte Batterien müssen in die Altbatteriesammelgefäße bei Handel und öffentlich-
rechtlichen Entsorgungsträgern gegeben werden.
Environmental note:
Batteries, including those which contain no heavy metals, may not be disposed of with
household waste. Please dispose of used batteries in an environmentally sound manner.
Find out about the legal regulations which apply in your area.
Remarque relative à l’environnement :
Ne jetez pas les piles dans les ordures ménagères, même si elles ne contiennent pas de
métaux lourds. Respectez la protection de l’environnement en déposant par exemple les
piles usagées dans un centre de collecte prévu à cet effet. Renseignez-vous sur la législa-
tion en vigueur dans votre pays.
GRUNDIG Kundenberatungszentrum
Montag bis Freitag von 8.00 bis 18.00 Uhr
Deutschland: 0180 / 523 18 80 *
Österreich: 0820 / 220 33 22 **
* gebührenpflichtig (0,14 €/Min. aus dem Festnetz)
** gebührenpflichtig (0,145 €/Min. aus dem Festnetz)
Haben Sie Fragen?
Unser Kundenberatungszentrum steht
Ihnen werktags stets von
8.00 – 18.00 Uhr zur Verfügung.
Grundig Multimedia B.V.
Atrium, Strawinskylaan 3105 • NL-1077 ZX Amsterdam • http://www.grundig.com
72011 407 4000
CLOCK RADIO
Sonoclock 560
ENGLISHENGLISHENGLISH
ENGLISHENGLISH
FRANÇAIS
FRANÇAISFRANÇAISFRANÇAISFRANÇAISFRANÇAIS
SAFETY
_______________________________________________________________
7
This device is designed for the playback of audio signals. Any other use is expressly pro-
hibited.
7
Protect the device from moisture (water drops or splashes). Do not place any vessels
such as vases on the device. These may be knocked over and spill fluid on the electrical
components, thus presenting a safety risk. Do not place any naked flames such as cand-
les on the device.
7
Make sure the device is adequately ventilated. Do not cover the ventilation slots with
newspapers, table cloths, curtains, etc.
7
When deciding where to place the device, please note that furniture surfaces are cove-
red by various types of varnish and plastic, most of which contain chemical additives.
These additives can corrode the device supports, leaving residues on the furniture surfa-
ces which can be difficult or impossible to remove.
7
Do not use any cleaning agent, as this may damage the casing. Clean the device with a
clean, moist leather cloth. Never open the device casing. The manufacturer will not
accept any liability for damage resulting from improper handling.
7
The type plate is located on the bottom of the device.
OVERVIEW
__________________________________________________________
Controls on the top
SNOOZE Interrupts the alarm function. Dipslays the seconds.
TIME Press and hold down: to set the time.
ALARM Press and hold down: to set the alarm time.
Press briefly: to display the alarm time.
DOWN To set the clock and alarm time with the time running slowly back-
wards.
UP To set the clock and alarm time with the time running quickly forwards.
RADIO ON Switches the radio on from stand-by mode.
RADIO/ALARM Switches the radio to stand-by. Switches the alarm signal off when
OFF the alarm is sounding. Switches the radio to stand-by before the sleep
timer period has elapsed.
SLEEP Activates the sleep timer. To display the current sleep timer setting.
Controls on the sides
ALARM Switches the alarm stand-by off.
9
e
ɷ
Switches the alarm between a signal and radio. Sliding switch on the
left side of the device.
ALARM Switches between alarm time 1 and 2.
1 1+2 2 Activates alarm time 1 and 2 or 1+2. Sliding switch on the left side of
the device.
z VOLUME Adjusts the volume. On the left side of the device.
DIMMER Switches the display between two brightness levels.
Ļ
ļ
Sliding switch on the right side of the device.
FM•MW Switches between the FM and MW bandwidths,
on the right side of the device.
TUNING For tuning to radio stations, on the right side of the device.
Controls on the back
Ü Mains cable.
y Wire antenna for FM reception.
The device has a built-in antenna for MW reception. Turn the device
around to direct the antenna.
y Headphone jack for connecting a headphone set with a jack plug (ø
3,5 mm).
– The device’s loudspeakers are switched off.
Controls on the bottom
Battery compartment for 9V back-up battery.
The display
ALARM 1
•
LED. Indicates that the alarm setting is activated with alarm time 1.
ALARM 2
•
LED. Indicates that the alarm setting is activated with alarm time 2.
00:00 Displays the time, the alarm time and the sleep timer time.
FM 88 ... 108 MHz LED Indicates that the radio is switched on.Shows the frequency of the
•
selected radio station on the frequency scale.
ENGLISH
Power supply
Mains operation
Check that the mains voltage on the type plate (on the bottom of the device) corresponds to
your local mains supply. If this is not the case, contact your specialist dealer.
1 Plug the mains cable into the socket (230V~, 50 Hz).
Caution:
The device is connected to the mains with the power plug. To fully disconnect the device
from the mains, pull out the plug.
The mains plug is used to disconnect the device. It shall remain readily operable and
should not be obstructed during intended use.
Inserting the back-up battery
During mains operation, the back-up battery ensures that stored settings are not lost in the
case of a power failure or when the device is briefly disconnected from the mains.
1 Open the battery compartment by pressing the area market with arrows on the drawing
and pushing down the cover.
2 When inserting the battery (9 V, 6LF 22), observe the polarity marked on the base of the
battery compartment.
Note:
Remove the back-up battery when it is flat or when you know that the device will not be
used for a long period of time.
ENGLISH
Setting the clock
When you switch on the device for the first time, the time flashes in the display to indicate
that you must set the clock. The same applies if the device has been disconnected from the
mains and no back-up battery is inserted.
1 Press »TIME« and hold down.
2 Using »DOWN« (hold down) set the clock with the time running slowly backwards.
and/or
Using »UP« (hold down) set the clock with the time running quickly forwards.
3 Release »TIME« to end the setting.
Note:
Using »SNOOZE« (press and hold down), display the seconds (time e.g. »12:15« and
20 seconds, display: »5:20«).
Setting the alarm times
1 Using »
9
ɷ
e« sliding switch (on the left of the device) set the desired alarm (»
ɷ
«
= radio station, »e« = signal).
2 When the alarm is switched off push the sliding switch »ALARM 1 1+2 2« (on the left
of the device) to »1« or »2«.
– Display: the »ALARM 1
•
« or »ALARM 2
•
« LED glows.
3 Press »ALARM«.
4 Press »ALARM« and hold down.
5 Using »DOWN« (hold down), set the alarm time with the time running slowly bak-
kwards.
and/or
Using »UP« (hold down), set the alarm time with the time running quickly forwards.
6 Release »ALARM« to end the setting.
– The device switches on at the set alarm times with the selected alarm signal.
Switching on and off
1 Press »RADIO ON« to switch on the device.
2 Press »RADIO/ALARM OFF« to switch off the device.
Radio operation
For the best FM (VHF) reception, it is sufficient to direct the wire antenna accordingly.
Tuning radio stations
1 Select the required bandwidth with »FM• MW« (on the right side of the device).
2 Find and tune the station using the control dial (right side of device).
Adjusting the volume
1 Adjust the volume using »
z VOLUME« (on the left side of the device).
Adjusting the brightness of the display
1 Increase the brightness of the display with »DIMMER
ļ
«.
2 Decrease the brightness of the display with »DIMMER
Ļ
«.
Alarm mode
Selecting the alarm times
The alarm stand-by (»
ɷ
« or »e«) must be activated.
1 Push the »ALARM 1 1+2 2« sliding switch (on the left side of the device) to »1« or
»2«.
– Display: the »ALARM 1
•
« or »ALARM 2
•
« LED glows
or
activate both alarm times by placing the »ALARM 1 1+2 2« sliding switch (on the left
side of the device) in the »1+2« position.
– Display: the »ALARM 1
•
« and »ALARM 2
•
« LEDs glow.
Displaying the alarm times
Depending on the setting – »ALARM 1« or »ALARM 2« – either alarm time 1 or alarm
time 2 is displayed.
1 Press »ALARM« and hold it down.
– Display: the last alarm time set.
2 Release »ALARM« to end the display of the alarm time.
– Display: the current time.
Note:
If the »ALARM 1 1+2 2« sliding switch (on the left side of the device) is set to
»1+2«, the alarm times cannot be displayed.
Alarm with radio station
1 Press »RADIO ON« to switch on the device.
2 Select the required bandwidth with »FM• MW« (on the right side of the device).
ENGLISH
ENGLISH
ENGLISH
3 Find and tune the station using the control dial (right side of device).
4 Set the required alarm volume with »
z VOLUME« (left side of the device).
5 Select the radio alarm (»
ɷ
«) with »ALARM
9
ɷ
e« (left side of the device).
– The device switches the radio on at the set times (alarm duration 59 minutes).
Alarm with signal tone
1 Set the signal alarm (»e«) with »ALARM
9
ɷ
e« (on the left side of the device).
– The device switches on at the set alarm times with the alarm signal (alarm duration 59
minutes).
Interrupting the alarm
1 Press »SNOOZE« while the alarm is sounding.
– The alarm (signal or radio) stops.
– The alarm comes again at 6-minute intervals (alarm duration - 59 minutes).
Cancelling the alarm for the day
1 During the alarm press »RADIO/ALARM OFF«.
– The alarm (signal or radio) stops, the alarm stand-by retains the set time for the next
day.
Cancelling/activating alarm stand-by
1 Switch »ALARM
9
ɷ
e« (left side of the device) to »
9
« stand-by to cancel the
alarm function.
– Display: The »ALARM 1
•
« and »ALARM 2
•
« LEDs stop glowing.
– The set alarm times are saved.
2 To activate the alarm function switch »ALARM
9
ɷ
e« (left of the device) from
»
9
« (stand-by) to »
ɷ
« or »e«.
– Display: The »ALARM 1
•
« and »ALARM 2
•
« LEDs glow.
Timer mode
The device possesses a sleep timer, which switches it off in radio mode at a preset time. It
is possible to set the switch-off time for between 0 minute (off) and 59 minutes.
Setting the sleep timer
1 Press »SLEEP« to switch on the device.
– Display: The switch-off time »0:59« (59 minutes).
– You will hear the selected radio station.
2 To set the required switch-off time press »SLEEP« and hold it down.
3 Use »DOWN« (hold down) to set the switch-off time with the time running slowly bak-
kwards.
and/or
Use »UP« (hold down) to set the switch-off time with the time running quickly forwards.
Note:
If only »SLEEP« is pressed for longer than 3 seconds, the remaining switch-off time
reduces in 1 minute steps.
4 Release »SLEEP« to end the setting.
– After the selected switch-off time has elapsed, the device switches off automatically.
Switching off the sleep timer
1 To switch off the sleep timer before the set time press »RADIO/ALARM OFF«.
or
Use »DOWN« (hold down) to set the switch-off time to » 0 «.
– The device switches off.
INFORMATION
_____________________________________________________
Technical data
This device is noise-suppressed according to the applicable EU directives.
This product fulfils the European directives 2004/108/EC, 2006/95/EC.
This device conforms to the safety regulation VDE 0860 and therefore the
international safety regulation IEC 65.
Power supply: 230 V, 50 Hz
Max. power consumption: <3 W (operation), <2 W (standby)
Output: DIN 45324, 10% THD 400 mW
Frequency bands: FM 87.5 ...108.0 MHz
MW 526.5 ...1606.5 kHz
Dimensions and weight: W x H x L 110 x 110 x 110 mm
Weight approx. 600 g
Technical and design modifications reserved
SÉCURITÉ
_____________________________________________________________
7
Cet appareil est conçu pour la restitution de signaux audio. Toute autre utilisation est for-
mellement exclue.
7
Tenez l’appareil à l’abri de l’humidité (projections d’eau). Ne posez pas de récipients
contenant des liquides (vases ou autres) sur l’appareil. Ces récipients pourraient se ren-
verser et les liquides s’en écoulant pourraient endommager le système électrique.Ne
posez pas d’objets produisant une flamme nue, comme des bougies, sur l’appareil.
7
Veillez à ce que l’appareil soit suffisamment aéré. N’obstruez pas les fentes d’aération
avec des journaux, des nappes, des rideaux, etc.
7
Lors de l’installation de votre appareil, tenez compte du fait que la plupart des meubles
sont recouverts de vernis, de peinture ou de matières plastiques et que ces revêtements
contiennent des additifs chimiques. Ces additifs peuvent entre autres attaquer le matéri-
au des pieds de votre appareil et laisser ainsi sur les meubles des traces indélébiles ou
difficiles à enlever.
7
N’utilisez pas de détergents, ceux-ci risqueraient d’endommager le boîtier. Nettoyez
l’appareil à l’aide d’une peau de chamois propre et humide. N’ouvrez jamais le boîtier
de l’appareil. La garantie du fabricant ne couvre aucun dégât occasionné par des mani-
pulations inadéquates.
7
La plaque signalétique se trouve sur la face inférieure de l’appareil.
FRANÇAIS
FRANÇAISFRANÇAIS
INFORMATIONS
___________________________________________________
Caractéristiques techniques
Cet appareil est antiparasité conformément aux directives européennes en
vigueur.
Ce produit est conforme aux directives européennes 2004/108/CE,
2006/95/CE.
Cet appareil est conforme aux consignes de sécurité VDE 0860 et donc à la législation
internationale de sécurité IEC 65.
Alimentation électrique : 230 volts, 50 Hz
Puissance absorbée max. : < 3 W (en service), < 2 W (en veille)
Puissance de sortie : 400 mW
Gammes d’ondes : FM 87,5 ...108,0 MHz
MW 526,5 ...1606,5 kHz
Dimensions et poids : l x h x p 110 x 110 x 110 mm
Poids de l’appareil 0,6 kg env.
Sous réserve de modifications techniques et esthétiques !
OPERATION
_________________________________________________________
FRANÇAIS
VUE D’ENSEMBLE
__________________________________________________
Commandes sur la face supérieure
SNOOZE Interrompt la fonction réveil ; affiche les secondes.
TIME Pression maintenue : le réglage de l’heure est activé.
ALARM Pression maintenue : active le réglage de l’heure de réveil ;
affiche l’heure de réveil (en mode de veille).
DOWN Permet de régler lentement la pendule et l’horaire de réveil
(dans l’ordre décroissant).
UP Permet de régler rapidement la pendule et l’horaire de réveil
(dans l’ordre croissant).
RADIO ON Fait basculer la radio du mode veille (stand-by) au mode marche.
RADIO/ALARM Fait passer l’appareil en mode veille (stand-by) ; stoppe la fonction
OFF réveil pour le reste de la journée ; désactive la fonction d’arrêt pro-
grammé.
SLEEP Active la fonction d’arrêt programmé ; affiche l’heure de l’arrêt
programmé.
Commandes latérales
ALARM Bascule entre les heures de réveil 1 et 2 ;
1 1+2 2 active les heures de réveil 1 et 2 ou 1+2 ; curseur, côté gauche de
l’appareil.
ALARM Désactive la fonction réveil ;
9
ɷ
e permet de choisir entre réveil par sonnerie ou réveil par émission radio;
curseur, côté gauche de l’appareil.
z VOLUME Réglage du volume, côté gauche de l’appareil.
DIMMER Permet de basculer entre deux niveaux de luminosité
Ļ
ļ
de l’affichage ; curseur, côté droit de l’appareil.
FM•MW Sélecteur des gammes d’ondes FM et MW (OM), côté droit de
l’appareil.
TUNING Bouton de réglage permettant de sélectionner les stations radio, côté
droit de l’appareil.
Commandes au dos
Ü Câble secteur.
y Antenne-câble pour réception FM.
Pour la réception en ondes moyennes (MW), l’appareil dispose d’une
antenne encastrée. Pour orienter l’antenne, veuillez tourner l’appareil
sur son axe.
y Prise casque pour le raccordement d’un casque ou d’écouteurs à fiche
jack (ø 3,5 mm).
– Le branchement entraîne la désactivation du haut-parleur.
Commandes sur la face inférieure
Boîtier pour pile de secours.
Affichage
ALARM 1
•
Témoin lumineux. Indique que la fonction réveil a été activée sur
l’horaire de réveil 1.
ALARM 2
•
Témoin lumineux. Indique que la fonction réveil a été activée sur
l’horaire de réveil 2.
00:00 Indique l’heure, l’horaire de réveil et l’horaire d’arrêt programmé.
FM 88 ... 108 MHz Témoin lumineux. Témoin de marche de la radio, affichage de la
•
fréquence.
Alimentation électrique
Fonctionnement sur secteur
Vérifiez que la tension secteur indiquée sur la plaque signalétique (apposée sur la face
inférieure de l’appareil) correspond à la tension secteur locale. Si ce n’est pas le cas, veuil-
lez contacter votre revendeur spécialisé.
1 Enfoncez la fiche du câble secteur dans votre prise secteur (230 V~,
50 Hz).
Attention :
L’appareil est relié au secteur par la fiche secteur. Pour débrancher complètement
l’appareil du secteur, il faut retirer la fiche secteur de la prise !
A l’aide de la fiche secteur, vous débranchez l’appareil du secteur. Par conséquent, veil-
lez à ce que la fiche secteur soit accessible pendant le fonctionnement : aucun objet ne
doit en bloquer l’accès.
Mise en place de la pile de secours
Lorsque l’appareil est branché sur secteur, la pile de secours empêche que les réglages
mémorisés soient effacés en cas de panne de courant ou si vous retirez le câble de la prise
pendant quelques instants.
1 Pour ouvrir le compartiment de la pile, appuyez sur les emplacements marqués de flè-
ches comme indiqué sur le dessin et poussez le couvercle vers le bas.
2 Lorsque vous placez la pile (type 9 V, 6LF 22) dans le compartiment, respectez la polari-
té indiquée au fond du compartiment.
Remarque :
Retirez la pile de secours lorsque l’appareil reste inutilisé pour une durée prolongée.
FONCTIONNEMENT
_______________________________________________
Réglage de l’heure
La première fois que vous mettez l’appareil en service, l’affichage de l’heure se met à
clignoter, indiquant ainsi que vous devez procéder au réglage de l’heure. Il en va de même
si vous n’avez pas installé de pile de secours, après les pannes de courant ou si l’appareil
a été débranché.
1 Appuyez sur la touche »TIME« et maintenez-la enfoncée.
2 Mettez lentement la pendule à l’heure (dans l’ordre décroissant) en appuyant sur la
touche »DOWN« (la maintenir enfoncée) ;
et/ou
mettez rapidement la pendule à l’heure (dans l’ordre croissant) en appuyant sur la
touche »UP« (la maintenir enfoncée).
3 Pour mettre fin au réglage, relâchez la touche »TIME«.
Remarque :
La touche »SNOOZE« (la presser et la maintenir enfoncée) permet de visualiser les
secondes (heure p. ex. »12:15« et 20 secondes, affichage : »5:20«).
Réglage des heures de réveil
1 A l’aide du curseur »
9
ɷ
e« (côté gauche de l’appareil), sélectionnez le signal de
réveil de votre choix (»
ɷ
« = émission radio, »e« = sonnerie).
2 Placer le curseur »ALARM 1 1+2 2« (côté gauche de l’appareil) sur »1« ou »2«.
– Le témoin lumineux »ALARM 1
•
« ou »ALARM 2
•
« s’allume.
3 Appuyez sur »ALARM«.
4 Appuyez sur la touche »ALARM« et maintenez-la enfoncée.
5 Réglez lentement l’horaire de réveil (dans l’ordre décroissant) en appuyant sur la touche
»DOWN« (la maintenir enfoncée) ;
et/ou
réglez rapidement l’horaire de réveil (dans l’ordre croissant) en appuyant sur la touche
»UP« (la maintenir enfoncée).
6 Pour mettre fin au réglage, relachez la touche »ALARM«.
– L’appareil vous réveillera à l’heure réglée ne utilisant le signal de réveil souhaité.
Mise en marche et à l’arrêt
1 Mettez l’appareil en marche à partir du mode veille (stand-by) en appuyant sur
»RADIO ON«.
2 Mettez l’appareil en veille (stand-by) en appuyant sur »RADIO/ALARM OFF«.
Mode Radio
Pour obtenir une parfaite réception en FM, il vous suffit d’orienter correctement l’antenne-câble.
Régler les stations radio
1 Sélectionnez la gamme d’ondes souhaitée avec »FM•MW« sur le côté droit de l’appareil.
2 Sélectionnez la station de votre choix en tournant le bouton de réglage »TUNING«
(côté droit de l’appareil).
Réglage du volume
1 Réglez le volume souhaité à l’aide du bouton de réglage »
z VOLUME«
(côté gauche de l’appareil).
Modification de la luminosité de l’affichage
1 Augmentez ou réduisez la luminosité de l’affichage avec »DIMMER
ļ
« ou
»DIMMER
Ļ
«.
Mode réveil
Sélection des horaires de réveil
Pour cela, la fonction réveil (»
ɷ
« ou »e«) doit avoir été activée auparvant.
1 Placer le curseur »ALARM 1 1+2 2« (côté gauche de l’appareil) sur »1« ou »2«.
– Le témoin lumineux »ALARM 1
•
« ou »ALARM 2
•
« s’allume ;
ou
pour activer les deux heures de réveil, placez le curseur »ALARM 1 1+2 2«
(côté gauche de l’appareil) sur »1+2«.
– Les témoins lumineux »ALARM 1
•
« et »ALARM 2
•
« s’allument.
Visualisation des horaires de réveil
Selon que »ALARM 1« ou »ALARM 2« aura été sélectionné, c’est l’horaire de réveil 1
ou l’horaire de réveil 2 qui apparaîtra.
1 Appuyez sur la touche »ALARM« et maintenez-la enfoncée.
– Affichage : l’horaire de réveil programmé en dernier.
2 Pour faire disparaître l’horaire de réveil, relâchez la touche »ALARM«.
– Affichage : l’heure actuelle.
Remarque :
Si le curseur »ALARM 1 1+2 2« (côté gauche de l’appareil) est placé sur »1+2«,
les heures de réveil ne peuvent pas être affichées.
Réveil par radio
1 Mettez l’appareil en marche en appuyant sur »RADIO ON«.
2 Sélectionnez la gamme d’ondes souhaitée avec »FM•MW« (côté droit de l’appareil).
3 Sélectionnez la station de votre choix en tournant le bouton de réglage »TUNING«
(côté droit de l’appareil).
4 Réglez le volume de réveil souhaité à l’aide du bouton de réglage »
z VOLUME«
(côté gauche de l’appareil).
5 Sélectionnez le signal de réveil “émission radio” (»
ɷ
«) à l’aide de »ALARM
9
ɷ
e« (sur le côté gauche de l’appareil).
– L’appareil vous réveillera par émission radio à l’heure programmée (durée de la
fonction Réveil : 59 minutes).
Réveil par sonnerie
1 Sélectionnez le signal de réveil “sonnerie” (»e«) à l’aide de »ALARM
9
ɷ
e«
(sur le côté gauche de l’appareil).
– L’appareil vous réveillera par sonnerie à l’heure programmée (durée de la fonction
Réveil : 59 minutes).
Interruption du réveil
1 Appuyez sur »SNOOZE« pendant que la fonction réveil est en cours.
– Le signal de réveil (sonnerie ou radio) s’arrête.
– Le signal de réveil se réactive de lui-même toutes les 6 minutes (et cela pour une durée
totale de 59 minutes).
Désactivation de la fonction réveil pour la journée en cours
1 Appuyez sur »RADIO/ALARM OFF« pendant que la fonction réveil est en cours.
– Le signal de réveil (sonnerie ou émission radio) s’arrête, mais la fonction réveil reste
activée pour le lendemain sur l’horaire programmé.
Activation/désactivation de la fonction réveil
1 Désactivez la fonction réveil en plaçant »ALARM
9
ɷ
e« (côté gauche de
l’appareil) sur »
9
« (stand-by).
– Affichage : les témoins lumineux »ALARM 1
•
« et »ALARM 2
•
« s’éteignent.
– Les horaires de réveil sont conservés.
2 Activez la fonction réveil en déplaçant »ALARM
9
ɷ
e« (côté droit de l’appareil)
de »
9
« (stand-by) vers »
ɷ
« ou »e«.
– Affichage : les voyants lumineux »ALARM 1
•
« ou »ALARM 2
•
« s’allument.
Mode Timer
L’appareil dispose d’une fonction arrêt programmé qui éteint automatiquement la radio
après écoulement de la durée préréglée. Cette durée peut être réglée de 0 (fonction dés-
activée) à 59 minutes.
Activation de l’arrêt programmé
1 Mettez l’appareil en marche en appuyant sur »SLEEP«.
– Affichage : la durée »0:59« (59 Minuten) au bout de laquelle l’appareil s’éteint.
2 Pour régler la durée de fonctionnement désirée, appuyez sur la touche »SLEEP« et
maintenez-la enfoncée.
3 Réglez lentement la durée de fonctionnement (dans l’ordre décroissant) en appuyant sur
la touche »DOWN« (la maintenir enfoncée) ;
et/ou
réglez rapidement la durée de fonctionnement (dans l’ordre croissant) en appuyant
sur la touche »UP« (la maintenir enfoncée).
Remarque :
Si vous appuyez uniquement sur »SLEEP« pendant plus de 3 secondes, la durée de
fonctionnement restante diminue par incréments de 1 minute.
4 Pour mettre fin au réglage, relâchez la touche »SLEEP«.
– Après écoulement de la durée programmée, l’appareil s’éteindra automatiquement.
Désactivation de l’arrêt programmé
1 Désactivez à l’avance l’arrêt programmé en appuyant sur »RADIO/ALARM OFF« ;
ou
Réglez l’heure d’arrêt sur » 0 « avec »DOWN« (maintenir la touche enfoncée).
– L’appareil passe en mode veille (stand-by).