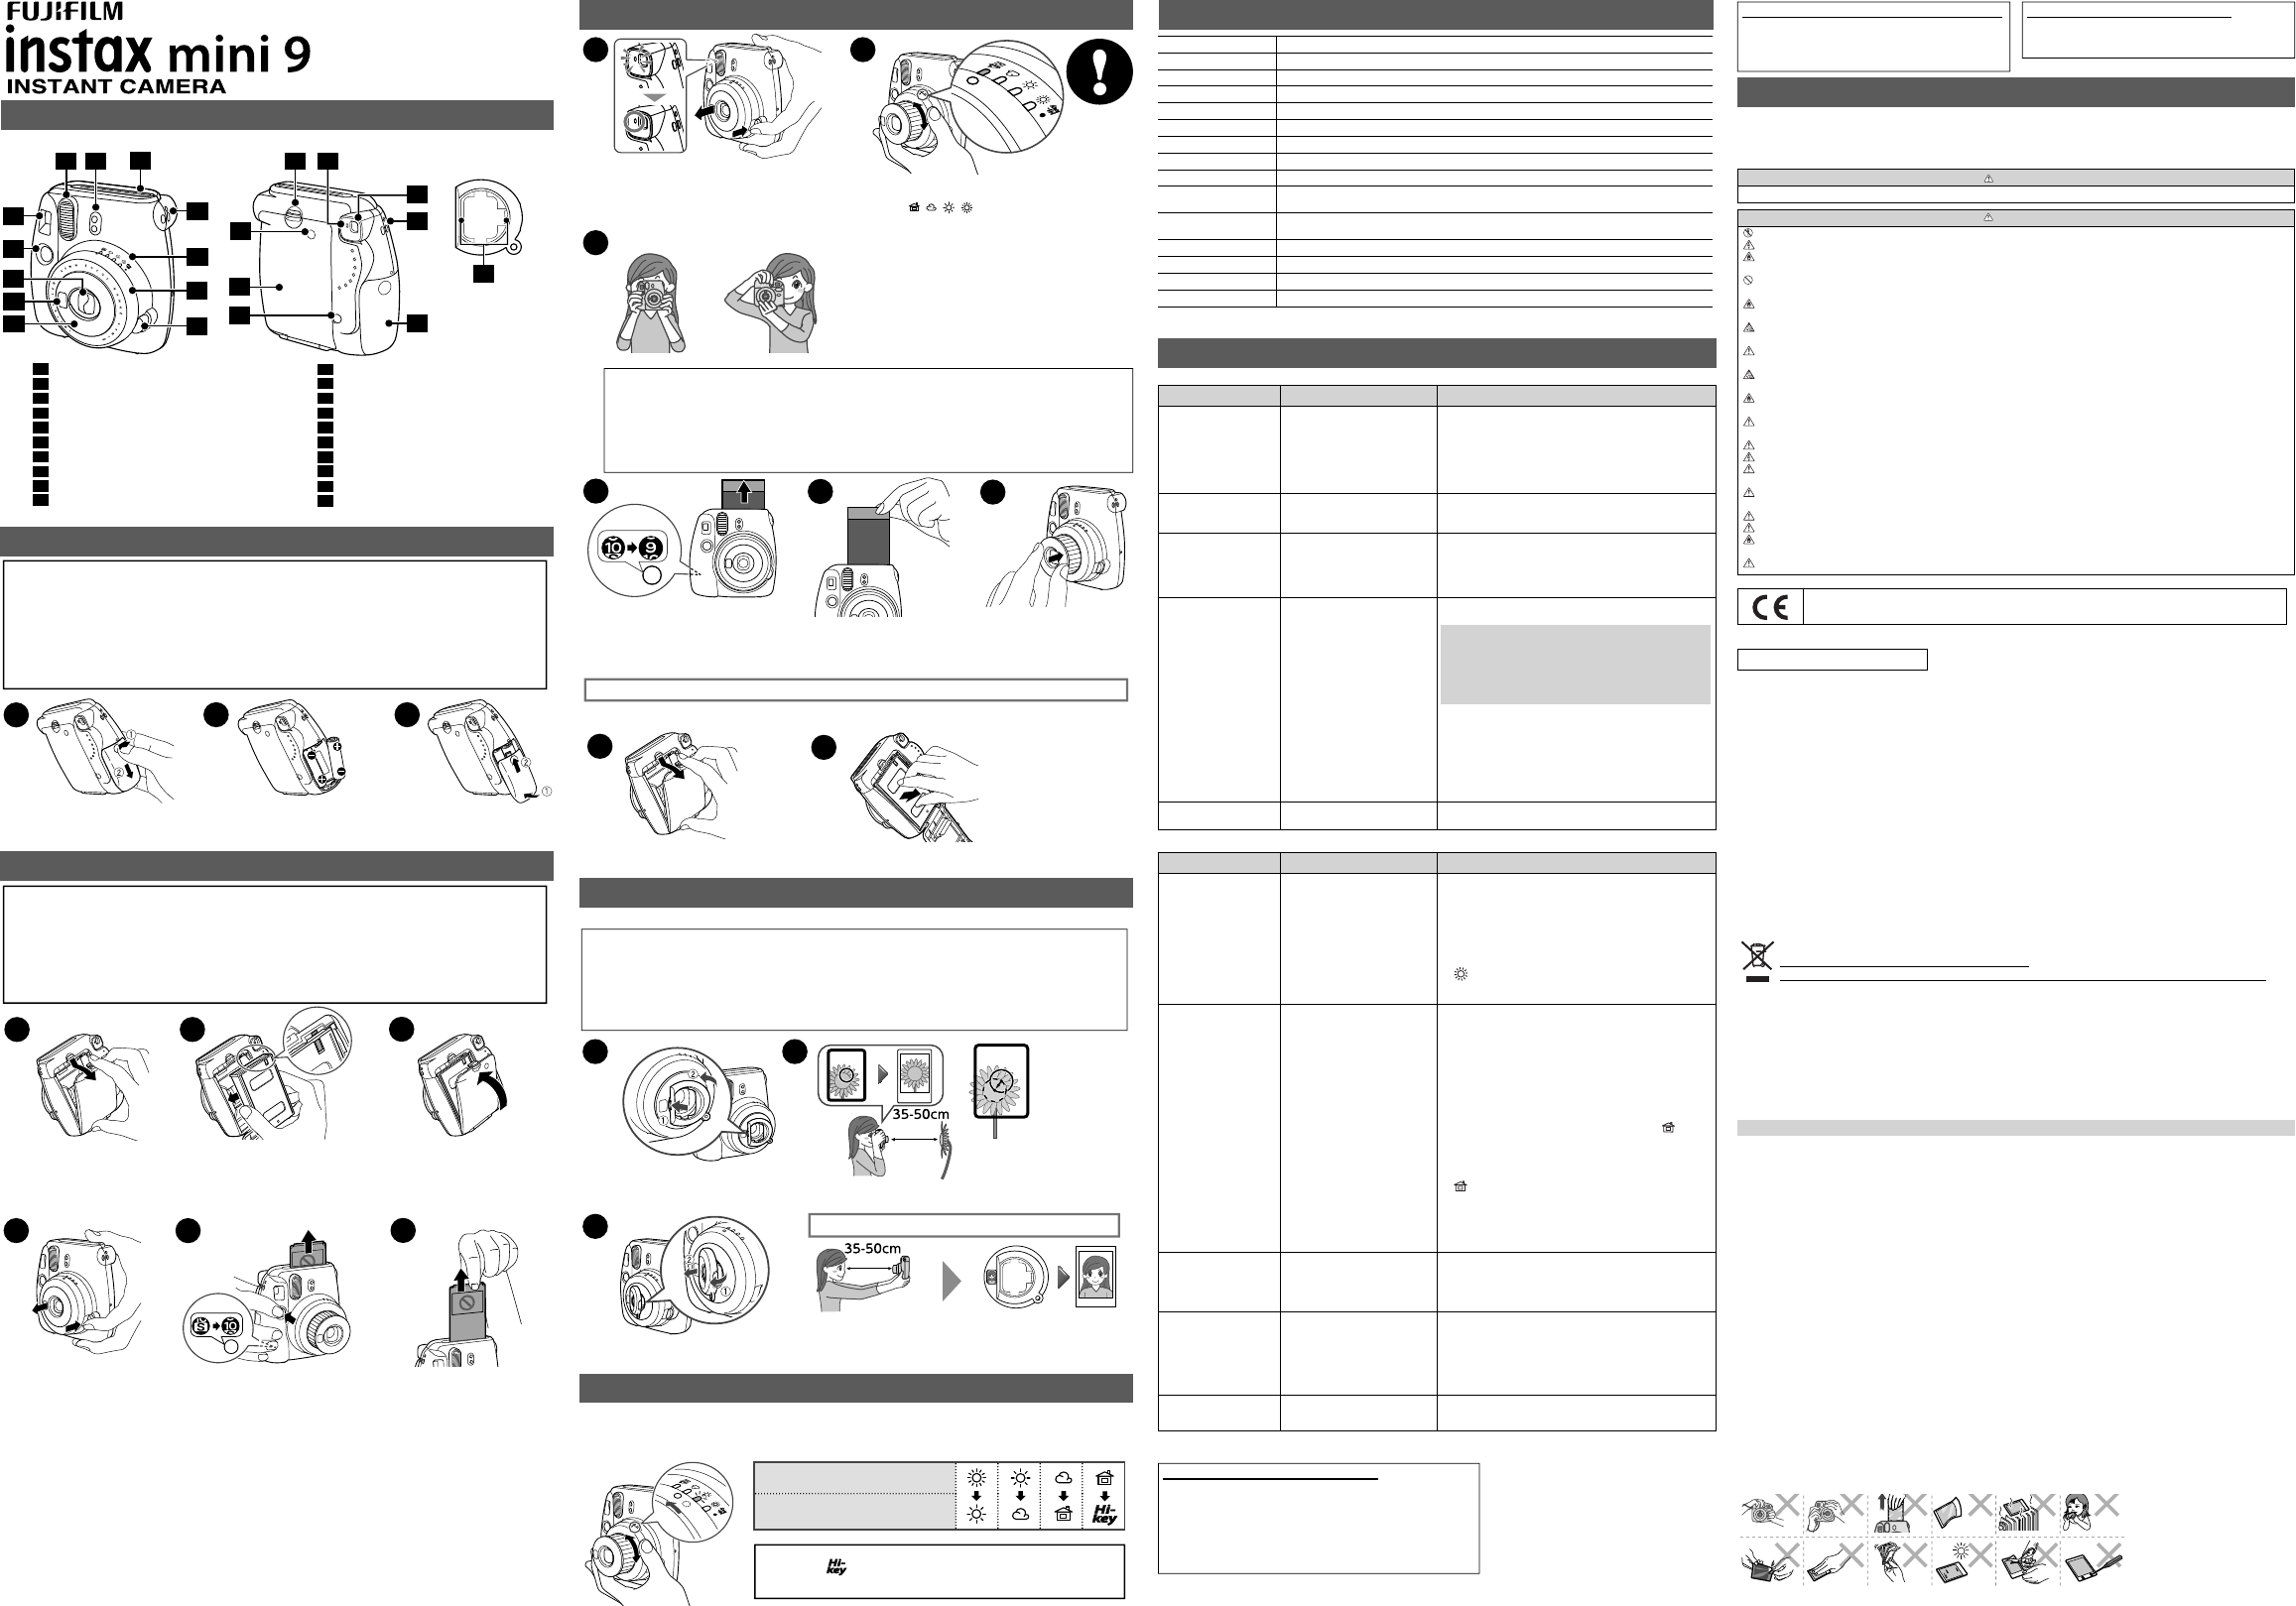
669494
1
Verklein
Vergroot
Pagina terug
1/2
Pagina verder
CPL10B112-101
Parts Name
1
Film ejection slot
11
Brightness adjustment dial
2
Light sensor
12
Power button
3
Flash lampface
13
Flash charging lamp
4
Viewfinder
14
Back cover lock
5
Shutter button
15
Film pack confirmation window
6
Lens/Lens cover
16
Back cover
7
Self-portrait mirror
17
Film counter
8
Lens barrel
18
Eyepiece
9
Strap hook
19
Battery lid
10
Brightness indicator
20
Tabs (Back)
Inserting Batteries
3
2
1
Push up the battery lid lock, then slide
o the battery cover.
Insert two AA batteries matching the
C
and
D
polarities.
Slide on the battery lid to close.
Loading the INSTAX mini Film Pack
1
Press down the back cover lock
to open the back cover.
Hold both sides of the  lm pack, align the
yellow marks on the camera and the  lm pack
as indicated on the INSTAX mini  lm pack
instructions, then insert it straight.
2
3
Close the back cover until the back
cover lock clicks into place.
[IMPORTANT] Taking Pictures
Press the power button to turn the camera on.
The  ash charging lamp on the left of the eyepiece
starts blinking. (Indicates the  ash is charging.)
You cannot take a photo while the lamp is blinking.
When the  lm has been ejected
(the camera stops making a sound),
grasp the edge of the  lm, then take
it out.
3
4
When you have  nished taking a
photo, push the lens barrel to turn
the camera o .
1
Turn the camera toward the subject, then turn
the brightness adjustment dial to move to the
position (
/ / / ) where the lamp is lit.
SPECIFICATIONS
Every time you take a photo, the number
on the  lm counter decreases from “10” to
re ect the number of remaining photos,
and “0“ is displayed when you have used up
the  lm pack.
5
6
You can photograph objects close-up, and can photograph yourself using the self-portrait mirror.
Attach the left tab on the back to the left
of the lens (
1
), then attach the right tab
(
2
) so that it clicks into place.
Hold the camera so that the O” mark
in the view nder is on the upper right
of the center of the subject (see the
illustration above), then take a photo.
Lift up the right side of the close-up lens
supporting the left side (
1
), then detach
it (
2
).
WARNING
Do not look through the close-up lens at the sun or other strong light. Blindness or vision problems could result.
Caution
Do not leave the close-up lens in places exposed to strong sunlight. Personal injury or  re could result if the lens should
accidentally concentrate the sunbeams on an object or a person.
• Switch o the camera before you attach/detach the close-up lens.
Never turn the close-up lens when you attach/detach it; otherwise, the tabs on the back may be broken.
Hold the camera securely
keeping 35 cm to 50 cm
between you and the edge
of the lens.
Con rm the composition using
the self-portrait mirror, then take
a photo.
Caution
Use new alkaline batteries of the same brand/type only (AA only).
Do not use any batteries other than alkaline batteries.
Replace both batteries in the following cases:
- When the red lamp on view nder lights
- When no lamp lights or blinks even though the power is turned on
About 100 pictures (roughly 10 packs of INSTAX mini  lm) can be taken with new batteries.
The battery performance may be reduced when it is cold. In this case, warm up the batteries to room temperature
before using this camera.
Use the supplied batteries for validation.
Caution
Make sure that the batteries are installed before loading the  lm pack.
Avoid direct sunlight when loading the  lm pack.
Do not use any  lm other than FUJIFILM INSTAX mini  lm.
When you load the  lm pack, never press the two rectangular holes on the back.
Do not open the back cover until you have used up the  lm; otherwise, the rest of the  lm is exposed and turns
white. The  lm can no longer be used.
Never use a  lm pack beyond its shelf life; otherwise, it may damage the camera.
For details, refer to the instructions and warnings on FUJIFILM INSTAX mini  lm.
Hold the camera, con rm the desired composition of the  nal image,
then press the shutter button.
Keep a distance from the subject of at least 0.6 m. The  ash has an
e ective range of between 0.6 m and 2.7m.
The subject will be out of focus using the regular lens if the
distance is less than 0.6 m. Use the close-up lens for short-distance
photography. Using it enables you to photograph the subject
between 35 cm and 50 cm.
In short-distance photography (including photography using the
provided close-up lens), the center of the subject in the view nder
will be on the upper right on the actual print.
Caution on holding the camera
For horizontal image, hold the camera with the  ash lampface at the top.
Do not take pictures where  ash photography is forbidden.
Be careful so that your  ngers or the strap do not cover the light sensor,  ash lampface,  ash, lens, or  lm ejection
slot.
Do not grasp the lens barrel when positioning the camera; otherwise, the  nished print may not look as expected.
Look into the view nder so that the “O” mark appears in the center.
Be careful not to touch the lens surface when you press the shutter button.
Using the Close-Up Lens
1
2
3
3
4
2
5
6
8
9
10
11
17
19
14
15
12
13
1
18
16
9
7
Front
20
When “0” is displayed on the  lm counter, unload the  lm pack following the procedure below and as indicated on the INSTAX
mini  lm pack instructions.
Unloading the INSTAX mini  lm pack
Press down the back cover lock to
open the back cover.
Grasp the rectangular holes on the  lm pack, then pull
it out straight.
1
2
Rear
Close-up lens
Vertical image Horizontal image
Taking self-portraits
Film FUJIFILM INSTAX mini film
Picture Size 62 mm × 46 mm
Lens 2 components, 2 elements, f=60 mm, 1:12.7
View nder Real
image finder 0.37× with target spot
Shooting range 0.6 m and beyond
Shutter Speed 1/60 sec.
Exposure Control Manual switching system (LED indicator in exposure meter)
Film Feeding Out Automatic
Film Developing Time Approximately 90 seconds (Varies depending on the ambient temperature)
Flash
Constant firing flash (automatic light adjustment) Recycle time: 0.2 sec. to 6 sec.
(when using new batteries) Effective flash range: 0.6 m – 2.7 m
Power Supply
Two AA-size 1.5V alkaline batteries Capacity: 100 shots
(Approximately 10 INSTAX mini 10-pack film packs with new AA batteries)
Auto power o time 5 min.
Others Exposure counter (number of unexposed films), film pack confirmation window
Dimensions 116 mm × 118.3 mm × 68.2 mm
Weight 307 g (without batteries, strap and film pack)
* Speci cations are subject to change without notice.
TROUBLE SHOOTING
During operation
Problems Possible Causes Solutions
The shutter release won’t
trip.
1 The battery power is low.
2 The batteries are not loaded
correctly.
3 Power is not turned on.
4 Camera has remained idle for
roughly 5 minutes with the
power turned on.
1 Replace the batteries with new ones.
2 Load the batteries correctly.
3 Press the power button to turn on the power.
4 Press the power button after retracting the lens or press the
shutter release button to restore the power-on state.
The lamp on the view
nder blinks and the
shutter release won’t trip.
Flash is charging.
Wait until the lamp on the brightness adjustment dial is lit
without blinking.
The  lm pack won’t load
into your camera, or won’t
load into your camera
smoothly.
1 The lm pack is not for your
camera.
2 You are not loading the  lm
pack correctly.
1 Use FUJIFILM INSTAX mini  lm only. (No other  lms can be
used.)
2 Match the yellow line on the  lm pack with the yellow
positioning mark in your camera. Follow the INSTAX mini
lm pack instructions.
All lamps on the
brightness adjustment
dial blink at the same
time.
1 The battery power is low, and
it takes a long time to charge
the  ash.
2 A more signi cant issue with
your camera has occurred.
Replace the batteries with new ones while the power is
turned on (when the lens is extended).
IMPORTANT:
Replace the batteries only while the power is turned on.
If you replace the batteries while the power is turned o
(when the lens is retracted), the lamps on the brightness
adjustment dial blink after turning on the power even with
new batteries.
* When the problem is due to reason 1, the lamps on the
brightness adjustment dial turn o after replacing the
batteries.
If the problem is due to reason 2, the lamps on the
brightness adjustment dial blink even after replacing the
batteries. In this case, turn o the power and remove the
batteries immediately, then contact an authorized FUJIFILM
repair center.
The red lamp on the view
nder lights up.
The battery power is low. Replace the batteries with new ones.
Printed pictures
Problems Possible Causes Solutions
The  nished print looks
over exposed. (White in
color)
1 The method of measuring
the subject brightness is
unsuitable.
2 Brightness adjustment dial
setting is incorrect.
3 The ambient temperature is
low (below +5°C/+41°F).
4 The background is too dark in
comparison with the subject.
5 The light sensor or  ash sensor
window is blocked.
1 Point the lens toward the center of the subject and
measure the subject brightness.
2 While pointing the lens toward the subject, turn the
brightness adjustment dial to set the brightness to that for
which the lamp lights.
3 Before taking pictures, place your camera in a warm place
to bring it to room temperature.
4 Turn the brightness adjustment dial one step toward the
direction.
5 When taking a picture, be careful not to cover the two small
windows next to the  ash on the camera.
The  nished print looks
under exposed. (Dark)
1 The method of measuring
the subject brightness is
unsuitable.
2 Brightness adjustment dial
setting is incorrect.
3 The ambient temperature is
high (above +40°C/+104°F).
4 The picture was taken with
direct light in front of you.
5 The ash lampface was
blocked.
6 The background is too bright
in comparison with the
subject.
7 The ash did not reach the
subject.
8 The ash re ected back from a
mirror or window glass.
9 Grasping the lens barrel
did not let the shutter work
properly.
1 Point the lens toward the center of the subject and
measure the subject brightness.
2 While pointing the lens toward the subject, turn the
brightness adjustment dial to set the brightness to that for
which the brightness adjustment dial lamp lights.
3 Before taking pictures, place your camera in a cool place.
When the picture comes out from your camera, keep
it away from places or objects with excessively high
temperature.
4 Take a picture with the light behind you, or turn the
brightness adjustment dial one step toward the
direction.
5 When holding your camera, be careful not to block the
ash lampface with your  nger or strap.
6 Turn the brightness adjustment dial one step toward the
direction.
7 Take pictures within 0.6 m to 2.7 m from the subject.
8 Adjust your position in taking the picture away from the
mirror or window glass.
9 Do not grasp the lens barrel when you take pictures.
The picture is out of focus.
1 The shooting range is too close
to the subject.
2 The lens is not clean.
3 Your camera was shaken when
taking pictures.
1 Take pictures with a distance of at least 0.6 m between you
and your subject.
2 Clean the lens.
3 Hold your camera  rmly and press the shutter release
button gently.
The picture is blurred.
1
Picture was not permitted to
develop without touching,
pressure being applied or other
interference once it ejected
from the camera.
2 The picture did not come out
smoothly.
1 Do not press onto or fold the picture.
2 Do not block the  lm exit with your  nger.
The subject in the
view nder has shifted in
nished print.
The shooting range is too close
to the subject.
Take pictures with a distance of at least 0.6 m between you
and your subject.
IMPORTANT SAFETY NOTICE
This product has been designed with safety in mind, and to provide safe service when handled correctly and in ac-
cordance with the User’s Guide and instructions. It is important that both the product and the INSTAX  lm are handled
properly and used only to take pictures as instructed in this User’s Guide and in the INSTAX mini  lm instructions. For
your ease and safety, please follow what is written in this User’s Guide. It is also a good idea to keep this User’s Guide in a
safe, easy to  nd place where you can refer to it if needed.
WARNING
This symbol indicates danger, which could result in injury or death. Please follow these instructions.
WARNING
Never attempt to take this product apart. There is a danger of an electric shock.
If this product is dropped or damaged so that the inside is showing, do not touch it. There is danger of an electric shock.
If the camera or the batteries inside become hot, begin to smoke, make a burning smell or show any sign of unusual condition,
remove the batteries right away. Use gloves to keep from burning your hands. Not removing batteries could result in burns or  re.
Using a  ash too close to a person’s eyes may for the short term a ect the eyesight. Take care when taking picture of infants
and young children.
If your camera gets wet or if something such as pieces of metal get inside, remove the batteries right away to avoid heat
buildup or a  re starting inside the camera.
Do not use this camera in places where there is  ammable gas or near open gasoline, benzene, paint thinner or other
unstable substances which can give o dangerous vapors. Doing so could result in explosion or  re.
Store your camera out of the reach of infants and young children. Failure to do this could result in serious injury. (For
example, the strap could become wrapped around a child’s neck and cause choking.)
Never take apart the batteries. Do not subject them to heat, throw them into an open  re, or attempt to short-circuit them.
Doing so could result in the batteries exploding or splitting open causing burns or  re.
Only use speci ed batteries in this product. Use of incorrect type of batteries could cause explosion. Dispose of used
batteries according to battery disposal instructions.
Make sure batteries are stored in a safe, secure place and well out of the reach of any infants, young children or pets. Improper
storage could result in a child swallowing a battery. (If a child swallows a battery, call a doctor or a hospital right away.)
Do not look through the close-up lens at the sun or other strong light. Blindness or vision problems could result.
Never get this product wet or handle it with wet hands. Doing so may result in an electric shock.
Never take  ash photographs of people riding bicycles, driving cars or riding a horse. The  ash can distract the driver and
frighten the animal, possibly causing an accident.
Make sure that the battery C and D polarities are installed correctly in the camera. A damaged battery or electrolyte
leakage may cause a  re, injury, and contaminate the environment.
Do not touch moving parts inside the camera. You may be injured.
When using the camera, make sure that the battery cover is attached; otherwise, you may be injured.
Do not leave the close-up lens in places exposed to strong sunlight. Personal injury or  re could result if the lens should
accidentally concentrate the sunbeams on an object or a person.
Do not swing around the camera. You may be injured.
The “CE” mark certi es that this product satis es the requirements of the EU (European Union) regarding safety,
public health, environment and consumer protection. (“CE” is the abbreviation of Conformité Européenne.)
For customers in Turkey:
EEE Complies with Directive.
For customers in the USA:
FCC Statement
This device complies with part 15 of the FCC Rules. Operation is subject to the following two conditions: (1) This device may
not cause harmful interference, and (2) this device must accept any interference received, including interference that may cause
undesired operation.
CAUTION
This equipment has been tested and found to comply with the limits for a Class B digital device, pursuant to Part 15 of the FCC
Rules. These limits are designed to provide reasonable protection against harmful interference in a residential installation. This
equipment generates, uses, and can radiate radio frequency energy and, if not installed and used in accordance with the instruc-
tions, may cause harmful interference to radio communications. However, there is no guarantee that interference will not occur in
a particular installation. If this equipment does cause harmful interference to radio or television, which can be determined by turn-
ing the equipment o and on, the user is encouraged to try to correct the interference by one or more of the following measures:
•Reorient or relocate the receiving antenna
•Increase the separation between the equipment and receiver
•Connect the equipment into an outlet on a circuit di erent from that to which the receiver id connected
•Consult the dealer or an experienced radio/TV technician for help
Changes or modi cations not expressly approved by FUJIFILM responsible for compliance could void the user’s authority to oper-
ate the equipment.
For customers in Canada:
CAUTION: This Class B digital apparatus complies with Canadian ICES-003.
Disposal of Electric and Electronic Equipment in Private Households
Disposal of used Electrical & Electronic Equipment
(Applicable in the European Union and other European countries with separate collection systems)
This symbol on the product, or in the manual and in the warranty, and/or on its packaging indicates that this product shall not be
treated as household waste.
Instead it should be taken to an applicable collection point for the recycling of electrical and electronic equipment.
By ensuring this product is disposed of correctly, you will help prevent potential negative consequences to the environment and
human health, which could otherwise be caused by inappropriate waste handling of this product.
If your equipment contains easy removable batteries or accumulators, please dispose these separately according to your local
requirements.
The recycling of materials will help to conserve natural resources. For more detailed information about recycling of this product, please
contact your local city o ce, your household waste disposal service or the shop where you have purchased the product.
In Countries outside of EU: If you wish to discard this product, please contact your local authorities and ask for the correct way of disposal.
COMMON SENSE CAMERA CARE
CAMERA CARE
1 Your camera is a precision instrument. Do not get it wet or drop it. Also, do not expose to sand.
2 Do not use a strap made for cellular phones or other similar electronic products. These straps are usually too weak to hold your
camera securely. For safety, use only straps designed for your camera, and use only as speci cally intended and instructed.
3 If you are not using your camera for a long interval, unload the batteries and keep it where it will be safe from heat, dust, and
moisture.
4 Remove soil and dust from the lens, view nder window, etc. with an air blower and by wiping lightly with a piece of soft cloth.
5 Do not use solvent such as thinner and alcohol to remove soil.
6 Keep the  lm chamber and camera interior clean to avoid damaging  lms.
7 In hot weather, do not leave your camera in a closed car or on the beach, and do not leave it in moist places.
8 Moth repellent gas such as naphthalene adversely a ects your camera and  lms. Avoid keeping your camera or  lms in a chest
with mothballs.
9
Your camera is computer-controlled. If you should experience an operational issue, remove the batteries and then reload them
.
0 Note that the temperature range within which your camera can be used is +5°C/+41°F to +40°C/+104°F.
INSTAX mini FILM AND PRINT CARE
See FUJIFILM INSTAX mini  lm for  lm use instructions. Follow all instructions for safe and proper use.
1
Keep the  lm in a cool and dry place. Do not leave the  lm in a place where the temperature is extremely high (e.g., in a closed car).
2
When you load a  lm pack, use the  lm as soon as possible.
3
If the  lm has been kept in a place where the temperature is extremely high or low, bring it to room temperature before start-
ing to take pictures.
4
Be sure to use the  lm before the expiration or “Use Before” date.
5
Avoid airport checked luggage inspection and other strong X-ray illumination. The e ect of fogging, etc. may appear on un-
used  lm. We recommend that you carry the camera and/or the  lm onto the aircraft as carry-on luggage. (Check with each
airport for more information).
6
Avoiding strong light, keep the developed prints in a cool and dry place.
7
Do not puncture, tear, or cut INSTAX mini  lm. If  lm becomes damaged, do not use.
Cautions on handling the  lm and prints
For details, refer to the instructions and warnings on FUJIFILM INSTAX mini  lm.
Information for traceability in Europe
Manufacturer: FUJIFILM Corporation
Address, City: 7-3, Akasaka 9-Chome, Minato-ku, Tokyo
Country: JAPAN
Authorized representative in Europe: FUJIFILM EUROPE GMBH
Address, City: Dusseldorf Heesenstrasse 31, 40549
Country: Germany
Information for FUJIFILM in Canada
FUJIFILM Canada Inc.
600 Suffolk Court, Mississauga, Ontario L5R 4G4
Information for FUJIFILM in the United States
FUJIFILM North America Corp.
200 Summit Lake Drive
Valhalla, New York 10595, USA
4
Press the power button to
turn the camera on.
The  ash charging lamp on
the left of the eyepiece starts
blinking. (Indicates the  ash is
charging.)
5
When you press the shutter button, the
lm cover (black) is ejected, and the  lm
counter display on the back changes from
“S” to “10”.
After the  lm cover has been ejected
(the camera stops making a sound),
grasp the edge of the  lm, then take it
out.
Your camera is now ready to take a
photo.
6
[IMPORTANT] Taking a lighter (Hi-Key) picture
Position at which the lamp lights
Position to set the dial for a lighter (Hi-
Key) picture
This camera automatically determines an appropriate brightness for taking any given picture, and informs you by lighting the
corresponding lamp.
To take a lighter (Hi-key) picture, set the position of the brightness adjustment dial to the position of the mode darker than the
mode for which the lamp on the dial lights.
Caution
Do not use the (Hi-key) function outside; otherwise, the picture may be much
lighter (whiter) than you intend.
2
instax_mini9_rev_sheet_ENFR.indd 1instax_mini9_rev_sheet_ENFR.indd 1 2017/5/11 15:14:172017/5/11 15:14:17
1

Hulp nodig? Stel uw vraag in het forum

Spelregels
1

Forum

Fujifilm-Instax-Mini-9

Zoeken resetten

  • Wat moet ik doen als er een rood lichtje brand bij de camera , ook al zijn er juist nieuwe fototjes in het toestel. Gesteld op 19-11-2023 om 17:23

    Reageer op deze vraag Misbruik melden
  • Wat betekent het als alle lampjes branden en je geen foto meer kan maken Gesteld op 20-8-2023 om 11:29

    Reageer op deze vraag Misbruik melden
  • Er zit een nieuwe cassette in de camera. Alle foto's blijven wit. Hoe kan dat? Gesteld op 2-8-2023 om 20:47

    Reageer op deze vraag Misbruik melden
  • me instax mini 9 camera werkt niet als ik op de selfie knop klik Gesteld op 31-1-2023 om 13:18

    Reageer op deze vraag Misbruik melden
  • Bij het laden van de instax mini app krijg ik duits als taal, hie wijzig ik dit naar engels? Gesteld op 21-1-2023 om 16:41

    Reageer op deze vraag Misbruik melden
  • Rood licht knippert terwijl er niks mis is met de batterijen en ik ook een nieuwe foto in heb gezet Gesteld op 4-1-2023 om 03:27

    Reageer op deze vraag Misbruik melden
  • 6
  • mijn instax mini 9 doet het niet en ik heb er gloed nieuwe batterijen in gezet Gesteld op 14-4-2022 om 16:58

    Reageer op deze vraag Misbruik melden
  • Klopt het dat een Instax mini Liplay geen Nederlandse taalinstelling heeft? Onze dochter van 13 heeft het toestel net gekregen voor haar verjaardag en er blijkt geen Nederlands in de taalinstellingen te staan? Maar dat kan/ mag toch niet voor een product dat in België verkocht wordt? Gesteld op 30-10-2021 om 22:44

    Reageer op deze vraag Misbruik melden
  • hallo mijn instax werkt niet als ik hem aan zet brand er alleen vanvoor een lichtje en vanachter niet en wilt ook geen fotos maken is hier een opossing voor alvast bedankt Gesteld op 6-6-2021 om 21:28

    Reageer op deze vraag Misbruik melden
  • Foto genomen maar die komt er niet helemaal uit. Ook na het plaatsen van nieuwe batterijen kan geen foto meer genomen worden. Gesteld op 1-5-2021 om 20:01

    Reageer op deze vraag Misbruik melden
  • Hoi ik heb ook een polaroid instax mini 9 alleen ik weet niet hoe je hem op timer moet zetten als je een selfie wilt maken Gesteld op 11-8-2020 om 18:06

    Reageer op deze vraag Misbruik melden
  • Mijn camera doet raar na het vervangen van de foto kaartjes, ik heb de instax mini 9, het keuze dinge van veel licht, minder licht, (voor de omstandigheden) werkt niet, ze blijven allemaal flikkeren en trekt geen foto? Weet iemand wat ik moet doen? Gesteld op 17-4-2020 om 14:24

    Reageer op deze vraag Misbruik melden
    • hier net hetzelfde probleem.. Andere batterijen geprobeert, maar niets helpt... de lichtjes blijven flikkeren en we knn geen foto's trekken!! Geantwoord op 15-11-2020 om 16:49

      Waardeer dit antwoord (46) Misbruik melden
  • 12
  • Mijn polaroid is gevallen, maar hij werkt wel nog. Alleen wil hij geen foto's meer trekken dit ging een aantal minuten geleden wel nog totdat er een kaartje vastzat. Het enige wat hij nu nog doet is de 4 lichtjes laten pinken die boven de lens geplaatst zijn. Hoe kan ik dit oplossen (zodat hij weer foto's kan nemen)? Gesteld op 29-2-2020 om 16:18

    Reageer op deze vraag Misbruik melden
    • ik heb het zelfde (niet laten vallen maar die lichtes knipperen gewoon) en heb ook geprobeerd die batterijen er opnieuw in te stoppen maar dat lukt niet Geantwoord op 1-4-2020 om 18:34

      Waardeer dit antwoord (13) Misbruik melden
  • ik zou graag de Nederlandse handleiding willen van deze camera.. vr gr Jenneke

    email: nir-vana@live.nl Gesteld op 24-2-2020 om 12:21

    Reageer op deze vraag Misbruik melden
  • Welke films kan men gebruiken bij fujifilm instax ?kan men enkel de mini gebruiken of ook de wijde? Gesteld op 19-2-2020 om 15:26

    Reageer op deze vraag Misbruik melden
  • zou graag de nederlandse handleiding ontvangen voor de Fuji instax mini 9
    leodebrouwer@ziggo.nl

    Gr Leo Gesteld op 11-2-2020 om 16:28

    Reageer op deze vraag Misbruik melden
  • Beste, ik kreeg graag een nederlandstalige handleiding/gebruiksaanwijziging van de Fujifilm Instax Mini 9
    (andre.demunck@skynet.be)
    Mvg, André De Munck Gesteld op 29-7-2019 om 14:52

    Reageer op deze vraag Misbruik melden
  • Hoi , mijn dochter heeft voor haar verjaardag een instax mini 9 gekregen ,nu hebben wij alles zoals beschreven gedaan en die werkte , na het plaatsen van nieuwe instax foto’s probeerde mijn dochter terug een foto te trekken maar er komen geen meer uit ,ik heb dan het pakje eruit gehaald en er een nieuw ingestoken ( kon altijd aan het pakje liggen) maar kreeg terug hetzelfde probleem,, heeft iemand dit al meegemaakt ? Gesteld op 26-3-2019 om 19:21

    Reageer op deze vraag Misbruik melden
  • 18
  • Ik zou van u graag de Nederlandse handleiding van de Instax mini 9 ontvangen. Mijn email is: plaats35@planet.nl.

    Alvast bedankt. Gesteld op 20-3-2019 om 09:54

    Reageer op deze vraag Misbruik melden
  • Als ik de uit doe en zet hem weer aan gooit hij er een ongebruikte foto uit en dit blijft hij herhalen Gesteld op 7-12-2018 om 17:58

    Reageer op deze vraag Misbruik melden
  • hebben jullie een handleiding in het nederlands . Gesteld op 28-11-2018 om 17:49

    Reageer op deze vraag Misbruik melden
  • Waarom is hij niet in het nederlands. Pittig irritant Gesteld op 15-4-2018 om 09:09

    Reageer op deze vraag Misbruik melden

Misbruik melden

Gebruikershandleiding.com neemt misbruik van zijn services uitermate serieus. U kunt hieronder aangeven waarom deze vraag ongepast is. Wij controleren de vraag en zonodig wordt deze verwijderd.

Product:

Bijvoorbeeld antisemitische inhoud, racistische inhoud, of materiaal dat gewelddadige fysieke handelingen tot gevolg kan hebben.

Bijvoorbeeld een creditcardnummer, een persoonlijk identificatienummer, of een geheim adres. E-mailadressen en volledige namen worden niet als privégegevens beschouwd.

Spelregels forum

Om tot zinvolle vragen te komen hanteren wij de volgende spelregels:

Belangrijk! Als er een antwoord wordt gegeven op uw vraag, dan is het voor de gever van het antwoord nuttig om te weten als u er wel (of niet) mee geholpen bent! Wij vragen u dus ook te reageren op een antwoord.

Belangrijk! Antwoorden worden ook per e-mail naar abonnees gestuurd. Laat uw emailadres achter op deze site, zodat u op de hoogte blijft. U krijgt dan ook andere vragen en antwoorden te zien.

Abonneren

Abonneer u voor het ontvangen van emails voor uw Fujifilm Instax Mini 9 bij:


U ontvangt een email met instructies om u voor één of beide opties in te schrijven.


Ontvang uw handleiding per email

Vul uw emailadres in en ontvang de handleiding van Fujifilm Instax Mini 9 in de taal/talen: Engels, Frans als bijlage per email.

De handleiding is 3,5 mb groot.


U ontvangt de handleiding per email binnen enkele minuten. Als u geen email heeft ontvangen, dan heeft u waarschijnlijk een verkeerd emailadres ingevuld of is uw mailbox te vol. Daarnaast kan het zijn dat uw internetprovider een maximum heeft aan de grootte per email. Omdat hier een handleiding wordt meegestuurd, kan het voorkomen dat de email groter is dan toegestaan bij uw provider.

Andere handleiding(en) van Fujifilm Instax Mini 9

Fujifilm Instax Mini 9 Gebruiksaanwijzing - Nederlands - 2 pagina's

Fujifilm Instax Mini 9 Gebruiksaanwijzing - Deutsch, Espanõl - 2 pagina's


Uw handleiding is per email verstuurd. Controleer uw email

Als u niet binnen een kwartier uw email met handleiding ontvangen heeft, kan het zijn dat u een verkeerd emailadres heeft ingevuld of dat uw emailprovider een maximum grootte per email heeft ingesteld die kleiner is dan de grootte van de handleiding.

Er is een email naar u verstuurd om uw inschrijving definitief te maken.

Controleer uw email en volg de aanwijzingen op om uw inschrijving definitief te maken

U heeft geen emailadres opgegeven

Als u de handleiding per email wilt ontvangen, vul dan een geldig emailadres in.

Uw vraag is op deze pagina toegevoegd

Wilt u een email ontvangen bij een antwoord en/of nieuwe vragen? Vul dan hier uw emailadres in.


Info