Digistat 3i
user instructions
The Digistat 3i features unique self learning optimum start
software. They can help achieve savings in excess of 10% on
heating costs and reduce CO
2
emissions, by delaying the start
time on milder days without affecting your comfort level.
USER INSTRUCTIONS FOR OPTIMUM
START
There is no extra programming involved. The self learning
software is factory preset and will start to monitor and adjust
the heating start times for setting , as soon as the unit is
installed.
The optimum start feature only operates on the first
switching time of each day ( ). Switching times
, and switch at the programmed times without any
delay.
The delay period can vary between 0 - 60 minutes
depending on:
a) The actual room temperature at the first switching time
( ).
b) The set temperature of the Digistat 3i.
c) The stored data on how fast the heating system
responded the previous day.
During normal operation the flame symbol on the
display indicates the current operating status.
Flame on = heating on
No flame = heating off
FIashing flame = saving energy (optimum start cycle
operating)
When the flame is flashing, the optimum start cycle can be
overriden by pressing the button once. This returns the
unit to normal operation.
5. Press “SET?” button twice to return
to normal operating mode.
PRE-PROGRAMMED TIMES AND
TEMPERATURES
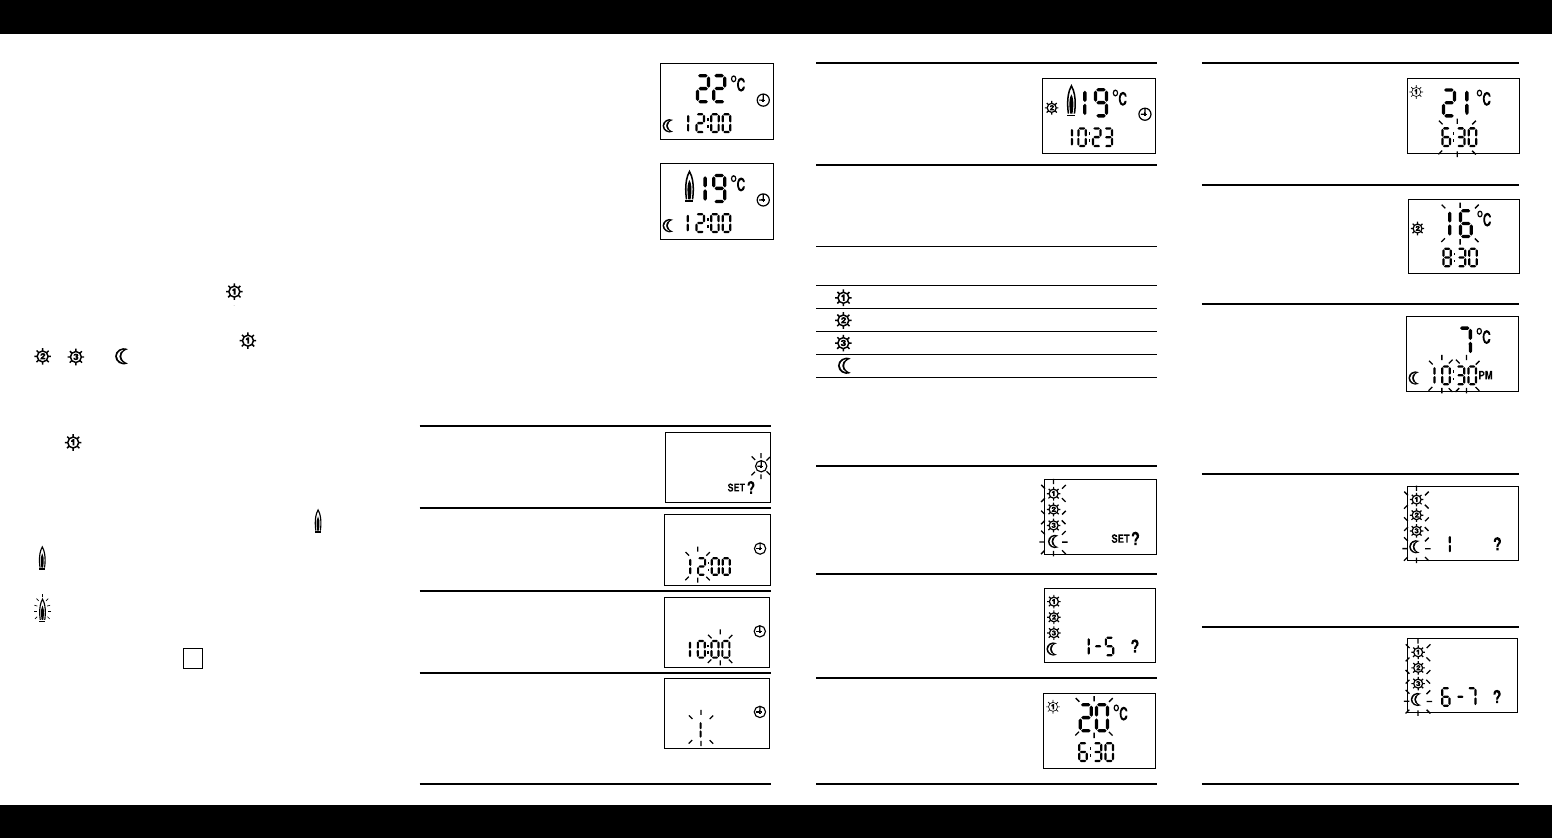
The Digistat 3i comes with the following preset programme.
Symbol Mon-Fri Sat-Sun Temperature
Time Time
6.30 7.00 20°C
8.30 9.00 16°C
4.30 pm 4.00 pm 21°C
10.30 pm 11.00 pm 7°C*
* 16°C if selector pin removed, see installation instructions
TO VIEW OR CHANGE THE FACTORY
SETTINGS (steps 6-14)
6. Press the “SET?” button until this
display is shown.
7. Press the Yes (–) button. You have
selected the Monday to Friday part
of the programme.
8. Press the Yes (–) button again. This
tells you that at 6.30, the heating
system will control your home at
20°C. If you wish to alter the temp-
erature use the + and – buttons.
9. Press the “SET?” button. The
time will now flash. If you wish
to alter the switching time use
the + and – buttons. This will
change the switching time in
10 minute steps.
10. Press the “SET?” button, this
tells you that at 8.30, the
heating system will control
your home at 16°C. If you wish
to alter this temperature use
the + and – buttons.
11. Continue to press the “SET?”
button as in steps 9 and 10
above to advance through the
times and temperatures for
Mon. to Fri. (1-5). If you wish to
alter any of the times and
temperatures use the + and
– button, when the one you
wish to alter is flashing.
12 . Once Mon. to Fri. have been
set, the display will show as
here. This means do you want
to set the times for Monday (1)
differently from the rest of the
week? If you do, press the Yes
(–) Button, and follow the
routine as steps 9 to 11.
13 . Continue to press the “SET?”
button to advance through
the week (1 – 5). When the
display is as shown here, press
the Yes (–) button if you wish
to view or alter the times for
Sat.-Sun. (6-7). Repeat steps
9-12 as required.
INITIAL START UP
Open the battery compartment situated
at the bottom left hand corner (press
to unlatch and slide down). Remove the
insulator strip from between the
batteries and their contacts and close
the compartment.
The unit will now display the actual
room temperature and time at 12.00
midnight (Diagram A).
If the unit has been stored in a cold
place, it may take time to warm up.
Digistat 3i has an indicator to show
when the heating system is ON or OFF, e.g. if the SET
temperature is 20°C and the actual room temperature is below
20°C a flame symbol will appear on the display (Diagram B).
This indicates a demand for heat (system will switch ON).
During normal operation, the Digistat 3i will display actual
room temperature continuously.
SETTING THE TIME OF DAY (steps 1-4)
The diagram next to each step description shows resulting display.
1. Press “SET?” button
2. Press “Yes” (–) button. The hours
will flash as this diagram. Use the +
and – buttons to set correct hour.
3. Press “SET?” button again and the
minutes will flash, use + and –
buttons to set correct minute time.
4. Press “SET?” button, day of the week
will flash, 1= Monday, 7= Sunday, use
+ and – buttons to set correct day.