Reif Umf
40-5 26 2026
44-5 26 2051
47-5 26 2070
50-5 26 2026
54-5 26 2089
57-5 26 2114
37-5 26 2133
32-6 27 2199
40-6 28 2224
47-6 28 2268
40-6 28 2265
37-6 28 2205
20-6 700 2114
23-6 700 2133
25-6 700 2146
28-6 700 2149
32-6 700 2174
G
O
Con
WitCUB
the SL
mea
The
com
Ple
GB
US
P
- CUBE
- batte
-
- handl
- trans
- cable
- spoke
The hand
on t
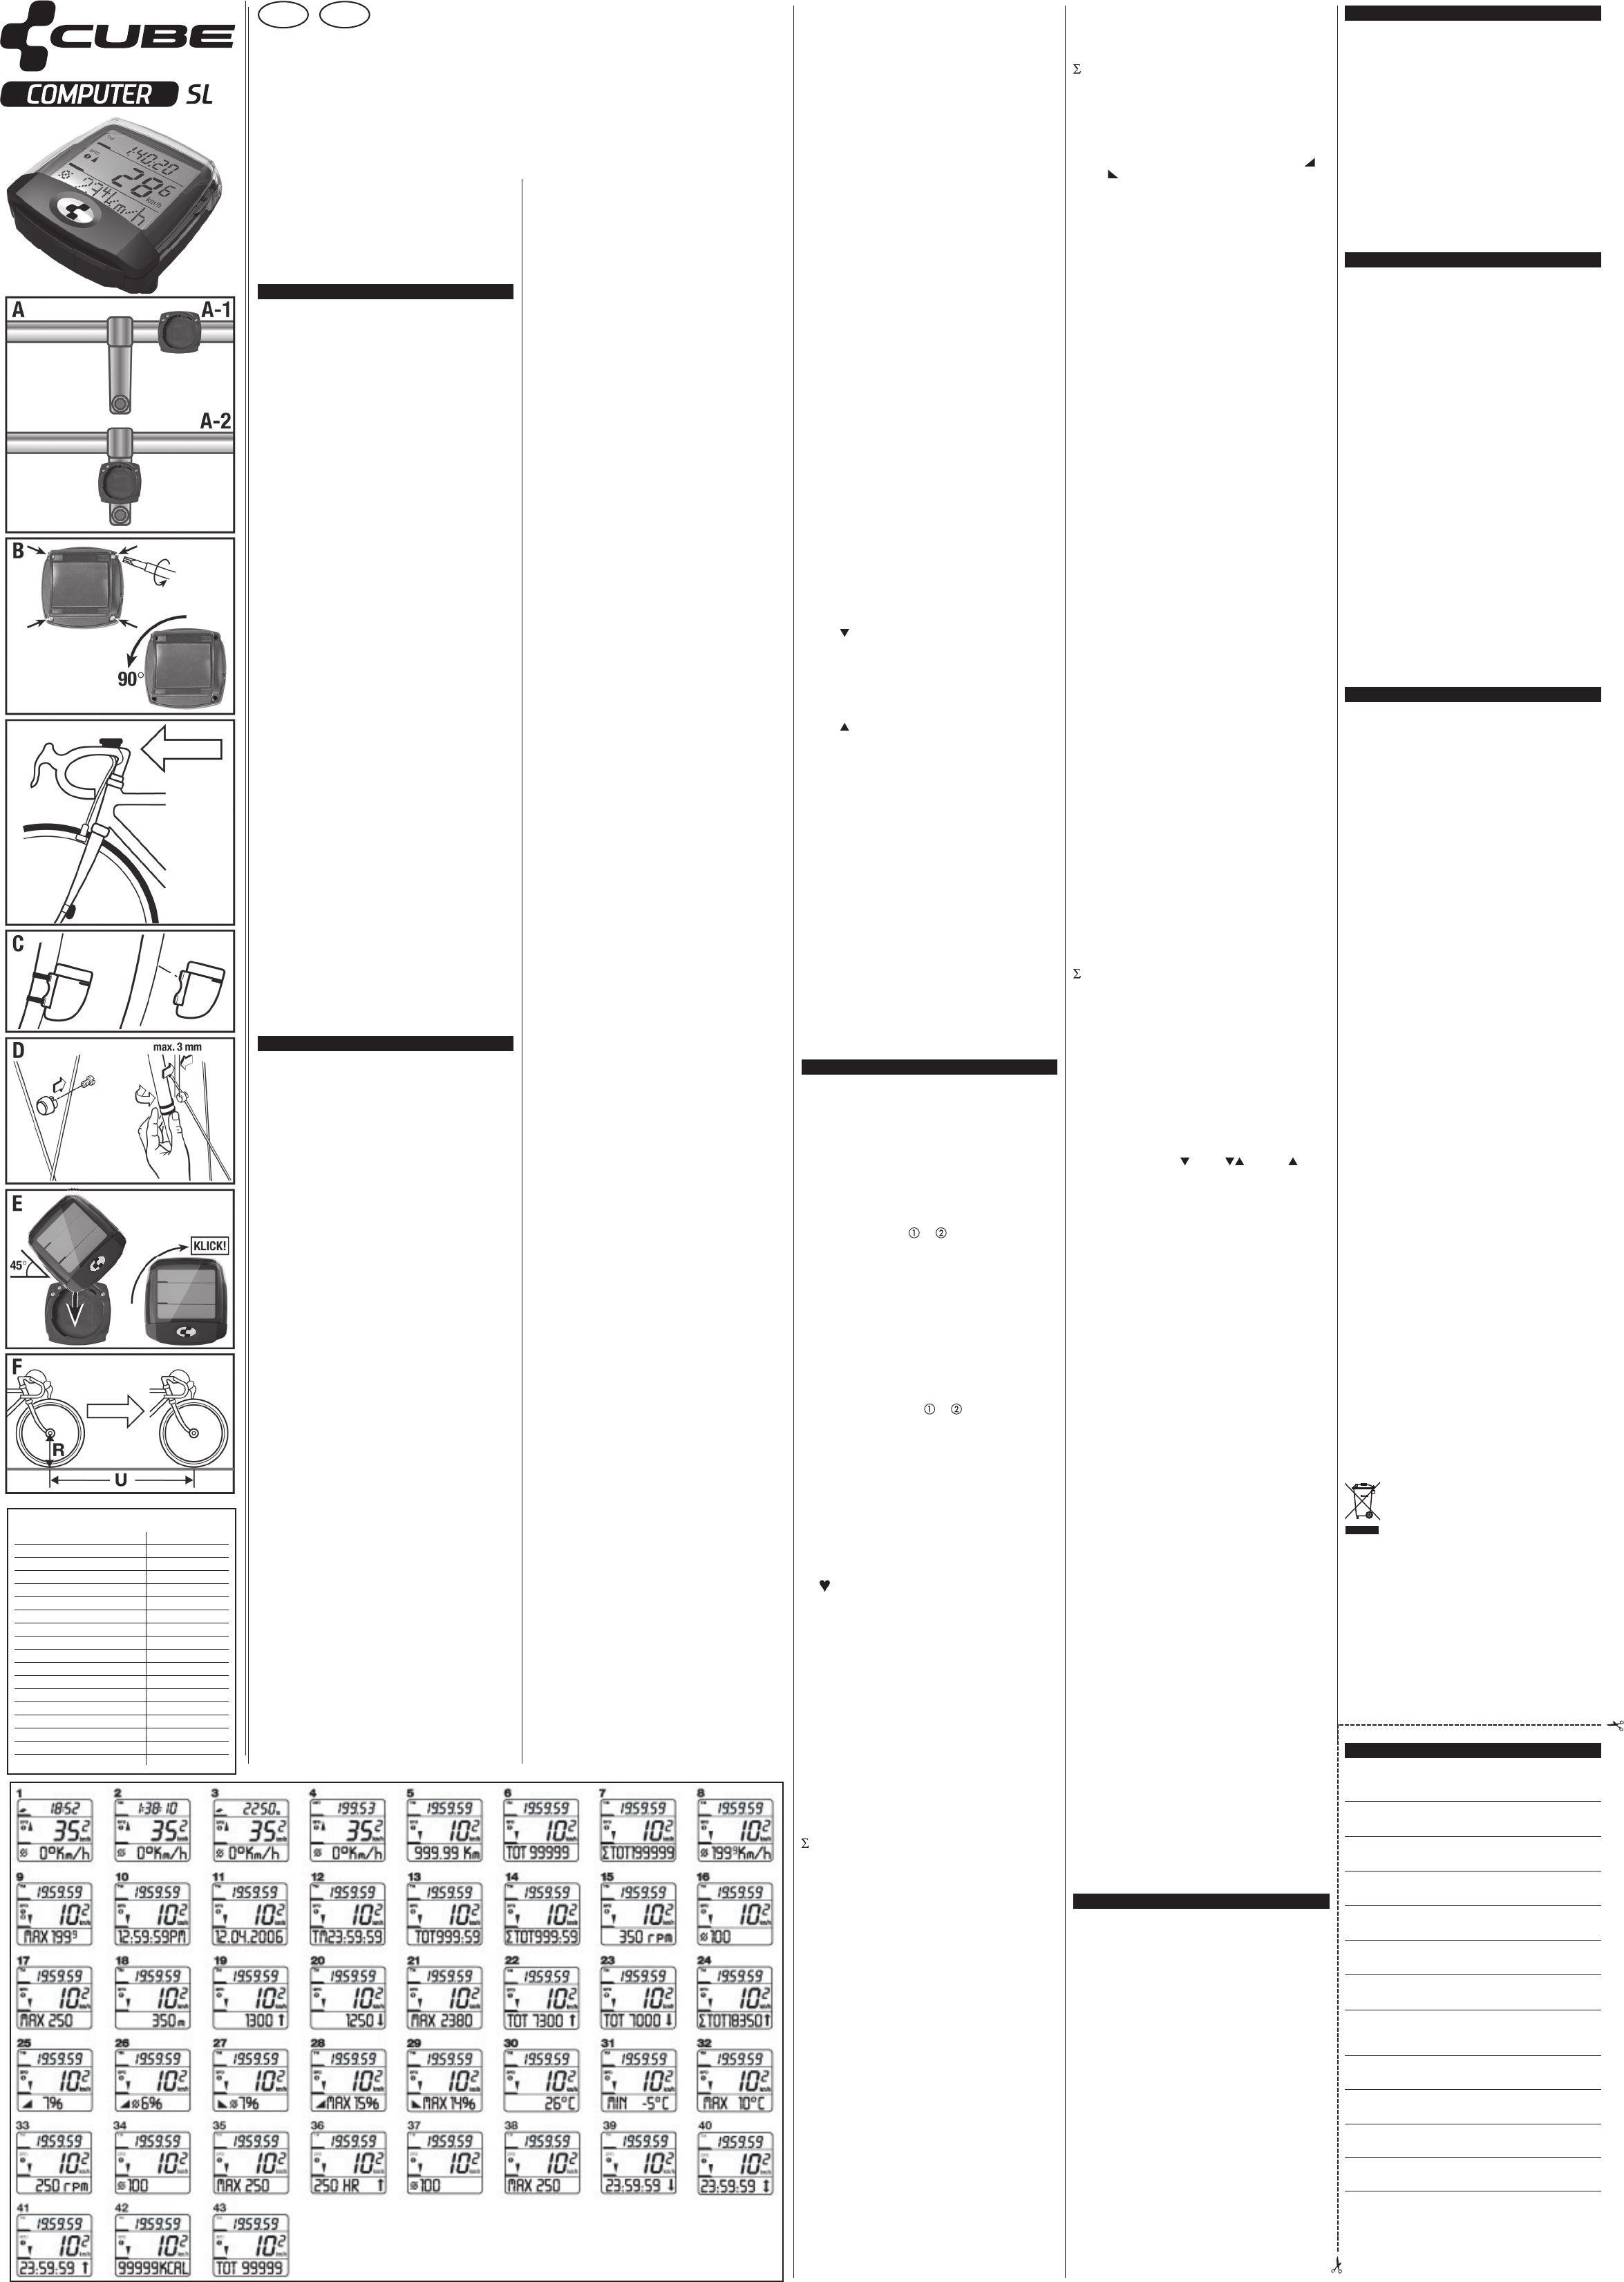
Bild
(Pos
Bi B F u i o th ste c br mou
orie
Remo
Plac
Bild
ble on (max.
dist
the right side,
same
Bild
the
if and ma
mm).
Bild E: Rota le it int
brac
45 d
egre
1.1
(sep
Moun
the
Place sensor the the
of
to
tie)
sens
The
nsor
swit
SL (s
is c
1.2
Wa w
chec
pers
from in the past. that a
doctor
ce
such blood pressu
diab
Pace s t d bef
usin
The
arou
logo
belo
(vie
to th
e
skin
with
If th
is no
electrodes
obta
Measu
be i f c an th S is th tr
rece
Inse
Inse
cap
batt
(If
the AC
pen similar will values
sett
2.1
Ente
ress
Disp
T
any
(T
display ‚LANGUAGE’. button choose this
func
butt
with
Thou SL c sho an wo m
show
The d
pres
or
mode
P
SET
SET
SET
SET
SET
EXIT
LANG
Each
The followi
can b
shor
the
For
fa
thefa.
SET
T
T
AL
T
Rang
Set
Here you th disp
noti
disp
HOME
T
Defa
Set
Here you can swit
he home altit
valu
HOME
Rang
Set
S a a w i
temp
Chan
vari
thes
poin
the
adj
UNIT
Set
Defa
Here
UNIT
Set
Defa
He you c adj w t i C (C)
Fahr
SET
Set
and
Choo
T
simu
agai
DAY
Set
Defa
Rang
Set
Here
tour
(This
ridd
TOT
Set
Defa
Rang
:
Set
Here
Whee
Set
Defa
Rang
Set
Here
The of ta f t
char
Measuring (fo
sett
Put a
Ride straight o
ne of a tire (fo
measurement, getting
your
exac
grou
Unit
Set
Defa
Set
Here
(km/
CAD
Swit
(ON/
Defa
Set
Here
func
deal
SET
Set
Choo
Time
Set
Rang
Set
Here
then
Year
S
et o
Defa
Rang
Set
Here
Mont
Set
Defa
Rang
Set
Here
Day
Set
Defa
Rang
Set
Here
Cloc
Set
Defa
Set
Here
u ca
SET
Adju
func
deal
HR O
Swit
Defa
Set
Here
Fitn
Adju
Defa
Set
Rang
1 –
2 –
3 –
4 –
He yo s y p fi l ne f t
CUBEInZo
®
-cal
Sex
Set
Chan
m =
The is th CI
®
-ca
calo
Weig
Rang
Set
left
The InZone
®
-calculation and
calo
Birt
Adju
Defa
Rang
The InZ
®
-cal
InZo
HereInZo
®
-cal
of a le but s ( a c f
CUBEInZo
®
).
In o
I o t a
CUBEInZo
®
fitn
In o ca t CUIn
®
corr
startInZ
®
left
The
seated, as
hear
stor
for
After the 5 mi val
CUBEInZo
®
app
Lowe
A rate limit can be set (afteInZone -
calc
When
an a
) as
Rang
Adju
Uppe
An I
®
-
calc
When
an a
) as
Rang
Adju
Max
ShowInZ
®
.
Rang
Adju
SET
Here switch powerdown-mode reset
(del
Choo
Powe
Swi t p c the
batt
T
disp
y fade
of a
Rese
Here
press righ button simulta
‘res
If yo
for
The
That
norm
1 minu
the display
only
If the wheel turns
norm
SL h
T sw f o mo to an s pr
the rig
= 0)
The display shows
on the
selected or
show
for tou a dedic wrist
show
The op
when
the
And
n
auto
T
seco
The a the the
speed a small
left
whet
T fu the u di , right
butt,lower left
butt.
Alwa
func
Impo
seco
Func
TM –
DST
Alti
HR (
)
Ti
Func
SPD
Inid
Rang
An ar on lef the dis the
curr
curr
Func
DST
Disp
Rang
TOT
Sub-
Disp
(sin
Rang
TOT
Sub-
Di th su of t t di r u to n i
kilo
and
Rang
Curr
Dis th level a i
displayed in inter the baro-
metr
weat
Rang
0 m
Attention! The values will be
sign
adde
Dail
Sub-
Disp
Rang
Dail
Sub-
Disp
MAX
Sub-
Disp
Rang
TO
upwa
Sub-
Disp
Rang
TO
Sub-
Disp
Rang
TO
(Thi
Sub-
Disp
Rang
Curr
Disp
the l side d whether as (
) or
desc
).
AtteFor
be s
Av
Sub-
Disp
Rang
Av
Sub-
Disp
Rang
Maxi
Sub-
Disp
rec
Rang
Maxi
Sub-
Disp
Rang
Ø –
Disp
Rang
MAX
Sub-
Disp
Rang
T
Disp
nt t
Rang
At I yo ca t o yo b me
temp
MIN
Sub-
Disp
Rang
MAX
Sub-
Disp
Rang
Ti
Disp
Rang
Date
Sub-
Disp
t da
TM –
Disp
Rang
TOT
Sub-
Disp
Rang
TOT
(pic
Sub-
Disp
chan
Rang
T f f ( r a c co
sump
sett
sepa
HR -
Indi
Rang
O
n the right
curr
), ) or above ( ) the set
hear
Ø -
Sub-
Indi
Rang
MAX
Sub-
Indi
Rang
T
(pic
Sub-
Disp
the
(sin
Rang
T
ning
Sub-
Indi
limi
Rang
T
(pic
Sub-
Indic
uppe
Rang
kCal
Indi
Rang
TO
ie c
Sub-
Indi
chan
Rang
The following
setting (for
separately available cadence set).
CAD - cadence (pict.
Indicates the current cadence (rpm = rounds per minute)
Range:
Ø - average cadence (pict.
Sub-function of function cadence
Indicates the average cadence.
Range:
MAX - maximum cadence (pict.
Sub-function of function cadence
Indicates the maximum reached cadence.
Range:
InZ
®
-Phi
CUBEInZo
®
is
trai
It
o
CUBEInZo
®
functio
puls
CUBEInZo
®
applied
road
Impr
your
foll
in
he
inteI
®
is the op
trai
WhatInZo
®
do?
It
weig
The var f p p t offer val
trai
maxi
(+/-
when
of t
The questi of burnin see t w
CUBEInZo
®
– o
SL: Open b ca coi to
batt
with
tighten. the displa show normal
mode
If
the AC
pen similar will values
sett
(Bat
T
mitt Open battery
coin
batt
sure
Plea
Fa
- check if
(Att
the
- press
Spee
-
-
whee
- make
- check
Spee
- check
- check
Inco
- Check Perhaps
were
- Chang
(rea
No incorrect
or u
- proof
ed
- Check
- Skin
- Dista
cm)
Cade
- Check
- Check
We
the SL.
The
The
,
been
inst
T
refe
the proo
post
Pl r th t i m ca be
sending
device or
if ha into que
contact our local distributor
RepaIf
r
guar
out au
The
D O E &
(A ot
coun
This
produ
be
of product
is
co f en a h h
coul
product.
resources. this
prod
disp
Send
Name
First
Stree
Code/
T
Fax
E-Mai
Reas
Afte
valu
CUBE Service
Pending System GmbH & Co KG
Ludwig-Hüttner
D-95679
T
Fax:
info@CUBE.eu
www