A car audio amplifier is generally mounted in the rear trunk area but can be mounted in any convenient area such as beneath a seat. Please be sure to
locate this unit where you have reasonable air circulation and protection from moisture. When considering the mounting location you should minimize
the length of the power and speaker leads. Minimizing both leads will yield a more reliable installation. It is also important to ensure that the heat sink
fins are not against a panel or a surface, preventing air circulation. Do not install the amplifier on a subwoofer box or on vibrating parts of the vehicle,
since the vibrations can cause damage to the amplifiers electrical components.
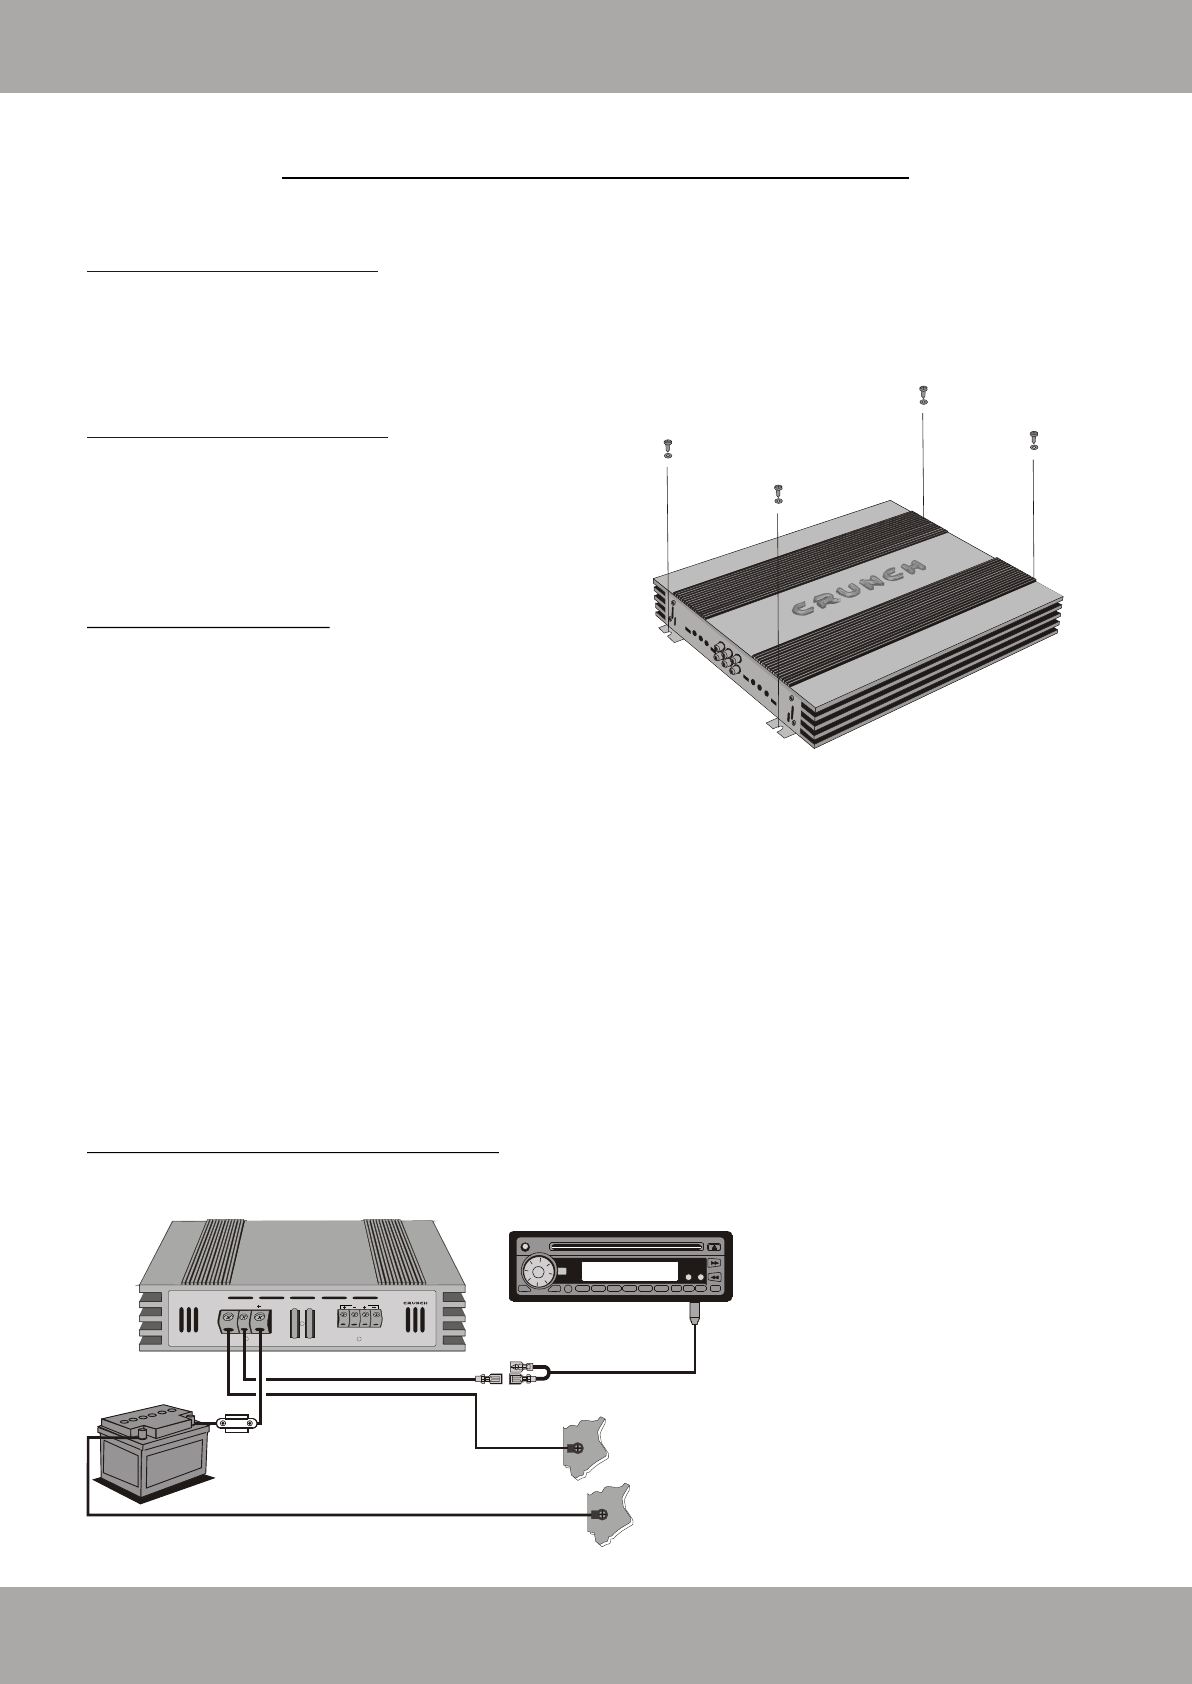
Installation of the Amplifier
Mark the location for the mounting screw holes by using the amplifier as a
template. Drill holes at the marked locations and firmly fasten the amplifier
in place with the mounting screws supplied in the accessory kit. Before drilling
or cutting any holes, investigate the layout of your automobile thoroughly:
Take care when working near the gas lines or hydraulic lines and
electrical wiring of your car.
Electrical Connection
Ground (GND)
This wire is the electrical ground and must be fastened securely to the vehicle chassis.
The best method is to use a threading sheet metal screw since the threads cut into
bare metal. Ensure that all paint or other insulation is remove from around the hole area,
and using self tapping screw, securely affix the bare wire ends to the vehicle chassis. Use
as short a piece of cable as possible - use the same gauge as was used for the +12V cable.
Make sure that the connection is safe, a loose connection may result in amplifier noise and fault condition.
Remote (REM)
Many music sources have an output terminal for connection of the remote turn-on of the power amplifier. If a radio doesn't have a remote turn-on
feature, then you can use the antenna relay wire, which activates the antenna motor. Please note, if the power antenna retracts when the radio is
operating, then you cannot use the antenna relay wire to operate the remote turn-on.
Battery Connection (+12V)
This wire is usually connected directly to the positive battery terminal. Ensure that the + power supply wire is fused via an assigned fuse in line with the
+ power supply wire. Please use a sufficient gauge for the installed amplifiers (min 16-25 mm). This connection must be completed using spade lug
with insulating sleeve.
Fuses
The integrated amplifier fuses protect the units from short circuit and overload. The fuse rating is for 4 Ohm loads (impedance) of the speakers, for
2 Ohm loads the fuses may have to get increased in case of higher power consumption.
Gebruikershandleiding.com neemt misbruik van zijn services uitermate serieus. U kunt hieronder aangeven waarom deze vraag ongepast is. Wij controleren de vraag en zonodig wordt deze verwijderd.
Product:
Spelregels forum
Om tot zinvolle vragen te komen hanteren wij de volgende spelregels:
lees eerst de handleiding door;
controleer of uw vraag al eerder door iemand anders is gesteld;
probeer uw vraag zo duidelijk mogelijk te stellen;
heeft u een probleem en al geprobeerd om dit op te lossen, vermeld dit erbij aub;
heeft u een oplossing gekregen van een bezoeker dan horen wij dat graag in dit forum;
wilt u een reactie geven op een vraag of antwoord, gebruik dan niet dit formulier maar klik op de knop 'reageer op deze vraag';
uw vraag wordt direct op de website gezet; vermijd daarom persoonlijke gegevens in te vullen;
Belangrijk! Als er een antwoord wordt gegeven op uw vraag, dan is het voor de gever van het antwoord nuttig om te weten als u er wel (of niet) mee geholpen bent! Wij vragen u dus ook te reageren op een antwoord.
Belangrijk! Antwoorden worden ook per e-mail naar abonnees gestuurd. Laat uw emailadres achter op deze site, zodat u op de hoogte blijft. U krijgt dan ook andere vragen en antwoorden te zien.
Abonneren
Abonneer u voor het ontvangen van emails voor uw Crunch GTR620.2 bij:
nieuwe vragen en antwoorden
nieuwe handleidingen
U ontvangt een email met instructies om u voor één of beide opties in te schrijven.
Ontvang uw handleiding per email
Vul uw emailadres in en ontvang de handleiding van Crunch GTR620.2 in de taal/talen: Duits, Engels als bijlage per email.
De handleiding is 3,99 mb groot.
U ontvangt de handleiding per email binnen enkele minuten. Als u geen email heeft ontvangen, dan heeft u waarschijnlijk een verkeerd emailadres ingevuld of is uw mailbox te vol. Daarnaast kan het zijn dat uw internetprovider een maximum heeft aan de grootte per email. Omdat hier een handleiding wordt meegestuurd, kan het voorkomen dat de email groter is dan toegestaan bij uw provider.
Uw handleiding is per email verstuurd. Controleer uw email
Als u niet binnen een kwartier uw email met handleiding ontvangen heeft, kan het zijn dat u een verkeerd emailadres heeft ingevuld of dat uw emailprovider een maximum grootte per email heeft ingesteld die kleiner is dan de grootte van de handleiding.
Er is een email naar u verstuurd om uw inschrijving definitief te maken.
Controleer uw email en volg de aanwijzingen op om uw inschrijving definitief te maken
U heeft geen emailadres opgegeven
Als u de handleiding per email wilt ontvangen, vul dan een geldig emailadres in.
Uw vraag is op deze pagina toegevoegd
Wilt u een email ontvangen bij een antwoord en/of nieuwe vragen? Vul dan hier uw emailadres in.