779578
1
Verklein
Vergroot
Pagina terug
1/2
Pagina verder
1 Equipment Approval Information
Your telephone equipment is approved for
connection to the Public Switched Telephone
Network and is in compliance with parts 15 and
68, FCC Rules and Regulations and the Technical
Requirements for Telephone Terminal Equipment
published by ACTA.
Notification to the Local Telephone Company
On the bottom of the equipment is a label indicating,
among other information, the US number and Ringer
Equivalence Number (REN) for the equipment. You
must, upon request, provide this information to your
telephone company.
The REN is useful in determining the number of
devices you may connect to your telephone line
and still have all of these devices ring when your
telephone number is called. In most (but not all)
areas, the sum of the RENs of all devices connected
to one line should not exceed 5. To be certain of the
number of devices you may connect to your line as
determined by the REN, you should contact your
local telephone company.
A plug and jack used to connect this equipment to
the premises wiring and telephone network must
comply with the applicable FCC Part 68 rules and
requirements adopted by the ACTA. A compliant
telephone cord and modular plug is provided with
this product. It is designed to be connected to a
compatible modular jack that is also compliant. See
installation instructions for details.
NOTE
This equipment may not be used on coin service
provided by the telephone company.
Party lines are subject to state taris, and
therefore, you may not be able to use your own
telephone equipment if you are on a party line.
Check with your local telephone company.
Notice must be given to the telephone company
upon permanent disconnection of your telephone
from your line.
If your home has specially wired alarm equipment
connected to the telephone line, ensure the
installation of this product does not disable your
alarm equipment. If you have questions about
what will disable alarm equipment, consult your
telephone company or a qualified installer.
US Number is located on the cabinet bottom
of the Motorola ML1000 base station that the
cordless handset is registered to.
REN number is located on the cabinet bottom
of the Motorola ML1000 base station that the
cordless handset is registered to.
Rights of the Telephone Company
Should your equipment cause trouble on your
line which may harm the telephone network, the
telephone company shall, where practicable, notify
you that temporary discontinuance of service may
be required. Where prior notice is not practicable
and the circumstances warrant such action, the
telephone company may temporarily discontinue
service immediately. In case of such temporary
discontinuance, the telephone company must:
(1) promptly notify you of such temporary
discontinuance;
(2) aord you the opportunity to correct the
situation; and
(3) inform you of your right to bring a complaint
to the Commission pursuant to procedures set
forth in Subpart E of Part 68, FCC Rules and
Regulations.
The telephone company may make changes in its
communications facilities, equipment, operations
or procedures where such action is required in the
operation of its business and not inconsistent with
FCC Rules and Regulations. If these changes are
expected to aect the use or performance of your
telephone equipment, the telephone company must
give you adequate notice, in writing, to allow you to
maintain uninterrupted service.
This product meets the applicable Innovation,
Science and Economic Development Canada
technical specifications.The Ringer Equivalence
Number (REN) indicates the maximum number of
devices allowed to be connected to a telephone
interface. The termination of an interface may
consist of any combination of devices subject only
to the requirement that the sum of the RENs of all
the devices not exceed five.
Interference Information
This device complies with Part 15 of the FCC Rules
and the Industry Canada license-exempt RSS
standard(s). Operation is subject to the following
two conditions:
(1) This device may not cause harmful interference;
and
(2) This device must accept any interference
received, including interference that may cause
undesired operation.
Privacy of communications may not be ensured
when using this telephone.
This equipment has been tested and found to
comply with the limits for a Class B digital device,
pursuant to Part 15 of the FCC Rules. These limits are
designed to provide reasonable protection against
harmful interference in a residential installation.
This equipment generates, uses, and can radiate
radio frequency energy and, if not installed and
used in accordance with the instructions, may cause
harmful interference to radio communications.
However, there is no guarantee that interference will
not occur in a particular installation.
If this equipment does cause harmful interference
to radio or television reception, which can be
determined by turning the equipment o and on, the
user is encouraged to try to correct the interference
by one or more of the following measures:
Reorient or relocate the receiving antenna (that
is, the antenna for radio or television that is
“receiving” the interference).
Reorient or relocate and increase the separation
between the telecommunications equipment and
receiving antenna.
Connect the telecommunications equipment into
an outlet on a circuit dierent from that to which
the receiving antenna is connected.
Consult the dealer or an experienced radio/TV
technician for help.
If these measures do not eliminate the interference,
please consult your dealer or an experienced radio/
television technician for additional suggestions.
Also, the Federal Communications Commission
has prepared a helpful booklet, “How To Identify
and Resolve Radio/TV Interference Problems.”
This booklet is available from the U.S. Government
Printing Oce, Washington, D.C. 20402. Please
specify stock number 004-000-00345-4 when
ordering copies.
Notice: The changes or modifications to this
equipment not expressly approved by the party
responsible for compliance could void the user’s
authority to operate the equipment.
FCC RF Radiation Exposure Statement
This equipment complies with FCC RF radiation
exposure limits set forth for an uncontrolled
environment.
This equipment should be installed and operated
with a minimum distance of 20 centimeters between
the radiator and your body. This transmitter must not
be co-located or operated in conjunction with any
other antenna or transmitter.
Caution: To maintain the compliance
with the Industry Canada’s RF exposure
guideline, place the base unit at least 20 cm
from nearby persons.
For body worn operation, this handset has been
tested an meets the FCC RF exposure guidelines
when used with Motorola ML1000 and Motorola
ML1100. Use of other accessories may not ensure
compliance with FCC RF exposure guidelines.
For body worn operation, this handset has been
tested and meets the Industry Canada RF exposure
guidelines when used with the Motorola ML1000
and Motorola ML1100. Use of other accessories may
not ensure compliance with Industry Canada RF
exposure guidelines.
Licensing
Licensed under US Patent 6,427,009.
Hearing Aid Compatibility
This telephone system meets FCC standards for
Hearing Aid Compatibility.
2 Introduction
Your Motorola multi-line / 4-line phone is a full-
featured phone ideally suited for home or oce use.
It is designed to receive call on up to four incoming
telephone lines and serve up to 9 extensions with
the Motorola ML1000 Base Station. The Motorola
ML1200 Cordless Handset will expand the Motorola
multi-line phone system operating in the DECT 6.0
frequency range.
Caution: When installing and using
telephone equipment, there are basic
safety instructions that should always be
followed. Refer to the IMPORTANT SAFETY
INSTRUCTIONS provided in the section
below.
IMPORTANT
Because cordless phones operate on electricity, you
should have at least one phone in your home that
isn’t cordless, in case the power in your home
goes out.
3 Important Safety Instructions
Some of the following information may not apply
to your particular product; however, when using
telephone equipment, basic safety precautions
should always be followed to reduce the risk of fire,
electric shock and injury to persons, including the
following:
1. Read and understand all instructions.
2. Follow all warnings and instructions marked on
the product.
3. Unplug this product from the wall outlet before
cleaning. Do not use liquid cleaners or aerosol
cleaners. Use a damp cloth for cleaning.
4. Telephones should not be used while you are
in a bathtub, shower or pool. Immersion of the
telephone or handset in water could cause an
electrical shock.
5. Slots and openings in the cabinet back or
bottom are provided for ventilation, to protect
it from overheating. Do not block or cover these
openings. Do not block the openings by placing
the product on a bed, sofa, rug, or other similar
surface. Do not place this product in a built-in
installation unless proper ventilation is provided.
6. Only operate this product from the type of
power source indicated on the marking label. If
you are not sure of the type of power supply to
your home, consult your dealer or local
power company.
7. Plug the adaptor into an easily accessible
electrical outlet near the equipment.
8. Do not allow anything to rest on the power cord.
Do not locate this product where the cord will be
abused by persons walking on it.
9. Do not overload wall outlets and extension cords
as this can result in the risk of fire or
electric shock.
10. Never push objects of any kind into this product
through cabinet slots as they may touch
dangerous voltage points or short out parts that
could result in a risk of fire or electric shock.
Never spill liquid of any kind on the product.
11. Never spill liquid of any kind on the product.
12. To reduce the risk of electric shock, do not
disassemble this product. If service or repair
work is required, take it to a qualified serviceman.
Opening or removing covers may expose you
to dangerous voltages or other risks. Incorrect
reassembly can cause electric shock when the
appliance is subsequently used.
13. Do not expose the product to extreme
temperatures such as areas near a hot radiator,
stove or in a hot car. Do not place product upon
other consumer electronic products such as;
computer monitors, power amplifiers, etc.
14. Do not place lighted candles, cigarettes, cigars,
etc., on the telephone.
15. Never touch uninsulated telephone wires or
terminals unless the telephone line has been
disconnected at the network interface.
16. Never install or modify telephone wiring during a
lightning storm.
17. Never install telephone jacks in wet locations
unless the jack is specifically designed for
wet locations.
18. Use caution when installing or modifying
telephone lines to prevent electrical shock
and/or fire.
19. Under the following conditions, unplug this
product from the wall outlet and refer servicing
to qualified service personnel:
(a) The power supply cord or plug is damaged
or frayed.
(b) The product has been exposed to rain
or water.
(c) The product does not operate normally by
following the operating instructions.
(d) The product’s cabinet has been damaged.
(e) The product exhibits a distinct change
in performance.
20. Avoid using a telephone (other than a cordless
type) during an electrical storm. There may be a
remote risk of electric shock from lightning.
21. Do not use the telephone to report a gas leak in
the vicinity of the leak.
22. Do not place this product on an unstable cart,
stand, or table. The product may fall, causing
serious damage to the product.
23. Only use attachments/accessories specified by
the manufacturer.
24. Unplug this apparatus during lightning storms or
when unused for long periods of time.
Save these instructions
Battery Safety Instructions
IF YOUR PRODUCT UTILIZES BATTERIES, THE
FOLLOWING ADDITIONAL PRECAUTIONS SHOULD
BE OBSERVED:
1. Use only the type and size battery(ies) specified
in the user manual.
2. Do not use this product if the battery door is
removed or missing.
3. Replace batteries that appear to be swollen or
have damaged wiring.
4. Do not dispose of the battery(ies) in fire. They
may explode. Check with local codes for possible
special disposal instructions.
5. Do not open or mutilate the battery(ies).
Released electrolyte is corrosive and may cause
damage to the eyes or skin. It may be toxic
if swallowed.
6. Exercise care in handling battery(ies) in order
not to short out the battery(ies) with conducting
materials such as rings, bracelets, and keys. The
battery(ies) or conductor may overheat and
cause burns.
7. Do not attempt to recharge the battery(ies)
provided with or identified for use with
this product that are not rechargeable. The
battery(ies) may leak corrosive electrolyte
or explode.
8. Do not attempt to rejuvenate the battery(ies)
provided with or identified for use with this
product by heating them. Sudden release of the
battery(ies) electrolyte may occur causing burns
or irritation to eyes or skin.
9. When replacing battery(ies), all batteries should
be replaced at the same time. Mixing fresh and
discharged batteries could increase internal cell
pressure and rupture the discharged battery(ies).
(Applies to products employing more than one
separately replaceable primary battery.)
10. When inserting battery(ies) into this product, the
proper polarity or direction must be observed.
Reverse insertion of battery(ies) may result in
leakage or explosion.
11. When inserting battery(ies) into this product,
do not twist or pinch the wires or allow wires to
become pinched in battery door.
12. If storing over 30 days, remove battery(ies) from
this product because the battery(ies) could leak
and damage the product.
13. Discard “dead” battery(ies) as soon as possible
since “dead” batteries are more likely to leak in
a product.
14. Do not store this product, or the battery(ies)
provided with or identified for use with this
product, in high-temperature areas. Batteries
that are stored in a freezer or refrigerator for
the purpose of extending shelf life should be
protected from condensation during storage and
defrosting. Batteries should be stabilized at room
temperature prior to use after cold storage.
15. If your product uses rechargeable battery(ies),
charge the battery(ies) only in accordance with
the instructions and limitation specified in the
User Guide.
16. Keep batteries out of the reach of children.
Save these instructions
4 Features
Call Waiting and Caller ID
99 Phonebook Memory
Hold and Call Transfer
Conference Call and Intercom
Speakerphone
This telephone has been designed to be simple
to use, however you can reach its potential more
quickly by taking a few minutes to read this
instruction book. This telephone is a multifunction
product for use with Call Waiting and Caller
ID services available from your local telephone
company.
NOTE
Your Caller ID Call Waiting phone allows you to:
View the name and telephone number of a caller
while you are on the phone (Call Waiting Caller ID).
Identify callers before you answer the phone.
View the time and date of each incoming call.
Record up to 99 Caller ID records sequentially in
each handset.
Know who called while you are on the line or when
you were away.
Screen unwanted calls, eliminate harassment from
annoying calls, or to get prepared before answering
a call.
IMPORTANT
In order to use all the features of this telephone, you
must subscribe to two separate services available
from your local telephone company: the standard
Name/Number Caller ID Service to know who is
calling when the phone rings and Caller ID with Call
Waiting Service to know who is calling while you are
on the phone.
5 Parts Checklist
Make sure your package includes the following
items:
Cordless handset
Charging cradle
Handset battery cover
Handset battery pack
Belt clip
AC power adaptor
NOTE
Digital Security System
Your cordless phone uses a digital security system
to protect against false ringing, unauthorized access,
and charges to your phone line.
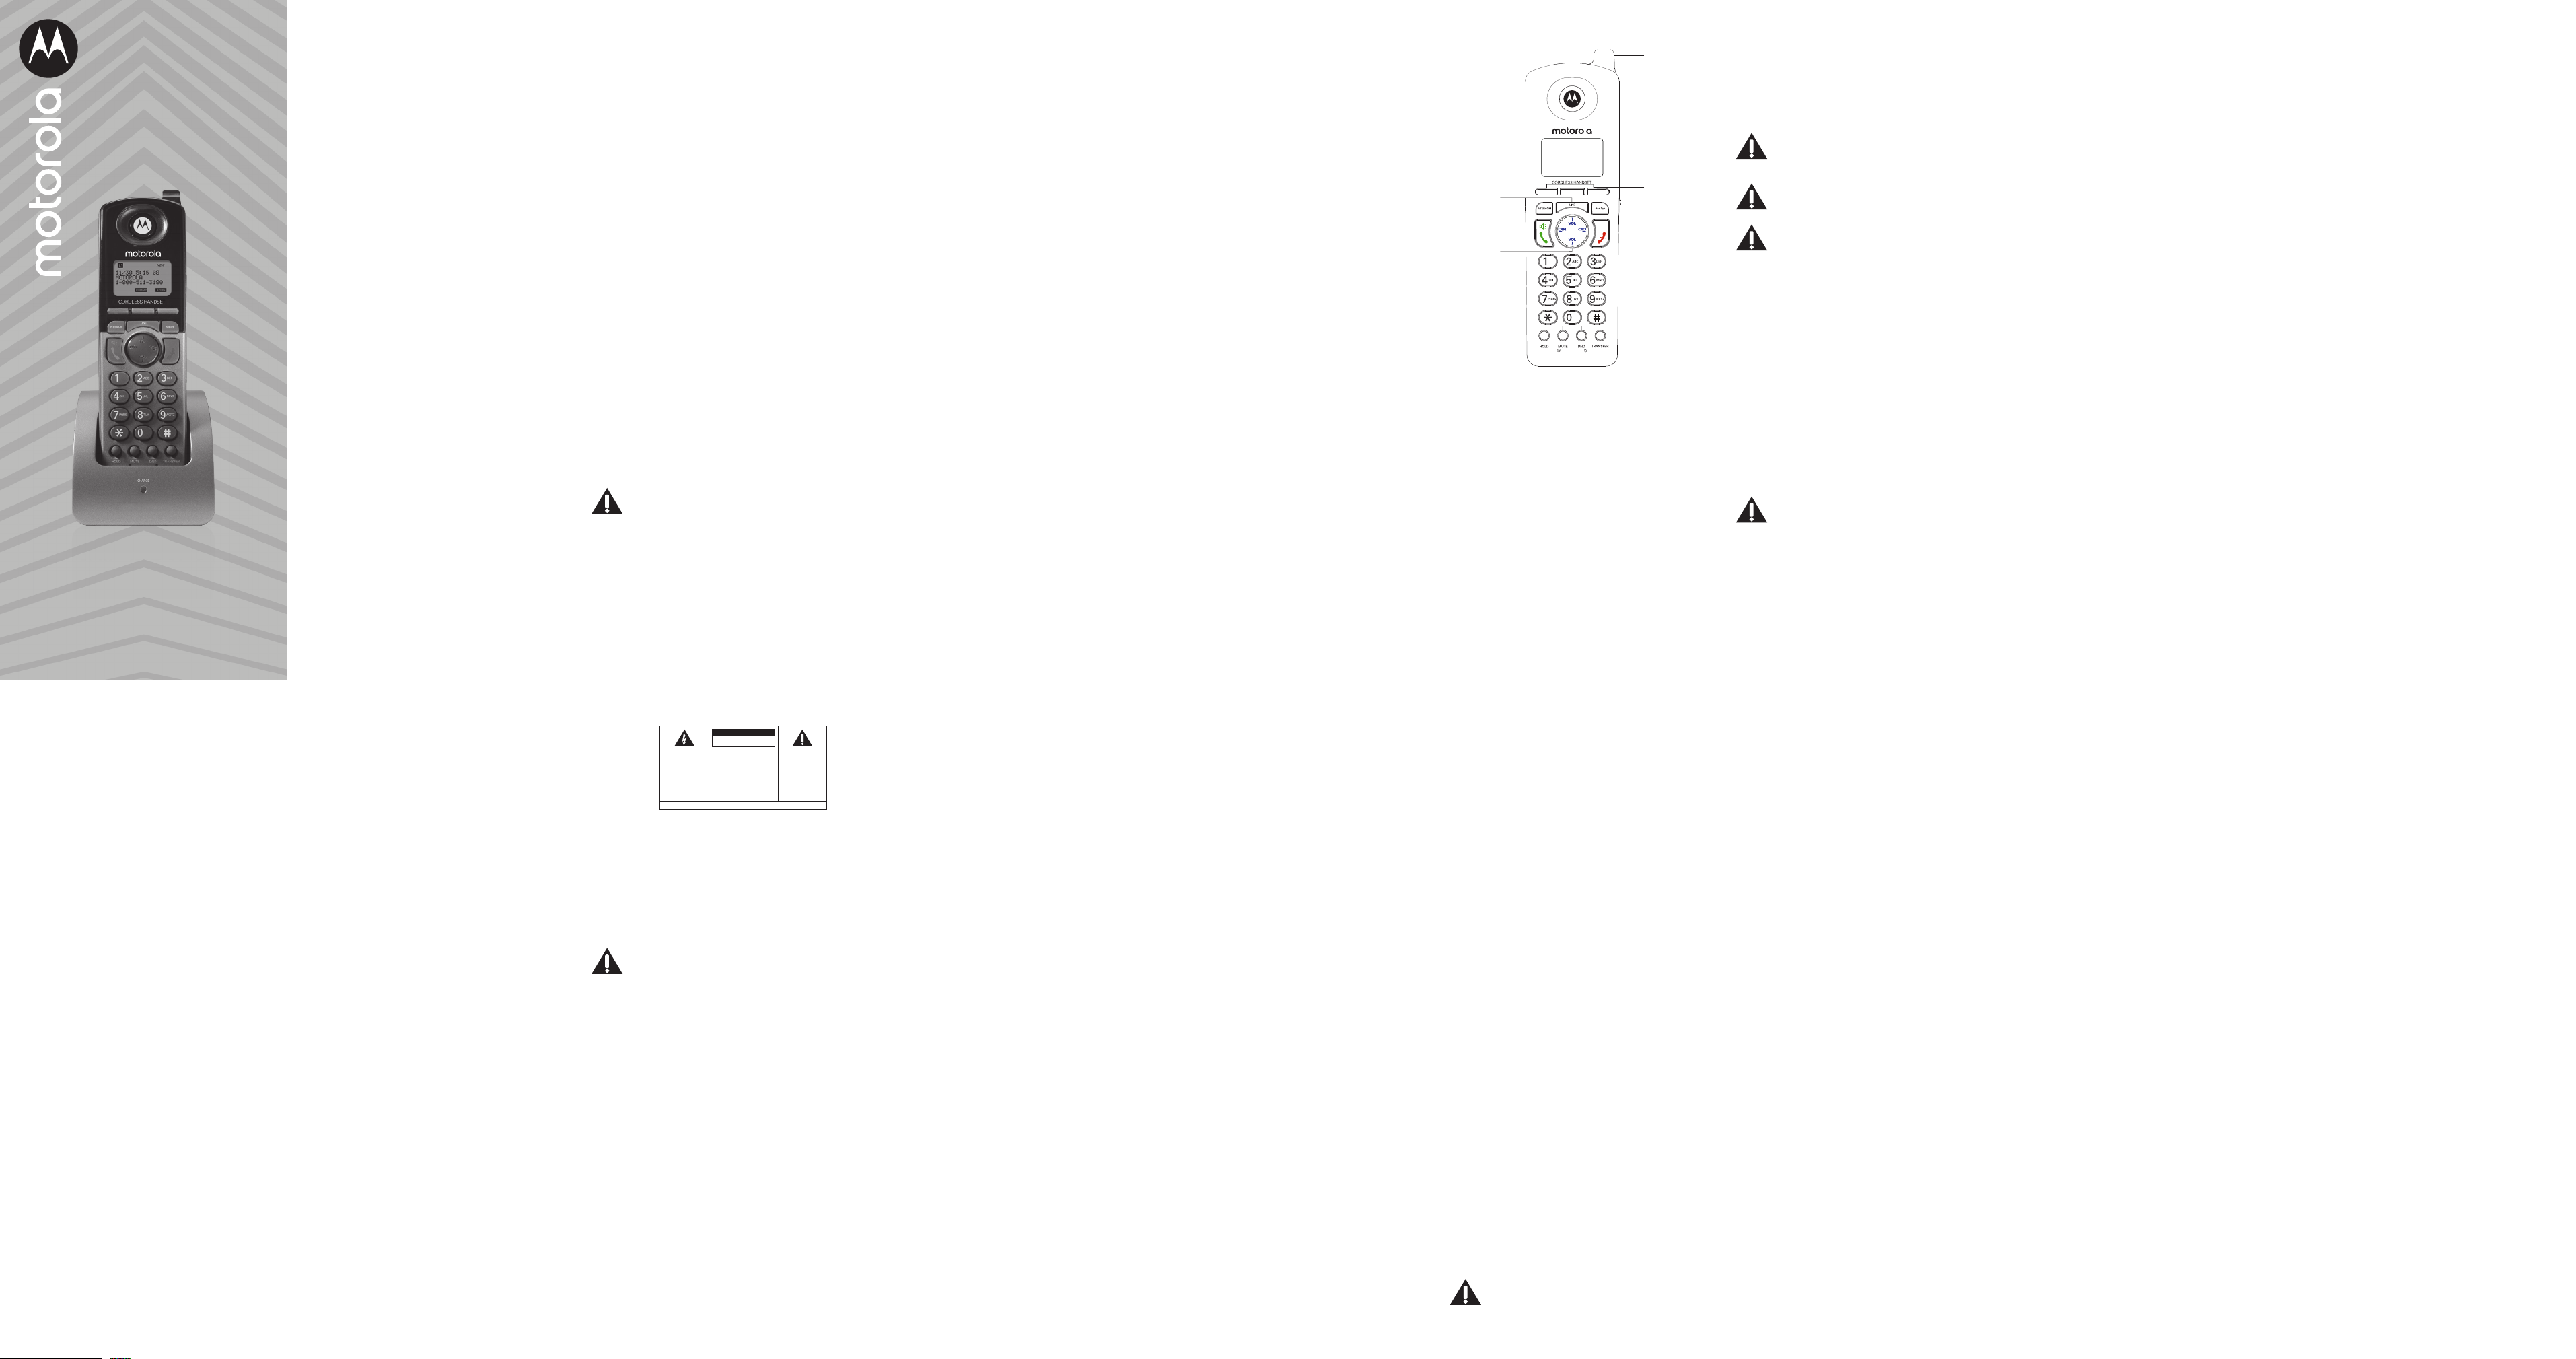
6 Handset Layout
A
B
C
D
F
E
G
I
J
K
H
M
L
A Line
B Extension / Intercom
C Talk / Speakerphone
D Navigation Button
E Mute
F Hold
G LED Event Indicator
H 3 Softkeys
I Headset Jack
J Digital Answering System
K End
L Do Not Disturb (DND)
M Transfer
7 Connection and Setup
7.1 Important Installation Information
Never install telephone wiring during a
lightning storm.
Never install telephone jacks in wet locations
unless the jack is specifically designed for
wet locations.
Never touch uninsulated telephone wires
or terminals unless the telephone line is
disconnected from the network.
Use caution when installing or modifying
telephone lines.
Temporarily disconnect any other equipment
connected to the telephone.
7.2 Important Installation Guidelines
Install telephone near both a telephone jack and
an electrical power outlet.
Avoid sources of noise, such as a window or a
busy street, and electrical noise, such as motors,
microwave ovens and fluorescent lighting.
Avoid heat sources, such as heating air ducts,
heating appliances, radiators and direct sunlight.
Avoid areas of excessive moisture or extremely
low temperature.
Avoid dusty locations.
Avoid other cordless telephones or personal
computers.
CAUTION
Always disconnect all phone cords from the base
unit before battery installation or replacement.
NOTE
Certain other communications devices may also use
the DECT 6.0 frequency for communication, and, if
not properly set, these devices may interfere with
each other and/or your new telephone. If you are
concerned with interference, please refer to the
owner’s manual for these devices.
7.3 Installing the Handset Battery
You must connect the handset battery before use.
1. Locate battery and battery door which are
packaged together inside a plastic bag and are
separate from the handset.
2. Locate the battery compartment on the back of
the handset.
3. Plug the battery pack connector into the jack
inside the compartment. To ensure proper
battery installation, the connector is keyed and
can be inserted only one way.
4. Place the battery pack in recessed area of the
handset battery compartment. Close the battery
compartment by pushing the door up until it
snaps into place.
Caution: To reduce the risk of fire or
personal injury, use only the approved
Nickel-metal Hydride (Ni-MH) battery pack
(2.4V, 550mAh rechargeable batteries).
7.4 Connecting the AC (Electrical) Power
Plug the power adaptor cord into the power jack
on the back of the charging cradle and the other
end into an electrical outlet. The charge indicator
turns on to indicate the battery is charging when the
handset is on the cradle.
Allow the phone to charge for 14 hours prior to first
use. If you do not properly charge the phone, battery
performance is compromised.
For pluggable equipment, the socket-outlet
(power adaptor) shall be installed near the
equipment and shall be easily accessible.
Caution: To reduce risk of personal injury,
fire, or damage use only the power adapter
supplied. This power adapter is intended to
be correctly orientated in a vertical or floor
mount position.
Class 2 Power source.
7.5 Changing / Charging the Handset
Battery
1. Make sure handset is
OFF
(not in TALK mode)
before you replace battery.
2. Remove the battery compartment door.
3. Disconnect the battery pack connector from the
jack inside the compartment and remove the
battery pack from the handset.
4. Insert the new battery pack and plug the battery
pack connector to the jack inside
the compartment.
5. Put the battery compartment door back on.
6. Place handset in the charging cradle to charge.
Allow the handset battery to properly charge for
14 hours prior to first use or when you install a
new battery pack. If you do not properly charge
the phone, battery performance will
be compromised.
Caution: To reduce the risk of fire or
personal injury, use only the approved
Nickel-metal Hydride (Ni-MH) battery pack
(2.4V, 550mAh rechargeable batteries).
7.6 Connecting your System
Once the Motorola ML1000 phone is set up and has
dial tone, it is ready to be wirelessly connected to
the other Motorola ML1100 phones and Motorola
ML1200 handsets that will make up your system.
Once you have unboxed and plugged in your
Motorola ML1200 handset, it will be ready to register
to the base.
7.6.1 To Register a Motorola ML1200 Cordless
Handset to the System
1. On your Motorola ML1000 base, press
Menu
softkey.
2. Using the navigation button, move the indicator
to
Add/Remove Phones
. Press
Select
softkey.
3. Select
Register Phone
option and press
Select
softkey. This will put the Motorola ML1000 base
in registration mode as it searches for another
phone to register.
4. On your Motorola ML1200 cordless handset,
press
REG
softkey. It will also enter registration
mode and search for the base.
5. If registration is successful, both phones will
beep and display
Registration Complete!
. If
registration is not successful, move the phones
closer together and try again.
NOTE
If your Motorola ML1200 does not display the
Press
“REG” To Initiate Registration
message on the display
when you plug it in, the
Register Phone
option is
available in the
Add/Remove
menu.
7.6.2 To remove a Motorola ML1200 from the
system
To remove a Motorola ML1200 from the system you
must deregister it from the Motorola ML1000 base
phone.
1. On your Motorola ML1000 base, press
Menu
softkey.
2. Using the navigation button, move the indicator
to
Add/Remove Phones
. Press
Select
softkey.
3. Move the indicator to
Deregister Phone
and press
Select
softkey.
4. Select from the list the extension you wish to
remove and press
Select
softkey. Confirm by
pressing
Yes
softkey.
NOTE
Removing an extension from the system will leave it
unable to make or receive calls until it is
re-registered to a Motorola ML1000 base.
8 Programming the Phone
When programming the phone or changing the
settings, if at any time you wish to discontinue
programming press
Back
or
Home
softkey until you
reach the idle screen. The phone will also return to
the idle screen if left on any menu screen for several
seconds without input.
8.1 Language
Set the display language to show messages in either
English, Spanish, Portuguese or French.
1. Press
Menu
softkey while in idle mode.
2. Using the navigation button, move the indicator
to
Phone Setting
. Press
Select
softkey.
3. Move the indicator to
Language
and press
Select
softkey.
4. Using the navigation button, move the indicator
to your chosen language and press
Select
softkey.
8.2 Call Volume
The ringer, speaker, handset and headset volumes
are set independently with the
VOL
(+ or -) buttons.
There are 8 possible volume levels in each mode. The
volume indicator is displayed on the screen during
volume adjustment. To adjust the volume, press the
VOL
(+ or -) buttons during an active call while using
either the speaker, handset, or headset.
8.3 Ringer Volume
To change the volume of the telephone ringer:
1. Press
Menu
softkey while in idle mode.
2. Using the navigation button, move the indicator
to
Line Setting
. Press
Select
softkey.
3. Move the indicator to
Ring Vol
and press
Select
softkey.
4. This menu will allow you to control the ring
volume for all lines (and the intercom) separately.
Using the navigation button, move the indicator
to the phone line whose volume you wish to
change. When selected, each line will play a
sample of the current ringtone at the selected
volume.
5. Using the left and right of the navigation button,
adjust the volume to your liking. Press
Select
softkey when you are finished.
NOTE
To mute a ringer, reduce the volume to
O
.
8.4 Ring Tone
The ringers for all four lines and intercom may be
set dierently.
1. Press
Menu
softkey while in idle mode.
2. Using the navigation button, move the indicator
to
Line Setting
. Press
Select
softkey.
3. Move the indicator to
Ringtone
and press
Select
softkey.
4. This menu will allow you to control the ring
tones on each line and the intercom. Using the
navigation button, move the indicator to the
phone line you wish to change the tone for.
When selected, each line will play sample of
the ringtone.
5. Using the left and right of the navigation button,
select the desired ring tone. Press
Select
softkey
when you are finished.
8.5 Priority Line
The priority line has precedence over the other three
lines and, if available, will be used automatically
when the c button is pressed. If the priority line is in
use, the next available line will be selected.
1. Press
Menu
softkey while in idle mode.
2. Using the navigation button, move the indicator
to
Line Setting
. Press
Select
softkey.
3. Move the indicator to
Priority Line
and press
Select
softkey.
4. Using the navigation button, move the indicator
to the phone line you wish to set as the priority
line and press
Select
softkey.
8.6 Delay Ring
Use this setting to delay this phone’s ringer. Other
phones on the system will still ring immediately on
incoming calls.
1. Press
Menu
softkey while in idle mode.
2. Using the navigation button, move the indicator
to
Phone Setting
. Press
Select
softkey.
3. Move the indicator to
Delay Ring
and press
Select
softkey.
4. Using the up and down of the navigation button,
select how many rings this phone will remain
silent before ringing during an incoming call.
8.7 Phone ID / Handset Name
Phone ID / Handset Name is what you name your
phone and how it will appear on the intercom lists of
the other phones on the system.
1. Press
Menu
softkey while in idle mode.
2. Using the navigation button, move the indicator
to
Phone Setting
. Press
Select
softkey.
3. Select
Handset Name
option and press
Select
softkey.
4. Using the alphanumeric dial pad, enter a phone
name up to 11 characters. More than one letter is
stored in each of the number keys. For example,
to enter “Lorraine,” press the 5 key three times
for the letter L, press the 6 key three times for
the letter O, press the 7 key three times for the
letter R, and so on.
5. When finished, press
Save
softkey to save the
name to your phone. If you make a mistake,
press
Clear
softkey to delete the previous
character.
8.8 Intercom Auto Answer
For hands-free operation, your phone can be set to
answer an intercom call by automatically activating
the speaker. This feature may also be used for room
monitoring.
1. Press
Menu
softkey while in idle mode.
2. Using the navigation button, move the indicator
to
Phone Setting
. Press
Select
softkey.
3. Move the indicator to
Auto Answer INT
and press
Select
softkey.
4. Choose either
On
or
O
and press
Select
softkey.
Manufactured, distributed or sold by Meizhou Guo Wei Electronics Co. LTD.,
ocial licensee for this product. MOTOROLA and the Stylized M Logo are
trademarks or registered trademarks of Motorola Trademark Holdings, LLC. and
are used under license. All other trademarks are the property of their respective
owners. © 2020 Motorola Mobility LLC. All rights reserved.
Issue 1.3 (EN-US)
Motorola ML1200
4-Line Cordless Handset
Accessory
Full User Guide
WARNING:
TO PREVENT FIRE
OR ELECTRICAL
SHOCK HAZARD, DO
NOT EXPOSE THIS
PRODUCT TO RAIN
OR MOISTURE.
CAUTION:
TO REDUCE THE RISK OF
ELECTRIC SHOCK, DO NOT
REMOVE COVER (OR BACK).
NO USER SERVICEABLE
PARTS INSIDE.
REFER SERVICING TO
QUALIFIED SERVICE
PERSONNEL.
SEE MARKING ON BOTTOM / BACK OF PRODUCT
THE LIGHTNING
FLASH AND
ARROW HEAD
WITHIN THE
TRIANGLE IS A
WARNING SIGN
ALERTING YOU OF
“DANGEROUS
VOLTAGE” INSIDE
THE PRODUCT.
THE EXCLAMATION
POINT WITHIN THE
TRIANGLE IS A
WARNING SIGN
ALERTING YOU OF
IMPORTANT
INSTRUCTIONS
ACCOMPANYING
THE PRODUCT.
CAUTION:
RISK OF ELECTRIC SHOCK
DO NOT OPEN
8.9 Call Alert Tone
Turn on the call alert to hear a tone for incoming
calls while you are using the telephone. This setting
can be changed for each individual line.
1. Press
Menu
softkey while in idle mode.
2. Using the navigation button, move the indicator
to
Phone Setting
. Press
Select
softkey.
3. Move the indicator to
2ND Call Alert
and press
Select
softkey.
4. Using the left and right of the navigation button,
to indicate which line you want to change. Then,
using the up and down of the navigation button
choose either
On
or
O
for that line. Repeat for
other lines if desired and press
Select
softkey.
8.10 Key Tone
If you wish to hear or silence the tone that plays
whenever a key is pressed, follow the steps below.
1. Press
Menu
softkey while in idle mode.
2. Using the navigation button, move the indicator
to
Phone Setting
. Press
Select
softkey.
3. Move the indicator to
Key Tone
and press
Select
softkey.
4. Choose either
On
or
O
and press
Select
softkey.
8.11 No Unknown/Blocked Caller ID
Record Blocker
This feature allows you to decide whether caller ID
records from unknown or blocked caller ID calls are
saved or not. If you choose
No
, the records will be
saved in the call history.
1. Press
Menu
softkey while in idle mode.
2. Using the navigation button, move the indicator
to
Phone Setting
. Press
Select
softkey.
3. Move the indicator to
No Unk/Blocked
and press
Select
softkey.
4. Choose
Yes
or
No
and press
Select
softkey.
8.12 Display Contrast
1. Press
Menu
softkey while in idle mode.
2. Using the navigation button, move the indicator
to
Phone Setting
. Press
Select
softkey.
3. Move the indicator to
Contrast
and press
Select
softkey.
4. Using the left and right of the navigation button,
adjust the contrast to your liking and press
Select
softkey.
8.13 Display Backlight
1. Press
Menu
softkey while in idle mode.
2. Using the navigation button, move the indicator
to
Phone Setting
. Press
Select
softkey.
3. Move the indicator to
Backlight
and press
Select
softkey.
4. Choose either
Always On
or
Automatic
and
press
Select
softkey. When the Backlight is on
Automatic
mode it will only light up during calls
and when the user interacts with the phone. It
will automatically turn o after several seconds
of inactivity.
8.14 Local Area Code
Setting up Home and Local area codes helps the
phone determine the number format to display
when a valid caller ID record is received. Call records
matching any of the set area codes are displayed as
10 digits.
1. Press
Menu
softkey while in idle mode.
2. Using the navigation button, move the indicator
to
Phone Setting
. Press
Select
softkey.
3. Move the indicator to
Area Code
and press
Select
softkey.
4. Using the dial pad, enter the three digits of the
area code of the phone number assigned to this
phone and press
Select
softkey to save.
8.15 Regional Area Code
If your area has more than one area code in use, you
can add more to the Regional Code menu.
1. Press
Menu
softkey while in idle mode.
2. Using the navigation button, move the indicator
to
Phone Setting
. Press
Select
softkey.
3. Move the indicator to
Regional Code
and press
Select
softkey.
4. Using the dial pad, enter the three digits of the
area code. If you wish to add more than one area
code, use the right and left of the navigation
button to select the next regional code. You may
add up to six more area codes. When you are
finished press Select softkey.
8.16 Reset Phone Settings
This feature will reset the phone settings to the
original default settings.
1. Press
Menu
softkey while in idle mode.
2. Using the navigation button, move the indicator
to
Phone Setting
. Press
Select
softkey.
3. Using the navigation button, move the indicator
to
Reset Settings
. Press
Select
softkey.
4. Move the indicator to
Yes
and press
Select
softkey. Confirm the action once more and the
phone will reboot with the default settings.
1

Hulp nodig? Stel uw vraag in het forum

Spelregels

Misbruik melden

Gebruikershandleiding.com neemt misbruik van zijn services uitermate serieus. U kunt hieronder aangeven waarom deze vraag ongepast is. Wij controleren de vraag en zonodig wordt deze verwijderd.

Product:

Bijvoorbeeld antisemitische inhoud, racistische inhoud, of materiaal dat gewelddadige fysieke handelingen tot gevolg kan hebben.

Bijvoorbeeld een creditcardnummer, een persoonlijk identificatienummer, of een geheim adres. E-mailadressen en volledige namen worden niet als privégegevens beschouwd.

Spelregels forum

Om tot zinvolle vragen te komen hanteren wij de volgende spelregels:

Belangrijk! Als er een antwoord wordt gegeven op uw vraag, dan is het voor de gever van het antwoord nuttig om te weten als u er wel (of niet) mee geholpen bent! Wij vragen u dus ook te reageren op een antwoord.

Belangrijk! Antwoorden worden ook per e-mail naar abonnees gestuurd. Laat uw emailadres achter op deze site, zodat u op de hoogte blijft. U krijgt dan ook andere vragen en antwoorden te zien.

Abonneren

Abonneer u voor het ontvangen van emails voor uw Motorola ML1200 bij:


U ontvangt een email met instructies om u voor één of beide opties in te schrijven.


Ontvang uw handleiding per email

Vul uw emailadres in en ontvang de handleiding van Motorola ML1200 in de taal/talen: Engels als bijlage per email.

De handleiding is 0.94 mb groot.


U ontvangt de handleiding per email binnen enkele minuten. Als u geen email heeft ontvangen, dan heeft u waarschijnlijk een verkeerd emailadres ingevuld of is uw mailbox te vol. Daarnaast kan het zijn dat uw internetprovider een maximum heeft aan de grootte per email. Omdat hier een handleiding wordt meegestuurd, kan het voorkomen dat de email groter is dan toegestaan bij uw provider.

Uw handleiding is per email verstuurd. Controleer uw email

Als u niet binnen een kwartier uw email met handleiding ontvangen heeft, kan het zijn dat u een verkeerd emailadres heeft ingevuld of dat uw emailprovider een maximum grootte per email heeft ingesteld die kleiner is dan de grootte van de handleiding.

Er is een email naar u verstuurd om uw inschrijving definitief te maken.

Controleer uw email en volg de aanwijzingen op om uw inschrijving definitief te maken

U heeft geen emailadres opgegeven

Als u de handleiding per email wilt ontvangen, vul dan een geldig emailadres in.

Uw vraag is op deze pagina toegevoegd

Wilt u een email ontvangen bij een antwoord en/of nieuwe vragen? Vul dan hier uw emailadres in.


Info