Operating Instructions
MIL 72/1 digi 20
WA-EKF 3045/10.97/S:MMS/D:Str./80.10.0736.7/97/00538
1. Putting into operation
Electrical units may only be installed and assembled by a skilled elec-
trician. (The term "skilled electrician" is defined in VDE 0105).
Notes:
The unit contains well-designed electronic components which are lar-
gely protected against external interference. However, it must be
remembered that extremely high interference voltage peaks can be
superimposed on the mains voltage, depending on the installation
site. Interference which, despite all internal protective measures, can
also effect an electronic unit also arises when contactors are switched.
In order to guarantee the greatest possible operational reliability, the
following details must be observed:
a) In the case of larger systems, a suitable varistor or RC element
must be used to provide interference suppression for contactor
coils directly switched by the time switch.
b) If inductive direct current loads are switched, a suppressor diode
must be installed.
c) Inductive loads and particularly fluorescent lamps place particular
demands on the output contacts. In each individual case, check
whether it is appropriate to install an isolating relay or contactor.
2. Assembly and connection
2.1 Surface-mounting
Fit the base in accordance with local conditions.
Fit the time switch and secure with the screws (A).
2.2 Connection
See unit imprint/circuit diagram.
3. Sealing with sealing glass – IP 40
Seal using the accessory sealing glass – attach and seal the sealing
glass, article number 01.78.0016.6.
The sealing glass can only be removed with a suitable tool.
A
A
A
A
2.3 Assembly with accessory terminal cover
Fit the base in accordance with local conditions, connect and attach
the terminal cover article-number 01.78.0004.6.
Then fit the time switch and secure with the screws (A).
GB
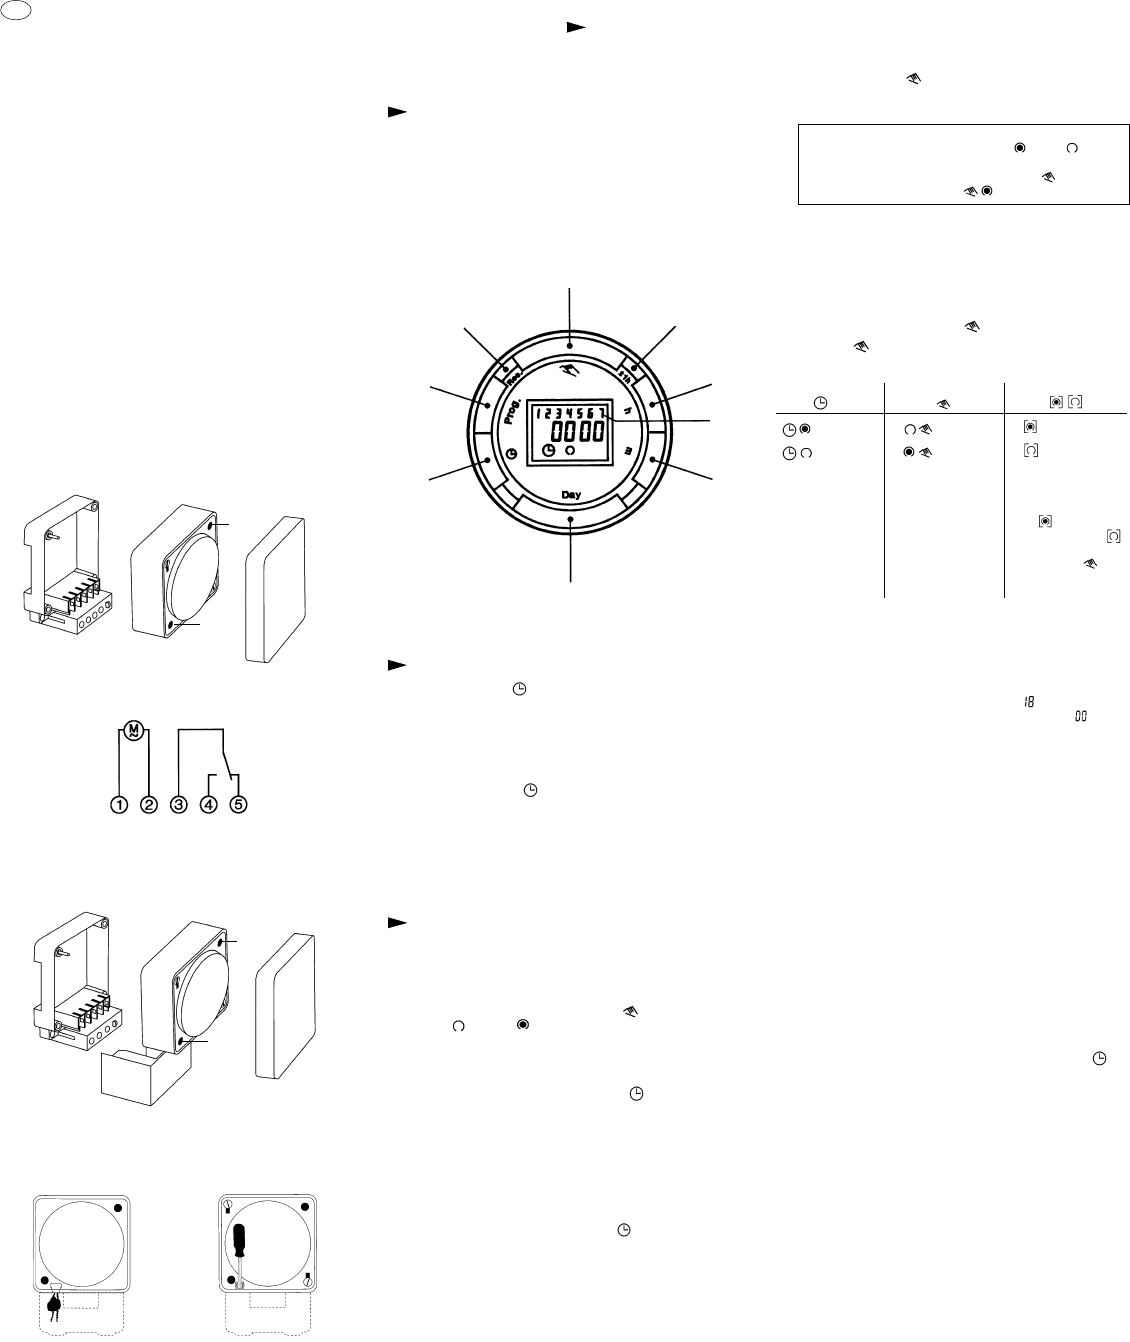
4. Operating the time switch
The steps marked with the symbol are necessary to carry out a
switching program.
4.0 Preparing for Operation
4.1 Activate the "Res" switch (= RESET) to reset
the time switch to its default settings
(activate using a pencil or similar pointed instrument)
Do this
– every time you wish to "reset" the time switch
– to erase all switching times and the current
time of day
4.2 Enter current time and weekday
– Keep the " " key pressed down
During the summer time period press the +/–1h key once.
Enter the hour using the "h" key
Enter the minutes using the "m" key
Enter the day using the "Day" key
1 = "Monday" ... 7 = "Sunday"
– Release the " " key
The colon now blinks once a second.
Notes:
If you keep the "h" and "m" keys pressed down for more than
2 seconds, the display will enter fast-forward scroll mode.
Manual switch
Summer and
winter time
setting
Enter
the hours
Week-
days
flash
Enter
minutes
Enter
weekday/s
Input
time
Enter
switching
times
Reset
After approximately two seconds the following display appears:
4.3 Entering the switching times
You have 20 memory locations available.
Each switching time takes up one memory location.
Keep pressing the "Prog" key until a free memory
location is shown in the display "– – : – –"..
Programme ON or OFF with the " " key:
" " = OFF, " " = ON
Enter the hour using "h"
Enter the minutes using "m"
If a switching command is to be carried out every day
(1 2 3 4 5 6 7) then store using the " " key, otherwise select
the day(s) it is to be carried out by using the "Day" key.
When the day selection is left blank, the programmed
switching instruction operates at the same time every day
1 2 3 4 5 6 = Monday – Saturday
1 2 3 4 5 = Monday – Friday
6 7 = Saturday – Sunday
Selection of single days: 1 = Mon., 2 = Tues. ...
Save the switching time with the " " key.
The time switch enters the automatic operating mode and
displays the current time of day.
Begin any further entry of a switching time with the "Prog"
switch
If your entry is incomplete, the segments not yet selected
will blink in the display.
5.2 Manual Override Switch " "
With the " " you can change the current switching settings at
any time. The switching program already entered is not altered.
5.0 Additional Functions
5.1 Switching from summer time to winter time
and vice versa
Press the "+/–1h" key once
5.3 Reading the programmed switching times
Pressing the "Prog" key displays the programmed switching
times until the first free memory location appears in the display
"– – : – –".
If you now press the "Prog" key once again, the number
of free
memory locations will be displayed, e.g. FR .
If all memory locations are occupied,. the display "FR "
appears.
5.4 Changing the programmed switching times
Press the "Prog" key repeatedly until the switching time you want
to change is displayed.
You can now enter the new data. See point 4.3.
Notes on storing switching times:
If you end your entry of the switching times by pressing the
"Prog" key, then the switching time you have entered will be
stored and the next memory location displayed.
Entry of further switching times is also carried out as described
in point 4.3.
In addition, a complete switching command is stored automa-
tically after around 90 seconds provided no other key is
pressed.
The time switch then enters the automatic operating mode and
displays the current time again.
5.5 Deleting individual switching times
Press the "Prog" key repeatedly until the switching time you wish
to delete is shown in the display.
Then set to "– –" using the "h" or "m" key and keep the " "
key pressed down for around 3 seconds.
The switching time is now erased and the current time is
displayed.
5.6 AM/PM time display
If you press the "+/–1h" and "h" keys at the same time, the
time display switches into the AM/PM mode
(mostly used in English-speaking countries)
6.0 Technical data
Connection see unit imprint
Switching capacity see unit imprint
Ambient temperature –10 °C to +55 °C
Running reserve 5 h at +20 °C
Memory locations 20
Shortest switching time 1 min.
Programmable every minute
Automatic Mode Manual Mode
Continuous Operation
= ON
= OFF
= OFF
= ON
= Continuous ON
= Continuous OFF
The switching If the current You can only return
times correspond switching mode is to automatic mode
to the program changed manually, from the continuously-
entered. the next switching ON and
time will be carried continuously-OFF
out automatically switching modes
again according by pressing " " key.
to the entered
switching program
After programming is completed, and you return the
timeswitch to the current time display with the " " key,
the timeswitch will not activate any switching instruction
required for the current time.
You may need to manually select the desired switching
state with the " " key. Thereafter, as the unit encounters
further switching instructions in the memory in real time,
it will correctly activate all subsequent switching instructions.
Note:
Note what position the switch is in, ON or OFF .
Depending on the switching program and the time of day,
select the desired switch position with the key .
(For channel 1 and/or 2) e.g.