cCautions must be observed to avoid damage to your equipment.
Notes contain important information and useful tips on the operation of this product.
Unpacking
Make sure the following parts are included and not damaged.
Removing the Protective Material
1.Open the scanner unit.
2.Remove the tapes and take out the protective material,
then put it in a safe place for future use.
Unlocking
Open the document cover and slide the transportation
lock lever.
Attaching the Parts
1.Attach the paper support.
2.Connect the document cover’s cable to
the TPU interface connector.
Turning On
Plug in the power cord and press the P On button
to turn on this product.
Note:
Do not connect this product to your computer
before step , or you will fail to install the
software.
Installing Ink Cartridges
1.Open the scanner unit.
2.Open the cartridge cover.
power cord
paper support
ink cartridges
The contents may vary in certain locations.
The power cord comes attached in some countries.CD-ROM
film holder
3.Remove an ink cartridge from its
package.
4.Place all the cartridge into its holder.
5.Then, push the ink cartridge down until it
clicks into place and close the cartridge
cover.
6.Lower the scanner unit.
Ink charging starts and it takes about two minutes to complete.
Initial charge. Charging. Please wait. appears on the LCD panel and this product
produces a variety of mechanical sounds. This is normal.
cCaution:
❏Never turn off this product during the ink charging process.
❏Do not load paper until ink charging is complete.
Selecting a Language
1.Press the Setup button.
2.Select Language by using the u/d buttons and press the OK button.
3.Use the l/r buttons to select a language and press the OK button.
Menu items appear in the selected language.
Loading Paper
1.Open the output tray.
2.Move the feeder guard towards you.
3.While holding down the edge guide
locking tab, slide out the edge guide.
4.Load the stack of paper with the printable side facing down and resting against the
guide of feeder guard.
5.Stand the stack of paper against the paper support, then move the feeder guard back.
Now you are ready to use this product as a stand-alone device. See the next section to
learn how to make a test copy. If you want to install software, see “Connecting to Your
Computer” on this sheet.
Making Copies
1.Place a document on the document table.
2.Press the Copy button to enter the Copy Mode.
123
feeder guard
guide
3.Use the l/r buttons to set the number of copies.
4.Press the x B&W button (to copy in grayscale), or the
x Color button (to copy in color).
This product starts Copying.
cCaution:
Do not open the scanner unit during scanning
or copying; otherwise, you may damage this
product.
This product has a variety of copy functions. See “Features” on this sheet or Basic
Operation Guide. To use this product with your computer, see next step.
Connecting to your Computer
1.Press the P On button to turn off this product.
2.Connect the USB cable to your computer.
Installing the Software
Note:
If your CD is labeled “Multilingual CD”, you must install the English software from the
English CD first. Next, install your preferred language addition from the Multilingual CD.
For Windows
1.Make sure this product is connected and turned off, then insert the software CD.
2.Turn off all virus protection programs and then click Continue.
3.Read the license agreement. If you agree with the terms, click Agree.
4.Click Install, and then follow the onscreen
instructions.
5.When you see this screen, turn on this product and
wait until the screen disappears. Then follow the
onscreen instructions. Note that EPSON Smart Panel
is installed in several steps.
6.Click Exit or Restart Now on the final screen, then remove the CD-ROM.
Now you are ready to scan and print. See the Reference Guide for instructions.
For Mac OS 8.6 to 9.X
1.Make sure this product is connected and turned off, then insert the software CD.
2.Double-click the icon in the software CD after inserting it.
3.Follow steps 2 to 6 in “Installing the software for Windows”.
4.Open Chooser from the Apple menu.
5.Select SP RX600 Series and your USB port, and then
close Chooser.
Now you are ready to scan and print. See the Reference
Guide for instructions.
For Mac OS X
1.Make sure this product is connected turned off, then insert the software CD.
Note:
❏This software does not support the UNIX File System (UFS) for Mac OS X. Install the
software on a disk or in a partition that does not use UFS.
❏This product does not support the Mac OS X Classic environment.
2.Open the Mac OS X folder and then double-click the icon after inserting the
software CD.
3.Follow steps 2 to 6 in “Installing the software for Windows”.
4.Open the Applications folder on your hard drive, and then open the Utilities
folder and double-click Print Center icon.
5.Click Add icon in the Printer List dialog box.
6.Select EPSON USB, click Stylus Photo RX600, and then
select All from the Page Setup pop-up menu. Finally,
click Add.
7.Make sure the Printer List contains the printer options
(margin-type) options, then close the Printer List
dialog box.
Now you are ready to scan and print. See the Reference
Guide for instructions.
3
4
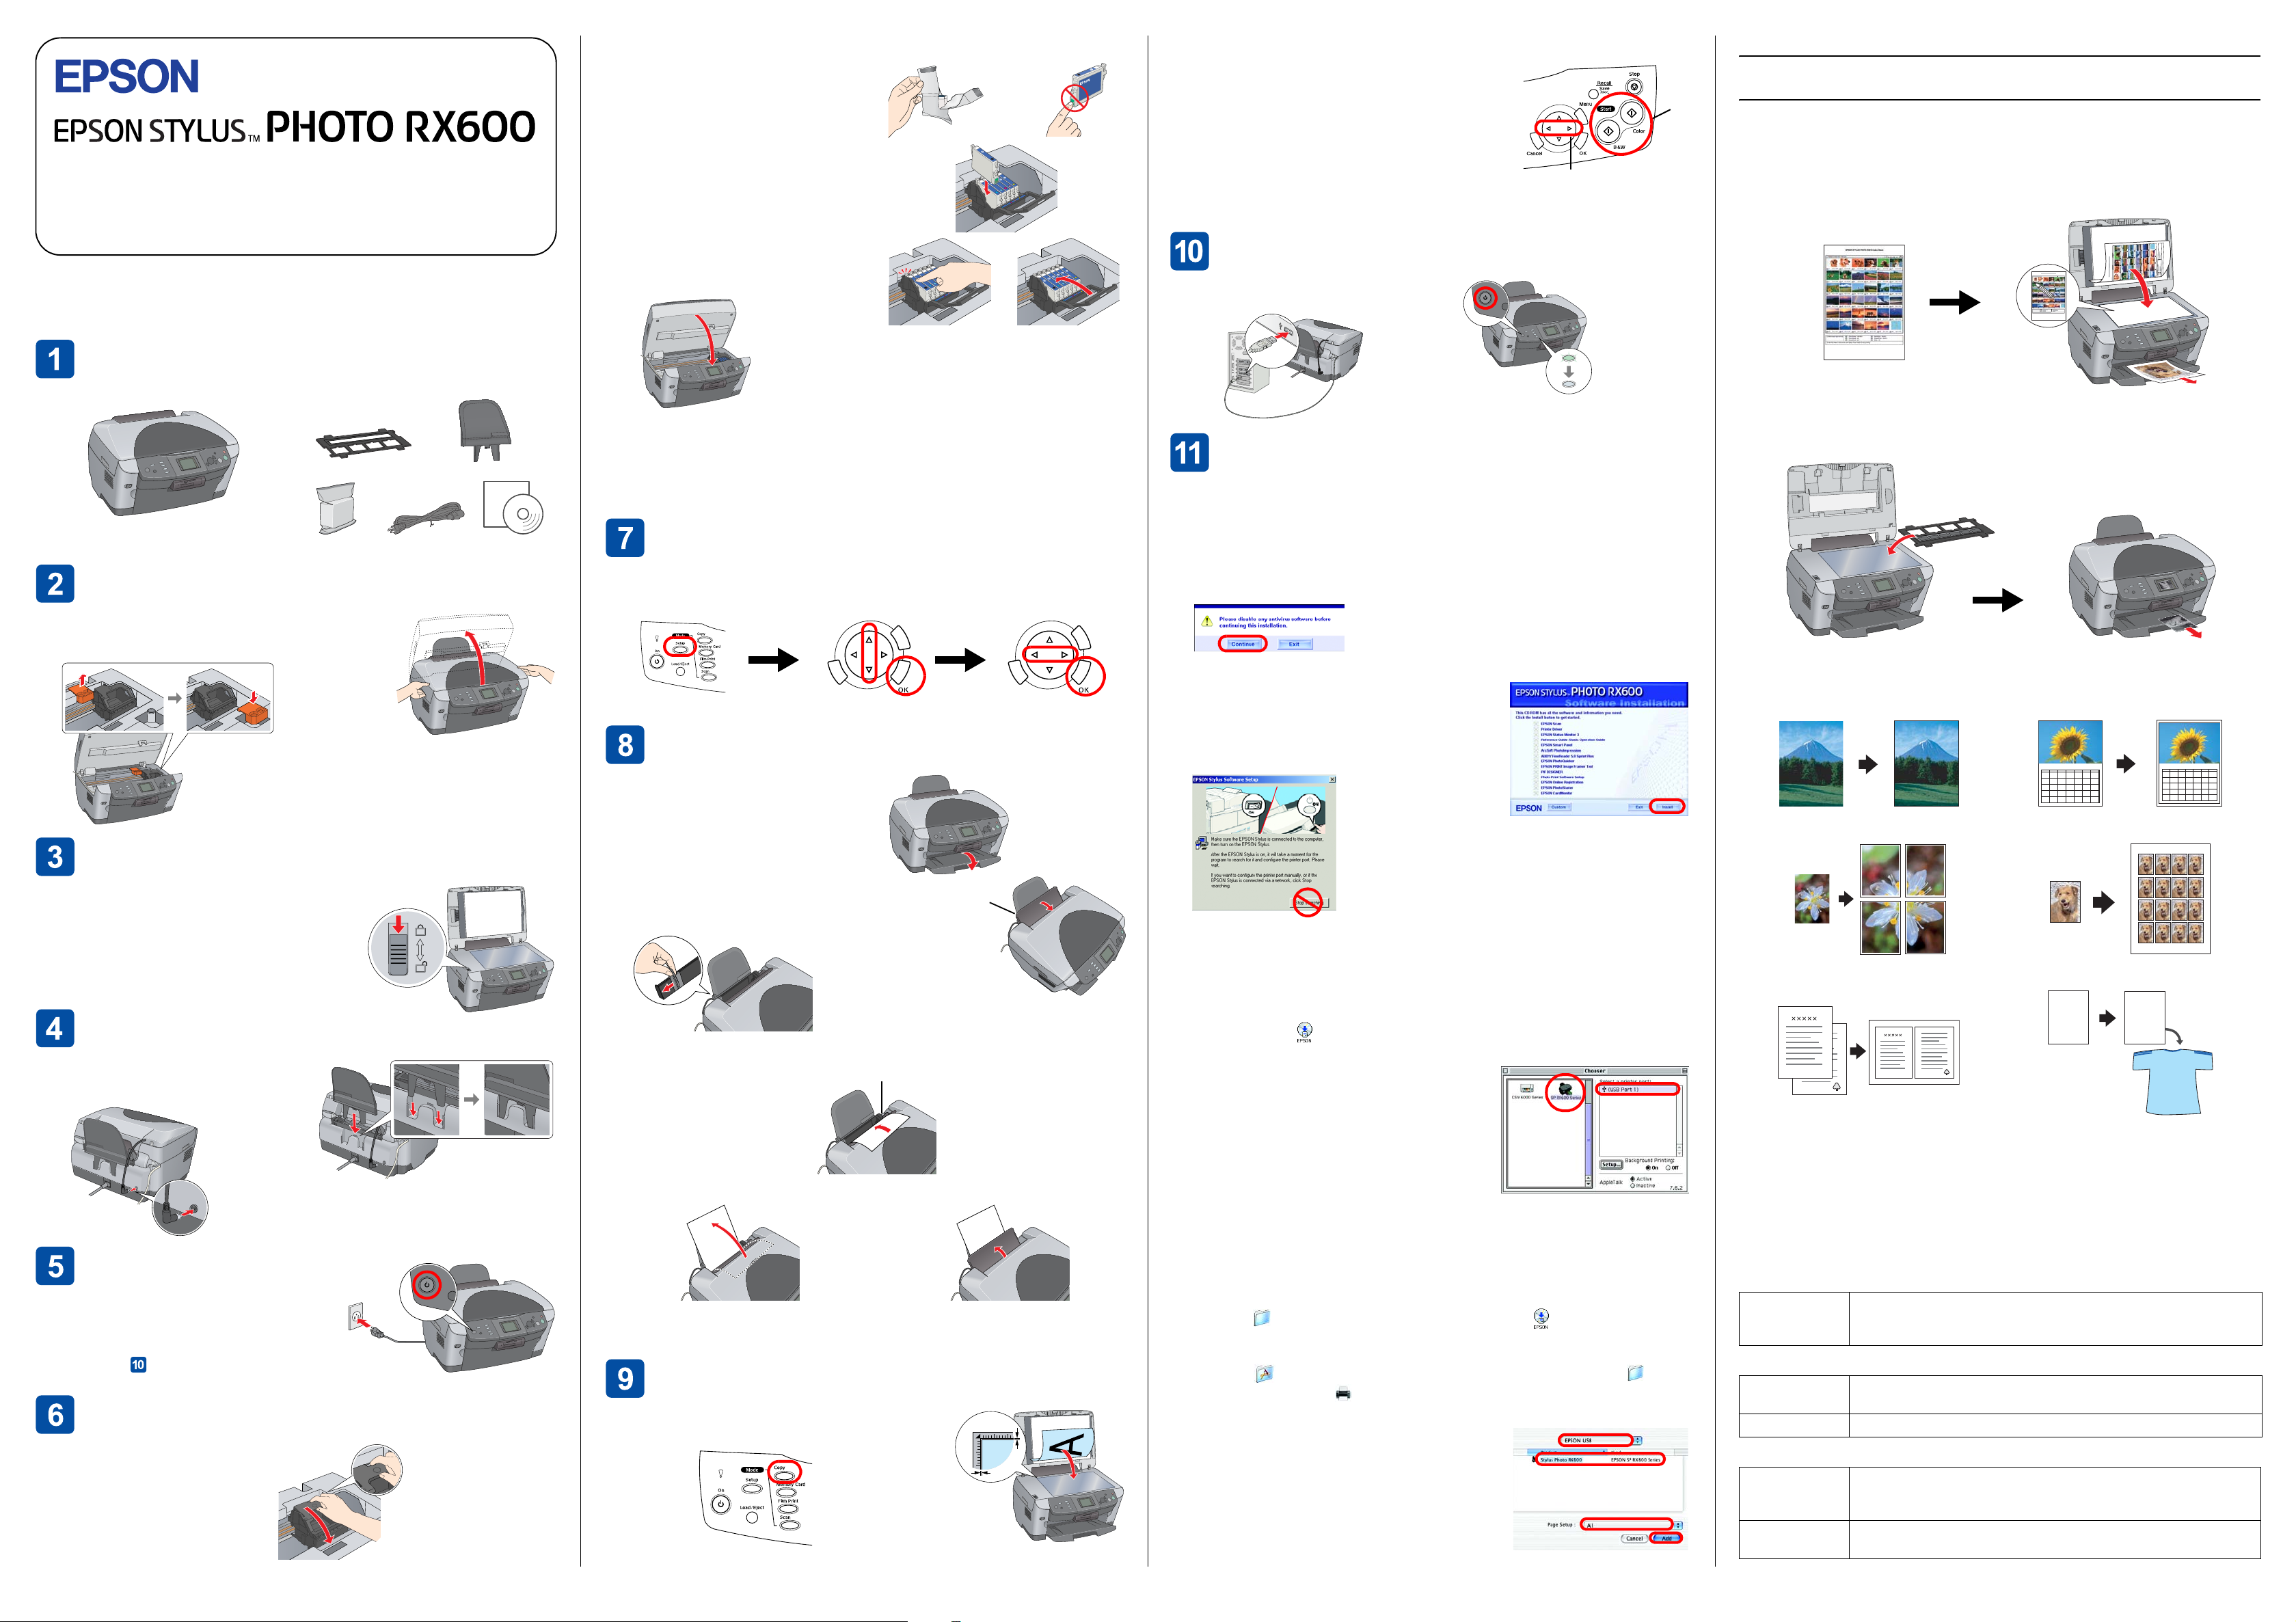
Features
This product provides you with a variety of stand-alone functions as outlined in this section.
See the Basic Operation Guide for details.
Printing using an index sheet
You can easily print photos directly from a memory card by filling an index sheet feeling
like developing photos.
Printing from film
You can print photos directly from film by scanning the film and selecting the photo data
with LCD panel.
Copying
Copies can be made with a variety options without connecting to a computer.
Using a Memory Card
The built-in memory card slot allow you to do the followings:
❏Print directly from a memory card.
❏Scan and save an image directly to a memory card.
❏Transfer the data stored on a memory card to your computer. (See the Reference Guide.)
Getting More Information
Getting started (Paper manual)
Reference Guide (Viewing on the computer)
Basic Operation Guide (Viewing on the computer)
BorderFreeSmall Margin
PosterRepeat
2-upMirror
ContentsDescribes in short how you can start using this product in standalone
mode. For full operation details, please refer to the Basic Operation
Guide.
ContentsBasic information on printing and scanning, Maintenance and
troubleshooting tips, Technical and customer support information.
How to accessDouble - click the ESPRX600 Reference Guide icon on the desktop.
ContentsDescribes how to use this product as a copy machine, change ink
cartridges and check the condition of this product. It also provides
troubleshooting tips and customer support information.
How to accessDouble - click the ESPRX600 Basic Operation Guide icon on the
desktop.
123
45678910
11121314151617
18192021222324
25262728293031
8
123
45678910
11121314151617
18192021222324
25262728293031
8
5
5
5
Setup4048677-00
XXX
Hulp nodig? Stel uw vraag in het forum
Misbruik melden
Gebruikershandleiding.com neemt misbruik van zijn services uitermate serieus. U kunt hieronder aangeven waarom deze vraag ongepast is. Wij controleren de vraag en zonodig wordt deze verwijderd.
Product:
Spelregels forum
Om tot zinvolle vragen te komen hanteren wij de volgende spelregels:
lees eerst de handleiding door;
controleer of uw vraag al eerder door iemand anders is gesteld;
probeer uw vraag zo duidelijk mogelijk te stellen;
heeft u een probleem en al geprobeerd om dit op te lossen, vermeld dit erbij aub;
heeft u een oplossing gekregen van een bezoeker dan horen wij dat graag in dit forum;
wilt u een reactie geven op een vraag of antwoord, gebruik dan niet dit formulier maar klik op de knop 'reageer op deze vraag';
uw vraag wordt direct op de website gezet; vermijd daarom persoonlijke gegevens in te vullen;
Belangrijk! Als er een antwoord wordt gegeven op uw vraag, dan is het voor de gever van het antwoord nuttig om te weten als u er wel (of niet) mee geholpen bent! Wij vragen u dus ook te reageren op een antwoord.
Belangrijk! Antwoorden worden ook per e-mail naar abonnees gestuurd. Laat uw emailadres achter op deze site, zodat u op de hoogte blijft. U krijgt dan ook andere vragen en antwoorden te zien.
Abonneren
Abonneer u voor het ontvangen van emails voor uw Epson Stylus Photo RX600 bij:
nieuwe vragen en antwoorden
nieuwe handleidingen
U ontvangt een email met instructies om u voor één of beide opties in te schrijven.
Ontvang uw handleiding per email
Vul uw emailadres in en ontvang de handleiding van Epson Stylus Photo RX600 in de taal/talen: Engels als bijlage per email.
De handleiding is 0,99 mb groot.
U ontvangt de handleiding per email binnen enkele minuten. Als u geen email heeft ontvangen, dan heeft u waarschijnlijk een verkeerd emailadres ingevuld of is uw mailbox te vol. Daarnaast kan het zijn dat uw internetprovider een maximum heeft aan de grootte per email. Omdat hier een handleiding wordt meegestuurd, kan het voorkomen dat de email groter is dan toegestaan bij uw provider.
Andere handleiding(en) van Epson Stylus Photo RX600
Uw handleiding is per email verstuurd. Controleer uw email
Als u niet binnen een kwartier uw email met handleiding ontvangen heeft, kan het zijn dat u een verkeerd emailadres heeft ingevuld of dat uw emailprovider een maximum grootte per email heeft ingesteld die kleiner is dan de grootte van de handleiding.
Er is een email naar u verstuurd om uw inschrijving definitief te maken.
Controleer uw email en volg de aanwijzingen op om uw inschrijving definitief te maken
U heeft geen emailadres opgegeven
Als u de handleiding per email wilt ontvangen, vul dan een geldig emailadres in.
Uw vraag is op deze pagina toegevoegd
Wilt u een email ontvangen bij een antwoord en/of nieuwe vragen? Vul dan hier uw emailadres in.